To obtain a beautiful, comfortable and durable covering for a path or site, you must choose the right type of paving slabs and laying pattern. The thickness of figured paving elements (FEM) depends on the planned loads; shape and color - from the architectural features of buildings located nearby; laying scheme - on the size and configuration of the paving area, type of tile. The correctly chosen option allows you to visually adjust the paving area in the desired direction - increase or decrease it, hide imperfections.
Assortment of paving slabs
When purchasing paving stones, first of all, it is necessary to determine the required thickness of the FEM, focusing on the planned load:
- 40 mm – pedestrian areas with low traffic intensity, garden paths, courtyard areas;
- 60 mm – universal thickness, suitable for pedestrian paths, areas with low traffic load;
- 80 mm – paths with high pedestrian traffic, parking lots, access roads to private houses;
- 100 mm – roads and areas with constant high loads.
Characteristics of the Old Town
The Old Town Stellard shape consists of three stones, measuring 90x120, 120x120, 180x120 (length and width), which are present in equal parts on a pallet with tiles. The number of tiles on a pallet varies in thickness. For pedestrian areas, we produce paving slabs 4 cm thick, with 315 stones of each size per pallet. For medium loads (including car parking), the thickness of the tiles is 6 cm - 300 pieces of each size on a pallet.
Old Town tile sizes
All tiles comply with GOST requirements and have the following characteristics:
- Concrete grade for frost resistance – F200;
- Water absorption – no more than 5%;
- Abrasion – G1 no more than 0.7
Old Town Tile Colors
Produced in any of the color palette options for paving slabs from the Stellard plant.
Let's sum it up
- Choose a color that will harmonize with the facade, fit into the composition of the garden and serve as a background, and not draw attention to itself.
- Natural neutral shades are the easiest to match with the color of your home. In addition, this is now the most trendy solution.
- Use bright colors only as accents; select combinations using the color wheel. The exterior should not have more than 3 - 4 colors.
- The color of the tiles should highlight the design of the site.
Techniques for laying popular tiles
For each tile collection there is a classic installation, which we will familiarize ourselves with. In any case, it is very convenient and effective to plan the layout of the tiles on the computer screen, which can be done independently even in a publicly available text editor. This will allow you to quickly select the required type of coating design and easily calculate the required quantity of all its components. First, let's get acquainted with the general factors that determine the choice of layout of paving elements in the country.
The easiest way is to lay rectangular tiles in straight areas and along curbs. Laying rectangular elements diagonally will require trimming each paving slab at the curb. Paving stones can be laid out with offset or coincident transverse seams, in pairs or at right angles. Tiles of the same size can be laid out in a pattern or in disarray.
If the tiles have non-linear shapes, offset seams and different pattern patterns are allowed. When paving paths with curves, longitudinal joints for tiles with long and short sides can be conveniently oriented in different directions.
Combining paving stones with lawn grass allows you to harmoniously link paving slabs of any shape with the paving area. To ensure that the elements of the drainage system (rain inlets, hatches, trays) do not spoil the planned pattern, you should start laying the coating from them.
Large patterns are appropriate for large areas of coverage.
Colored paving elements with an axis of central or radial symmetry will help highlight the direction of movement on the path.
One of the options for laying paving slabs on curved areas is to make wedge-shaped joints. In this case, the violation of the pattern is practically imperceptible.
The winding path laid out in a herringbone pattern looks harmonious and natural.
Schemes for laying out paving stones “Brick”
“Brick” paving stones usually have dimensions of 10x200mm and vary in thickness. Here are several examples of laying paving stones in a herringbone pattern. In this case, the paving elements are located at right angles to each other, and the pattern is often oriented along the direction of movement.
This type of covering can be laid with a bandage, that is, with the seams offset by 10mm. If the masonry pattern consists of half a tile in the center, and there are 4 whole bricks around it, you will get a “well” layout. Elements of two colors laid in pairs form a “checkerboard” masonry. Paired placement of paving stones at right angles to each other is called blocks.
Several more types of “Brick” paving stone layouts allow you to appreciate the wide possibilities for creativity and create your own ornament.
Paving stones "Brick" are very convenient at intersections, in corners and on steps. On garden paths with a thickness of 8 cm and laid on a mortar, such an element can serve as a border.
Laying "Rhombus"
Standard “Rhombus” paving stones have a diagonal size of 32x19cm. The special form of the paving element provides only one layout scheme. However, the use of coatings of different colors provides several decorative varieties.
Laying a “diamond” with a hexagon involves the contact of three tiles at an obtuse angle at a common point. Laying “ornament” involves decorating the figures in one color. When six tiles meet at a sharp angle at one point, it is called a star. To organize a 3D pattern, you need three tiles of different colors, two of them must be a shade of the same color.
Good news: some manufacturers offer diamond halves in long and short diagonals for installation near curbs and walls. Several examples of diamond layout using different colors will help you choose the appropriate method for laying paving stones.
Application options for the “Old Town” collection
The “Old Town” collection offers 4 paving options depending on the length: 60, 90, 120 and 180mm with a width of 120mm. In addition, there are two elements in the form of trapezoids with different inclinations of the sides. This makes it convenient to paving curved and complex surfaces and organizing a variety of patterns and ornaments.
Longitudinal version of laying paving stones “Old Town”.
The transverse layout involves placing the seams perpendicular to the direction of the track.
The multi-colored layout option assumes any method of laying relative to the seams.
LED lighting elements built into the coating significantly enhance the aesthetics of the paving at night.
The chaotic layout allows you to lay tiles of different colors in any order. Obviously, in this case there is a wide field for fantasy and self-realization.
Several types of coating design using the “Old Town” collection will help you decide on the right option.
Features of the organization of the geometric pattern of the “Old Town” set.
Wide possibilities of the “Old Town” in the new city.
How Clover blooms
Currently, the most common modification is “clover”, consisting of one tile measuring 218x267mm. Some manufacturers offer parts of collection elements, which eliminates trimming at the curb. There are not too many clover layout schemes.
Several examples of this type of layout will help you decide on the choice of paving stones.
“Wave” layout schemes
The Wave paving stones have dimensions of 11x22cm. Elements of this type can be laid offset relative to each other and at right angles. The slight unevenness of the sidewall of the tile does not interfere with its installation along the curb without trimming.
Various examples of wave laying methods allow you to evaluate its advantages.
“Coil” layout schemes
The Coil paving stones have dimensions of 17x20cm. “Coil” involves laying offset relative to each other, along the track and across.
Several photos of the coil layout explain the features of its use. If you cannot purchase ready-made halves of the elements, then when laying longitudinally you will have to cut each tile, and when laying transversely - every other tile.
Popular layout schemes
Due to the standard length/width ratio of FEM, paving slab laying patterns are varied. Even when using a single-color Brick, paving elements can be placed along the path, diagonally to its longitudinal axis, or in the form of a decorative pattern in any individual area.
Plain
The most popular layout schemes for figured paving elements are the following types of brick:
- “Linear” - all the bricks are oriented with the long side in one direction (usually along the path), the seams coincide;
Brickwork styling.
Herringbone paving pattern.
Important! The general orientation of blocks, herringbone, brickwork and linear layout can be directed in any direction convenient for the master.
If you add Cube paving elements to FEM Brick, you can improve the quality of the exterior of the paving area, even when using tiles of the same color, as in the photo below.
Two or more colors
The “Checkerboard” layout scheme is the simplest option for increasing the originality of the paving surface if the landscaping budget allows you to buy tiles of several colors/textures. This is a standard block diagram with Bricks oriented in pairs, as in the bottom photo.
The main nuances of paving with multi-colored FEM elements are:
- in small areas - a small repeating pattern, ornament, pattern is usually used;
Important! Flat areas without elevation changes, path intersections and junction points are a rarity in suburban areas. Therefore, in order to qualitatively complete the drawing of the paving area, it is better to draw a sketch to scale or make a full-fledged project with the Brick order.
Combined scheme for a difficult area.
Radius patterns
By analogy with paving stones made of natural stone, Brick paving elements make it possible to cover radial and winding areas with high quality and with minimal labor costs using the following technology:
- sketch – created by hand (to scale) or in a program;
- contact layer - granite screening, sand or sealing compound (cement/sand in a ratio of 1:6) is applied and leveled over the entire area of the paving area;
- laying - from a smaller to a larger radius when placing concrete products with the long side along the path route, as in the bottom figure;
- compaction - after filling the seams with quartz or washed quarry sand, the tiles are compacted with an area vibrator.
If the bricks are oriented across the path, first the entire row of small radius is laid with displacement of the longitudinal joints in the form of a wedge, the size of which is selected experimentally locally.
Paving a radius section.
By analogy with the above technology, it is possible to lay Brick in a radius pattern on straight sections if they are large enough (Patio, Roman courtyard, intersection of several paths). Here it will not be possible to do without trimming concrete products, but the decorative value of the paving area will sharply increase, despite the presence of small-sized pieces.
Specifications
Technical characteristics and quality standards of paving slabs must meet the necessary requirements, including the climatic conditions of the region - detailed technical documentation must be requested from the manufacturer.
Vibropressed paving slabs “Vybor” are produced using modern German equipment and have durability and high performance properties:
- Type of vibration pressing: two-layer (main layer + decorative front layer)
- Concrete class for compressive strength: B25
- Frost resistance grade, cycles: F200
- Abrasion, g/sq.cm: 0.7 (G1)
- Water absorption: no more than 6%
- Product weight, kg: 2.93 / 1.92 / 0.93
- In the 1st sq.m, pcs: 138.89 / 69.44 / 46.29
- On pallet, sq.m: 11.52
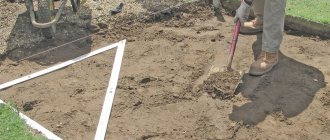
Preparing the base before laying paving slabs
Having assessed the condition of the old asphalt, it was decided to remove it completely. The work turned out to be quite difficult, despite the fact that over many years of exposure to frost and hot sun, the asphalt peeled off from the base and was easily removed in large layers. Having removed all the asphalt, I marked out the area for laying the tiles, and the places where the curb will lie using construction fishing line. Following the marked line, a place was prepared for the curb, with the expectation that the distance from the line to the base is 2-3 cm greater than the height of the curb. A gap of 2-3 cm will allow you to quickly and evenly install the curb. For good and strong fixation of borders, I used a cement-sand mixture in a ratio of 1:4. After installing the border, you need to give time for the solution to set. After which you can begin preparing the base for the tile itself.
Installed curb.
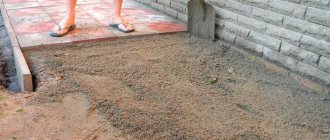
For the base I used a dry mixture of fine screenings of granite and cement in a ratio of 1:6 (instead of screenings, many use sand). He transported the finished mixture in wheelbarrows and then leveled it using an aluminum profile. The thickness of the base layer should be at least 6 cm for good drainage. The base must be well compacted to avoid subsidence after laying the tiles. To do this, before tamping, the surface must be moistened with water from a hose and then begin work.
Tampers can be manual or mechanical (with an electric or gasoline engine). I advise you to use a mechanical tamper (vibropress), rather than a manual one. It can be rented from construction companies or stores. A vibropress will save a lot of time and effort.
Preparing the base for laying paving slabs.
Plot
0 votes
+
Vote for!
—
Vote against!
When designing the territory of a country house or summer cottage, special attention is paid to pedestrian and driveway paths. They must be functional and have an aesthetic component. Many property owners choose paving stones, which perfectly cope with their responsibilities. This article will discuss the technology of laying paving stones with your own hands.
Paving stones have a number of advantages:
- resistant to changing weather conditions;
- resistant to abrasion and other mechanical influences;
- allows for partial repairs compared to monolithic concrete or asphalt pavements;
- has a long service life;
- a variety of sizes, textures and shades make it possible to show creativity and solve any design problems.
Types of paving stones
Of course, the above advantages may differ slightly from each other depending on the material from which the paving stones are made.
Concrete paving stones
- This manufacturing material is quite popular. Products can have different shapes and colors. But due to the fact that the mixture is not always colored in bulk during the production process, the abrasion resistance of such products is low.
- The porous structure is hygroscopic and, therefore, gradually collapses under the influence of changing temperature conditions. The service life of such paving stones is about 7 years. It is worth noting that the price of these products is quite attractive, which is why they are often chosen as paving.
- Paving stones produced by vibrocompression of concrete have higher performance indicators. The choice of colors is quite wide, and the products can withstand heavy loads. Such elements are used for arranging paths with high traffic.
Granite paving stones
This natural material produces a reliable coating with a long service life (up to 50 years), because granite is considered an eternal stone. Processing of quarried stone can be done manually or mechanically. In turn, granite paving stones are divided according to the methods of “cutting”:
- crushed elements are obtained by the method of chaotic splitting of a stone block. In this case, all the edges turn out uneven;
- paving stones sawn on a machine are a product with smooth sides;
- split-sawn is produced by combining the two previous processing methods. As a result, the surfaces of this product have two faces that are smooth and even (mainly the sides, which greatly simplifies their installation).
Clinker paving stones
- High-temperature heat treatment of natural clay and the addition of special additives form a very durable material. Due to the dense structure, the hygroscopicity of the products is low. During production, no dyes are added to the mass; the color scheme is formed due to the type of clay used and the processing temperature in the oven. Clinker products are not afraid of frost and exposure to ultraviolet rays.
Rubber paving stones
- A relatively new material for making paving stones is rubber. It is economically beneficial to purchase such products, since when making calculations there is no need to invest additional interest on items with chips, cracks and other damage.
- They have another advantage - safety from injuries, which is why they are often chosen by families with children. Manufacturers recommend installation on a solid, level base (asphalt, concrete). The service life of the coating can be 10-12 years.
Sizes and shape of paving stones
The geometry of the elements is quite diverse and the choice is made only on your own preferences. Of course, the more correct the shape, the easier it is to paving.
- Rectangular - a classic option for installation. Practicality and ease of installation are the main advantages of piece material.
- Round or hexagonal (hexagonal) - allows you to lay out a mosaic and design a sidewalk path in an original way.
- Curly - can create some difficulties during installation, but at the same time provides ample opportunities for solving design ideas.
- Large (massive) - looks great on large areas. This type of product will require labor-intensive installation work.
The most popular sizes of elements of regular shapes are 100x100x100 mm or 200x100x100 mm. As for chipped granite products, their dimensions have deviations not exceeding ±10 mm. For paths with low traffic, you can use products with a smaller thickness - 50 mm.
Paving stone laying technology
To lay paving slabs, it is not necessary to contact a specialized company; here you can do it yourself. The main thing is to follow the basic rules and follow the recommendations.
The width of the track is chosen based on personal convenience, but it is necessary to take into account the number of whole elements included in one row. This will significantly reduce the time for laying, since you will not have to adjust the paving stones to size.
The technology for laying paving stones is divided into stages:
- creating a project;
- preparation of the base;
- laying the material;
- filling seams.
The implementation of each point must be approached with the utmost care.
Paving stone paving project
- By drawing up a project we mean determining the location and area of paths and access roads. At this stage, the shape, size, and options for laying the paving stones are selected. The coloring of the paths should correspond to the general style of the landscape.
- Particular attention is paid to the relief. The slope of the ground must be organized in such a way that rain and melt water flows from the base of the building into the drainage systems, and not vice versa. This figure can be 1.5-2 cm per meter.
- If the difference in ground heights is too great, then the relief is leveled artificially, that is, by removing soil from one part it is poured to the missing side.
Base for paving stones
The service life of the coating depends on how thoroughly and correctly the base is prepared.
- The pegs are driven in along the length of the future path, the gap between them should not exceed 3 m. This will help to avoid the curvature of the stretched string.
- Excavation is carried out to a depth of 30-50 cm, depending on the condition of the soil and the purpose of the path. So, for a garden path, a depth of 30 cm is considered sufficient, and for a driveway - 50 cm.
The layers of the pie are constructed as follows (from bottom to top).
For pedestrian paths with low traffic:
- geotextiles;
- crushed stone fraction 20x40, layer thickness 20 cm;
- sand without clay impurities with a layer thickness of at least 10 cm.
Dornit will prevent deformation of the subgrade; a substrate is especially necessary if the soil is unstable. This canvas will not allow vegetation to break through between the individual elements. However, when installing paving stones under a canopy or in a gazebo, geotextile material does not need to be used.
- The gravel layer is leveled with a rake using a level, and the planned slope is created along the way. Curbs are installed along the ditch; a sand-cement mixture is used for reliable fixation. They serve not only for aesthetic perception, but also perform a functional role - the paving stones will rest against them, which will not allow them to “creep” during operation.
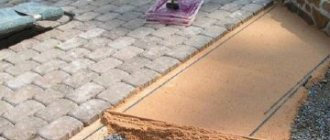
- No less than a day later, a layer of sand is laid out. For compaction, it is better to use a special machine, which will greatly facilitate this process, but if the area to be laid is small, then improvised means are quite suitable. The sand layer should be watered with water for better compaction.
- Next, you need another layer of dry sand, 4-5 cm thick, on which the paving stones will be laid.
For pedestrian paths of large areas and medium-intensity traffic:
- geotextiles;
- crushed stone fraction 20x40, layer thickness 20 cm;
- a dry mixture of sand and cement in a 1:1 ratio, where the layer thickness is about 10 cm;
- Instead of the previous 2 layers, you can use thin concrete. The amount of gravel and sand in the mortar is increased, and the amount of cement, on the contrary, is reduced.
Reinforcement will give the base extra strength. After complete drying, an additional layer of sand (3-5 cm) is created.
For driveways and pedestrian paths with high traffic levels:
- geotextiles;
- crushed stone fraction 20x40, layer thickness 20 cm;
- concrete mixture.
- Formwork is constructed along the entire perimeter of the site on top of the gravel layer; the height of the sides can vary from 10 to 20 cm. Next, reinforcement or a special road mesh must be laid, which will give the foundation strength.
- Concrete mixture is poured into the finished structure; due attention should be paid to leveling the surface. Small unevenness is leveled out by a layer of sand (4-5 cm) poured onto a dried concrete base.
- If this surface is intended for vehicle passage, then cement is added to the sand or tile adhesive is used. The joints are filled with a sand-cement mixture. In this case, the surface should not be wetted.
- It is also not recommended to operate the coating under high loads. It is necessary to give the paving stones time to “rest”; over time, the rains will wet the PCB and it will become durable.
Laying paving stones with your own hands
- Before starting work, it is necessary to conduct a “rehearsal”, especially if you plan to lay out an ornament (pattern) using multi-colored elements. Laying is done from the border to the center and along the length - from one edge to the other.
- The elements are mounted tightly to each other, it is desirable that the gap between them is minimal. Undoubtedly, it is impossible to avoid the formation of cracks in turning and curved sections, but you should ensure their uniform location. Later they will be filled with sand.
Laying paving stones photo
- After laying each row, the horizontal level is checked; even small deviations of each strip will subsequently lead to a displacement of the entire coating.
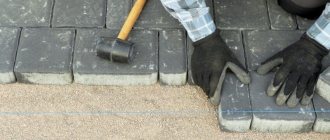
- Adjustment is made by lightly tapping with a rubber mallet. If necessary, the paving stones are sawed using a grinder with a cutting diamond blade. Rubber products are adjusted using an electric jigsaw. The element is cut so that it fits snugly against the curb. The destruction of the coating begins with the presence of large cracks.
- Upon completion of the work, it is advisable to compact the entire surface using a vibrating plate (compression machine) with a rubber base in order to avoid damage to the material. This will significantly strengthen the coating, and therefore extend its service life.
- It is better to lay granite paving stones one at a time from different packages, as they may differ in shades. This method minimizes color discrepancy.
Laying paving stones video
Filling joints between paving stones
- After paving is completed, the seams between the elements are filled with sifted sand. Such manipulation will not only prevent deformation of the coating, but also prevent the appearance of sprouts.
- A small amount of sand is poured onto part of the path and the seams are filled with a broom or brush. Excess sand is swept away or washed off with a weak stream of water. After this procedure, it is advisable to fill the cracks again until the sand shrinks to a minimum and then compact the surface with a vibrating plate.
Paving stone paths for country houses and country houses are the best option. The natural “origin” of the material allows it to fit perfectly into the environment without creating disharmony. The use of different schemes and combinations of color shades make it possible to design the territory in an original and interesting way.
Options for drawings and patterns, laying scheme
Before performing work, you should prepare standard materials and tools. It’s easy to calculate the amount of preparatory materials. For 1 sq. meter of area, the best option would be to stock up on 25 kg of cement, three bags of sand and the same amount of sand. This is a classic ratio; it is more practical to make a reserve taking into account specific soil conditions, terrain, design loads and other conditions. The set of tools is quite simple. It consists of two shovels, a marking cord or rope, this must include a trowel, a level, and a soft household broom. This article will tell you how to lay paving slabs.
Do-it-yourself layout methods and technologies
The technological basis of the layout is as follows:
- Leveling differences in the laying surface, leveling the soil.
- Marking the outlines of the planned paths; tolerance for the width of the curb is required.
- Installation of border elements.
- Preparation of a sand-cement mixture in a ratio of 3/1. It is used to strengthen the installed border.
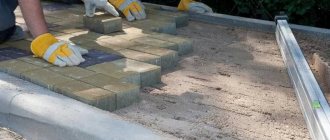
- Paving stones are laid in accordance with the sketches, the elements fit well together and are adjusted in height using a rubber mallet.
- Formation of slopes for water drainage.
- After laying the paving stones, the entire path is covered with primer; it is especially important to fill the gaps. Remove excess with a broom.
When creating the basic sketch of the Old Town sidewalk, you need to know the technology of laying paving stones and remember one regularity. This is a strict geometry and the presence of lines of transverse or longitudinal directions.
In addition, the selection of colors is important - a contrasting combination or a “chaos” scheme, when the designer simply improvises. It is possible to use patterns for laying paving slabs: wicker, parquet, herringbone, and various ornaments reminiscent of the traditions of Italian and Arab masters.
It is also necessary to take into account some subtleties in laying this type of paving stones, which should not be neglected. First of all, you need to work only in dry weather, for some time after laying the sidewalk you should not wash it, carefully clean its surface from cement residues, these tiles for the path in the country quickly absorb foreign substances and lose their appearance and color.
Excavation
The amount of work directly depends on the composition and density of the top layer. Having a site with clay soil, the owner often plans to import fertile soil to level the site and improve the quality of the soil. In this case, there is no need to remove a thick layer of soil.
Note!
Mosaic from broken tiles: step-by-step instructions on how to lay it out with your own hands (140 photo ideas)
Mosaic for the bathroom: TOP-150 photos of new designs, as well as modern ideas for combining mosaic tiles
Do-it-yourself water heated floor under tiles step by step: installation instructions with photos and descriptions, installation and connection
As practice shows, on average it is necessary to remove the top layer of soil to a depth of 30 cm. After this work is completed, the bottom of the trench is leveled, compacted, and covered with a thin layer of sand.
The use of geotextiles will solve the problem of water drainage and growing weeds. Strips of geotextile are laid over a layer of sand, forming a margin of 20 cm along the edges of the future path. At the joints, the width of the overlap is no more than 20 cm.
Basic rules for laying paving slabs “Old Town”
When laying, it is recommended to observe the location of the tiles in the corresponding row of the transport pallet - this will ensure the minimum length of the seams in the coating and evenly distribute static and dynamic loads over a large area. Violation of the correct alternation of stones in rows will lead to the fact that at the end of laying tiles of the same format will remain unclaimed (the number of tiles in a pallet of each format is different!).
Laying of products must be done with the placement of individual elements through a row according to the “Layout Drawing” in order to avoid the formation of a continuous seam, which reduces the integrity and rigidity of the paving.
“Old Town”/”Classico” tile layout pattern:
The laying of a new row must be started in accordance with the “Layout Pattern”, without using stones from the previous row that were left unlaid.
When arranging connections, the following rules should be followed:
- no piece cut should be smaller than a quarter of a full-size stone;
- do not use cut stones if the remaining short side does not correspond to at least half the length of the longer side of the uncut stone;
- cut stones should not have sharp corners (less than 45 degrees).
Do not forget to ensure water drainage from the surface of the tile - a sufficient transverse or longitudinal slope of 2-2.5% must be provided.
Types of paving slabs
Old Town paving stones are:
- Clinker room. Produced by firing in a blast furnace. To make such tiles, certain clay rocks are taken. Clinker tiles are resistant to sunlight and negative temperatures, do not absorb water, and retain their appearance under intense mechanical pressure.
- Granite. Made from natural stone – granite. Natural strength and durability. The service life can be up to 50 years. Granite tiles can also have uneven edges (chipped) or machined (sawed). It is considered the most durable paving stones and can be laid in any area.
- Concrete. Manufactured using vibration casting. Special pigments and impurities are added to it, which ensure high performance characteristics of the material. The tiles are durable, but vulnerable to acid.
When purchasing paving mosaics, you should consider the material used to make them.
Paving slabs “Old Town”: advantages of shape and laying pattern
A distinctive feature of vibro-pressed tiles Old Town is that it consists of three elements. Moreover, the length of two small plates is the length of the large one. Thus, by combining elements you can create unusual beautiful compositions and drawings.
Old Town tile laying scheme
Laying tiles depends on the wishes of the customers and the creativity of the builders. Thanks to the wide range of color palettes, there are a huge variety of styling options.
It is worth paying attention that the multiplicity of parts on the pallet may be different, so in the drawing it is worth taking into account the number of parts in order to avoid leftovers.
Let's look at the most common options for laying vibro-pressed tiles in the Old Town.
Row tile laying Old Town
Standard scheme for laying vibro-pressed tiles Old Town, offered by manufacturers. In this case, the elements are stacked in rows in order of frequency and sequence.
This scheme is perfect for paving paths and parking lots. With the help of through seams you can achieve visual effects: extend the length or increase the width of the tracks.
Mosaic installation
Mosaic laying is different in that the tile elements are laid in different directions. In this case, there are no pronounced rows or through seams in the paving. Using mosaic laying, you can create beautiful patterns or highlight individual areas.
Block laying
Paving elements are arranged into blocks in accordance with the proportions of the parts on the pallet. With this paving, through seams are obtained, dividing the area in two directions. This method is perfect for laying rectangular areas.
Large format slabs 600×300
Large rectangles without chamfer allow you to get smooth paving on large areas, wide paths, and driveways. It is convenient to move on such a surface on foot and on wheels. The shape is combined with modern high-tech buildings and brick houses. It is used for landscaping private areas, but is more suitable for courtyards of residential complexes, city boulevards, squares and squares. Laying schemes:
Row laying is predominantly used, but it is worth considering that large-format slabs are heavy and difficult to install manually.
Schemes for laying paving slabs Old Town
Standard installation scheme
First, let's look at the standard monochromatic layout of the Old Town. On the pallet, the tiles are arranged in the order shown in the picture below.
Arrangement of stones on the pallet
During paving, it is necessary to change the elements in the rows, as in the following figure.
Standard installation scheme
Monochromatic styling option
This scheme is suitable for laying the Old Town in Colormix colors. But if you use your imagination, you can use colored tiles, making inclusions in the main mass. When starting to lay tiles, you need to cut the 180x120 stones in half.
Monochromatic layout of the old city
For plain paths with a width of 117 cm
Here we suggest using single-color tiles or colors from the colormix series.
One-color scheme for paths
For paths 117 cm wide.
This laying model provides 2 colors, the main color in the center, the additional one frames the edges of the track. The second shade requires 33.3% of the total volume. If it is necessary to make wider paving, then a second color will be needed at the rate of 0.195 m2 per meter of perimeter.
Laying option for 1.17 m paths
Pattern for sidewalks of any width
The amount of primary color depends on the width of the path, and the tiles for the outline are 0.12 m2 per 1 meter of perimeter.
Laying scheme for sidewalks
Another layout for paths of any width
Here the frame of the track is represented by two lines. The calculation of the volume of the tile is carried out similarly to the previous one.
Laying option for paths
Standard scheme with the introduction of a second shade of tile.
In the presented version, we propose adding a second shade that will be combined with the main color. The ratio is 80 to 20.
Standard two-tone styling scheme
Two color combination
You will need Old Town tiles in two tones in equal quantities.
Old town of two tones
9 . Scheme for paths with triple edging
Width 1.68 m. For each meter of path, 1.2 m2 of light-colored tiles and 0.48 m2 of dark-colored tiles are required.
Laying pattern with triple edging
Tip 5. Choose colors to match the style of the site
Paving should highlight the design of the garden. We talked about this in the article “Full review of BRAER tiles: collections, shapes, colors, installation options.” For example, if the garden is laid out in a landscape style, you should give preference to a material in brown tones like cobblestones or flat natural stone with a torn edge.
1399 rub. per sq. m.
Innsbruck Alt SteinRus 60 mm Beryl
Go to catalog
1399 rub. per sq. m.
Innsbruck Tyrol SteinRus 60 mm Beryl
Go to catalog
An example of paving curved paths on a site in a landscape style. View project
For a site in a regular style with a main brick building, it is better to choose rectangular tiles that will harmonize in color with the facade.
1595 rub. per sq. m.
Bavaria Steingot 60 mm Travertine
Go to catalog
An example of paving on a site in a regular style. View project
When the main building is a high-tech house made of concrete and glass, gray large-format tiles with a flat surface will be the ideal complement.
Features of laying tiles with ColorMix surface texture
Paving slabs made using the ColorMix/Listopad technology are a unique product. Original color patterns, using several shades, will make the walkway or terrace unusual and attractive. By playing with tints of color and shadow, you can achieve various effects when paving paths.
However, the process of laying ColorMix/Listopad paving slabs has its own characteristics:
1. It is necessary to take tiles of the desired format from 3-5 different pallets!
To avoid unwanted concentration of one color, when paving, tiles should be laid in such a way that adjacent stones differ as much as possible from each other in color. Those. darker tiles were adjacent to lighter ones both in the same row and in relation to the tiles of neighboring rows. To do this, you need to take stones from 3, or better yet, 5 different pallets. You can pre-select pallets with different color tones on the top row.
By adhering to this rule, you will create a uniform surface over the entire area, avoiding the appearance of individual lighter or darker spots, which in turn would dull the pattern.
2. Select the direction of the color stripes on the tiles.
The first method: strictly observe the one-way direction of the color stripes on the surface of the products.
The stripes of color on each tile should be oriented in the same direction. This will allow you to achieve the effect of an elongated and eye-catching path.
Second method: The pattern on the surface of the slabs must be constantly interrupted.
Paving elements are laid in different directions of color stripes on the surface of the tiles, both vertically and horizontally. In this case, the surface of the sidewalk in the sun will play with colors in two planes.
Features of paving
Paving areas and tile features
Naturally, when choosing a covering for a path, everyone dreams of a beautiful and original design. But not all tiles may be suitable in these conditions, and not every pattern will fit into the landscape. The industry gives you a huge variety of collections of paving slabs, each of them has its own name, design and personal characteristics.
Types of paving stone dimensions
The defining characteristic when laying paving slabs is thickness; it is the key among all other characteristics. For garden paths, a size of thirty millimeters is suitable; among the common ones used on roads in the yard, paving stones of forty millimeters are suitable; for the most reliable platform for a car, you need tiles sixty millimeters thick.
To meet any need, companies create a wide selection of paving elements of different thicknesses for each of the shapes. Coverings of thirty millimeters or less are called tiles, and those that are considered to be more than thirty are already commonly called paving stones. When choosing paving components, it is necessary to strive for the smallest amount of pruning, because otherwise this will greatly increase the cost of material and the time for constructing a garden path.
Paving elements of smaller dimensions provide more opportunities for constructing a covering of the required width without trimming.
Design features of tiles
Tiles of a neat (regular) shape, in a geometric sense, that is, a square, rhombus, rectangle, are much better to lay. The volume of trimming is much greater when using rather unusual elements that will have to be cut near the curb. With all this, the decorative value of free-form paving elements is much higher.
There are manufacturers who offer half tiles, for example, clover tiles, which partially compensate for the indicated disadvantage. In some cases, paving stone collections consist of components of completely different sizes that are arranged into different patterns and shapes.
Colored and standard tiles - price and decor
If you want to lay paving slabs as decoration, then you need multi-colored paving stones for the sidewalk.
With all this, the design can be chaotic, having a geometric shape, or simply consist of stripes that will be directed at different angles. Colored elements are slightly more expensive. It is necessary to take a diagram for laying colored tiles in advance - without it you will not be able to calculate the required amount of material required. It is necessary to understand that the richness of the color and brightness of the coating will be seriously inferior to the picture in the catalog.
Prices for tiles and their installation
The price aspect of paving stones The Old Town is quite affordable. Depending on the manufacturer and the popularity of the color scheme, the price per square meter may be as follows:
- Old city brick, diamond, clover, manufacturer Odessa, Ukraine. Price 1 sq. meters 3.5 US dollars.
- Assortment of paving stones in yellow shades, produced in Kharkov, Ukraine. Cost of 1 sq. meters 4.9 – 5.2 US dollars.
The cost of installation usually fluctuates somewhat depending on the category of the company performing the work and other factors. Typically the base cost is $2.1 - $2.5 per square meter of tile. This includes the execution of all work, from the zero cycle to commissioning.
More details about the options for laying paving stones are described here.
Grouting joints
After laying the tiles, you need to grout the seams.
Laid paving slabs "Old Town".
For this you need river sand and a brush. The sand should be dry, so it is better poured into the seams between the tiles. Use a brush to thoroughly sweep everything, then moisten the entire tile with water. In some places the sand will fall through. And you will need to repeat the grouting procedure again. After completing the grouting stage, the tiles will be well fixed and will not wobble underfoot. If during the installation of borders you get seams between them, then they need to be sealed using a cement-sand mixture in a ratio of 1:4.
By following all the recommendations for the correct installation of paving slabs, the coating will serve you for many years, will look good in any weather, and will fit into the overall picture of the decorative landscaping of the area!
Paving stones "Old Town"
Paving slabs such as “Old Town” (Brook) are an excellent solution for classic landscape design. The material has incredible aesthetic appeal and allows you to create an interesting surface reminiscent of old squares and parks of past centuries.
The main advantage of “Old Town” paving slabs is its variability. Material for paving pedestrian areas is produced in various shapes and sizes, as well as in different colors. At the same time, the price for paving slabs of this type is lower than for many similar materials.
Conclusion
Using various combinations of shapes, colors and textures of vibropressed tiles, it is possible to create practical, aesthetic, and, importantly, durable paving. Both adherents of the classics and connoisseurs of minimalism will find their own collection that will organically fit into the landscape design of the site.
You can read more about the production of vibropressed tiles and its advantages in one of the previous materials. Paving is multifaceted and vibropressed concrete tiles are the optimal material not only for paths and entrance areas, but also for blind areas. The video shows the construction of the original step track.
Subscribe to our Telegram channelExclusive posts every week
Advantages of the option
Paving stone "Old Town" is available in a variety of shades. Thanks to this, the possibilities of its use in design landscape projects are expanded.
An important advantage of this paving slab is that it does not emit volatile petroleum products and other harmful chemicals when exposed to high temperatures. “Old Town” does not soften when heated. It has a high level of environmental safety. This is facilitated by manufacturing from environmentally friendly materials.
With proper installation, the formation of puddles on the coating is eliminated - all moisture flows into the recesses.
Due to the nature of production, the “Old Town” paving stone has a rough surface. This creates an anti-slip effect. For this reason, it is suitable for covering sidewalks, bus stops, and gas stations.
“Old Town” tiles are significantly superior to concrete and asphalt coatings in terms of price and quality ratio. These types of stones are easy to clean. If damage occurs, it is enough to replace the damaged “Old City” cell without disassembling the entire structure.
In the production of supporting paving surfaces, a minimum amount of raw materials is used.
Several advantages of the material should be noted:
- does not deteriorate from exposure to water;
- does not deform at low temperatures;
- allows you to implement a variety of design projects;
- does not freeze and is absolutely safe due to the existing anti-slip effect;
- has good value for money;
- provides for the replacement of damaged elements without disassembling the entire track.
Laying such tiles is an easy job. You can do it yourself in a short time.
Pros and cons of paving stones
Like any material, paving stones have their advantages:
- Durability. A path or platform made of paving stones will last for many years and certainly longer than asphalt could.
- Resistance to mechanical damage and abrasion. If the paving stones are laid out to form a beautiful pattern, you don't have to worry about soles, tires and paws rubbing it off. You also don’t have to worry that a stone falling on the tile can damage it.
- Indifference to precipitation. Rains do not wash away the paving stones and puddles do not form on them. Water simply goes into the cracks between the tiles into the base, and from it into the ground.
- Environmental friendliness. Paving stones do not emit unpleasant odors or harmful substances, do not negatively affect the environment and do not cause allergies. In fact, it is simply a beautiful stone placed in the right place.
- Aesthetics. The paving stones are beautiful. It not only performs a utilitarian function, but can serve as an excellent decoration for a site, especially if you approach its installation with imagination.
- Laying paving stones is quick, easy and does not require additional education. After reading a few instructions on the Internet, anyone can handle it.
- Ease of dismantling. If you get tired of your paving stone path, you can always take it apart and lay it out differently.
However, with all these advantages, paving stones have one big disadvantage:
Price. Natural stone is expensive.
Maintenance of laid paving slabs
During the first year of operation, white salt deposits (efflorescence) may form on the surface of paving slabs.
The reason for the formation of efflorescence is the crystallization of soluble compounds from cement when interacting with carbon dioxide in the air. Efflorescence is an aesthetic defect, does not affect the physical and mechanical characteristics of the coating and disappears under the influence of rain within 1-2 years of operation. If you want to quickly get rid of efflorescence and improve the aesthetic appearance of the coating, you can carry out surface treatment with special cleaning agents - efflorescence cleaners.
Regardless of the operating conditions of paving slabs, the most effective method of protection is the use of water repellents.
Water repellents prevent the formation of efflorescence and give the surface water-repellent properties. After treatment, water and contaminants are not absorbed into the surface, but flow off from it. On a paving surface treated with water-repellent agents, less ice forms and is easily removed.
Laying methods
Construction stores sell different versions of Old Town paving slabs. The width of the elements is the same, but the length varies.
Segmented trapezoidal stones are positioned so that the pavement layout is maintained when turning. This does not affect the width of the passage. Thanks to this, it is easy to maintain the ratio of seams when laying. This is often used on straight sections of the track.
The most complex layout scheme is considered chaotic. It matches the seams of adjacent courses, and the tiles are laid in a unique color and pattern. This method is often used for paving individual zones and areas, leading to them with paths with the correct geometric pattern.
To arrange coils and construct round sections, trapezoidal products are used, choosing the size depending on the radius of rotation. In this case, the laying starts from the center of the circle and ends at the outer diameter.
Before you begin, you need to make a fragment of the track. It is made separately in size of one square meter, then the orientation is made on the manufactured sample.
Laying on a primer without a base
Before laying paving slabs, it is necessary to prepare the surface. To do this, level the soil. When creating the contours of the planned path, do not forget about the curbs. It is recommended to use twine for marking.
When installing curbs, take into account the selected primer height and the thickness of the paving stones.
The ratio of sand and cement should be 3:1. Pour primer along the length of the fragment and lay out a sample of the coating. It is recommended to distribute the material so that the center is slightly higher than the edges.
Next, all the components of the track are laid out according to the selected template. It is recommended to adjust the height of the stones with a rubber hammer. Minor slopes towards the curbs are made using a level. During rain or thaw, water will flow down them.
At the end of the paving installation, it is necessary to cover the gaps between the stones over the entire surface with a primer. Excess composition is removed.
Marking the work area
At the preparatory stage, it is useful to draw a plan of the entire site with the buildings, flower beds and other structures located on it. It is necessary to draw diagrams of future paths on it. When creating a scheme, it is important to take into account the direction of natural slopes, which will ensure the drainage of excess water from future paved paths.
When calculating the width of the pedestrian path, it is determined within 1-1.2 meters. This will allow two adults to separate freely. When planning to tile a driveway for a car, you need to add space for people to move around.
- Having completed the theoretical preparation, you can begin marking on site. To do this, you will need to prepare sharpened pegs, a strong cord and a tape measure.
- When marking the width of future paved paths, add 10 cm to it on each side to accommodate the curb.
- The cord must be pulled tight enough to avoid sagging. As a result, you can get smooth paths.
Shape and dimensions of the “Old Town” tiles
The classic form “Old Town” (in the “Choice” nomenclature this form is called “Classico”) includes paving stones of 3 standard sizes - when laid, they can be combined with each other. The presence of characteristic rounded corners of the elements stylizes the paving as a medieval pavement.
The thickness of the tiles is 60 mm, intended for pedestrian paving (paths, sidewalks, pedestrian areas with low traffic intensity).
Attention! In the nomenclature, the series of tiles B.1.Fsm.6 and B.1.Fsm.8 “Old Town” differs from the classic one - it also includes paving stones of 3 standard sizes, but has right angles and a micro-chamfer along the perimeter of the products, which allows you to create seamless paving.
“Old Town” tiles are an excellent option for arranging garden and park paths, terraces, and making blind areas around the house.
Installation of curbs
It is easy to use piece concrete products as a border, as well as:
- stone;
- brick;
- slate;
- wood;
- plastic;
- concrete.
The parts are placed along the edge of the future path after the drainage has been installed.