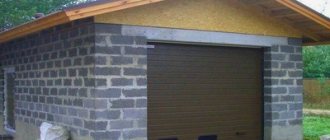
Aerated concrete garage: fast, cheap, practical
Our topic today is building a garage from aerated concrete. The reader and I will get to know several projects of separate garages and private houses with garages, and also find out what features of the material should be taken into account at different stages of construction. We will study the technology of erecting walls, making armored belts and solutions that can be used for the exterior finishing of buildings made of aerated concrete.
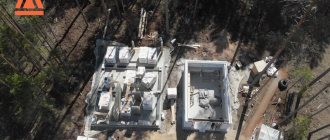
Projects
What do you need to consider when designing an aerated concrete garage?
Minimum dimensions
The dimensions of a modern budget runabout are approximately 4.5 x 1.7 meters with a height of 1.5 - 1.6 meters.
Dimensions of one of the most popular small cars - Hyundai Solaris
However, a car should not fit into a garage like a hand into a glove: there are several additional factors that limit the minimum size of a garage.
- The minimum ceiling or roof height is 2.4 meters. This value is common to all residential and technical premises, prescribed in all building regulations. At a lower height, it will be downright uncomfortable to be in the garage;
- A reasonable minimum garage length is 6 meters. In this case, you will be able to bypass the car with the gates closed both from behind and from the front;
- The minimum width is 4 meters. It will leave room in the garage for maneuvering the car and for shelves with tools, oils, antifreeze and other things useful for the car owner;
Dimensions of the garage, ensuring its comfortable use
- The width of the gate should not be less than 2.6 - 3 meters. Room for maneuver, remember? You will not always enter the gate at a strictly right angle, and exactly in its center.
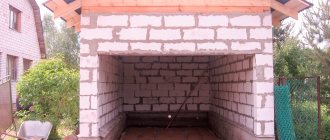
Detached garage
Here are several project options designed for different construction budgets and, accordingly, providing different levels of comfort to the owner.
Garage in the house
If you are just starting construction on a new site, then you may find the idea of making a garage part of the house attractive. The benefits of the solution are obvious:
- The absence of separate buildings on the site, which means saving free space;
- A weatherproof passage from the garage to the living quarters;
- Rational use of the area of the ground floor or basement.
If you are interested in projects of aerated concrete cottages with a garage, we will bring to your attention several more options.
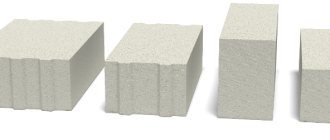
Features of aerated concrete
When building a house from aerated concrete with a garage or a separate garage, two key features of the material are important:
- Rigidity , complete lack of elasticity with low bending strength. From a practical point of view, this means that the slightest deformation of the walls due to uneven shrinkage of the building will decorate them with cracks;
Please note: this is why the foundation for a garage made of aerated concrete, and especially for a much heavier house, must have maximum rigidity. This is especially important on unstable soils - clays and loams - and with high groundwater levels.
Insufficient foundation rigidity guarantees the appearance of cracks in aerated concrete walls
- Low compressive strength of popular brands of aerated concrete (D400-D600). Floor slabs and beams, roof rafters should not rest directly on the walls.
Practical conclusions: for any one-story building made of aerated concrete, it is highly desirable to pour an armored belt along the top of the walls. Houses of two floors or higher are built with a reinforced frame that eliminates any deformation of the building and absorbs the load from the floors.
Online payments
Reinforcement under window openings
Windows in a bathhouse are not the most important element, but they can be present in the project. Reinforcement of the window sill area often becomes a controversial issue. Let's look at the main issues you should pay attention to.
- Section of the groove in the window sill area
- Selection of reinforcement for reinforcing the window sill area (composite or metal reinforcement).
- Reinforcement laying place
The size of the groove will depend on the choice of binder (CPS or mineral adhesive for masonry). Mineral adhesive has better shear resistance, and it also has better adhesion to aerated concrete. Accordingly, when laying on mineral glue, it is permissible to make the groove size with a cross-section of 25x25 mm; when laying on mineral glue, the shear resistance is two times lower, so it is recommended to make the size of the groove for the reinforcement 50x50 or 40x40 mm.
The fittings should be located on the last row of the window sill area. If the last row does not reach the window frame in size, then an additional row is installed. It can be made from thin blocks laid on a side plane or from cut blocks.
Additional row over reinforcement
Sometimes reinforcement is placed under the last row of the window sill area, since it is believed that the reinforcing elements should be covered with another layer of masonry. This method is applicable in brickwork, but in the case of gas blocks, the reinforcement is too far from the corners of the window opening, which are the main stress points.
Incorrect location of reinforcement
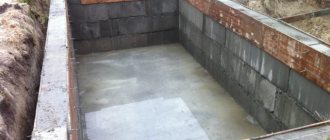
Foundation
The foundation for a garage made of aerated concrete can be:
| Image | Description |
| Slab. A monolithic reinforced slab evenly distributes the load over a large area of soil. It is ideal for soils with low bearing capacity (in particular wet clay) |
| Monolithic tape. The laying depth, shape and height of the foundation must prevent its deformation during frost heaving of the soil. |
How to pour the foundation correctly?
Slab
Construction of a slab foundation for a garage made of aerated concrete blocks
- We prepare the site: remove a 30-centimeter layer of soil, level it and tamp it;
- We fill the area with sand, crushed stone or sand gravel to a height of 20 cm. Crushed stone needs tamping (manual or mechanical), the sand cushion can simply be watered with plenty of water for maximum shrinkage;
- We construct the formwork to a height of 15-20 cm from the ground level;
- We cover it with polyethylene or roofing felt. Waterproofing will prevent cement laitance from going into the bedding and weakening the concrete;
- We assemble the reinforcement frame. For a slab foundation, it should be two-level, with a minimum distance between the surface of the slab (bottom or top) and the reinforcement of 1.5 cm. Reinforcement with a diameter of 8-10 mm is knitted with annealed steel wire;
Hint: instead of reinforcement, you can use a mesh with a wire thickness of 5-6 mm and a cell of 100-150 mm.
- The formwork is poured with concrete grade M200 and higher, and bayoneted or compacted with a submersible vibrator. The thickness of the slab is 20 - 25 cm. It takes two weeks for the concrete to gain sufficient strength to erect walls.
Pouring a slab foundation for a garage
Hint: the thickness of the garage slab can be reduced to 10 cm if it is reinforced with reinforced ribs of the same thickness. Their construction will make reinforcement and formwork more complex, but will reduce concrete consumption by 35-40%.
Slab foundation with stiffeners
Tape
How to build a strip foundation with your own hands?
- We tear off a trench at least 30 cm wide and 30-50 centimeters deep along the perimeter of the building;
Captain Obviousness suggests: if the garage has internal partitions or if you are building a cottage made of aerated concrete with a garage, the foundation should not only encircle the future building along the perimeter, but also pass under all the internal walls.
Trench for strip foundation
- We fill it with 15-20 cm of sand or crushed stone;
- We compact the bedding (in the case of crushed stone - with a tamper, in the case of sand - fill it with a large amount of water);
- We construct the formwork to a height of at least 30 cm above ground level;
- We cover the trench and formwork with waterproofing material (polyethylene or roofing felt);
- We install a reinforcement frame (two-level, with a reinforcement thickness of 10-12 mm);
Formwork with waterproofing and reinforcement cage
- We fill the foundation with concrete and bayonet it.
Selection of material and calculation of parameters
When choosing a material, you need to pay attention to the structure of the wood, the absence of curvature and the integrity of the surface. Products must be free from knots, cracks and traces of biological influence
The moisture content of purchased wood should not exceed 8%.
The Mauerlat is made from a wooden rectangular profile with dimensions:
- 80 x 180 mm;
- 100 x 150 mm;
- 100 x 100 mm;
- 150 x 150 mm;
- 200 x 200 mm.
The choice of beam section is influenced by the following factors:
- number of floors and external dimensions of the building;
- design features (number of slopes, presence of an attic, etc.);
- roofing material;
- climatic conditions of the region.
The thickness of the Mauerlat must correspond to the recommended loads - exceeding the weight of the product will affect the bearing capacity of the foundation.
Dimensions of wooden beams.
The weight of the timber used is calculated as follows:
- Determine the cross-sectional area - multiply the width by the height.
- We multiply the resulting value by the perimeter to obtain the volume of the material.
- We multiply the result by the specific density of wood - in this way we calculate the weight, or the amount of load that the Mauerlat will exert on the external walls.
The length of the profile should be such that the number of connections on one side of the building is minimal. The standard size of the produced material is 3-6 m, so for a distance of 8 m you need to purchase 2 segments of 6 m each.
When choosing the height of the profile, it is necessary to take into account that the connection of the rafters to the Mauerlat is made by cutting, and 50% of its actual size is used.
Walls
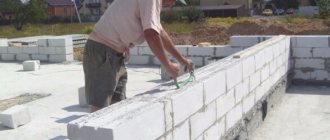
The first row of aerated concrete blocks is laid out on a cement-sand cushion laid on top of waterproofing - two layers of roofing material. The waterproofing material will prevent the walls from getting wet, absorbing water from the foundation and soil due to the capillary effect.
Laying the first row on a leveling pad on top of the waterproofing
Tip: when laying out the first row, use the longest possible level or a mooring cord stretched strictly horizontally. Their appearance and strength depend on how smoothly the blocks lie at the base of the walls.
The second and subsequent rows are laid out on aerated concrete glue with the obligatory bandaging of the vertical seams by at least 20 cm. The thickness of the seam is 1-3 mm, the tool for applying the glue is a carriage or a notched trowel. Every third row is reinforced with longitudinal reinforcement: reinforcement with a diameter of 8 mm is placed in the grooves cut with a wall chaser.
The reinforcement is placed in grooves, which are then filled with glue
Additional blocks are cut in place with a hacksaw for foam blocks. To cut strictly at right angles to the surface, use a jig square.
Square for cutting aerated concrete blocks
If you are building a garage with utility rooms, or a house with a garage made of aerated concrete, you will inevitably have to solve the problem of partitions joining the main walls. The connection must be strong and withstand significant horizontal loads.
This problem can be solved in two ways:
| Image | Description |
| General reinforcement: the reinforcement is laid in grooves cut at the same level in both walls adjacent to each other. |
| Anchors: the partition is fixed with a piece of reinforcement hammered into a hole in the wall or a perforated galvanized corner. |
Getting ready to build a monolithic belt: what is needed for work
To reinforce aerated concrete, it is necessary to prepare the following building materials:
- steel reinforcement with a cross-section of 1–1.2 cm. The use of rods of increased diameter allows them to withstand significant loads, ensuring the integrity of aerated concrete. The rods are placed in the grooves and filled with solution;
Armobelt in the construction industry is used to increase the resistance of the load-bearing walls of a house to external and internal influences
- wire mesh with square cells measuring 50x50 mm. Reinforcement is carried out by laying a mesh on the surface of the blocks, followed by applying a small layer of binding solution;
- concrete solution. It is used to form a support contour at the level of the building’s foundation, as well as to fill the load-bearing belt under the floor elements. The solution is prepared using Portland cement brand M400.
When carrying out the work, you will need annealed wire for knitting reinforcing bars used for assembling load-bearing frames, as well as a cement solution. It is used to fill reinforcing mesh when strengthening masonry.
To perform the work you will need the following equipment and tools:
- concrete mixer;
- Bulgarian;
- wall chaser;
- device for bending rods;
- crochet hook.
After preparing the tools and materials, you can begin the work.
Armopoyas, reinforcement frame
To fill the armored belt (in particular, under the mauerlat - a beam that serves as a support for beams or roof rafters) and install lintels over openings, so-called U-blocks are used. They are placed on the glue with the tray facing up. Since the standard length of the U-block is only 500 mm, the future lintel will have to be fixed in the openings with temporary spacers.
U-blocks. Depending on the size, the price varies from 200 to 380 rubles per piece
Then a reinforcement cage is placed in the tray, and it is filled with concrete with obligatory bayoneting. Excess concrete is removed flush with the edges of the tray.
Please note: an armored belt with U-blocks allows you to avoid the appearance of cold bridges. The low thermal conductivity of aerated concrete prevents freezing of heavy concrete.
The armored belt is made using U-blocks
A reinforced frame will also be needed if we are building a garage from aerated concrete with at least two above-ground floors. Installation of the reinforced frame looks different:
- The walls are laid with gaps in the corners and gaps in long straight walls under reinforced concrete columns;
- On the outside of the corners, on both sides of gaps in the walls, and along the top of the walls, formwork is assembled from boards;
- In the formwork, a frame common to the columns and armored belt is knitted;
- The formwork is poured and bayoneted.
Attention: the columns are concreted with gradual assembly of formwork to a height of no more than a meter and layer-by-layer pouring of concrete with bayoneting of each layer.
Pouring reinforced frame columns during the construction of an aerated concrete cottage with a garage
Mounting methods
The topic of this short article is attaching the Mauerlat to a wall made of aerated concrete and other block materials. But, oddly enough, there will be less talk about fastening words.
Important! When constructing walls from aerated concrete and other cellular blocks, the Mauerlat is mounted around the entire perimeter of the house, regardless of the type of roof and the placement of the rafters.
Possible options
Various construction forums and websites talk about numerous “modern, effective” methods of attaching a Mauerlat to a wall made of aerated concrete and other blocks. Mainly using anchors embedded in a concrete reinforced belt. Moreover, fastening mauerlats to block walls without an armored belt is considered nonsense, a whim of illiterate builders.
Only a few authors of publications discuss the topic of attaching a wooden Mauerlat directly to a wall made of block porous materials.
Table 1. Approximate options and suggestions for attaching the Mauerlat to a wall made of porous blocks.
| Mounting option | A comment |
| Using wire. Steel wire twisted in 3-4 layers with a minimum diameter of 4 mm is inserted into the masonry 3-4 rows below the mauerlat. Then the wire overlaps through the Mauerlat and is pulled together, creating a strong, reliable fastening. | This option is good for everyone, it was invented about 200 years ago for fastening the roofs of log houses. But for aerated blocks it should be used extremely carefully for a simple reason: to tighten the aerated block too much means to destroy the soft stone. Tightening loosely or not tightening the tie a little will not give the desired result. |
| Attracting the Mauerlat to the wall with long (about 0.5 m) anchors and dowels. | Unreliable. Metal and gas block are not compatible at all. And if the Mauerlat is not dry enough and becomes deformed during operation, the fastening will definitely be torn off. The same thing will happen if there is excessive windage on the roof, for example, in strong winds and an open attic. |
| Cross pins in combination with tie wire. | Labor-intensive, costly, ineffective, inconvenient and low-tech. |
| Chemical anchor. A hole is drilled, an anchor for the Mauerlat is inserted into it, the hole is filled with a chemical composition identical to the composition of aerated concrete. | Too wise. There are no reviews on this method, but presumably the fastening will be weak due to the low density of aerated concrete and the possibility of wood deformation. |
There are also options for using anchors, wire, pins, metal rods and strips, but they all belong to the same category of low efficiency and unreliability in extreme situations.
Important! The above does not mean that the listed technological methods of fastening are unacceptable. Their use is quite acceptable, but the type of fastening is not a dogma.
Fastening with crimp tape
Each professional builder has certain skills and experience; he chooses the optimal and sufficient fastening option based on the totality of all negative factors that can affect the quality of construction.
For example, the use of the method of twisting a Mauerlat with a wall can be slightly modified. Instead of wire, steel tape (bandage tape) is used, similar to a container for wooden boxes. It is inserted into the masonry in the same way; you can fold the tape in two or three layers.
Video explaining the principle of fastening the bandage tape:
A wooden plug is inserted into the masonry between the tape and the gas block; it will not allow the crimping tape to cut the block when tensioned. From above, the ends of the strip are tensioned using a simple tensioning device, fastened together and on the Mauerlat in any way.
Roof: budget solution
After pouring the armored belt, aerated concrete walls are capable of supporting any type of roof; its construction does not have any specific features.
The author will allow himself to mention only one solution, interesting for its extreme cheapness:
- The armored belt is not flooded;
- One or three top rows of masonry are cut obliquely, forming a slope of at least 5 degrees;
- Slots for roof beams are selected in aerated concrete;
- Beams soaked in antiseptic are embedded in the slots using ordinary cement-sand mortar;
- The roof is laid over the sheathing laid on the beams (usually made of metal tiles, which prevents water from flowing in on small slopes due to the transverse wave).
The photo shows the simplest and cheapest roof structure: the beams are embedded in the walls
Preparation of formwork
Most modern people trust the procedure for constructing a seismic belt to experienced specialists.
In the absence of construction skills, such a solution may be optimal, but if you put in a little effort and understand the step-by-step guide, you can make a reinforced belt for a house from an aerated block with your own hands. So, the whole process is conditionally divided into the following stages:
- Preparation of formwork.
- Insulation (if provided for by the project).
- Assembly and installation of a frame made of reinforcement.
- Pouring concrete solution.
In fact, such a process is not much different from arranging lintels in windows.
After the calculations, you can begin preparing the formwork. In most cases, such a structure is erected from prefabricated parts, for example, large panels made of boards. And you can also use furniture panels instead of boards. The finished formwork is fixed on the wall structure:
- In the side part, using pieces of reinforcement or wire.
- From above (for this purpose, stiffeners are constructed in advance from wooden scraps, which are nailed to the top of parallel formwork panels in increments of one and a half meters).
To prevent the structure from shifting, the heaviest part is additionally secured with reinforcement. As for the thickness of the boards, it is determined by the height from which the concrete solution will be supplied. The algorithm is simple: the higher the height, the thicker the formwork should be.
Frame installation
Next, it is necessary to install a frame made of reinforcement, which consists of strong steel elements 12 mm thick and knitting wire. The structure is installed inside the formwork directly on special plastic stands (they are often replaced with wooden blocks 3 centimeters wide).
Important advice: at the stage of frame production it is better not to weld the elements. The fact is that such an approach violates the strength of the structure and causes the development of corrosion processes inside the concrete.
Then the frame is covered with a concrete solution, and the formwork is dismantled using a nail puller after a specified period of time. In summer it is 24 hours from the moment of installation, and in winter it is 72 hours.
It is no secret that concrete is significantly superior to gas silicate in terms of thermal conductivity, so this method of constructing formwork can only be used if there is careful external insulation of the walls. Otherwise, the wall structures will be subject to freezing in the armored belt area. However, the use of the following technique prevents such trouble.
Fixed structure made of U-blocks
To avoid significant heat loss, permanent formwork is used at the junction of concrete and gas silicate. To create it, it is customary to use factory U-blocks with a standard box shape. The construction process itself consists of the following stages:
- The topmost row of blocks is treated with glue, after which the blocks are placed on it with the hollow side up.
- Polyurethane foam, polystyrene foam or stone wool are placed inside wall structures to provide additional thermal insulation.
- The frame made of metal elements is laid in the same way as during the construction of formwork.
- As a result, the concrete mixture is poured.
If you use this technique, then the need to install and dismantle the formwork structure will simply disappear, and the speed of work will increase significantly. However, U-shaped blocks are significantly more expensive than classic wooden panels. In addition, in this case it is necessary to additionally saw aerated concrete for formwork.
In addition to the above methods, a combined method can be used to install the frame. It consists of laying blocks 150 millimeters thick on the outer parts of the walls, as well as constructing formwork from wooden panels inside.
Exterior finishing
Aerated concrete has exceptionally high vapor permeability. If the garage is not heated and is used only for its intended purpose, this factor can be neglected: there are simply no sources of moisture in it. But in a garage with habitable premises, or in a house with a garage made of aerated concrete, the vapor permeability of the exterior finishing should be at least not lower than the vapor permeability of the wall material.
Reference: the humidity in an inhabited heated room is higher in the cold season than outside. If the vapor permeability of the exterior finish is lower than that of the walls, moisture will condense underneath it. Damp walls deteriorate faster and lose more heat.
In order for a wall to be dry, its vapor permeability should not decrease from inside to outside.
That is why, for the exterior decoration of aerated concrete buildings, the following are used:
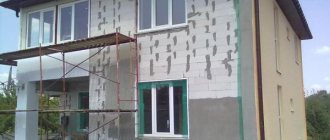
- Ventilated facades (vinyl and metal siding, corrugated sheets, etc.);
Garage exterior with vinyl siding
- Plasters with increased vapor permeability, designed for gas and foam concrete blocks.
Vapor-permeable plaster for aerated concrete