The material for constructing a shed can be any building material.
But this article is devoted to expanded clay concrete blocks. Let's consider why it is advisable to use them for the construction of outbuildings, how to make the correct calculations and according to what rules for constructing the walls of a shed from expanded clay concrete?
We will discuss the important issue of material requirements for the construction of such premises, as well as whether it is necessary to make a design for the structure and how to do it.
No. 8. Foundation for a barn
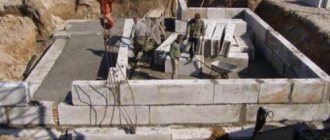
No matter how easy the construction, a foundation for a shed is necessary in any case. If you save money or succumb to the persuasion of laziness, and miss this important stage of building a shed at the dacha, then you may soon be faced with rickety walls. Of course, a powerful, labor-intensive foundation is not always necessary - it all depends on the material used in construction. Typically, the following types of foundation are used:
- block - the basis for the lightest sheds, incl. wooden. It is arranged using concrete blocks, which are installed on a sand cushion around the perimeter of the future barn in increments of 1-1.5 m. Financial and labor costs are minimal;
- Monolithic slab foundation is a universal option that can be used even in areas with loose soil. The arrangement process is simple and consists of preparing a sand cushion 15-20 cm thick and pouring cement mortar 10 cm thick; to guarantee it, it can be additionally reinforced with reinforcement. A significant advantage of this solution is the absence of floor installation work;
- a columnar foundation is a popular option for frame sheds; it is cheap and easy to install, but is not suitable for areas with difficult soil;
- a pile foundation can be used on any soil, it is quickly installed, but is highly expensive, so its construction is resorted to in the absence of alternatives;
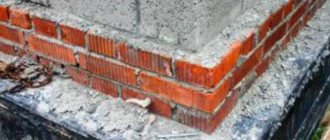
- strip foundations are the most labor-intensive, but the construction of heavy buildings (a brick shed, for example) is difficult to imagine without it. The strip foundation is erected using monolithic technology from concrete and using prefabricated technology from concrete blocks. An intermittent strip foundation can be used under the barn; it is not laid in a continuous line.
Website about the dacha
02/26/2019 admin Comments No comments
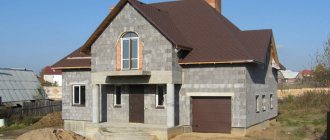
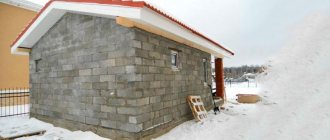
Many owners of private and country houses very often face such a pressing problem as the lack of suitable space to store the necessary work items and tools. This problem is solved by building a shed on your site. As a rule, lumber or ceramic bricks are used for these purposes, but today many choose cellular products, and this is a good choice, because a shed made of foam blocks is not only reliable and durable, but also ergonomic.
Installing a floor in a barn made of aerated concrete
The floor covering for the shed is selected depending on its specific functionality. If inventory is simply stored there, they can be ground or adobe. But since the owner decided to build a garage not from boards or corrugated sheets, but from aerated concrete, it means that he wants the room to be as warm as possible.
The structure of the floor largely depends on the structure of the foundation. If it's a stove, then there's not much to think about. You already have a concrete base, which can simply be covered with technical linoleum on a backing or board. If the foundation is strip, you can pour a concrete floor over the ground, but there is a lot of hassle with it. It makes sense to flood only if animals will be kept in the barn.
The structure of the floor is shown in the diagram:
Books on the topic:
Scientific and technical basis for the production and use of silicate cellular concrete - Alexander Fedin - 911 rubles - link to book review
Concrete mixtures. Recipe guide for builders and manufacturers of building materials - P. Mayorov - 166 rubles - link to book review
Floor installation. Materials and technologies - Lyudmila Zarubina - 127 rubles - link to book review
Handbook of a modern designer - Dmitry Mailyan - 194 rubles - link to book review
Pros and cons of construction from expanded clay concrete
How feasible it is to build a shed from expanded clay concrete products was written in the first subtitle. In fact, these are the advantages of such construction. But it is also worth mentioning the thermal insulation properties of the material:
- The porous structure of the elements creates the effect of a thermos, which retains heat in the barn. In terms of thermal insulation, expanded clay concrete is not inferior to wood and even exceeds brick in this indicator by about 3 times.
- The material is non-flammable and can withstand direct fire for 8 hours. This is very good, especially if the barn will contain animals or important equipment. You can have time to take them out (if the fire has not yet flared up), without worrying that the walls are about to collapse.
A not very significant disadvantage is that the utility room can be built no higher than 10 m. Usually such buildings are not built at such a height, so the disadvantage is not very significant.
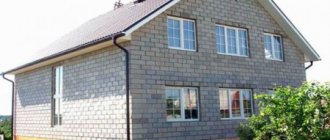
One of the disadvantages of the material is that expanded clay concrete needs finishing and external cladding, since the material itself does not look very attractive, and even without additional protection, the products can be deformed from the influence of moisture.
Instructions for laying walls with your own hands
Laying expanded clay concrete for a barn begins with digging the foundation.
Its depth should be from 30 to 50 cm. the walls of the barn in 2 blocks to retain heat in the room. This is especially important if pets and birds will live in the barn.
Even if only equipment is stored in the room, the heat will prevent these items from freezing up in the cold or becoming moldy from dampness. Barn partitions can be mounted in 1 block.
Masonry always starts from the corner of the room. The first masonry row must be mounted on a layer of waterproofing. Every second row starts with half a block to ensure that the seams are spaced apart. As you lay the walls, you must remember to leave space for window and door openings.
And in the room itself, it is important to install a ventilation system by making or leaving several holes in the wall for the flow of fresh air.
After the construction of the building, it is necessary to finish it - at least plaster the surface. Ideally, it should then be painted or decorated (if the interior of the site requires it). Internal walls can be sheathed with OSB boards or simply painted.
The shed should take about a week to build.
Strengths and weaknesses of expanded clay concrete buildings
The quality and durability of the structure directly depends on the material used. Therefore, you should be careful when purchasing building blocks. The surface of the products must be free of defects of mechanical origin - chips, cracks, scratches
You should pay attention to the shade of the blocks. The darker it is, the more cement in the composition - such products will be stronger
An indicator of the strength of any building block is its density. The higher it is, the harder and stronger the block. But its thermal insulation characteristics are less. Therefore, wall insulation must be performed. If we are talking about blocks made of expanded clay concrete, then products with fine fractional filler will be stronger.
Comparison of characteristics with other materials
When choosing expanded clay concrete blocks as a bathhouse wall material, you should know in advance about the strengths and weaknesses of the material. This will allow all stages of construction to be completed correctly and ensure the efficiency and durability of the structure.
pros
- The construction of walls occurs quickly. Laying can be done by one person. At the same time, there is no need to take a technological break for further internal and external work.
- The large size of the blocks and their light weight allow you to speed up the laying process. The transfer of blocks is carried out manually and does not require the use of special equipment.
- No special masonry mortars are needed to form masonry.
- The blocks are inexpensive, so they are a budget type of building material.
- The blocks do not require adjustment and allow you to get a flat wall plane the first time.
- Wall finishing can be done using most facing materials, as well as plaster.
- A bathhouse made of expanded clay blocks has a long service life.
- Savings also occur due to the fact that the walls do not require additional vapor barrier.
- Expanded clay concrete has a low water absorption coefficient and excellent thermal insulation properties.
Minuses
- Expanded clay concrete blocks are not recommended for the construction of a two-story building with an attic floor - the lower blocks will not withstand the load.
- Blocks are characterized by weak mechanical strength; they can be damaged even by a slight blow.
- Construction costs are rising due to the need for mandatory interior and exterior wall finishing.
- The foundation must be strong and stable.
As you can see, there are more advantages, but the disadvantages are easily eliminated. To build such a bathhouse, you can use it by choosing a project from a specialized construction organization. Or build a bathhouse from scratch. But first you need to perform detailed calculations based on the project.
Difficulties in work and typical mistakes
Some craftsmen, wanting to finish building a barn as quickly as possible, build the walls all at once. But you need to lay no more than 3-4 rows per day so that the stones do not shrink.
Also, some build not one row along the entire perimeter, but only one wall. But it's not right. It is necessary to lay the entire row at once on the sides of the entire building, so that in the end you can come out flush with all the walls. Otherwise, there is no guarantee that bringing the sides together will result in an even plane. And this will create difficulties in installing the roof.
The use of uncertified products, even for a shed, is strictly not recommended. Firstly, there is no confidence in the environmental friendliness of such a material and that low-quality additives or slag impurities have not been added to it. And secondly, such a product does not guarantee the strength of the products and the strength of the finished building.
The use of broken, chipped or cracked items is not permitted if these defects affect the integrity of the structure.
Possible difficulties and errors
When building a shed or garage yourself, some difficulties may arise. To minimize them when working with concrete blocks, you need to listen to the advice of experienced builders.
- To improve the adhesion of the material and the solution, it is advisable to walk over the blocks with a wet brush before starting work.
- It is better to use corners as jumpers.
- It is more convenient to distribute the solution by moving block over block, so it will lie more evenly.
- Each next block is placed at a short distance from the previous one, and then moved forward, capturing a little of the solution.
- It is not advisable to hit hollow blocks, as they may be damaged.
- If you have no experience in breaking concrete products, this can be done using an angle grinder.
- If the top row has unevenness, it can be trimmed using a hacksaw.
- You should check the diagonal between the corners more often, since it will be impossible to correct the error later.
Consumables and tools
When working with expanded clay concrete blocks for the construction of a utility room, you will need :
- Expanded clay concrete blocks.
- Cement-sand mortar and adhesive mixture (if the elements from the second row will be connected with glue).
- Reinforcement or reinforcing mesh.
- Waterproofing (roofing felt, bitumen mastic).
- Mixer or drill - for mixing the solution.
- Roulette.
- Pencil or marker.
- Level.
- Square.
- Order.
- Joining.
- Trowel, spatula, comb.
- A hacksaw or grinder with a stone disc.
- Mallet.
- Bucket and containers for solution.
- Concrete mixer.
- Shovel.
Calculator for expanded clay concrete blocks for home
One of the preparatory stages of construction is the design stage. After developing and agreeing on the project, it is necessary to calculate the need for materials. You can determine the required amount of building material yourself. Let’s take as an example a one-story house made of expanded clay concrete blocks with dimensions of 10x20 m and a ceiling height of 3 m.
The calculation can be made using two methods:
- by area;
- by volume.
When calculating the required number of elements according to the first option, we proceed according to the following algorithm:
- Determine the total area of the walls. In our case – (10+10+20+20) x3=180 m².
- We calculate the number of units of production per 1 m². For an element with dimensions 400x200x200 mm this is 12.5 pieces (1/0.4x0.2=12.5).
- We multiply the total area of the walls and the quantity by 1 m² - we get the required number of units of production - 180x12.5 = 2250 pieces.
How many expanded clay blocks are needed to build a house
The second calculation option is similar to the first, only when carrying out calculations they operate not with area indicators, but with the volumes of masonry and one unit of production.
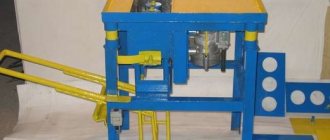
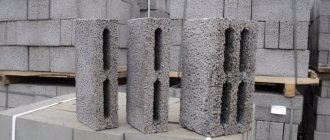
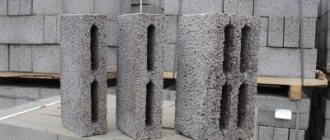
Block Features
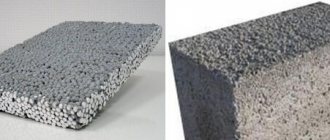
The composition of expanded clay concrete includes sand, cement and granulated clay. Blocks are formed by vibration pressing. By design, the block can be full or hollow - with rectangular voids. Due to the large size of the block and its light weight, the construction of walls occurs quickly.
The main difference from wood is the fire resistance of expanded clay concrete. The low coefficient of water absorption and the components included make the material biologically resistant. Another advantage of expanded clay blocks is their low cost. The disadvantages of the material include the need for mandatory insulation and external finishing of the building, and this is additional expense.
Structure of expanded clay concrete blocks
Flaws
Disadvantages of houses made of expanded clay concrete:
- Low building height. This is due to the lack of strength of the elements, which is only enough to build a maximum of a three-story house. In this case, the thickness of the walls must be at least 40 cm.
- Need for finishing. It is impossible to leave a house without external cladding for longer than 2 years.
- Unattractive appearance. Unfinished houses look gray and unkempt.
- The need to insulate the wall if its thickness is less than 40 cm. Although this factor is largely determined by the regional climate.
- High moisture absorption rate. The material is porous, so it quickly absorbs water. If it does not have time to weather and freezes, this will lead to gradual destruction of the structure.
- Difficulty of processing. Cutting expanded clay concrete blocks requires special equipment. Considering that the material is fragile, this process is fraught with a number of difficulties.
Expanded clay concrete - characteristics, advantages, disadvantages
Products made from lightweight concrete, the main filler of which is baked clay pellets, are in high demand in the construction of small private houses, as well as in the construction of country houses and auxiliary buildings. Expanded clay is a lightweight, environmentally friendly, porous and, at the same time, very durable material.
When binding pellets with cement mortar, a product is obtained that has many positive aspects:
- increased thermal conductivity. Thanks to the large number of air cavities inside the expanded clay, even a half-block house made of expanded clay concrete blocks perfectly retains heat in winter and coolness in summer;
- light weight. If you want to reduce the load on the foundation, expanded clay concrete blocks are used. Reviews from home owners confirm that reducing loads has a positive effect on the performance characteristics of the foundation;
- high strength characteristics. When you first get acquainted with the material, you may feel that building a house from expanded clay blocks is not justified due to its increased fragility. The material is indeed susceptible to impact loads. As for compressive forces, the composite is ahead of many building materials in this indicator;
- increased sound insulation properties.
Thanks to the same voids inside the filler, wall materials based on expanded clay are characterized by increased sound insulation. With proper sound insulation of window and door openings, even in a busy city, a comfortable noise level is always maintained inside such buildings; Expanded clay concrete block - environmental friendliness. Since only components of natural origin are used in production, the environmental friendliness indicator is quite high;
- low shrinkage rates. This indicator can be appreciated during the operation of the building. Even after a long period, cracks do not appear on the walls, as often happens with aerated concrete products.
Advantages that do not affect the quality of work, but improve mood when purchasing materials and during construction activities include:
- low cost of production. The use of readily available components in manufacturing allows us to maintain a price range accessible to most developers;
- ease of masonry. Small dimensions and weight of individual elements allow installation at an accelerated pace;
- increased surface roughness, which improves adhesion to finishing compounds and facilitates cladding work.
But when choosing a building material, you should not turn a blind eye to the disadvantages, which include:
- increased porosity.
The presence of a large number of air pores helps, on the one hand, to improve thermal conductivity and increase sound insulation properties, and, on the other hand, increases moisture absorption rates. Therefore, the construction of houses from expanded clay concrete blocks is associated with mandatory waterproofing of the walls; Expanded clay concrete block in section - reduced thermal conductivity compared to cellular concrete. In this regard, projects of houses made of expanded clay concrete blocks contain requirements for insulation of the box;
- appearance that needs additional finishing. Decorative panels, tiles, and siding can be used as cladding.
Why is it profitable to build a shed from blocks?
Blocks made from lightweight concrete have optimal technical characteristics, combining the properties of wood and brick.
By manipulating such material, you can achieve the following advantages:
- Despite its impressive dimensions, the product is distinguished by its acceptable weight, which does not require the use of technical devices and facilitates transportation;
- the dimensions of the blocks allow the construction of the structure at high speed;
- all types of block materials are good heat and vapor insulators;
- ease of processing;
- environmentally friendly, low susceptibility to combustion.
The final choice should be based on the availability of the material, the possibility of implementing external finishing after completion of the work, the economic component, and local conditions.
Suitable elements for walls
For the construction of cellar and basement walls, suitable expanded clay concrete blocks are solid and hollow blocks and semi-blocks made using a non-autoclave method and complying with GOST standards:
- 33126-2014;
- 6133-99.
The blocks are rectangular in shape, and the half-blocks are square. The structural purpose of expanded clay concrete products is that they are intended for load-bearing walls and are able to withstand certain loads, so their marking will always correspond to the indicators M500-M700 and higher.
To arrange partitions or interior spaces in basements, you can also use thermal insulation and structural type blocks, marked “P” (partition). They can also be used to arrange a second layer of blocks, following the load-bearing ones, so that the room has an even more comfortable temperature.
The second layer of expanded clay blocks is especially recommended for regions with low winter temperatures. Here you can also use slotted products, which are useful when performing thermal and waterproofing.
Regardless of appearance and dimensions, the block and semi-block have a gray tint, a smooth or rough surface. Hollow products, laid in alternation with solid ones, are good because they can be reinforced with small rods.
When drawing up a project, the specialist independently determines, depending on surrounding factors, what materials (solid or hollow) will need to be worked with in the process. Examples of blocks can be seen in the photo table below:
Preparatory work
Before constructing an object, its functional purpose is determined, for example:
- raising and keeping animals;
- storage of tools and equipment;
- use as a handicraft repair shop.
Shed designs with a combination of “compartments” for a garage, bathhouse, bathroom, and summer kitchen are popular.
Based on the purpose of the building, a drawing is made in which the locations of windows and doors are noted.
Based on this, a drawing of the room is drawn up, noting the dimensions of the building, the thickness of the load-bearing walls, the location of partitions, windows and doors. Standard for this type of structure:
- height - 200-240 cm;
- area - 6-9 sq. m.
Using the drawing, calculate the need for expanded clay concrete elements. Next, the project is tied to a specific territory. Outbuildings are located at a distance from the main premises or to the side of it. When planning to place a bathroom or outbuilding for animals in a barn, the structure should be built from the external boundaries of the house at a distance of up to 12 m, from the boundaries of the nearest plot - at least 4 m. If you plan to install a bathhouse or shower, the distance from the home is set at 8 m, to neighbors - more than 1 m.
Features and rules for constructing walls
Cinder blocks are used in the construction of various structural elements of a house: foundation, plinth and walls. The requirements for them will depend on this appointment. The strength parameter is the most important of them. According to GOST, slag concrete blocks are produced with modifications M10 - M125.
The foundation for cinder block houses is built from monolithic blocks M100 and M125, which have increased endurance to withstand a one-story house and a wall of at least 40 cm
It is important to carry out preliminary high-quality waterproofing of the foundation, since cinder block can strongly absorb moisture
The basement is also erected from monolithic blocks M100 and M125, no earlier than 7 days after completion of the foundation work. Before laying the 1st row of basement walls, waterproofing is carried out. The height of the seam is no more than 1.5 cm, otherwise it will certainly reduce the heat-insulating characteristics of the basement walls. Work on the plinth is carried out during warm weather.
The walls are erected after the base has stood for a month. For non-load-bearing walls, cinder blocks M25/M35 are used, and for load-bearing walls - M50 or more. To create a separate heat-protective layer of walls, the use of M10 cinder blocks is allowed.
Conclusion
There is absolutely nothing complicated in the construction of a non-residential structure, as we have seen. The recommendations are simple, the advice is rational, and all the work will take at most a few days (also find out how to build a garage from cinder blocks yourself).
If you are interested in this and are ready to get started, then in the video presented in this article you will find additional information on this topic.
Residential building project
It is best to order a schematic plan for the construction of a residential building with a full list of calculations from a local architectural office or from specialists from a construction company who will complete the work quickly and professionally. The project will be officially registered in the land registry, with a unique number assigned to it, on the basis of which further registration of the residential premises and its connection to communications will then take place.
The project, in addition to the diagram, fully describes the plan and sequence of work, taking into account the soil, area, location and other important factors
Particular attention is paid to the construction of the foundation and the study of soils, freezing characteristics and the proximity of groundwater passage
Here they use SP 45.13330.2012 (rules for the construction of earthworks and foundations), as well as SP 50-101-2004 (foundation).
For a one-story house, the diagram may look like this:
In order to calculate the required amount of materials yourself, you can use an online calculator.
The project includes the following details:
- geographical location, taking into account technical and sanitary standards;
- features of climate and average annual temperature;
- indication of requirements for soil, groundwater and communications;
- planned area, number of floors, number of rooms;
- type of foundation chosen;
- number of interior partitions;
- degree of frost resistance of blocks;
- process of wall insulation;
- door and window openings;
- roof type;
- wall thickness (pie);
- proposed connection to communications (type of heating, water supply, electricity, sewerage);
- types of expanded clay concrete that will be used, their dimensions and volume;
- the total quantity of all building materials involved, including insulation materials;
- selected types of finishes;
- possibility of influence of external factors.
All important calculations will be included in the project, in addition to the drawings. The building codes that you need to rely on in the process will also be indicated there. As for the dacha, it must be located, according to technical standards, 30 m from the nearest body of water, and located 3 m from the owner’s boundary between buildings.
Rules for drafting a project
The standard for building a shed is considered to be an area size of 6 to 9 m2. And the height of the building is from 2 m to 3 m.
The project can be drawn by hand on paper, or using a computer program, such as AutoCad.
It is important to immediately note the location in the project:
- windows;
- doors;
- gate
This will allow you to more accurately calculate the number of blocks required for construction.
The calculation of the project also involves choosing the desired type of foundation:
- Tape . It is used in sheds in which a lot of heavy equipment, hanging shelves, large and bulky items will be stored. The foundation must be strong to withstand such a load from the total weight of the objects. A strip foundation is an ideal option for such sheds.
- Columnar . Suitable if only a few things are stored in the outbuilding, then you can use a lightweight type of foundation - a columnar one.
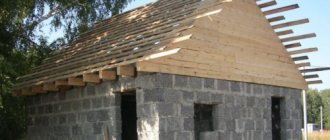
For sheds, it is best to install a shed roof with a frame made of wooden beams (the installation step of the beams is 1 m), so that the total weight of the roof is not very large. Sheets of slate are attached on top of the wooden frame.
To calculate the required number of expanded clay stones in a project, you need to:
- Determine the total area of the walls. Let's say the barn is 6 m in width, 9 m in length, 3 m in height. The area is: (6×3)+(6×3)+(9×3)+(9×3)=90 m2.
- Calculate the area of the windows (assuming that there are 2 windows 1.2 m wide and 1.2 m high). It turns out that the total area of the windows is: (1.2×1.2)+(1.2×1.2)=2.88 m2.
- Set the area of the doorway (width 1.2 m, height 2.2 m): 1.2 × 2.2 = 2.64 m2.
- Find out the actual area of the walls without window and door openings: 90-2.88-2.64=84.48 m2.
- Calculate the area of one expanded clay concrete block, taking into account its dimensions (for example, a standard block 200×200×400 mm): 0.2×0.4=0.08 m2.
- Calculate how many elements are needed to lay the walls. To do this, the area of 4 walls is divided by the area of one expanded clay concrete: 90/0.08 = 1.125 pcs.
You can take less material, because this figure does not take into account the thickness of the masonry joint. But it’s better not to do this and even add another 5% to the final amount, with the expectation of defects in the pallet or fights during work.
Using the same scheme, the required number of blocks for the internal partitions of the barn is calculated.
What are expanded clay concrete blocks according to GOST
Expanded clay concrete is classified as lightweight concrete. A porous material, expanded clay, is used as a filler. These are round granules made of baked clay. The composition of expanded clay concrete is cement, sand, expanded clay and water. When preparing the mixture, more water is poured than in ordinary heavy concrete, since expanded clay is hygroscopic and absorbs liquid. When producing blocks, the finished mixture is poured into molds, left until initial hardening, after which they are removed from the mold. In principle, the blocks are ready, but they cannot be used until they reach their design strength.
A house made of expanded clay concrete blocks can be built quickly
There are two technologies for bringing products to normal strength at the factory - in an autoclave and by vibration pressing. In the first case, the blocks are sent to an autoclave, where the material is treated with steam under pressure. This makes expanded clay concrete blocks more durable. The second method is vibration with simultaneous pressure. When vibrating, all voids disappear, the solution becomes more homogeneous and fluid, enveloping each of the expanded clay granules. The result is high strength indicators.
In artisanal production, the blocks are simply left to “ripen.” In theory, it takes at least 28 days until the concrete gains strength. But they can sell it earlier so as not to take up space. Nobody guarantees durability.
Round granules of expanded clay can be seen on the surface of the block. Depending on the brand, they can be of different sizes, in larger or smaller quantities
The fact is that for cement to gain normal strength, it is necessary to create a certain heat and humidity regime. In this regard, expanded clay concrete is more capricious than ordinary concrete. Due to the high absorption capacity of expanded clay, it can take up too much water. And the liquid will not be enough for the concrete stone to gain strength and not just dry out. Therefore, it is advisable to water the finished blocks and cover them with film at least for several days after production. They cannot be kept in the sun and the temperature should not be lower than +20°C. Otherwise, expanded clay blocks will never gain the required strength and will crumble even under light loads and impacts.
When it comes to price, factory units are more expensive. But still. If you are building a house, and not a utility block or barn, you should not save money and buy “garage”-made blocks. Quality is a big question here.
Is it worth using expanded clay for a utility room?
If we briefly answer the question about the advisability of building a shed from expanded clay concrete, then the answer will be unequivocal - yes.
Firstly, it is an environmentally friendly material.
It includes:
- cement;
- sand;
- water;
- expanded clay;
- additives to improve performance properties.
Unlike cinder block, expanded clay concrete is environmentally safe for humans , food and households that will live in the barn (chickens, rabbits, etc.).
During operation, the material does not emit toxins or other toxic substances that would be absorbed into objects located indoors and have a negative effect on them.
In addition, expanded clay concrete is mainly made in large blocks, which are equal in area to approximately 7 standard bricks. Therefore, working with this material will be especially easy and advisable for beginners . They won't have to level every little element. Instead, there will be large, convenient products with which the building will be built much faster and easier.
But since some people prefer to leave the barn with one masonry, without finishing the blocks with a decorative layer, it is not advisable for such people to build a barn from expanded clay concrete. Expanded clay concrete is a porous material that does not tolerate moisture getting inside it. Therefore, the direct action of rain and snow will very quickly destroy the installed elements.
The barn must either be built from expanded clay concrete, but then be sure to finish it with decor and a protective layer, or choose another building material.
Stone requirements
If the owner of the house still decides to use expanded clay concrete, then you need to make sure that it meets the requirements for the material for this building:
- Strength products for the construction of a shed can be minimal - from M15 to M35. The strength grade of the product should not be lower than the grade of cement used for masonry mortar.
The brands must be the same, otherwise cracks may appear on the walls. Sometimes the accompanying documents for the product indicate the release strength (the one that was immediately after pouring the solution into the molds) instead of the nominal strength, and this indicator is always less than the specified strength.But this should not be scary, since the blocks gain their final strength after 28 days after preparation. Therefore, if this time has already passed since the date of release of the product, then you can safely buy such products and not worry about their durability.
- Density – minimum D. Despite the fact that the barn is a non-residential premises, its walls will still bear mechanical load, both from the weight of the roof and from objects that will be attached to its walls. Therefore, the density of masonry products should not be the lowest.
- Frost resistance is at least F50, so that it is enough for 50 freeze-thaw cycles. With each such cycle, the strength of the product decreases, therefore, the higher the frost resistance, the longer the strength of the building will be maintained.
- Deviations from the specified dimensions should not be more than 3-4 mm in length, 3 mm in thickness, 4 mm in height and 3 mm in the evenness of the edges of the material. These requirements are specified in GOST.
- Dimensions . To construct the walls of a building, standard blocks measuring 200x200x400 mm are usually used.
Construction process
Any step-by-step instruction cannot ignore such a moment as the construction of a foundation. Since expanded clay concrete is relatively light, it is possible to form a strip base with a shallow depth
This is very economical, but when there is no complete confidence that the soil will be sufficiently stable, you will need to contact geologists to examine the area. If there is the slightest doubt, it is worth deepening the base of the structure below the soil freezing line. Strictly according to the drawing, the space is marked out to create future walls and internal partitions.
Further construction proceeds as follows:
- digging a pit;
- a cushion of sand and crushed stone is filled in;
- formwork is made under a monolithic foundation, reinforcement is placed and mortar is poured on top of it;
- as a replacement, a set of expanded clay concrete parts with fine grain can be used;
- wait until the foundation is stable (monolithic version - at least 30 days, and masonry made of expanded clay blocks - at least 7 days);
- the base is covered with a layer of waterproofing - not only the top, but also the side.
Next, they build a box, which they begin to mount from the highest corner of the base. Immediately after placing the first row of parts, their level is carefully checked, and if the slightest deformation is detected, they must be corrected with wedges. When working with your own hands or hiring builders, you cannot divide the construction of the box into stages. The shorter the time intervals between sequential laying of blocks, the better the result achieved and the lower the risk of making a serious mistake. In the same way, excess concentrations of solutions must be removed and seams unstitched immediately.
The most durable structure is created if every 4th or 6th row is reinforced. In large baths, the topmost row is sometimes reinforced with a reinforced concrete belt.
The construction of rafter systems and roofs does not differ significantly from the construction of similar parts of a residential building:
- first lay the beams;
- rafters are placed on them;
- a layer of waterproofing, vapor barrier and thermal insulation is created;
- the roof is formed (the choice of slate, tiles, metal or any other solution is determined by specific conditions).
External finishing, although not necessary for technical reasons, is very useful because it increases the evenness of the walls and their resistance to external influences. At the same time, the costs are relatively low, and the structure will be much more aesthetically pleasing. Brick cladding is not the only option; the use of relief plaster, plastered surfaces for painting, curtain wall facades and many other solutions has been developed. If a decision is made to additionally insulate a bathhouse, it is advisable to choose the most environmentally friendly materials; the same requirement applies to products that will be used to line the inside of bathhouse buildings.
Before finishing work begins, all communications must be carried out. Among all natural materials, the first place in finishing should be given to high-quality wood, since it best matches a traditional bathhouse. After finishing, it would be right to immediately install the stove, buy (or make your own) sun loungers and other furniture.
DIY gable roof installation
The shed was made of foam blocks. The roof is erected after the cement adhesive mortar has hardened in the following sequence:
- On the top row of the foam block wall we place a waterproofing material - roofing felt, folded in 2 layers. We fasten the mauerlat on top - wooden blocks 50x150 mm.
- We assemble the rafters on the ground, having previously cut out a gap for fastening to the Mauerlat, then lift them and mount them with metal fasteners.
- We lay under-roof insulation on top of the rafter system - a hydrobarrier film membrane. The layers of waterproofing overlap one another by 7 cm and are fastened with a stapler.
- The counter-batten is mounted with self-tapping screws, then the sheathing, after which the roofing material can also be overlapped.
We are putting out the outer trusses. We level them, strengthen them with the help of temporary stops (a board that is nailed to the wall during the construction of the house), and attach them to the mauerlat. We stretch the twine between the gables, creating a direction for installing the next trusses.
After completing the main work, you can begin to insulate the outer walls of the constructed barn, carry out internal work, and equip the barn with drains.
How to insulate a bathhouse made of expanded clay concrete blocks from the inside with your own hands?
The construction of a bathhouse on a country site is always a priority over other buildings. And more often than not, the house is still under construction, and water procedures are already being performed in the bathhouse. This building plays such an important role among Russians. Today, bathhouses are built from different materials: logs, bricks, expanded clay concrete blocks, cinder blocks, cellular concrete blocks.
But, as practice shows, a building made of any material must be insulated. For example, a bathhouse made of expanded clay concrete blocks. This material has excellent thermal insulation qualities. And still, experts recommend even insulation for him. How it's done?
Thermal insulation of buildings
Like any thermal insulation process, the insulation of a bathhouse is carried out in several stages. But before you start the process itself, one very important piece of advice.
Advice! When the conversation turns to insulating a bathhouse, an important question is decided on which side to carry it out from: outside or inside. Since baths are used periodically, it is better to do this from the inside. In this case, there is no need to warm up the walls and floor structures.
Selecting a thermal insulator
Before you start insulating, you need to choose the insulation itself. In principle, there are no special restrictions in this regard. And if earlier this issue was serious, then with the advent of vapor barrier materials, it has exhausted itself.
Therefore, choose any, although a reasonable approach is the choice of material with an optimal price-quality ratio. Eg:
- Mineral wool.
- Expanded polystyrene boards.
- Glass wool.
- Insulation based on other polymers.
Let's take mineral wool and use it to show how to insulate a bathhouse made of expanded clay concrete blocks. Again, we remind you that the process will be carried out internally.
- Mineral wool can only be installed on walls using lathing. Therefore, to do this, it is necessary to install vertical racks directly along the wall and secure them to it with self-tapping screws. Wooden beams with a cross section of 50x50 mm are usually chosen as vertical posts.
- The distance between the sheathing elements should be slightly less than the width of the mineral wool mat. The insulation must enter the space between the slats, pressing tightly against the slats. However, it should not extend beyond the edges of the sheathing. That is, its thickness should be 50 mm.
Advice! All wooden products must be treated with an antiseptic composition before installation. A bathhouse is a humid room, and although the entire thermal insulation cake will be reliably protected by a vapor barrier, you need to be on the safe side. As they say, God protects those who are careful.
So, the insulation has been installed, now you need to cover it with a vapor barrier. For this you can use different materials. There are special membranes made of polyethylene on the market, and there is foamed polyethylene itself, covered with a foil layer. There are a lot of materials, you can use any in the bath
The most important thing here is to install the vapor barrier in such a way that there are no gaps between the edges of its strips. Therefore, the strips are laid overlapping each other by 10-15 cm
The joint is also additionally covered with a special foil self-adhesive tape.
And the last stage is finishing the bathhouse from the inside. Most often, lining is used as a finishing material. It is stuffed horizontally directly along the installed sheathing.
Please note that this material has a tongue and groove connection. So the panels should be positioned so that the groove always looks down
Thus, the problem of moisture accumulation inside the lock joint is solved.