The TISE foundation is an abbreviation for the concept of “individual construction technology and ecology.” The inventor of this construction method is Rashid Yakovlev; this topic is discussed in as much detail as possible in his book “New Methods of Construction”.
This method is quite old, but it is still widely used due to a number of advantages and features.
TISE foundation - application
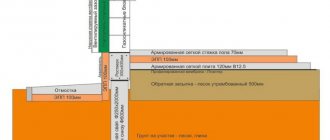
The TISE foundation is a pile-tape type foundation, which is formed from bored piles, widened in the lower part, and a raised reinforced concrete grillage.
Fig. 1.1 : Diagram of the TISE foundation
Such a foundation can be built with only a hand drill TISE F in the arsenal - a structure equipped with a cutting-expansion sleeve, which creates a dome-shaped widening at the bottom of the well.
Expert advice! The TISE method was developed and designed by R.N Yakovlev in the mid-nineties, this abbreviation stands for “Technology of Individual Construction and Ecology.”
The scope of application of TISE foundations is extremely wide; in fact, it is a universal foundation option for any individual construction projects.
The following types of buildings can be erected on the TISE foundation:
- One-story brick houses;
- Two-story buildings made of light materials - timber, logs, foam concrete and frame panels;
- Baths;
- Agricultural and non-residential technical premises - garages, workshops;
- Heavy brick and concrete fences.
In terms of soil conditions, TISE foundations have virtually no contraindications; they have proven themselves well in:
- Clay soil;
- Sandy soils;
- Loess and loam;
- Sandy loam.
The above soil types make up over 90% of all soils in the Russian Federation, which determines the widespread use of foundations built using this technology.
Rice. 1.2 : Scheme of operation of the TISE drill in the ground
The TISE foundation is a good analogue to classic strip foundations on heaving soil. Strip foundations, to minimize the risk of deformation under the influence of frost heaving, must be laid in the soil below the depth of its freezing, which, in most cases, is not economically profitable.
Expert advice! TISE foundations, being much cheaper, demonstrate high stability even in highly heaving soil, while possessing load-bearing characteristics sufficient for the construction of any one-story houses.
Minuses
It is worth paying attention to the disadvantages:
- the impossibility of construction by this method in regions on muddy or swampy soils. Large loads on the pile can cause cracks to appear or even break;
- When manual labor is used, labor costs increase. Although, today you can find special-purpose drills that make work easier;
- building a foundation can be done easily, but it is impossible to build a basement around the entire perimeter of the new building;
- mandatory presence of a wide blind area.
Despite the presence of minor drawbacks, this method is one of the most common for constructing foundations in difficult areas.
TISE foundation - advantages
The key advantage of TISE foundations is the simplicity of their arrangement - to build such a foundation you do not need to use the services of third-party organizations; if you have the required equipment and know the methodology, you can do the entire range of work yourself.
The second important advantage is the low financial cost of the project, which is determined by the minimum amount of consumable materials. As an example, let’s look at a comparison of concrete costs for pouring a strip foundation and a TISE base:
- A strip foundation, when laying a strip 30 meters long 70 centimeters deep into the soil (take the standard strip width of 40 cm, for one and a half masonry), requires the use of 8.4 cubic meters of concrete;
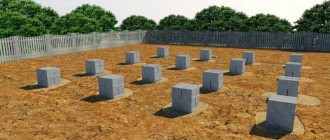
- To pour the TISE foundation, which consists of 20 pile supports laid to a depth of 1.2 meters, only two cubic meters of concrete are needed.
The absence of the need to use special construction equipment means that all foundation work can be carried out completely autonomously - there is no need to organize electricity and water supply to the construction site, which also affects financial savings.
Rice. 1.3 : Design diagram of TISE piles
In comparison with classic pile foundations, the TISE foundation is not demanding in terms of project implementation time - while screw and reinforced concrete piles need to be loaded with the weight of the building so that in winter they are not pushed out by heaving forces, the TISE support pillars, due to reinforcements in the lower part, can stand winter and without external load - this is the best option for a foundation for long-term construction, which will be implemented as funds become available.
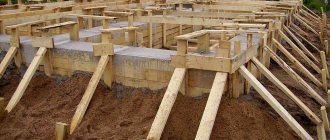
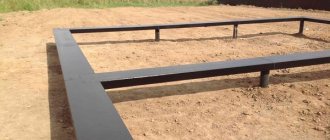
Pouring the grillage
The grillage is a tape that connects all the piles into a system; it gives strength to the structure. The grillage is made of metal, wood, or poured from concrete. Let's consider a grillage poured from concrete.
First of all, formwork is constructed. For this, plywood or boards are used. The material must be strong enough for the formwork to support the weight of the concrete solution. It is necessary to fill the soil under the lower part of the formwork (it is subsequently removed). The height of the grillage must be at least 30 cm, and reinforcement is required. When the structure is ready, polyethylene or other similar material is laid down to prevent cement from seeping through. Then a bunch of reinforcement is carried out. After this, you can begin pouring the structure with concrete.
The concrete is covered with polyethylene and moistened regularly. A month later, the supporting structure using TISE technology is ready for the construction of walls.
Using this technology, you can install a foundation with your own hands for a garage, a foundation for a fence, a monolithic foundation with a basement, as well as a foundation for a bathhouse.
TISE foundation - disadvantages
With the correct implementation of construction technology, TISE foundations do not have any significant disadvantages.
Of course, such foundations have limited load-bearing capacity, but if we consider them in terms of their intended purpose - the construction of medium-heavy one-story and light two-story buildings, this is not a disadvantage.
Expert advice! The only actual disadvantage of such a foundation is the impossibility of arranging a basement and ground floor.
It is also worth noting the need for additional insulation of the floor of the house - due to the fact that the grillage in the TISE foundations is raised, there will be a draft between the subfloor and the ground, from which the ceiling will be quite cool in winter. This problem is solved by arranging the intake and thermal insulation.
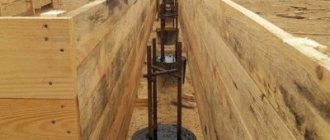
Rice. 1.4 : Blind area on the TISE foundation
Unlike pouring a foundation strip, the technology of which is extremely simple, drilling wells and subsequent formation of piles is a more delicate work, which, for the first time, is recommended to be performed under the guidance of a knowledgeable person.
Concreting
Due to the small diameter of the pile and the presence of reinforcement, it is quite difficult to concrete it. Therefore, this operation is performed according to the following scheme:
- The formwork is half filled with concrete.
- The compaction of the laid mixture is carried out using a vibrator.
- Pouring the remaining part of the pile.
- Re-sealing.
Piles using TISE technology - concreting
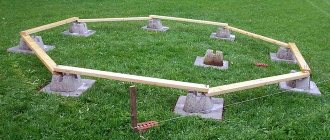
Foundation marking
Laying out the TISE foundation involves setting up a zero level (a line indicating the height of the grillage above the ground) and laying out the locations for drilling wells.
Expert advice! To mark the places for drilling wells inside the contours of the walls, an additional string is stretched, the design pitch of the support pillars is measured along it, and pegs made of reinforcement or timber are driven in at their locations.
Rice. 1.5 : TISE foundation marking scheme
The work is performed in the following sequence:
- Along the contour of the first wall in the ground, parallel to each other, two fence boards are installed. They should be mounted at a distance of 2-3 meters from the extreme points of the wall.
- Nails are driven into the cast-off material or self-tapping screws are screwed in, and a string is stretched between them, protruding as the outline of the building wall;
- The cast-off is driven into the ground so that the stretched string is located at the level of the design height of the upper edge of the grillage - this is our zero line;
- The next fence board is hammered onto a perpendicular wall so that the twine forms a right angle to the wall with the already marked outline;
- The remaining walls of the house are marked in the same way;
- Next, a distance equal to the thickness of the grillage is set aside from the marking corners, and the internal contour of the foundation is stretched.
Figure 1.6 : Scheme for fastening the bypass boards
Expert advice! To mark the places for drilling wells inside the contours of the walls, an additional string is stretched, the design pitch of the support pillars is measured along it, and pegs made of reinforcement or timber are driven in at their locations.
Drilling wells and pouring TISE piles
Wells for pouring concrete are created using a TISE-F hand drill, which allows you to form a widening with a diameter of 60 cm in the lower part of the well.
Rice. 1.7 : Sequence of arrangement of TISE piles
This stage of construction consists of the following operations:
- According to the completed markings, wells are drilled on the site to the design depth of the support pillars. The expansions are formed one by one, first the expansion blades are set to the first position - this is how you make a recess with a diameter of 50 cm, after which the blades are set to the final position and the expansion is brought to a maximum of 60 cm;
- Next, the body of the pile is reinforced, for this purpose reinforcing bars with a diameter of 12 mm are used. The rods must be the length of the TISE pile itself, so that the protruding rods can be connected to the reinforced frame of the grillage (the height of each rod is 5 centimeters below the zero mark of the grillage). The reinforcement bars are fastened together using transverse jumpers and binding wire;
- The well is partially filled with concrete M250-M300 (so that the concrete fills the widening), after which formwork is installed in the well from roofing felt or roofing felt rolled into a cylinder (the cylinder should protrude above the ground to a height of 15-20 cm), which is filled with concrete to the top cut. To prevent deformation of the upper part, the formwork is tied with wire and sprinkled with soil.
Figure 1.8 : TISE pile formwork ready for pouring concrete
Expert advice! TISE technology methodologists do not recommend installing sand cushions at the bottom of wells, citing the leakage of cement laitance into the sand and, as a consequence, a decrease in the design strength of concrete.
Grillage arrangement
TISE piles are tied with a reinforced concrete grillage raised above the ground to a height of 30-40 centimeters, the thickness of which depends on the design thickness of the walls of the house.
Figure 1.9 : Sequence of work on tying the TISE foundation
Important! The grillage is subject to mandatory reinforcement with a reinforcement frame, while the reinforcement frame of the strapping must be rigidly connected to the protruding reinforcement and piles.
The sequence of work on arranging the grillage is as follows:
- The upper edge of the support pillars is covered with bitumen mastic (any waterproofing material);
- Along the perimeter of the inner and outer contours of the cast-off, wooden stakes are driven into the ground, which will later act as formwork clamps;
- A bedding of sand is made along the entire width of the grillage, the level of which should correspond to the height of the elevation of the piles above the ground - the bedding will hold the grillage until the concrete has completely hardened;
- Planed boards 2-3 centimeters thick or OSB boards are nailed to the installed stakes. The bottom edge of the boards should rest against a layer of added sand;
- The entire length of the formwork is covered with waterproofing material;
- A reinforced frame with two upper and two lower longitudinal contours connected by transverse jumpers is knitted from reinforcing bars; after laying, it must be recessed into the formwork by 4 centimeters on each side;
- The formwork is poured with concrete mixture. After pouring, the concrete is bayoneted with reinforcement, this is necessary to remove the air cavities formed in it.
Rice. 2.0 : Grillage formwork before pouring concrete
Expert advice! Dismantling of the formwork and work on the construction of the walls of the building is carried out no earlier than 28 days after pouring the grillage.
Pile reinforcement
This procedure is necessary in order to:
- during frost heaving of the soil, the wide part of the TISE pile did not come off;
- the pile did not shear under pressure.
Reinforcement of the TISE pile is done using 10–12 mm reinforcement. Usually two rods bent in the form of staples are used. You can also use four rods connected with wire at the top.
For reinforcement, it is allowed to use metal rods, corners or strips. It is not recommended to use pipes - if groundwater gets into the cavity and freezes, there is a high risk of column destruction. The reinforcement must be located at a distance of at least 4 cm from the edge of the well.
TISE foundation - current prices
If you do not have sufficient experience to correctly implement the technology described above, it is recommended to entrust the arrangement of the TISE foundation to professionals.
The average cost of services for the construction of a TISE foundation today is (including work and materials):
- 4-4.5 thousand rubles per linear meter of reinforced concrete grillage.
- 3-3 thousand rubles for the installation of one TISE pile.
When installing a reinforced grillage (the reinforcement frame on each circuit consists of 4 reinforcing bars, and not 2, as in the standard version), its cost increases to 5 t.r./l.m.
A standard foundation for a two-story wooden house with an area of 10*10 sq.m, when ordered turnkey, will cost you around 300-350 thousand. rubles
Drilling of the wells
Building a foundation is a fairly lengthy process that requires attention and effort. To optimize your strength, it is recommended to drill several wells (maximum depth - 3 m), and then expand them. This can save time on re-equipping the drill.
If the soil is difficult to drill, this indicates that there is not enough sand in its composition. This situation can be corrected with water. It is necessary to pour 5 buckets of water into each well overnight. The very next morning, drilling wells will be much easier.
Site preparation
This is one of the main stages on which the service life of the future structure depends.
The technological sequence is as follows:
- remove the fertile soil layer and prepare sand;
- install cast-off;
- explore the site;
- calculate and mark the site, considering the location of the pillars.
Of course, the soil layer may not be removed, but in this case it is necessary to make the floors of the building especially high quality. Then it is better to make the grillage itself hanging.
The expansion of the TISE foundation pillar must necessarily be below the depth of soil freezing
Boers
To construct a bored pile, special hand drills of the TISE-3F type are used. The design of such instruments is very simple.
- Telescopic rod 1.4 meters long. A handle is installed on top of the rod. Additionally, the kit includes a 1.0 m extension cord.
- To expand the bottom of the well, a plow is mounted on a movable bracket between the rod and the drill. It is released at the depth where expansion should begin.
- The drill itself is attached to the bottom of the rod. It has 4 cutters for different areas of work. The drill body itself is a container for collecting and removing soil.
- After marking the location of the piles, the turf is removed from the drilling site. Then, exactly in the center of the future pile, using a shovel or a special device (included in the kit), a round hole 0.15 m deep along the diameter of the drill is dug.
- We remove the plow from the bar and install the handle on top.
- We set the initial length of the rod. 3 holes are drilled in its body for gradual lengthening as the depth of the well increases. If you need to use an extension, then remove the handle, add an extension to the bar and put the handle back on.
- When drilling, as soil accumulates in the container, it is lifted, released and the process continues. During work, pay special attention to the verticality of drilling, constantly check the level. The diameter of the pile will be small, and concrete does not work well under bending loads. The pile may simply break!
- When you reach the design mark, begin expanding the bottom of the well. Unscrew the two bolts on the container. Install and secure the plow. It should be noted here that the plow can be installed in three different positions. To extend the bottom by 400, 500 and 600 mm (see instructions). Screw a rope to the bracket and lift the plow into the transport position.
- All that remains is to lower the plow into the hole, release the rope and, turning counterclockwise, widen the bottom.
- It is advisable to work together.