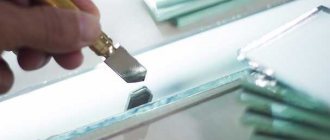
Construction mixtures help level the surface before continuing work. They are presented in a wide range. You need to understand how wallpaper putty differs from plaster, and you should also learn how to use this material correctly. Before performing finishing work, it is necessary to carefully level the surface, for which only certain compositions are suitable.
How does putty differ from plaster?
The names of the materials are partly similar, but the structure is significantly different.
The difference lies in the purpose and properties:
- putty mixtures
(aka putty) are used to level surfaces that have only minor defects - small cracks, chips, unevenness and level differences of up to 1 cm;
- plaster
designed to remove more significant defects, it is used to level surfaces with level differences at different points of up to 15 cm, respectively, such mixtures are used for work on rough foundations, in addition, they often exhibit thermal insulation properties and protect the supporting structure/partition from moisture .
The structure of starting mixtures for putty is looser. This is due to the fact that in most cases the finishing composition will be applied on top. Such materials, on the contrary, create a smooth coating. Their structure is fine-grained. As a result, when leveling, grains on the surface are not visible. This option is suitable for putty under wallpaper.
Preparation of putty from a dry mixture
To prepare a thick plastic composition you will need a clean container, water, a spatula and a drill mixer.
The finished solution should not slide over the surface, and there should be no lumps in it.
- You need to pour water into the container, then add the dry mixture to the water.
- The putty is first stirred with a spatula, and then brought to a homogeneous state with a drill-mixer.
For the starting layer, it is better to prepare the solution in small portions so that the mixture does not have time to dry out during the application process.
What materials will be needed to level the walls?
The choice is made taking into account the condition of the surfaces.
If necessary, significant defects are removed using plaster. But it should be borne in mind that this material will not be able to remove small cracks - large fractions in the composition make it difficult to obtain a smooth surface and completely fill the area with unevenness. On the contrary, starting putty can eliminate more significant defects.
This feature expands the scope of application of the material.
In addition, to level the walls you will need:
- starting and finishing putties
, most often such materials are used in tandem, because they complement each other’s properties;
- primer composition:
ensures reliable adhesion of subsequent layers (starting putty with plaster, finishing coat with starting putty, as well as wallpaper), selected taking into account the properties, it is best to use a primer with antiseptic additives;
- reinforcing tape:
used when finishing drywall - this method is used to increase the reliability of the areas where the joints of gypsum board sheets are located;
- wallpaper
: not only are selected taking into account personal preferences, but also take into account the condition of the base surface; the smaller the defects, the wider the choice of decorative coating, since some of its varieties exhibit more unevenness, which worsens the appearance.
Puttying on beacons
Reminds me of a similar method of applying plaster. The thickness of the wall is set using beacons, which are set according to the level. To level the putty, use a rule that is established between two beacons. This method is rarely used due to the significant costs of material.
About plastering walls using beacons, read the article: “A simple way to plaster walls with your own hands: step-by-step instructions”
Types of putty for interior decoration of premises, walls in an apartment - choose which one
First, pay attention to the composition of the material.
The main components are:
- gypsum;
- cement;
- lime;
- polymer material;
- adhesive base.
Each of them has features. When choosing putty before gluing wallpaper, take into account that gypsum compositions are characterized by plasticity and high drying speed, but this type of coating is not strong enough and absorbs moisture.
Cement compositions
They are reliable, but are subject to shrinkage during drying. They can be used for work in rooms with high humidity. Cement putty is also suitable for wallpaper. Cement mixtures are often used to level brick and concrete walls.
Lime compounds
are also used, but less often than others. This is a simple material that can be used for leveling and finishing surfaces. The mixture is plastic, thanks to the cement in the composition it gains strength.
Polymer plaster
- a suitable option for finishing putty. Used to fill various irregularities (chips, cracks). The material is characterized by plasticity, due to which it can withstand significant shrinkage deformations of structures.
Adhesive compositions
cover the surface evenly, resulting in a thin protective layer. At the same time, the mixture levels the walls and eliminates minor defects. It is used to cover concrete, wooden structures, as well as plastered walls (and in the case of applying starting putty), including cases when it is planned to glue wallpaper on top.
Starting putty for walls: which is better
This type of material is used in cases where there are small but visible defects. Any irregularities will appear under the wallpaper. In the kitchen, you should use a composition that is resistant to moisture. Then the putty walls will remain attractive for a long time. If you plan to use a cement mixture, first prime the base; without this, the adhesion of the materials will be worse in this case.
When working with starting putty for walls under wallpaper, take into account the permissible level difference - from 3 to 20 mm. Surfaces with such features will be easy to level using this type of material.
For work in rooms where the humidity level does not exceed normal, it is permissible to consider compositions with the designation KR on the packaging.
To decide which putty to choose for walls under wallpaper, it is recommended to study the rating of the best manufacturers of ready-mixes.
Among them:
- Knauf
— the material is applied in small quantities, as it smoothes out defects well, the maximum layer is up to 1.5 cm;
- Osnovit-Ekonsilk
— it is important to apply a coating no thicker than 1 mm, otherwise cracks will appear when drying;
- Volma-Standard
— suitable for dry rooms, because it contains gypsum.
Finishing putty: which is better
It must be remembered that large defects cannot be leveled using such material. The finishing putty will retain its properties if applied in small quantities. Moreover, it is important to follow the operating rules (taking into account air parameters) in order to extend the service life of the coating.
Rating of the most suitable compositions:
- Knauff
— Uniflot wall putty. The mixture does not shrink when dried; on the contrary, it only gains strength. Available in durable bags containing dry mixture.
- Fugenfüller (Knauff)
. It is used to eliminate gaps, small cracks, as well as joints between sheets of drywall. This is a harmless material that has no odor.
- Rotband
. Another type of composition of the Knauff brand. It is a gypsum putty. The permissible layer thickness is from 3 to 10 mm. The disadvantage is the high drying speed. This means that you can work with the finished mixture for no longer than 20 minutes.
- Ceresit
. Consider different materials of this brand. It is recommended to prime the surface first. Such mixtures behave better when applied to moistened brick or concrete walls, which is explained by their porous structure.
- Eunice
. Along with Knauff brand materials, such compositions are characterized by whiteness, which is considered a good indicator. Another advantage is high ductility.
- Weber veronit
- a good budget option. But this material has a drawback - low drying speed. In addition, it is used for finishing walls in rooms with low humidity levels.
Finishing putty for wallpaper: which one is better?
If the decorative coating is dense enough, it is not necessary to smooth out the smallest defects. The drawing will further hide them. But in most cases, the wallpaper shows almost all the irregularities, so it is better to prepare the surface.
When choosing which putty is best for walls under wallpaper, first of all pay attention to the following options:
- gypsum (for dry rooms);
- latex - universal mixtures.
Manufacturers chosen are Vetonit and Knauff. The compositions are similar in properties.
Advantages of the products of these brands:
- smooth surface after leveling;
- Easy to process; to remove unevenness then just use sandpaper.
Disadvantages include moderate adhesion and low strength. But, given that wallpaper does not contribute to the weight of the supporting structure/partition, it is not necessary to use compositions with an increased level of reliability.
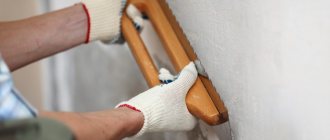
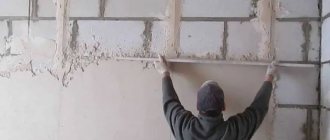
Applying the starting layer
- At this stage, you don't have to worry about trowel marks. The main thing is to maintain an even surface geometry.
- The spatula should be held at an angle of 30 degrees to the wall. Using a small spatula, you can apply the mixture onto a large spatula or on a trowel, then spread the solution over the wall.
- The composition is applied diagonally. Adjacent layers are applied overlapping so that no bumps appear on the wall.
- The starting putty is applied in two stages. The first layer must be allowed to dry, then we again check the evenness of the plane with a level. All distortions must be noted; they are eliminated when laying the second layer.
How to properly putty a wall for wallpapering - step-by-step instructions for applying to plaster
It is necessary to determine the alignment method:
- starting putty;
- finishing;
- combined option (involves alternate application of starting and finishing mixtures).
In the first case, a starting solution is sufficient, but this option does not allow obtaining a smooth surface. If the wallpaper is thick, with a bright relief pattern, you can use this method to level the walls. But this option is used less often than others.
The most common methods: applying only the finishing mixture, using a combined method. The difference between them is the need to use starting putty. This material does not need to be used if the rough base is smooth and has no obvious defects. Small irregularities are removed with the finishing mixture.
If the question of which putty is best to putty on walls under wallpaper is being decided, most often a combined option is considered. This is due to the fact that when constructing objects, workers do not always carefully level the surfaces. As a result, streaks and sagging remain, and level differences are formed in different sections of the wall. Such defects are corrected in 2 approaches: first, apply the starting mixture, then the finishing mixture.
Puttying the walls before wallpapering is done several times, but it is important to wait until the previous layer has dried. Only then the next one is applied.
Is it necessary to putty the walls before wallpapering with starting and finishing putty?
This is the classic alignment method. It is always used whenever possible. This will allow you to withstand the technology of wall finishing. One of the problems that is solved in this case is to strengthen the supporting structure, which will make it possible to support decorative finishing of significant weight. But if the question of how to glue wallpaper is resolved, then there is no need to apply different types of putty. This is a light coating, so often only the finishing mixture is used.
Advantages of puttying walls under wallpaper:
- increased adhesion;
- reduction of glue consumption;
- elimination of minor defects.
Wallpaper cannot be glued to plaster without additional coating. A coarse-grained mixture will prevent the material from being properly fixed. Due to low adhesion, the wallpaper will soon come off the wall. The starting mixture before the finishing mixture is most often used on top of brickwork and concrete structures. The result will be the same as in the case of gluing wallpaper over plaster, i.e. not very good. The service life of the decorative coating will be reduced.
Do I need to prime the walls before puttying?
The first mandatory step is the use of leveling mixtures. Priming is another way to improve the properties of the rough base.
This composition simultaneously solves several problems, including:
- normalization of the absorbency of the treated surface, which allows reducing the consumption of wallpaper glue;
- increasing the adhesion of the material to the rough base;
- reducing putty consumption (walls are primed before and after leveling);
- strengthening the surface layer of the coating, which does not allow the putty to crumble, and this is an important nuance when working with wallpaper;
- providing protection against fungus and moisture.
If for some reason it is not possible to use a primer or the information on how to properly putty walls under wallpaper was not studied in time, then you are still allowed to proceed to finishing with decorative material, skipping this stage. But as a result, it will be difficult to predict how the coating will behave in this case.
Wall putty tool
Often the leveling material is produced in the form of a dry mixture. Learning how to prepare a working solution is much easier if you have a special tool. When mixing the mass with your own hands, mistakes are made, which leads to a decrease in the quality of the finished material. But this is the only way to gain experience in working with building mixtures. If you don’t have time to experiment, you can immediately move on to finishing.
Tools for finishing putty on walls under wallpaper with your own hands:
- drill with a special attachment - mixer;
- spatulas of different lengths, with smooth and serrated edges;
- rule;
- building level, plumb line;
- roller and brushes;
- special devices, materials for removing minor defects after the putty has dried - sandpaper, graters;
- container in which the solution will be mixed.
How (how many times) to apply putty to the wall before wallpapering - technology
Sequencing:
- Prepare a solution (instructions are given by the manufacturer of each type of material); there is no universal scheme for mixing putty with water. The consistency is always the same - creamy.
- Starting putty is applied to the primed surface. To do this, use a wide spatula. It is held in the hand at an angle of 30°, the direction of movement is diagonal to the wall.
- The next layer is finishing putty under the wallpaper, applied after priming. The break between leveling processes is from 12 to 24 hours. You need to wait until the starting mixture is completely dry. Use large and small spatulas. The thickness of the layer depends on the type of material (1-10 mm). The resulting surface should be smooth. If necessary, apply several layers. Each of them is primed.
Use sandpaper or a grater to remove small irregularities. This should be done when the top layer of material has dried.
Is it possible to apply putty to level walls on paint?
The use of paints and varnishes allows you to create an impermeable film on the surface of the supporting structure/partition. If you try to apply the building mixture on top, it will not stick. It’s better not to even deal with the issue of how to putty the walls with your own hands. The quality of fixation of the decorative coating will be below average.
If possible, remove paint. Water-based is easy to wash off. Other types of coatings are removed as thoroughly as possible using special compounds that destroy the paint, or using mechanical action (scratching, sanding).
Maximum layer of putty on walls after plastering
The following options are being considered:
- apply several layers with a thickness of 0.5-3 mm, this facilitates the leveling process, but the implementation of the method takes more time and increases the consumption of the mixture (this option can be used by beginners in the construction business);
- many layers of smaller thickness are applied - up to 0.5 mm, the number of stages when creating a coating often reaches 5 or more, this option is more difficult to implement.
Grouting walls after puttying - detailed instructions for beginners
If minor defects remain on the surface, there is no need to reapply the leveling mixture.
Just follow the instructions:
- Treat uneven areas with coarse sandpaper.
- Even smaller defects are smoothed out with fine-grained sandpaper. If there are a lot of irregularities, you can immediately take a mesh for sanding. It does not clog as quickly as the previously discussed tool.
- Sanding is carried out at each leveling stage, when the next layer of putty dries.
- During work, you should not enter an already treated area, this will lead to the appearance of depressions and new irregularities.
They check the quality of grinding using a flashlight - they illuminate the surface with it, even if the work is done in good light during the day.
Overhead light does not contribute to the appearance of all defects. When the work is completed, remove the microparticles that have separated from the coating.
How to do the work yourself?
- At the preparatory stage, cracks on the surface must be widened and oil stains must be degreased.
- Deep cracks are filled with polyurethane foam, acrylic sealant, recesses up to 5 mm are filled with starting putty with a serpyanka gasket.
- Copper in the room should be covered with insulating material (polyethylene).
- After the fragmentary finish has dried, use a construction vacuum cleaner to remove dirt and dust.
Puttying process:
- Apply 2 layers of concrete contact with a drying break.
- Apply the primer with a long-haired nylon or fur roller.
- Apply a strip of mounting adhesive along the width of the reinforcing mesh (1 m) with an allowance of 5 cm at the edges.
- Fix the fiberglass at the top edge of the wall, using a herringbone motion, remove bubbles with a plastic spatula.
- Accelerate the air, moving from the middle to the edges, do not press on the tool.
- Apply 1 layer of penetrating primer, wait until dry (3-4 hours).
- Mix the solution with a construction mixer until there are no lumps and a paste-like consistency.
- Follow the instructions on the package, the average proportions are 5 liters of water per 25 kg of mixture.
- Let the solution sit for 3-4 minutes, stir again.
- Using a 450 mm spatula, apply a layer of the starting composition to the strip without pouring.
- Apply the composition with horizontal or vertical movements in the direction of lighting.
- Maintain a thickness of 1-1.5 mm, cut off the solution with a spatula immediately after application.
- After the starting coating has dried, apply 2-3 layers of the finishing solution in the same way.
- After the final coating has dried, sand the surface using a circular float with a P180 nozzle.
Reinforcing mesh is necessary to prevent cracking of the putty and enhance adhesion. If the surface is being prepared for wallpaper or panel cladding, then sanding can be neglected. Before decorative finishing, apply 1-2 layers of penetrating primer. After sanding, it is recommended to dust the surface with a construction vacuum cleaner. Do not use a damp cloth.
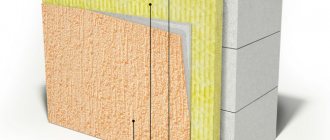
Putty for concrete surfaces must have elasticity and thixotropy (liquefaction and increase in viscosity when drying).
Attention
Acrylic compositions are suitable for wet rooms and facade work, and gypsum compositions are suitable for interior work.
Which putty for interior work should you choose for walls for wallpapering?
Among the variety of materials, you need to choose the right composition that is most suitable for working under the given conditions.
When you putty walls under wallpaper with your own hands, it is best to use the following types of mixtures:
- gypsum;
- polymer;
- cement.
The properties of each option were discussed above. At this stage, the value for money is assessed. The mentioned mixtures are the most suitable, especially if you have to level a large surface area.
The choice is also made taking into account the structure of the material. There are ready-made mixtures and dry formulations. It must be remembered that the first option cannot be used for leveling walls; if you have to apply a layer more than 2 mm thick, this will lead to deformation of the coating due to shrinkage.
Corner processing
You need to start working on the walls with a distance of 5 - 10 cm from the corner. In order to properly cover the corner with putty, you need to first treat one plane, then let it dry and treat the second. The corner can be brought to its final state using an angle spatula.
Preparatory stage
Read also: Latex paint or acrylic: what is the difference and which one is better to choose for different types of work (Photo & Video) + Reviews
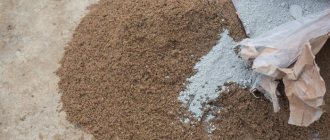
A properly diluted dry mixture is homogeneous in consistency.
When using a ready-made composition, the step of mixing the putty is skipped, and for dry mixtures proceed as follows:
- 2.5 liters of clean water are poured into a 7-liter container.
- Gradually pour the mixture into the water in a thin stream until a mound forms above the surface of the water.
- Put a mixer attachment on the drill and quickly mix the mixture until it has a homogeneous consistency without lumps. It is recommended to stir for at least 2-3 minutes
- The composition is allowed to stand for 30–60 seconds and a second batch is made. After this, the putty is ready for application.
If, when stirring, the mixture turns out to be thick or liquid, it is not recommended to add either dry material or water. It is best to knead a new portion, taking into account previous mistakes.
The preparatory stage also includes the processing of construction tools: the spatula blade is wiped with a clean, lint-free material, the buckets are washed and wiped dry.
Lumps from previously used mixtures are removed from the mixer attachment. If this is not done, future work with the new composition will be greatly complicated.
The walls to be treated are cleaned of the remnants of previous finishing: wallpaper, paint, plaster.
Technology
The technique for applying plasters is the same for any composition. What matters is only compliance with the recipe indicated on the packaging (ratio of water and dry mass) and the time within which it must be used. Otherwise, the plastering technique is the same.
Preparing the base
Work begins on a dry and clean base. If there is an old covering, everything that can fall is cleaned off, cracks are opened, screws and nails, remnants of wallpaper and other coverings are removed.
As sad as it may be, both paint and whitewash must be removed. Paint for the reason that the putty does not stick well to it, and if it does stick, it may later fall off. The whitewash is removed because it is loose. With it, after priming, adhesion is normal, but after a while the finish begins to crack and peel. If you don’t want to redo the ceiling or wall again in a year and a half, you need to clean off the lime.
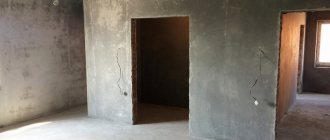
This is what the prepared surface looks like
After the old coating is removed, remove the dust. If you have an industrial vacuum cleaner, you can use it (you can’t use a household vacuum cleaner - it will break). If you don’t have such equipment, you can first go over it with a dry broom, then with a brush, and finally with a slightly damp cloth to collect the residue.
Primer
Priming walls under plaster is used to ensure that the materials adhere better. Its second task is to reduce the amount of moisture absorbed by the base. This is very important on porous surfaces such as brick, dry plastered wall, etc. On walls that are loose and prone to crumbling, special deep penetration compounds are used. They bind particles of material to each other, increasing the overall strength of the base.
Priming drywall
Gypsum is an extremely hygroscopic (moisture-absorbing) material. It is because of this moisture that it collapses. Even if you take moisture-resistant drywall, it is undesirable to use it in rooms where humidity is high - the ingress of water is detrimental to it.
Therefore, priming the drywall is advisable, even if you do not intend to putty or tile it afterwards. Due to the primer, the moisture resistance of the gypsum material increases and the gypsum layer is compacted.
Whenever installing drywall, it is necessary to putty the joints and screw heads. The seams and spaces around the screw heads are primed for better adhesion to the putty.
If sickle tape is used on drywall seams, then priming is required before laying it and after sanding the laid seams for the final finish.
Calculation of the amount of putty
Read also: TOP 8 Best ceiling paints: priority on reliability and durability. Review of the most popular manufacturers
Calculation of the amount of material is done taking into account the area of the working room
The amount of dry leveling mixture for treating a room is calculated according to the following parameters:
- room area minus door and window openings
- primer consumption (usually indicated by the manufacturer on the packaging)
- number of layers (minimum 3: 1 starting and 2 finishing)
- application thickness (calculated for each layer)
- stock (10–15% of the result obtained)
So, to level the vertical planes of a standard room 5 by 6 meters, with ceilings 2.8 m high, two windows and a doorway, according to average calculations, you will need 5 bags of dry mixture (25 kg each).
Types of putties
Read also: Decorative panels for interior wall decoration: how to choose a reliable material (110+ Photos & Videos) + Reviews
Ready-made mixtures have the required viscosity, but are more expensive than dry ones
Depending on the composition, putty mixtures are:
- Oil-glue. They are considered an obsolete material that is not recommended for use due to the drying oil in the composition. The oily base soaks into the porous concrete and then appears in sloppy patches on the wallpaper.
- Gypsum cement. Dry mixtures for use are diluted with water and mixed. The coating turns out to be quite thick and is best suited for processing before wallpapering. Can be used everywhere: for interior work in dry and damp areas. For distinction, it is marked with the indices LR, KR, VH
- Water-dispersed. Such putties also contain cement and gypsum, but they do not need to be diluted. The mixtures are sold in plastic buckets immediately in finished form, already mixed with a polymer emulsion. Such products are characterized by increased smoothness and strength.
- Acrylics. The highest quality and most convenient to use formulations. Their only drawback is their high price. They allow you to achieve a perfectly even coating, so they are rarely used for puttying under wallpaper.
Choosing tools
It won’t take much time to understand how to putty walls with your own hands. First of all, you need to understand the tools. The work is carried out using spatulas, which are flat metal plates with a handle. They vary in shape and size.
Types of spatulas:
- the largest - façade - with a width of 30-60 cm is intended for external decoration, which does not in the least interfere with its use indoors. In addition, it will serve as a convenient “easel”. In order not to constantly reach for the container where the mixture is located, the plastic mass can be placed on a wide plate, armed with two tools at once. The blade is made of carbon steel, so it does not bend;
- painter - this is what they will have to do when distributing the mixture over the walls and ceiling. It is made of stainless steel and bends well without breaking;
- angular - its plate is bent at a right angle.
It is better to work with a paint spatula at first. It doesn't take much time to master it. It is lightweight and very comfortable. In addition, it will be easier for a beginner to master one instrument than three.