Preparing walls for plastering is an intermediate procedure between leveling the walls and applying a decorative layer. This stage is considered one of the most important, since the quality of the work determines the future appearance of the surfaces, their service life, as well as strength and resistance to moisture, temperature changes, and so on. Most decorative plasters do not require perfectly smooth walls, but their surface must be clean.
It should be immediately noted that preparing walls for decorative plaster is practically no different from preparing for painting or wallpapering. With the clarification that such a plastic material as decorative plaster can smooth out some unevenness and close cracks or small potholes. Before you begin preparing the surface for plastering, you need to stock up on the necessary tools and materials.
What is needed for preparation
Preparing walls for decorative plaster requires the following tools and consumables:
Tools necessary for preparing walls for decorative plaster
- spatulas;
- building level and plumb line;
- sandpaper, sanding machine with polishing and cutting wheels;
- paint brush;
- drill with impact function (the hammer drill is too heavy and powerful for this work);
- plastic film, masking tape or tape;
- sponges and rags;
- screwdrivers;
- mixer attachment;
- mixing container;
- putty;
- solvent;
- primer.
A spray bottle may also be required. If the walls were previously covered with wallpaper, then they may have to be soaked using this product.
Putty technology
It is important to choose the right putty materials. They should not be based on oil-based adhesives, alabaster, etc., which block absorption. Also, you can’t start putting putty until the soil has dried. On average, this may take from 3 to 6 hours.
You need to apply at least two layers of putty. If the wall has significant unevenness, then you will have to putty in 3 layers. Moreover, before applying the next one, each layer must be allowed to dry for 6 to 10 hours, having previously been primed (a universal primer is used for this).
The surface cannot be forced to dry. Drying should take place at room temperature. Then it is important to sand all surfaces thoroughly using fine-grained sandpaper. And finally apply decorative plaster.
How the preparatory work is carried out
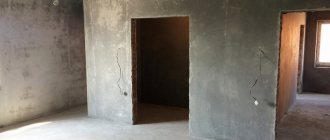
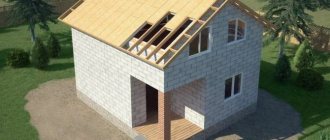
It should be said right away that this work should be one of the last to be carried out. That is, at the time they begin, double-glazed windows and door frames must be installed in the apartment, the flooring must be laid and ready for use. In general, all work has been completed that may directly or indirectly appear on the surfaces of the walls.
The room must be completely ready for decorative finishing
Preparing walls for decorative plaster includes the following steps:
- The first step is to remove the remnants of the old coating, such as wallpaper, paint or putty. The wallpaper is removed with a spatula after preliminary soaking, the paint is washed off with a solvent, and the putty is beaten off with an impact drill. Then you should remove all fasteners from the wall. Self-tapping screws and dowels are removed with a screwdriver, nails with a nail puller. Also, after removing the old coating, reinforcement elements may appear; they must be cut off with a grinder.
Removing old covering from a wall
- After this, you should tap the wall with a hammer to identify weak spots. If potholes and cracks appear, they are sealed with putty. If they are deep and wide, then they are sealed in several stages.
- The next step is to apply a primer with strengthening properties, after which you need to wait about 4 hours for it to dry. If we are talking about bathrooms, kitchens or other rooms with high humidity, you need to treat them with a special antifungal substance and wait again for about 4 hours.
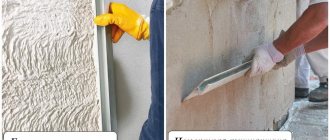
Applying primer to the wall with a roller
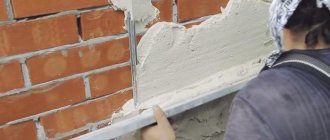
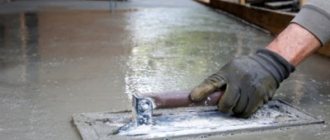
- After the primer has dried, they begin to putty the surface. This procedure is carried out using wide and narrow spatulas. After applying the putty, it is necessary to check the evenness of the surface with a building level and plumb line. The putty layer is the basis for decorative plaster, so it should be carefully leveled. At the end, it is necessary to sand the surface using sandpaper or a grinding machine, and its surface should be fine-grained.
A layer of putty is the basis for applying decorative plaster
- Next, you need to apply a layer of deep penetrating primer. A paint brush is used for this. Most decorative plasters do not have a high level of adhesion, so over time the material may simply fall off. To ensure tight contact, a primer is needed. It is required to apply 2 layers with an interval of 3-4 hours to allow them to dry.
Now that the preparation of the surface for plastering is complete, you can begin decorating the walls.
On a note! If you plan to apply a thick layer of textured or textured plaster, then finishing the surfaces with putty is optional. But for thin layers of the above types of finishing materials or for “Venetian”, puttying is mandatory. The fact is that a small layer will not be able to fill cracks and potholes, which will appear after the decorative material dries, which will affect the appearance of the walls and their service life.
Some types of decorative plaster require the walls to be puttied
Decorative plaster – elegant and practical
Decorative plaster is understood as a special multi-layer coating that forms a specified original texture on the walls being treated. The latter may have a different appearance. It depends on the shape and size of the decorative plaster filler, the tools with which it is applied, and directly on the method of applying the composition.
Now the described mixtures for creating original interiors are extremely popular. Decorative plaster is characterized by the following advantages:
- relatively low cost of material;
- abundance of colors and textures;
- minimal exposure to household mechanical damage;
- quick and easy application to walls;
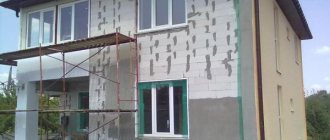
- Possibility of use for finishing exteriors (facade decorative plaster) and interiors.
Decorative mixtures for creating original interiors
In addition, the plaster mixtures in question can be cleaned of contaminants without any problems. It’s hard to imagine a more practical and at the same time truly beautiful material for decoration.
Decorative plaster is usually divided into several varieties. It happens:
- Structural. Such compositions are made on the basis of latexes (synthetic) or on a mineral basis. Structural plaster is a heterogeneous granular mixture to which small pieces of wood fibers, mica or quartz are added.
- Textured. Decorative material of various shades, made on the basis of astringent synthetic components. Crumbs of stones (natural), cotton and flax fibers, and other fillers are added to such compositions.
- Venetian. A mixture based on marble dust (also called flour). Venetian plaster is a transparent material. After hardening on the walls, it gives them a unique marble effect.
- Stone. This material consists of binding elements and chips of natural stones. It is used in cases where the home owner wants to get a fine-grained unusual coating on wall surfaces.
Expert advice
Preparing walls for plastering should be carried out taking into account the following nuances.
Before starting work, it is recommended to cover the floor surface, windows and furniture with plastic film. The ceiling area near the wall and baseboards must be sealed with masking tape. For each layer of putty, it is necessary to allow at least 48 hours for complete drying, and it is forbidden to use heaters or hair dryers to speed up the process. Otherwise, the surface may crack.
Why prepare the wall
Decorative plaster gives the room an unusual and very aesthetic appearance. In order for the walls to shine and the coating itself to be durable, the surface must be prepared before starting work. Otherwise, the finishing layer will not adhere firmly and will soon require additional repair and restoration work, which will not be cheap. Therefore, before applying the final layer, the walls must be properly treated.
Test application of plaster
Professionals with many years of experience can skip this step, but inexperienced people are strongly advised to do a trial application. To do this, you need to select a small section of the wall closer to the corners or use a sheet of plasterboard that has been previously finished in the same way as the surface of the walls. After the test layer has dried, you need to evaluate the quality of the resulting surface, its texture and color. If everything suits you, you can safely start plastering.
Test application of decorative plaster allows you to evaluate its texture and color
Surface repair
When the old coating is removed, you can proceed to repairing the walls. They may have unevenness, cracks, potholes and chips. To remove these defects, materials similar to decorative plaster are used. Small cracks are puttied, and large cracks are sealed with cement mortar.
For this purpose, you can use liquid sealant. Don't forget to remove any excess material after it dries.
Curved walls are leveled using plaster mortar. To make work easier, you can use beacon profiles. They are installed on the mortar and limit the thickness of the plaster layer. After it dries, the beacons are removed and the seams are sealed. Then the entire area is puttyed. This will improve the adhesion of the decorative coating to the base.
Important point! After completing all the work, do not forget to prime the surface again. Carry out this procedure after each stage. At low costs, the primer improves the quality of the base for applying plaster.
Preparation of material and its consumption
The modern construction market offers customers ready-made mixtures in plastic containers and dry powdery substances that must be diluted with water. In the first case, it is enough to simply open the container and mix the composition with improvised means (a long screwdriver, a wooden plank, and so on). In the second, you must first study the instructions provided by the manufacturer, and then prepare the solution in the required proportions. To do this, you will need a mixing container and an electric drill with a mixer attachment.
Preparing a solution of decorative plaster with a mixer
Consumption of main types of decorative plaster:
- Structural compositions - approximately 3 kg of material per square meter of surface.
- Textured plasters - on average 1.5 kg per square meter.
- Venetian plaster - about 150 g per square meter. meter for one layer, the total consumption must be calculated based on the number of layers.
The above data is approximate. Actual consumption depends on application method and desired result.
Preparatory work is both a simple and important part of finishing. In order for the stage of preparing the surface for plastering to be successful, and for the coating to last for many years, it is necessary to follow the above instructions and the recommendations of the manufacturers.
Advantages and disadvantages
The advantages of this finish include:
- durability, strength and practicality;
- resistance to various types of mechanical stress;
- masking irregularities and cracks;
- the material can be applied to any surface: concrete, wood, brick, metal, etc.;
- can be used for external or internal work;
- moisture resistance, frost resistance and sound insulation;
- Only natural ingredients are used for production.
Among the disadvantages of this finish, it is worth noting the following points:
- high price;
- difficulty of dismantling. Removing such a coating will require a lot of effort and time;
- Before installation, the surface must be properly treated.
Despite the disadvantages, this finish is becoming more and more popular every year.
Cleaning old coatings
New plaster cannot be applied to walls if they have traces of old coatings (tiles, wallpaper).
Advice
To choose the right cleaning method, first evaluate how durable and thick a layer of paint or other finish you will have to remove.
Let's look at how to quickly get rid of old coating.
How to tear off wallpaper?
The wallpaper needs to be pryed off with a spatula and peeled off in strips - the same way they were pasted. If there are stubborn areas left, they are pre-soaked with water and then carefully cleaned off.
- Wet the surface with a garden sprayer.
- We wait about 20 minutes.
- We clean the wallpaper with a spatula (starting from the seam).
Non-woven or vinyl wallpaper must first be pierced in several places and then cut in the middle of the canvas with a knife. The sheets will come off easily. Fiberglass wallpaper will have to be removed with special mixtures.
There are special cleaning products that dissolve old glue (Pufas Tapetenabloser, etc.). Such mixtures contain easily disintegrating surfactants. They make it easier to get rid of wallpaper remnants. Professionals also use a tool called a wallpaper tiger, which makes cuts automatically. You can also try an iron or steam generator, which will heat up the old glue and allow you to tear off a strip of wallpaper.
Removing paint
To remove oil paint use:
- putty knife;
- grinder;
- electric drill with special attachments.
This is the dirtiest, but also the most effective way to get rid of paint, especially if it is old and applied in several layers. Paint solvents are also used: you can buy them at any hardware store. You will have to protect yourself from harmful fumes with a mask.
Thermal effects on paint also help. We use a hair dryer or a gas burner and heat the wall well. The coating should swell with bubbles, then it can be easily removed with a spatula.
Important
Please note that the paint layer may catch fire and release harmful substances when heated. You should open the windows in the room while working and have a fire extinguisher ready, just in case.
How to get rid of whitewash?
- We get rid of the whitewash using a sanding machine, which you can rent. An abrasive nozzle with the largest radius and large grain size is used. This method is called dry.
- There is also a wet option.
It is advisable to moisten the surface with hot water to soften the whitewash and reduce the amount of dust in the room. Wait about twenty minutes, clean the surface with a spatula. For cleaning, they also use a special soda solution (a couple of tablespoons of soda and bubble bath or liquid soap per 3 liters of water). The total temperature of the mixture should be about 50 degrees. We treat the walls with a hot solution and remove excess with a spatula. When rubbing with a cloth, there should be no traces of whitewash left on it. Then the work is considered completed.
Removing plaster and ceramic tiles
Old plaster will have to be cleaned off if it is peeling, crumbling, or was initially applied in an uneven layer. For the work, a plumber's hammer is used, which is used to tap the walls to find out where the layer departs from the surface and can be easily cleaned off with a spatula. The entire surface will have to be treated.
For difficult areas, use an aluminum float to remove the plaster layer, a hammer drill with a blade attachment with a crushing mode, or a drill with the same functions. For aerated concrete walls, a drill with an impact function is required.
To remove old plaster, also use a solution of starch with water (a couple of tablespoons of starch per liter of water). You need to wet the walls with this mixture, and then try to clean everything off with a spatula. The joints of the masonry are cleared, and the surface is additionally cleaned with water.
If the tile was glued, then it is pryed off with a narrow spatula.
- To remove, treat the grout joints with water and clean them with a spatula.
- The grouting paste is removed, otherwise the tile will be difficult to pull out. If the installation was done recently, you can soak the glue or cement mortar and then pry it off with a chisel.
- First the top row is removed, and then all the rest.
- We tap the tile looking for voids and carefully knock it off using a chisel and hammer. You can also dismantle tiles in the bathroom or kitchen with a hammer drill if you can’t do it with improvised means. The chisel is driven between the wall and the covering like a wedge.
Masking tape can save the safety of the tiles: they can be sold or used for other purposes. If the tiles were laid on drywall, then you will have to get rid of the whole sheet with the glued tiles.
A rough method of removal is using a hammer, cutting the seams with a grinder. The tiles will crumble, but sometimes this is the only way to get rid of very old cladding that is stuck tightly.
Attention
Be sure to tap the walls before removing tiles. Dismantling begins from voids in order to avoid the risk of an unexpected collapse of an entire sector of tiles.
Required Tools
In order to do the work yourself, you will need the following tools:
- narrow and wide spatula;
- primer brush;
- buckets and roller;
- hammer;
- scraper;
- garden sprayer.
To dismantle sockets and switches, you will also need screwdrivers. In difficult cases, a hammer drill or drill may be required. For old tiles and chipped plaster, you will need durable trash bags.
Where to begin
We start by filling out existing shrinkage cracks and filling them again with plaster.
We glue the strobe mesh onto the gypsum putty over the crack. Also at this stage, we usually go over the walls with a rule and trim the unevenness at the tops, bottoms and corners.
Then we take a good primer, such as ceresite, and prime all surfaces thoroughly. After application, let the walls dry for 4 hours.