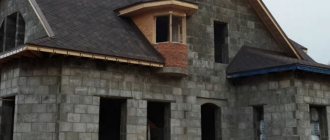
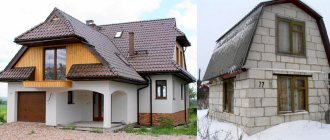
A house made of aerated concrete is an excellent choice for those who want to build inexpensive and high-quality housing, characterized by excellent heat-saving properties and many other advantages. Aerated blocks are becoming increasingly popular every year due to their positive technical characteristics and relatively low cost.
Due to certain physical and mechanical properties of the material, low-rise buildings are most often built from aerated concrete (up to 3-5 floors maximum), as well as outbuildings, garages, and bathhouses. Aerated blocks are quite fragile and require reinforcement; they can shrink slightly, so in multi-story construction they are used for laying internal partitions.
Aerated concrete is cellular lightweight concrete, which is produced by adding aluminum powder to the traditional solution composition (cement, sand, water), which acts as a gas former. As a result of the reaction, pores appear in the solution, which reduce the density and weight of concrete and increase sound/heat insulation properties.
The production process is simple: all components are mixed, poured into a mold, waiting for the reaction to occur and the mixture to increase in volume and for the monolith to set. It is then cut into blocks of a specified size and sent to an autoclave, where drying occurs under pressure and high temperature.
Aerated concrete blocks are structural for construction, thermal insulating to improve the heat-saving characteristics of buildings, and structural and thermal insulating (combine the properties of the first two categories). The construction of houses from aerated blocks is extremely popular today and many examples of the implementation of various projects confirm the relevance of this choice.
Properties of aerated concrete
The construction of houses made of aerated concrete is carried out using a certain technology, which necessarily takes into account the characteristics of the material that are important for creating a durable and reliable building. First you need to study the properties of aerated concrete.
For low-rise construction, structural and thermal insulating aerated concrete is suitable, which demonstrates the best ratio of a good level of heat saving and sufficient strength, its density is in the range of 500-900 kg/m3 and correlates with the grade - D500-D900.
It is better to build houses from aerated concrete blocks using autoclaved hardening material. Naturally dried blocks may exhibit reduced strength and resistance to various influences.
The most important properties of aerated concrete for house construction:
- Low level of thermal conductivity - within 0.12-0.19 W/m°C.
- Good vapor permeability - in the range of 0.15-0.20 mg/mchPa.
- The optimal compressive strength is about 1-1.5 MPa.
- Safety and environmental friendliness - aerated concrete is non-flammable, biologically inert, and does not emit toxins or harmful substances into the air.
- Large sizes, which simplifies and speeds up installation - standard block dimensions are 25-30 centimeters in height, 50-62.5 centimeters in length, 10-40 centimeters in thickness.
- The light weight of the blocks makes it possible to carry out construction from aerated concrete with your own hands, without the involvement of special equipment and a large number of workers.
- Easy processing - aerated concrete is simply cut, sawed, drilled and processed with any hand tool.
Cellular concrete is produced in the form of blocks of different sizes with smooth edges, the presence of a tongue-and-groove lock, there are also thin profile and partition elements, and other options. Some blocks have special recesses at the ends for convenient construction of a house made of aerated concrete. There are reinforced beams and slabs that have high bending strength.
What materials and tools will be required?
Used for working with aerated concrete blocks:
special hacksaw;- trowel;
- double-sided hammer with rubberized top;
- building level, beacons, mooring line;
- plane;
- hand tool for creating grooves;
- hard brush;
- guide angle;
- template for applying the solution (to speed up the process).
Materials:
- gas blocks;
- adhesive and cement mortars;
- fittings;
- on the foundation (sand, clay, crushed stone, concrete, geotextiles);
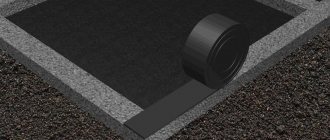
- roll waterproofing;
- ceiling slabs;
- roofing materials;
- boards for formwork and rafters.
Foundation for a house made of foam blocks
The foundation is the basis of the entire building and its design must be carried out on the basis of accurate calculations. Errors during the construction of the foundation can cause destruction of the entire building, which will be irreversible. While the roof can be reinstalled, the foundation of the house cannot be rebuilt. And therefore, the construction of a house from an aerated block must begin with the important stage of calculations and foundation design.
Aerated concrete is a lightweight material and does not require a serious foundation. One wall made of aerated concrete blocks weighs 2-3 times less compared to brick. At the same time, the base must be reliable, since aerated concrete is very fragile and the slightest shrinkage of the base can cause cracks in the walls.
Choosing a foundation type
The main criteria and factors that are taken into account when choosing the type of foundation for a house made of aerated concrete with your own hands: the total mass of the building, the load from wind and snow, the groundwater level, the bearing capacity and composition of the soil, the presence/absence of a basement, climatic features, the topography of the entire territory, surrounding buildings and their location in relation to the future home.
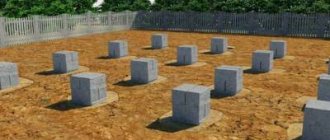
For a house made of aerated concrete, the following types of foundation are chosen: strip, pile, slab. According to the installation method, the foundation can be monolithic or prefabricated. Pile types come with a recessed, above-ground, or hanging grillage. A strip foundation can be made in the form of a beam, which is laid below/above the level of seasonal freezing of the soil. A monolithic slab also involves laying the sole at different depths.
Soil studies must be carried out before construction of a house made of aerated concrete with your own hands or by the developer begins. The soil can vary greatly not only across regions, but even within the same territory.
The type of foundation is chosen taking into account the characteristics of the soil and it is better that all calculations are performed by a professional. It is quite difficult to calculate everything on your own.
When you can choose the type of base yourself:
- The territory has dense, homogeneous soil, which is determined by digging holes in the corners of the future building to a depth of 50 centimeters greater than the depth of the foundation.
- If the soil water level is low - from 3 meters.
- When there are no swampy plants around, if there are any, situations of interlayer water release or flooding are possible.
- If there is a flat site for construction, eliminating differences in height.
- When it is possible to arrange drainage designed for effective drainage of melt/rain water.
- If there are no cracks or subsidence of the foundation in neighboring buildings and houses.
In all other cases, before building a house from aerated concrete, they must carry out geological surveys, determine all the soil characteristics, and consider different options for creating a foundation. It is better to leave the task to a design organization or an individual specialist.
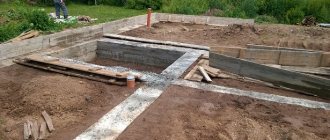
Shallow strip foundation
This type of foundation demonstrates optimal load-bearing capacity to absorb the load from aerated concrete walls, roofing and other elements. A shallow foundation is not afraid of frost heaving, is relatively inexpensive, and easy to install.
How to build a shallow foundation:
- Marking the boundaries of the future foundation using pegs and cords, checking the geometry with a tape measure and optical instruments.
- Installation of cast-offs in the corners and at the intersections of walls, made of 2 posts and a board nailed between them. Here the position of the axes of the structure is noted.
- Digging a trench up to 70-100 centimeters deep with preliminary removal of a fertile soil layer up to 30 centimeters thick. Fill the bottom of the trench with a cushion of crushed stone and sand; the layer should have a total height of 30-50 centimeters. Next, layer-by-layer compaction is performed.
- Installation of removable formwork made of wooden panels, or assembly of a permanent structure made of polystyrene foam. The structure should rise above the ground by a maximum of 30 centimeters, the optimal strip width is 30-40 centimeters. A layer of waterproofing is laid inside with an overlap on the formwork.
- Assembling a reinforcement frame from rods with a cross-section of 12 millimeters or more in the amount of 4-6 pieces. Fastening a sleeve from pipe scraps where communications will be laid.
- Filling the formwork with at least M200 concrete, high-quality layer-by-layer compaction using mechanical or hand tools.
- Dismantling of formwork after concrete has gained strength - after 28 days.
While laying the foundation, it is advisable to simultaneously arrange drainage, which will protect the house from the influence of moisture. It is important to carry out heat/waterproofing work and install a temporary blind area. All this will prevent the foundation from collapsing under the influence of heaving.
Aerated concrete house: laying blocks
Before building a house from aerated concrete, it is necessary to become familiar with the characteristics of the material, which directly affect the choice of construction technology and require mandatory consideration.
What you need to remember when building an aerated concrete house:
- Masonry made from aerated blocks is susceptible to bending loads and may become deformed.
- Window/door openings significantly weaken the masonry, especially when it comes to load-bearing walls.
- The frame does not provide the required stiffness in the wall junction areas.
- If there is no ventilation gap under the finishing material, moisture can lead to destruction.
- The close proximity of buildings and subsidence of the soil can cause uneven settlement of the foundation, which has a detrimental effect on fragile aerated concrete.
A one or two-story aerated concrete house is susceptible to the appearance of cracks of various shapes, the most dangerous of which are inclined, vertical, parabolic, and V-shaped. If a crack opens from above, the load-bearing capacity of the masonry is significantly reduced. A special technology for building a house made of aerated concrete, which must be followed, will help prevent such problems.
Rules for laying aerated concrete blocks
Aerated concrete houses are built in accordance with the rules and regulations regulated by SP, SN, SNiP. It is also important to take into account the advice of experienced craftsmen who have built more than one house and help to avoid common mistakes.
Basic rules and regulations for laying aerated concrete blocks:
- All cellular blocks with high water absorption should be laid on a layer of cut-off waterproofing running along the top of the plinth.
- Before work begins, order slats are installed in the corners of the building with a stretched cord between them. This makes it possible to lay the first row evenly. Marks must be placed on the rail in accordance with the position of each row.
- The laying should be carried out with bandaging of the seams, the displacement of the top row above the bottom row is about 8-12 centimeters (0.4 of the block height). When the installation of one level is completed, the cord is pulled to a new mark.
- The second and subsequent rows are placed with special glue, since the cement-sand mixture can cause the appearance of cold bridges.
- In the frames of openings, at the edges or corners of the walls, additional elements are installed, the length of which must be at least 11.5 centimeters.
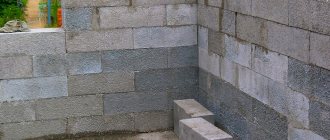
- Internal and external walls must meet to a depth of at least 20 centimeters.
- The masonry must be reinforced with steel rods and mesh.
You can build a house from aerated concrete blocks at an ambient temperature of +5 to +35 degrees. When working in winter, special anti-frost additives are added to the masonry adhesive, which prevent it from hardening ahead of time.
Tool
When thinking about how to properly build a house with your own hands, you need to take care of all the necessary tools in advance. For construction you will need: a mixer and a container for mixing glue, a laser level or a level for checking evenness, a notched trowel, trowels, a rubber mallet, a hand saw, a grinder, a grater, a brush for cleaning after cutting blocks, a pencil/ruler for marking.
In addition, it is worth stocking up on scaffolding for assembling the blocks of the upper rows, a shovel, a ladder, and a box for mixing the cement-sand mixture.
Possible difficulties and errors
What you need to know in advance:
- Only concrete foundations are suitable for such buildings. Others may not be able to bear the weight.
- Installation of the base and blind area is required. The walls should rise above the ground and not be accessible to direct moisture.
- The structure must be reinforced. If cracks do appear over time, they can be repaired.
- Waterproofing is mandatory. Insulation - at the request of the owners, it is recommended to carry out in the northern regions and the central zone.
- Aerated concrete blocks must be completely dry before finishing. Otherwise, the water will not be able to evaporate and will begin to destroy the walls from the inside. Therefore, it is necessary to observe a break between stages of work.
- When forming masonry walls, an adhesive solution for aerated blocks is used, not a tile solution, and especially not a cement-sand solution.
Laying aerated concrete block
The general stages of wall construction are as follows: marking on the base or overlapping the locations of openings and walls, installing the ordering batten and tensioning the cord, laying out the DSP, installing the first row of aerated concrete blocks, geometry control, laying out the blocks along the wall, laying rows and reinforcement, cutting additional elements, cleaning them and styling them.
Laying the first row
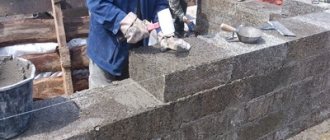
First, they find the most elevated point of the base, then moisten the lower surface of the block with water and install it on the leveling layer of the DSP. Aerated concrete is moistened so that it does not set so quickly with the mixture. The blocks are placed horizontally, checked with a level and adjusted with a rubber mallet.
If you need to make an additional element, the size of the space in the row is measured and the product is cut according to it. The ends are leveled with a trowel, all sides of the block are coated with glue and installed.
To preserve the sling, the top row begins with a whole block above the sawn one. After installing the row, the entire surface is leveled with a trowel to eliminate local stresses in areas of height difference between the elements. Dust and crumbs of the gas block are swept away with a brush.
Second and subsequent rows
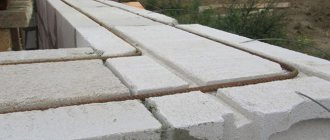
Construction is carried out relatively quickly: after one and a half to two hours after laying the first row, you can lay the second. Load-bearing walls begin to be built from the corners, the blocks are aligned horizontally/vertically. The cord is tensioned in the same way as in the case of the first row. Glue is applied to the blocks at the ends and bottom, the stone is pressed into place, the glue layer should be a maximum of 2-5 millimeters, the excess is removed with a trowel.
The position of the block can be adjusted within the first 15 minutes, excess glue is wiped off with a wet rag, and the solid solution is removed with a tool. All further rows are laid using the same technology, filling the seams with glue.
Walling
The order of operation does not depend on the design of the blocks. First you need to clean the surface of the foundation from dust and dirt, then cover it with roofing felt.
For laying the first row, a solution of sand and cement should be used. It dries much longer than conventional glue, which allows you to correct the evenness of the layer. The minimum thickness is 1 cm, but there are no maximum restrictions.
Next, you need to determine the highest angle and use a fishing line to mark the wall of the house. Aerated blocks are laid at all corners, then a rope is pulled between the building elements.
After laying each block, be sure to check the evenness. Door openings are skipped. Polishing should be used to polish the surface. A similar procedure must be followed for each layer laid.
The rows are tied, moving half of the gas block. The process is no different from bricklaying. The minimum shift level is 8 cm. To apply the glue, you can use ladles with teeth. The blocks should be pushed end to end; you can check the evenness of the masonry using a level. A rubber hammer is suitable for removing uneven surfaces.
When laying an opening, it is not always possible to fit into the length of the gas block. The excess part can be sawed off using a hacksaw.
Window arrangement
If the window sills are four rows of blocks high, the window openings should be reinforced after laying the third row. For this you will need a wall chaser. With its help we cut two parallel lines. They should extend beyond the opening by 30 cm on each side. Then reinforcing bars are installed in the grooves and filled with a solution of sand and cement.
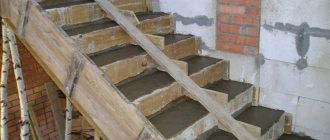
Installation of jumpers
Lintels are necessary to strengthen the wall above openings - window and door. Otherwise the structure will collapse. The jumper above the window can be made as follows:
- a board is installed;
- then a non-removable structure made of blocks: outside (15 cm), in the center (15 cm), inside (10 cm);
- squares are cut from the reinforcing mesh, after which reinforcement bars are tied to them;
- A frame is inserted into the opening between the gas blocks and then filled with concrete.
You can simplify the task by using ready-made U-shaped blocks. They need to be glued to a sufficient length and installed. Then the reinforcement is laid and filled with cement mortar.
The optimal width of aerated blocks for making formwork is 10 cm. But porous material of standard parameters is also suitable; it can be cut into three identical parts. Glue should be used for fastening.
The lintel over the interior doors is installed as follows:
- the blocks are glued to the required length;
- three ditches are made using a wall chaser;
- reinforcement bars are laid;
- cement solution is poured.
It will take an average of 24 hours for it to dry. When installing jumpers, the fittings should be located at the bottom. The gaps should be filled using gas blocks cut to the required sizes.
Reinforcement of aerated concrete
It is impossible to build a house from aerated concrete with your own hands without reinforcement - it will not be reliable enough and may soon become covered with cracks or completely collapse. Experience shows that it is necessary to reinforce aerated concrete houses in any case, paying special attention to construction in earthquake-prone regions, on subsidence soils, and in places with hurricanes.
Reinforcement rules
In standard projects, provided there are no seismological factors, winds and other influences, reinforcement is performed in a certain way.
Where standard reinforcement of aerated concrete houses is needed:
- The first row, which rests on the base.
- Every 4th row, provided the wall length is more than 6 meters.
- At the junctions of the walls and at the corners.
- In the areas of support of rafters, lintels, beams, ceilings, balcony slabs, stairs.
- All columns and vertical pillars.
- The lower part of the window opening structure.
- All sites with increased load.
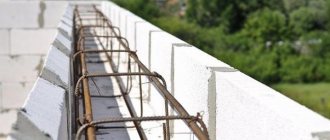
Armopoyas
The reinforcement frame is created along the top row in the areas where the slabs or floor beams rest. The belt connects load-bearing walls made of blocks and partitions into one structure, taking them away from the elements located above and distributing the load evenly.
The formwork is assembled in a continuous strip running along the entire perimeter of the building and the partitions inside. They use wooden panels, bricks or U-shaped profiles. Thin partition blocks can be mounted outside and the board inside.
The rods must be made of class A3 steel, with a cross-section of 12 millimeters, which are placed 2 at the top/bottom (in 2 rows). The diameter of the clamps is 8-10 millimeters, mounted in increments of 20-30 centimeters. The rods are joined with an overlap, and U/L-shaped products are used at the junctions of the walls and in the corners.
To protect the structure from freezing, polystyrene foam boards 3-5 centimeters thick are placed in the formwork along the outer wall, which must be taken into account when knitting the frame. Next, concrete M200/M300 is poured with pre-mounted anchors or studs securing the rafters and floors.
Masonry reinforcement
To prevent wall deformation and maintain their stability and rigidity, different types of reinforcement are used. The construction of cottages from aerated concrete provides several options.
Types of reinforcement to strengthen the structure:
- Horizontal reinforcement with metal rods - holes 25 millimeters deep are made in the blocks using a wall chaser, they are filled with glue, reinforcement with a cross-section of up to 8 millimeters is placed with an overlapping joint, bent at the corners, pressed in, and excess glue is removed.
- Using perforated strips - galvanized steel 1 millimeter thick, cut into strips 16 millimeters wide, attached to the blocks with self-tapping screws (no grooves needed). Reinforcement involves a two-layer laying of tapes.
- Masonry grids - steel, glass-basalt or fiberglass - are laid out over the masonry with a distance of 5 centimeters from the edges. Metal meshes are embedded in the solution, composite meshes are secured with glue.
Polymer meshes are considered more preferable, since they do not create cold bridges, do not corrode, provide high adhesion, and show high tensile strength.
Strengthening window openings of aerated concrete houses
It is necessary to strengthen the locations of window openings and this is not as difficult as it might seem. If reinforcement fails or is incorrect, cracks may appear.
Step-by-step instructions for strengthening the structure under the windows:
- Cutting grooves in masonry with a wall chaser that are 60 centimeters longer than the width of the window on both sides.
- Pouring glue into the furrow.
- Installation of class A3 reinforcement 8-10 millimeters, pressing it into the glue, removing excess mass.
- You can make lintels yourself from monolithic concrete or a metal corner. You can also buy ready-made ones. The cross-section of the structure depends on the width of the opening.
Where the jumpers rest, multidirectional stresses operate. To evenly distribute the weight of the wall, the beam must be laid in compliance with the minimum extension length beyond the masonry. It is better not to increase the width of the wall between the openings by more than 60 centimeters. To lay out a narrower structure, you can take brick or reinforce it with vertical reinforcement.
The lintel need not be installed where the width of the openings does not reach 120 centimeters, and above them the height of the masonry is at least two-thirds of the width. In this case, it is allowed to lay 2 rows of reinforcement, which must be inserted into the wall at least 50 centimeters.
Vertical reinforcement
When we build a house, the plan must be stage-by-stage, including all mandatory and optional items. Horizontal reinforcement is done in any case, but the vertical type of strengthening is relevant only in the following situations: the location of the house in an earthquake-prone region, if there is a strong wind load, when the site has complex terrain, in columns/pillars, when using aerated concrete with a density of less than 400 kg/m3, with wide openings and narrow partitions, at points of support of heavy structures and elements.
To perform vertical type reinforcement in the walls, grooves are drilled in the direction from bottom to top, O-shaped profiles are mounted, 1-4 steel rods with a diameter of at least 14 millimeters are inserted inside, then filled with M250/M300 concrete.
Interior decoration
Decorating the inside of a house can be done with any materials that match the properties and characteristics of an aerated concrete block. Plaster mixtures and screeds must be selected from highly specialized raw materials, and finishing materials must meet all the requirements stipulated by GOST and SNiP.
First, you need to decide what you want to see in the end. Let's consider the possible options.
Search for design solutions and a brief description of the progress of work
For clarity, we will use the method of stage-by-stage planning of the design of individual parts of the premises.
Table 3. Alternative designs for interior decoration of the house:
| The ceiling in a house can be finished in several ways: by plastering and subsequently painting, or by installing plasterboard boards. In the second case, the choice of design options is extremely large. With the help of gypsum plasterboards it is possible to create complex multi-level ceilings with specialized lighting of any desired shape. Drywall is attached to a pre-assembled frame. Plastering will not be necessary, but insulation will be quite important. |
| First, before applying the finishing layer, the walls should be plastered and leveled at the same time. Priming and laying the reinforcing mesh is mandatory, since the adhesion of aerated concrete does not allow the materials to be reliably fastened together without additional impact. Next, the finished surface should be painted, covered with wallpaper or covered with textured plaster. Individual areas can be decorated with artificial stone or any other material. The emphasis can be placed on the corners, window openings of the room, as well as highlighting certain areas of the room. |
| One of the most common options is laying laminate, parquet and linoleum. Ceramic tiles and porcelain tiles are used more often than usual in bathrooms, kitchens and hallways. The device begins with the installation of wooden logs. Next, the floors are insulated and, as an option, covered with floorboards. |
| With the help of gypsum boards you can diversify the interior with arches. Since drywall is easy to process, you can create even the most incredible designs and shapes. |
How to winter without heating
Often, when a country house made of aerated concrete has already been built, but the heating has not been connected and winter looms ahead, you have to think about protecting the structure. You can’t leave it as is – gas blocks don’t like water and frost and can collapse.
Basic measures to protect your home:
- Draining water from all systems.
- Insulation of the base, plinth, blind area with polystyrene foam boards.
- Close doors and windows tightly or secure in all openings a thick film taken in 2 layers.
- Without exterior decoration, the building can be left for a maximum of 1-2 winter seasons.
A house made of aerated concrete is an excellent solution, which is already being implemented in Moscow and the regions. Construction companies present standard and create individual designs for houses of various shapes, sizes, layouts, etc. If the technology is followed and all requirements and standards are correctly met, the structure turns out to be strong, comfortable and durable.
Production technology
The technological process consists of several stages:
- grinding components to dust and mixing using electronic dispensers. Dosage accuracy is a crucial moment that ensures the quality of the material;
- adding water and aluminum powder (usually in paste form). The mixture is placed in special molds to undergo a chemical reaction. At this time, the mixture rises and swells, like yeast dough;
- at the end of the reaction, aerated concrete receives its porous shape thanks to many small (2-4 mm) gas bubbles. The massif is removed from the mold and sent for cutting using special knives and strings;
- The finished aerated blocks are sent to an autoclave for final crystallization. The process lasts 12 hours, during which time the blocks are treated with hot steam under high pressure;
- After crystallization is complete, the material gains grade strength. It is packaged and sent to trade organizations.
An autoclave method for producing aerated concrete is described. There is another, non-autoclave material. It undergoes crystallization under treatment with hot steam, but without pressure. It is generally accepted that non-autoclaved aerated concrete has less strength and durability. However, studies have shown that the lack of heat treatment leaves non-autoclaved aerated concrete with the possibility of slowly gaining strength during almost its entire service life. Samples of the material taken for research from buildings approximately 80 years old showed hardness and strength 2-4 times higher than the brand name. This feature makes you look at non-autoclaved aerated concrete with different eyes.