Correct Mauerlat: purpose
This structure is a kind of foundation, like the foundation of the roof itself, which rests on the walls.
It consists of beams or beams that are located around the perimeter of all four walls. With their help, walls and rafters form a stable and reliable structure. What are the main functions assigned to the Mauerlat assembly?
- Creation of a general structure from the walls of the house and roof structures.
- Uniform load distribution, from individual points to all walls.
We have rather harsh climatic conditions, heavy snowfalls are not uncommon: it may happen that the accumulation of a large amount of precipitation on the roof will cause significant damage to the entire structure.
The installation of four- or gable roofs allows you to redistribute the increased load. How can they help?
The angle at which the roof is tilted reduces the pressure of accumulated snow on the structure and redirects it from a vertical to a horizontal plane. It becomes, as it were, bursting, which is why it acquires the ability to influence the walls in the place where the rafters are attached to them, pointwise. Over time, this negative impact can not only deform the wall, but also compromise its integrity.
Summary
It’s not enough to know how to install rafters and secure them to the walls of the house. First you need to calculate the loads and choose the optimal fastening method, taking into account the length of the spans, the possibility of shrinkage and other factors affecting the stability and durability of the structure being created. And most importantly, you need to have experience working with wood and be a perfectionist in order to achieve the perfect identity of each pair of rafters and install them in the same plane.
You can take on such work yourself if you have a detailed project in hand and an experienced assistant nearby. Otherwise, it makes sense to turn to professionals.
When is it necessary to cover the Mauerlat?
If the structure is built of wood, or erected using a frame type, there is no point in attaching the Mauerlat as a separate structure. The wall, or rather its upper part, can handle its functions quite well.
If the building is made of brick, foam blocks, aerated concrete and other similar materials, then its walls must be reinforced with Mauerlat. The same material is used for its construction as for the roofing.
Typically, wood is used in this capacity, which is a relatively cheap material, quite affordable, environmentally friendly and quite convenient to work with.
This device can be made from metal, but this material is more suitable for large industrial buildings, in which the load on the roofing system significantly exceeds that in residential buildings.
To ensure the strength and reliability of the wooden Mauerlat structure, it is preferable to use solid beams made from solid wood.
In the case where the wall is too large and it is not possible to select the material of the required length, the individual beams must be connected as securely as possible.
It is necessary that the place of their connection be exactly in the middle of the wall, so that each of the parts of this beam is as long as possible.
Let's put it this way: if there is a six-meter long beam and a four-meter long wall, then you will need two equal pieces of four meters each, and not two and six.
Materials
Several methods are used to construct a Mauerlat. According to the general rules, the element is made from the material used for the rafter system.
Possible options:
- Beam.
Depending on the mass of the floor, the mauerlat is fitted with timber of sizes 100 × 100, 100 × 150, 150 × 150 or 80 × 180. The length is selected in proportion to the walls. Considering the specifics of the application, the lumber must be of the first grade, without cracks or signs of rotting. The presence of knots is allowed provided that their diameter does not exceed 2/3 of the width of the end. The timber can be replaced with a rounded log, but this option will somewhat complicate the installation work. One side will have to be cut to ensure the tightest possible fit to the wall, and this is almost impossible to do without special equipment.
- Boards.
A high-quality edged board with a recommended cross-section of 50 × 150 mm is used. To ensure reliable fixation, the boards are laid in two rows. This option is usually used for frame buildings, where a foundation roof is not expected, and therefore large loads on the supporting structures.
- Metal.
A rather rare option for residential buildings, but often found in the construction of outbuildings: garages, workshops or hangars. The function of the Mauerlat is performed by a channel with an H-shaped or U-shaped section. Depending on the type of roof and rafters, metal products No. 10–14 are used.
Important! If a board or timber is used for the Mauerlat, the lumber must be treated with deep-penetrating antiseptic compounds. If this requirement is not met, the ceiling may suffer from dampness or pests, which leads to roof collapse.
Mauerlat installation
There are certain rules for the design of this system.
The width of the beam should be approximately a third of the thickness of the load-bearing wall; this value is usually about twenty centimeters.
You should not try to make the maeurlat section wider in the hope of getting a more reliable device, this can only complicate the situation.
A thick beam will also have significantly increased weight. Not only will it place a much greater load on the walls of the building, its mass will also complicate the installation of this structure.
To prevent damage to the wood, it is necessary to place a layer of waterproofing material between the wall and the Mauerlat. You can use the simplest roofing material.
To prevent wood from being damaged by microorganisms, it must be thoroughly treated with an antiseptic composition. The bars are placed closer to the middle of the wall, or closer to its inner part, so that at least five centimeters remain to its outer edge.
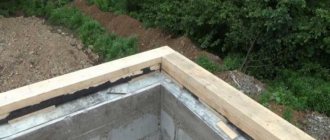
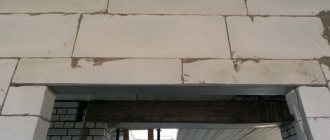
Completion of masonry
The wall structure at the top can end with an even horizontal cut or a special protrusion for the Mauerlat. The second option is preferable when building a small private residential building, as it slightly reduces the labor costs for installing the upper frame of the structure with a mauerlat.
Each method of completing masonry is acceptable and is not considered erroneous.
Smooth edge
In the case when the mason has completed the construction of the wall at one level, the mauerlat is attached to the masonry from the inside. After installation and fixation is completed, the outer part of the wall is insulated. You can fill the upper edge with expanded clay concrete, insulate it with foam plastic or other material - this is the choice of the developer, which does not have a significant impact on the wall and roof structure.
Brick laying with a ledge
The outer part is built higher than the inner part, as a rule, by the thickness of the Mauerlat - this creates resistance to thrust forces and ensures thermal insulation of the house. The method is convenient for self-construction, and is used for thoughtful construction of a building by one contractor.
Regardless of how the upper surface of the wall is laid out, a waterproofing layer must be laid under the Mauerlat.
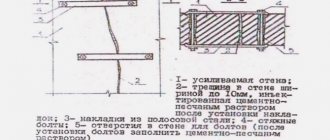
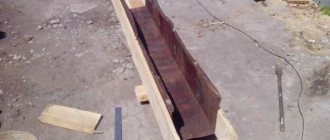
Fastening the Mauerlat with wire
This method is one of the simplest in the device.
You will need a metal wire with a diameter of five millimeters, which is placed at a depth of about six rows deep into the brickwork.
It should have such a length that it is enough not only for the entire volume of the Mauerlat, but also the remaining ends are sufficient for twisting with each other.
Paired holes for the wire are drilled through the entire thickness of the beam, at a distance of about thirty centimeters, and the ends threaded through them are twisted tightly. The number of required twists is determined during the process, but definitely their number should not be less than the number of rafters.
Installation of the rafter system
The rafter system is the basis of the entire roof and the strength of the future structure depends on its configuration. According to the principle of structure and nature of application, the support frame differs into two opposite types: hanging and layered .
- Hanging rafters . They rest only on the outer walls of the building, and the triangle-shaped truss remains in a hanging position. Used for lightweight structures.
- Layered rafters . They rely both on the external walls of the building and on the internal ones. The rafter legs “lean” onto the racks, and they, in turn, rest on the bed, which lies on the internal main wall. Used for large and heavy structures.
The functionality and stability of the entire roof depends on the correct choice of the rafter system.
Attaching the rafters to the mauerlat
In private construction, rafters are attached to the mauerlat in the two most common ways: rigid and sliding connections.
In brick and stone houses, the rafters are fastened to the mauerlat in a rigid way using a mortise and non-mortise connection . In the first case, tight fixation is achieved by creating a gash in the rafter leg, and in the second, a support beam is used that supports the beam from the reverse side. These are the most labor-intensive, reliable and universal fastening methods - applicable for both layered and hanging rafter systems.
Slip joints are most often used in timber structures because they exhibit the greatest shrinkage. The rafters are fastened using “floating” fasteners - slides, which avoids deformation of the roof when the position of the upper row of beams changes.
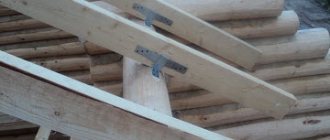
Fastening the rafters in the ridge
Today, only three main methods of installing the upper part of the rafters are actively used:
- Overlapping . In this case, half the cross-section of the adjacent elements is cut out to create a groove and a hole is prepared for the bolted connection.
- Butt . The upper ends of the beam are cut to obtain an ideal vertical joint, and metal plates or wooden linings (notches) are used as fastening elements.
- For a run . The rafter legs are laid close to each other and connected directly to the support beam.
How to strengthen the system?
In order to strengthen the roof frame with a span length exceeding 6 m, it is necessary to reduce the free span of the rafters. This can be achieved by creating an additional horizontal support beam (beam) on the internal load-bearing wall and installing inclined posts.
To add additional rigidity and to reduce the expansion of the rafters, tie-downs are used. They are attached to both sides of the rafter beam using self-tapping screws, nails, and studs at a distance of approximately 1/4 from the top.
To prevent the created frame from being torn off by a strong gust of wind, the rafters themselves can also be attached to load-bearing walls. To do this, twists based on two wires with a diameter of 4 mm are used - they are wrapped around the legs, and then connected from the inside and fixed with an anchor at a distance of 4-5 rows before the cut.
If you are not sure about the reliability of your structure, we recommend not only reading the step-by-step instructions for building a house roof with your own hands, but also contacting specialized specialists.
Fastening with studs
This mount looks like a pin made of metal, reminiscent of the letter L, as it is bent at an angle of 90 degrees, with different lengths of the sides. A square metal plate with a side of five centimeters can also be welded to the stud.
Marlat and fastening with studs
These metal products are placed deep into the masonry at a distance of approximately 45 centimeters.
In this case, a metal square pin or a short crossbar of the letter “G” should be located below.
The length of this fastening should be sufficient for the entire width of the Mauerlat, and at least three centimeters of it should stick out. The washers that securely press the device to the wall are screwed on top.
Video description
Video about the construction of a rafter system for a pitched roof:
Modern steel rafter fasteners greatly facilitate the work of creating a roof frame. When using them, you should use the following tips and recommendations:
- all fastened wooden elements must have a thickness of at least 50 mm;
- The shaped fasteners should be fixed with galvanized screws or nails. Moreover, the nails should not be ordinary, but rough - with notches on the trunk, at least 40 mm long;
- symmetrically located fasteners can be additionally tightened with studs, tightening the nuts on both sides of the rafters.
Fastening with M12 studs Source mercabadom.ru
Mauerlat: fastening to the wall with bolts
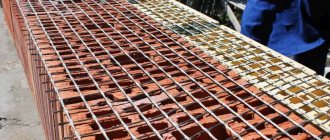
Anchor bolts can be installed directly into the reinforced belt itself, which is filled with concrete mortar. When dry, the design ensures reliable retention of the Mauerlat.
The number of such pins should be no less than the number of existing rafters. Their placement should not be the same.
The bolts should be as vertical as possible, and as aligned as possible in a row.
After the pins are installed in their place, the Mauerlat is placed on them, then they are hit hard with a special hammer.
The impact causes marks to be imprinted on the surface of the timber, which will then be used to make holes for anchors. Bolts ensure the strength and reliability of this device.
Armopoyas: fastening the Mauerlat
Sometimes the use of a reinforced belt is simply recommended, and in some cases it is strictly necessary. What does this depend on? When a dwelling is built from materials such as expanded clay concrete or aerated concrete, any attempt to drive any fastening into the walls of the building can be fatal. Due to its comparative softness, the material may begin to deteriorate. To prevent this from happening, an armored belt is used, which helps to install the Mauerlat without damaging the integrity of the building elements.
However, professional builders advise using a reinforced belt for buildings made of fairly hard materials, such as, for example, brick, because this structure has many useful qualities:
- Corrects not too even wall laying in the horizontal direction;
- Helps to hold the wall structure during ground movements and earthquakes;
- Distributes the entire existing load more evenly;
- Gives the structure special rigidity and additional strength;
- It holds the Mauerlat very reliably and firmly.
Content
- Types of roofs
- Roof structure - terms
- How to calculate a roof with your own hands?
- Step-by-step instruction
- How to properly attach the Mauerlat?
- Installation of the rafter system
- Attaching the rafters to the mauerlat
- Fastening the rafters in the ridge
- How to strengthen the system?
- Comparison of roofing materials
Types of roofs
The construction of a roof begins with the selection of a design design, that is, with the determination of its future shape. In modern private construction, the most common types are:
- Shed roofs . The design option with one slope is the least labor-intensive, quickly erected and allows significant savings on materials. The main disadvantages are the impossibility of arranging a full-fledged attic and attic, due to the low roof space, as well as use in snowy areas at small angles of inclination.
- Gable roofs (gable roofs) . The design with two slopes and two gables is the most common in private construction, as it provides a balance between labor intensity, cost and practicality. Allows you to create a full-fledged attic space and effectively cope with significant precipitation in winter.
- Hip roofs . The most reliable structures in terms of resistance to atmospheric phenomena: wind and snow loads. They are distinguished by significant weight - they require a strong foundation and strong load-bearing walls, as well as a well-thought-out rafter system. Also, due to the large area of the roof covering and significant heat transfer, additional insulation is required.
- Hip roofs . The structures consist of four slopes, in which the side slopes are shaped like an isosceles trapezoid, and the end slopes are shaped like a triangle. They have minimal resistance to wind loads and an attractive appearance, but are difficult to calculate and install.
- Half-hip roofs (Dutch) . The frame structure is similar to the previous one, with the exception of the triangular slopes, which have a truncated appearance, as a result of which small pediments appear. The main advantage is the possibility of arranging a full-fledged living space. However, such a roof requires the creation of a complex rafter system due to the large number of angles.
- Hip roofs (pyramidal) . Systems of four identical slopes in the form of isosceles triangles converging at one point. The design has the best aerodynamic properties and resistance to heavy precipitation, thanks to the uniform drainage of water. The main disadvantage is the complexity of designing and constructing the frame.
- Multi-pitched roofs (multi-gable) . They are combined pitched roofs for buildings in the shape of the letters “P”, “G”, “T”. The most difficult to design, manufacture and assemble. They are used extremely rarely in private construction.
If you cannot determine what shape of roof to build with your own hands, all other things being equal, compare the appearance of the structures and see which option is the most attractive.
Roof structure - terms
Also, immediately before starting to build a roof with your own hands, you need to familiarize yourself with the basic elements and terminology, which will make it easier to understand the process and allow you to find a common language with the builders.
- roof - the upper part of the assembled building structure;
- roof – the upper element of the roof (covering);
- Mauerlat - support beam laid along the perimeter of the walls of the building;
- bench - support beam laid on the internal load-bearing walls of the building;
- rafters (rafter legs) - structural elements of the roof that support the roof covering;
- purlins - horizontal longitudinal beams supporting the rafters from the inside;
- ties - horizontal transverse beams connecting the legs of one pair of rafters;
- crossbar - a tie installed directly in front of the ridge of the structure;
- ridge - a horizontal rib located at the junction of the slopes at the very top of the roof;
- racks - vertical beams placed on a bench or other support, designed to support the purlin;
- struts (rafter legs) - inclined beams connecting the rafters to the supporting elements and located at an angle of 45°;
- counter-lattice - rows of boards laid along the rafters on top of the waterproofing material;
- sheathing - rows of boards laid on rafters/counter-lattice at an angle of 90°;
- cornice - the hanging part of the roof, which covers the upper part of the external walls from the negative effects of atmospheric manifestations;
- fillies - boards with which you can lengthen the rafter leg;
- valley - an internal angle formed at the junction of two slopes in multi-gable roofs;
- hip - a triangular roof slope at the ends / covered pediment with a slope;
- pediment - the upper part of the facade of a building, which is limited by two slopes.
How to calculate a roof with your own hands?
After the design design has been developed, it is necessary to calculate the amount of materials for its manufacture. This is necessary in order to know in advance the volume of lumber and order the appropriate batch from the manufacturer.
The online roof calculation calculator from KALK.PRO allows you to perform the most accurate calculation of materials, as well as receive a set of drawings and a 3D model of the structure.
It is also recommended to perform a roof calculation for permissible loads in order to select the cross-section of the load-bearing elements. For example, one of the most important parts is the rafter leg - for it, the height and width of the beam is selected based on parameters such as:
- roofing materials;
- snow load;
- laying step;
- span.
However, most often, such detailed calculations are neglected and the choice of rafter sections is made on the basis of general recommendations, but with a slight margin, since the tables do not take into account the specifics of a particular situation.
Section of the rafter leg - table
| Rafter leg length, m | Distance between rafter legs, m | |||||
| 0,60 | 0,90 | 1,10 | 1,40 | 1,75 | 2,15 | |
| Section of the rafter leg, mm | ||||||
| 3,0 | 40×150 | 50×150 | 75×150 | 75×125 | 75×150 | 100×150 |
| 3,5 | 40×175 | 50×175 | 75×150 | 75×175 | 75×200 | 100×175 |
| 4,0 | 50×150 | 50×200 | 75×175 | 75×200 | 75×200 | 100×200 |
| 4,5 | 50×150 | 75×175 | 75×175 | 75×200 | 100×200 | 100×200 |
| 5,0 | 50×175 | 75×175 | 75×200 | 75×200 | 100×200 | 100×250 |
| 5,5 | 50×200 | 75×250 | 75×200 | 100×200 | 100×200 | 100x250 |
| 6,0 | 50×200 | 75×200 | 100x200 | 100×200 | 100×250 | — |
If you plan to build a warm roof, then the choice of the height of the section of the legs should take into account the thickness of the insulation, since it should be mounted so as not to protrude higher than the load-bearing beams.
The parameters of the remaining wooden structural elements are in most cases taken structurally:
- Mauerlat - 150×150 mm;
- racks - 100×150 mm / 100×100 mm (depending on the cross-section of the rafters);
- struts - 100×150 mm / 50×150 mm (depending on the cross-section of the rafters);
- puffs - 50×150 mm;
- purlins - 100×150 / 150×50 mm (depending on the load);
- overlays - thickness is 32–50 mm.
If you want to get the safest possible structure, we recommend that when building the roof of a house with your own hands, double-check the parameters of the elements several times.
Insulation and vapor barrier
Using high-quality roof insulation can significantly reduce heat losses and save on space heating. Companies provide a large variety of materials with their own advantages and disadvantages. However, the most common are still:
- mineral wool;
- basalt wool;
- glass wool;
- Styrofoam.
Installation is carried out from the inside into the space between the rafters. The sheets should be cut so that their width exceeds the distance between the rafters by 15-30 mm, which allows for more reliable fixation of the material, that is, “in space.” When insulating in several layers, the materials should be placed in a checkerboard pattern to prevent the appearance of a cold bridge.
In order to protect the insulation from evaporating moisture from the lower floors of the building and, accordingly, prevent the appearance of fungus, it is imperative to lay a vapor barrier film from the inside. Its fastening should be done using a stapler, maintaining an overlap of 4-6 cm, and the seams must be sealed with sealing tape.
Insulation is especially important if you have an attic space.
Application of chemical anchors
By chemical anchor we mean a liquid injection mass made on the basis of a polymer resin, which quickly hardens and firmly fixes the metal rods in the thickness of the Mauerlat.
The advantage of this material is the absence of bursting stress, so fragile aerated concrete does not collapse. If mechanical anchors fix parts by expanding the dowel, then the adhesive composition of a chemical anchor fills the pores of aerated concrete and holds the rod motionless.
The process of attaching liquid dowels looks like this:
- A recess for the anchor is drilled in the gas block. The size of the recess should be larger than for a regular anchor bolt.
- Remove dust and debris from the hole, for example, with a vacuum cleaner.
- The adhesive composition is poured into the hole.
- Next, a threaded metal rod is inserted into the glue - an M 12-14 pin or a piece of reinforcement.
- Complete crystallization of the polymer composition occurs in 1/3 hour if the ambient temperature is above 20 ℃.
- Once the glue hardens, the pin will be securely fixed. It is noteworthy that such fasteners are stronger than mechanical ones.
Installing a roof Mauerlat on a wall made of aerated concrete using liquid dowels has a number of undoubted advantages:
- The fastening does not lose strength for more than 50 years.
- Due to the polymer structure of the glue, this method of fixation is widely used at the edges of walls, where there is a risk of the gas block splitting.
- The chemical anchor has good chemical resistance.
- Even damp weather and wet surfaces of the joining elements do not prevent the installation of these fasteners.
- The installation of the roof mauerlat on aerated concrete blocks can be carried out without pouring an armored belt, since the reliability of fastening a chemical anchor is much higher than that of a mechanical one.
- The chemical composition of the anchor is ideally combined with the porous structure of aerated blocks.
- To install liquid dowels, holes of a shallower depth are required than in the case of mechanical anchors - there the depth is 2-3 rows.
However, welding work cannot be carried out on anchors installed by this method - overheating of the metal rod will lead to disruptions in the polymer structure of the material, causing it to lose strength.
Waterproofing
It is laid directly on the rafter legs using small nails or a construction stapler. Work should be carried out from the bottom up, overlapping the bottom layer by 10-15 cm to prevent moisture from getting under the material. The tension should be strong enough to prevent moisture from accumulating on the surface - the sagging should not exceed 2 cm. However, you should not force the material too much, as it is easily damaged.
It is recommended to use a high-quality vapor diffusion membrane, which, in addition to moisture protection, provides vapor exchange and helps create a favorable under-roof microclimate. The seams must be treated with sealing tape.
Tools for work
To fasten the Mauerlat to your home, you will need the following tools and materials:
- drill;
- screws;
- hairpins;
- strong (preferably steel) wire;
- fishing line (rope);
- boards (beams) of the required sizes;
- anchors (calculation of their quantity is described above);
- a standard set of construction tools (hammer, wood saw, etc.).
To attach the Mauerlat to expanded clay concrete blocks, it is necessary to use exceptionally high quality materials: the wood must be free of knots, and the waterproofing must be free of damage.
To perform quality work, it is better to use professional tools. We should not forget about the importance of the accuracy of preliminary calculations, because without them the highest quality work will not ensure reliable fastening of the Mauerlat to the expanded clay concrete blocks.
The roof can be compared to a large sail. Therefore, it is better to spend a little time ensuring reliable fastening so that even in the event of a strong wind the roof does not even move against the walls of the house.
Particular attention should be paid to this point by everyone who has a country house. A dacha made of expanded clay concrete blocks is often incorrectly classified as temporary housing, which is why due attention is not paid to the correct arrangement of its roof.
1pobetonu.ru
Drainage system
The roof drainage system allows you to reduce the negative impact of moisture on the lower elements of the roof, maintain a beautiful appearance of the building facade, and also helps remove water from the base. For novice craftsmen, the main difficulty at this stage of work is the installation of gutter brackets.
If the roofing material has not been installed, the fasteners are fixed on the lower rows of the sheathing. This option is the most optimal because, if necessary, the bracket leg can be bent to achieve the correct angle of inclination of the gutter.
If the roofing has already been installed, then you can try installing fasteners on the side surface of the rafters or using a front board. In the first option, brackets are used on a leg bent 90° for more convenient mounting. In the second, a board is installed along the perimeter of the roof at the edge of the eaves, onto which a profile with hooks is attached. At the same time, in order to avoid water overflow in the gutter, the hooks must be secured so that the roof covers the drain by half or a third of its width.
It should also be noted that the latter method is only possible if the rafter legs have a sufficiently large cross-sectional size, for example, 120×50 or 150×50 mm.
Mistakes when building a roof with your own hands
- Lack of project . When building the roof of a house with your own hands, without a project, it will not be possible to create a reliable and safe structure, since without the appropriate documentation it is impossible to assess the stability of the structure, find out the permissible loads and cross-sections of rafter legs, fix node connections and fastening points, calculate the amount of materials, etc.
- Incorrect roof covering . For example, roofs made of ceramic tiles and slate should be laid only with sufficiently large slopes, while soft materials, on the contrary, require a flat roof, since otherwise the integrity of the structure may be at risk.
- Loose fit of thermal insulation . If blocks with thermal insulation materials do not fit tightly together, this will lead to the formation of cold bridges, which in turn contribute to the accumulation of condensation and the appearance of mold/mildew.
- Absence/incorrect installation of vapor barrier . The absence of a vapor barrier membrane on the inside of the roofing pie leads to the accumulation of dampness in the thermal insulation and wood, as a result of which the materials lose their performance qualities. It is also necessary to ensure that the membrane is laid on the correct side.
- Lack of ventilation . It also leads to condensation and dampness with corresponding consequences. To create optimal under-roof air circulation, it is necessary to use a counter-lattice.
- Poor sealing . Poor quality sealing can lead to damage to the integrity of the entire structure. However, due to negligence, the joints are often insufficiently treated, the sealing tape is glued directly to the dirty surface of the hydro- or vapor barrier, and fasteners without a sealing washer are used to install the roof.
- Inappropriate savings on materials . The roof is one of the most difficult structures to erect, which protects all other elements of the structure. If you want all this to serve in good condition for many years, you cannot skimp on both roofing materials and all accessories - membranes, tapes, fasteners. Otherwise, irrational savings can lead to expensive repairs in the near future.
If you still want to save on construction, we suggest using a roof calculation calculator , which can calculate the optimal amount of materials without overpayments.