- October 13, 2018
- Country house
- Timoshenko Mikhail
When arranging a barn for a summer house or a personal plot, you should take care of laying a reliable floor. The coating must meet a number of requirements. The first place goes to decent strength, moisture resistance, low thermal conductivity and the safety of the materials used for animal health. What shed flooring options are worth considering? We will tell you about the best solutions in our publication.
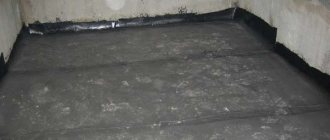
Dirt floor
A simple option for installing a floor in a barn is to create a ground covering. The solution is to prepare a tightly compacted base, where fine gravel plays the role of the substrate. A pillow made of a thick layer of bedding is placed on top, which serves as insulation.
The main advantage of the idea of creating a dirt floor in a barn is the expenditure of a minimum amount of effort and time. The budget for the project is reduced to almost zero. However, rodents can penetrate through the dirt floor in a garden shed. Over time, the litter accumulates moisture, becomes moldy and begins to emit a repulsive odor.
To make a dirt floor in a shed, prepare the following tools and materials:
- fine gravel;
- pieces of roofing felt;
- hammer;
- nails that have a wide head;
- shovel.
Outside, around the perimeter of the shed, dig a trench about 30 centimeters deep. Place pieces of roofing felt on the walls. Nail the material. Leave the bottom of the roofing felt hanging into the ditch. Fill the trench with soil and compact it well. Ruberoid will protect the ground floor in the barn from moisture coming in from the outside. Thanks to such waterproofing, you can protect the room from flooding with storm water.
Inside the shed, thoroughly level the soil. Mix topsoil with gravel. Compact the formed pillow. Place bedding on top in the form of small sawdust or straw. Clay can be used as a replacement for gravel, which will minimize cash costs.
Options and materials for thermal insulation
How to insulate a shed with your own hands? First of all, you need to choose technology and material. The following materials have traditionally been used for thermal insulation of outbuildings:
- Chopped straw. This insulation has been used by people for thousands of years. It is highly environmentally friendly, but short-lived. Straw is flammable, susceptible to getting wet and rotting, and insects and rodents readily grow in it. In order to protect the material, it is impregnated with lime at the rate of 1 part lime to 25 parts straw. The resulting mixture is used to fill the space between two plank walls. Straw is also used to insulate the ceiling. The thermal insulation coefficient of straw is low.
- Sawdust. Sawdust, like straw, is also flammable and susceptible to biological hazards. They are mixed with lime in a ratio of 1:15. To strengthen the composition and increase its moisture resistance, add up to 10% cement. Sawdust is prone to caking; if the walls are insulated, they will have to be added annually.
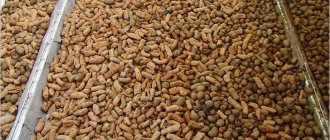
- Expanded clay. These are light pellets with a diameter of 1-2 cm, sintered from ceramic raw materials. The material is not hygroscopic, durable, non-flammable, and has little caking. It is also not susceptible to biological threats. The only drawback is the low thermal insulation rates, forcing the use of thick layers of material. When filling expanded clay between walls, it is often mixed with cement mortar. It turns out to be a very durable material. This should be done in layers of 20 cm, giving the solution time to set each time. Otherwise, the lower part of the wall may burst open.
Expanded clay - material for insulating sheds
Nowadays, more modern materials are increasingly being used for insulating sheds. They are more expensive, but have several times higher performance. Among them are:
- Foam glass. Small granules of foam glass. Does not burn, does not get wet, does not allow mold, microorganisms or rodents to develop.
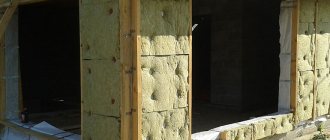
- Mineral wool. The product is made from rocks (basalt wool) or from glass production waste. The material does not burn and is not subject to biohazards. It has high thermal insulation rates, so a 50 mm layer of mineral wool is equivalent to a 25 cm layer of sawdust. Mineral wool is mounted in a guide system. It is suitable for insulating both walls and ceilings. When the material gets wet, it loses its heat-insulating properties, so during installation special attention should be paid to waterproofing and steam removal. During installation, mineral wool emits dust that is harmful to health; you should work with it wearing protective gloves, thick clothing and shoes, and a respirator.
- Expanded polystyrene. The common name for the material is polystyrene foam. It is produced in sheets measuring 100*100cm and can be easily mounted on vertical and horizontal surfaces. It has good thermal insulation and does not absorb moisture. One of the main disadvantages is fragility. When pressed hard, the sheets crumble, so you need to be careful when handling them. Another significant disadvantage: the material is flammable and, when heated, releases toxic gases and aerosols. This limits the use of foam plastic for insulation of residential premises.
- Extruded polystyrene foam. It is produced by extrusion and has a significantly smaller granule size than conventional foam. The material is durable, does not crumble, and does not require additional vapor or waterproofing. Ideal for thermal insulation of floors.
- Polyethylene foam. The common name is penofol. This flexible and elastic roll of material is covered on one side with a layer of foil, which reflects heat back into the protected room. Used as waterproofing and additional insulation, or as the main heat insulator. Easily mounted on wooden surfaces using a construction stapler. The material also releases harmful substances when heated. The widespread use of penofol is limited by its high price.
In addition, progressive sprayed materials such as polyurethane foam and ecowool are becoming more common. The high cost of equipment makes it unlikely that they will be purchased specifically for a shed. However, if they carry out thermal insulation of the main house, and the equipment has already been delivered to the site, then it is quite possible to use the remaining materials for outbuildings. Sprayed materials have no seams and create a perfectly smooth continuous layer of thermal insulation. They do not cake, do not crumble and are characterized by consistently high thermal insulation properties and durability.
Concrete floor
How to cover the floors in a barn? The most reliable option is a concrete coating. Every owner who has ever mixed cement mortar and made a screed is capable of implementing the project. The advantage of the solution is the protection of the premises from rodents and simple, quick cleaning after animals.
How to make a concrete floor? Carry out the work according to the following scheme:
- Remove the top layer of soil to a depth of about 20-30 cm.
- Fill the cleared, compacted area with a mixture of gravel and crushed stone.
- Along the perimeter of the barn, make formwork from boards that fit tightly to the walls.
- Fill the floor in the barn with a solution of M400 cement and sifted sand, following a ratio of 1:3.
- Level the surface with a board.
- Leave the solution alone for 2-3 days.
- When the concrete floor in the shed is thoroughly dry, remove the wooden formwork.
Stages of work
We prepare the surface, lay waterproofing and install beacons. Before you start filling the expanded clay, you should carefully plan the base (if the floor is poured on the ground) and carefully cover it with polyethylene film with an overlap of 100 mm.
Installing beacons is a very important stage that requires accuracy and scrupulousness. Let’s immediately answer a popular question from non-professional builders: how to evenly fill a floor with concrete without beacons?
It's possible. There is a private video on the Internet showing how to evenly fill a floor with concrete without beacons. True, to implement such a technology, you will need to purchase and manufacture an expensive special tool and get your hands on it. Therefore, it is faster, easier and cheaper to install simple and inexpensive beacons.
- Using a ruler, measure the boundary of the expanded clay backfill 100 mm from the surface of the base, and place a point on the wall. We apply the lath or rule with one end to the point and press the lath (rule) with its side surface against the wall along the surface of the base. Using a level placed on top of the slats or rules, we set the horizontal position and draw the boundary line of the backfill. We sequentially rearrange the slats, setting the horizontal and drawing the border, we go around the entire perimeter of the room. This operation is performed in tandem with an assistant.
- From the boundary of the expanded clay filling, use a ruler to measure the boundary of the concrete pouring 40 mm and draw a line along the perimeter of the room.
- Next, mix a thick cement-sand mortar of grade M150. They retreat from the wall 1 m and in increments of 1 m, in the form of pyramids with a base of 150-200 mm, pour (piles) of mortar - a series of beacons. They retreat from the row of beacons to a depth of 1 m in the room and repeat the operation. As a result, the room is divided into 1x1 meter squares by beacons. While the solution has not hardened, using a lath (rule) and a level, level the tops of the pyramids along the line of the concrete pouring boundary. Excess mortar is cut off with a spatula, and the missing solution is added with a trowel. After leveling, work is stopped for 4-5 days until the solution hardens.
There are other technologies for installing beacons, which involve the purchase of steel profiles, anchor bolts, adjusting screws and other material parts. The technology described above is the simplest and cheapest, all other things being equal. The final stages of constructing a concrete floor:
- Carefully, so as not to damage the beacons, pour out expanded clay and level it along the border on the wall using a slats and a level.
- A reinforcing mesh is carefully laid on top of the expanded clay. If the mesh is placed on top of the lighthouse, the interfering piece of wire is bitten out.
- In accordance with the above proportions, a solution is prepared using a concrete mixer. The structure is poured along the beacons and the boundary outlined on the wall. Immediately after pouring the next batch of mortar, first level the surface with a rule or a lath, after which the ironing operation is immediately carried out. To avoid delamination along the boundaries of mortar batches, the floor should be poured continuously until complete completion.
- Maintenance of the structure consists of spraying with water for 72 hours. You can walk on the floor 4-5 days after pouring, and laying the final coating or installing household items is allowed only after the solution has completely dried. Control of complete drying - there is no moisture condensation on the back surface of the polyethylene film laid on the floor surface.
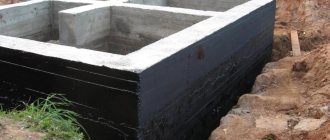
Waterproofing concrete screed
Before pouring cement, it is advisable to take care of waterproofing. For these purposes, use polymer materials or resin solution. Apply these substances to a bed of crushed stone and gravel, and then dry thoroughly. If desired, you can mix the polymer with liquid concrete and fill the floor. Experts call the method penetrating waterproofing. Such solutions will make it possible to protect the shed from the penetration of groundwater.
Choosing the optimal barn layout according to the drawings
Depending on what functions the utility unit will perform, its dimensions are determined:
- if only gardening tools and tools will be stored in the outbuilding, a size of 1.5 x 1.5 m will be quite sufficient. For storage use hooks and shelves on the walls.
- A workshop shed or storage room for conservation is built larger - 2 x 3 m, you can also attach a vestibule to better retain heat during the cold period.
- If the outbuilding will perform several functions, for example: barn - workshop - summer kitchen, then the dimensions will already be - 3 x 4 or more.
The simplest solution is to build a rectangular barn with a pitched roof.
Advice! It is not recommended to build a building that is too tall. It is necessary to take into account that a person must move in it at full height, without bending. The height of the structure is 2.2 - 2.6 m, which will be quite enough.
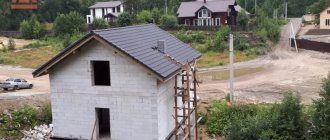
Cheap shed options
The cheapest and most popular is a barn made of timber or unedged boards. However, this is not the only option. Also used to build a utility block:
- slate (fence or roofing) - such a structure does not look aesthetically pleasing and requires cladding both outside and inside;
- plastic - a cheap and mobile building, but not durable and of little functionality;
- foam block - such a building will be warm and resistant to rodents, but requires a strong pillow or foundation.
Outbuildings from the above materials are built quickly (2-5 days), but at the same time, when constructing such buildings, the owners should think about how to sheathe the outside of the barn for an aesthetic appearance.
Insulation of concrete floors
An important point is the insulation of the cement coating. This goal can be achieved in several ways, using wooden cladding or a thick layer of bedding. Lay boards about 3 centimeters thick on the surface of the hardened concrete. Secure the structure with wooden lintels at the walls.
A cheaper option would be to lay a thick cushion of sawdust on top of the concrete floor. Alternatively, you can use peat insulation. Be prepared for the fact that such bedding will have to be changed regularly to avoid the development of mold and mildew.
Adviсe
When starting work on making a concrete floor, adhere to the following recommendations:
- if the floor will experience increased loads, then it is necessary to pre-lay the reinforcing frame. For concrete floors with light loads, reinforced mesh is suitable;
- To install a concrete floor, it is necessary to use cement of a grade not lower than M300.
After the compaction process, the thickness of the concrete floor should be approximately 12 cm.
Wooden floor
Wood flooring has one undeniable advantage over concrete flooring. We are talking about much better heat retention in the room. The idea should be adopted if you plan to keep animals in a barn during the frosty winter. As a material, use oak or pine boards, which belong to the category of hardwood.
Work instructions:
- Place cross beams on the foundation columns along the entire perimeter of the room close to the walls. Secure the material in the corners of the shed with large screws or staples.
- Install a strong metal mesh onto the support beam, securing it with nails. Lay wooden logs on top at intervals of 50 centimeters. Nail such jumpers to the supporting beam.
- Place insulation on the mesh between the joists.
- Lay the top plank covering perpendicular to the joists and nail it in place. Treat the surface with a water-repellent compound. Let the boards dry thoroughly.
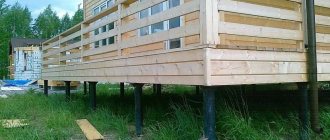
Construction of the frame of the utility block
The frame can be wooden or metal . The optimal solution would be to make a shed from a material identical to that from which the residential building is built. Or it is sheathed with appropriate material that looks organically with a residential building.
When building a wooden shed, a timber frame is ideal. Before installation, it must be treated with protective impregnation. A frame made of profiled pipes will make the structure more reliable and durable. It is better to choose a square or rectangular section for ease of joining and welding. Manufacturers also offer ready-made metal frames that can be assembled quite quickly using self-tapping screws.
The basis of the entire structure will be the lower frame , for which a high-quality timber with a section of 100x100mm is taken. It is attached to a foundation covered with two sheets of roofing material. Such preliminary preparation will protect the timber from rotting. At the corners, the elements are connected using dowels. After installing the lower frame, the racks are erected, which are nailed obliquely or secured with metal overlay plates.
When installing a metal frame, the parts are connected by welding.
Waterproofing a wooden floor
Before you begin installing the plank floor, you should take care of waterproofing. Use coarse crushed stone mixed with sand as a protective cushion. Compact the layer thoroughly. Cover with plastic wrap. Re-place the sand and gravel mixture. Cover the backing with another layer of polyethylene. Connect the edges of the film with tape or other adhesive tape. Consider the groundwater level. The closer the moisture penetrates to the soil base of the future floor, the more massive the waterproofing pad should be.
Making slatted flooring
Concrete flooring, although durable, is very cold and will require additional heating, which will result in spending a lot of money on electricity bills. It is better to make the gap covering from galvanized sheets or cast iron. The sheet thickness must be at least 5 mm. The number of blanks is calculated depending on the area of the room, taking into account that the distance between the logs will be 10-20 mm, otherwise the limbs of the piglets will get stuck in the floor. From the prepared strips you will then need to make a grid that can cover the entire area of the machine.
The strips prepared in advance are welded overlapping, collecting all the parts into a single structure. In the part of the room where the pigs will rest, it is better to lay warmer material, such as plastic or wood. To avoid sagging of the flooring, you need to install at least 5 supports, and preferably even a little more. After all the work is completed, feeders are placed in one part of the room, and warm bedding is placed in the other. Pigs will defecate on the slatted surface. To simplify cleaning the room, you can make a removable flooring and use ready-made plastic structures instead of metal gratings.
Wooden floor insulation
There are many noteworthy materials on the market that will serve as good insulation for a plank floor in a barn. Experienced craftsmen advise giving preference to mineral wool and sheet foam. The first option is ideal for implementing the task. Mineral wool creates a reliable barrier between the freezing soil and the wooden covering. Polystyrene foam also insulates the floor quite well. However, the material is classified as flammable. In addition, polystyrene foam often suffers from small rodents.
The best solution is to insulate a wooden floor with polyurethane foam. The material is expensive. Despite this comparative disadvantage, the base ideally retains heat in the room, has a hydrophobic structure and can last for decades.
Regardless of the nature of the selected insulation, proceed as follows:
- Lay the material between the wooden floor joists;
- Treat the surface with compounds with water-repellent properties;
- Secure the insulation to the mesh with wire or elastic ties.
It is advisable to place anti-rodent poisons in the section under the outer plank covering where the thermal insulation material is laid. Naturally, the poison must be safe for the animals that will be kept in the barn.
Construction of a barn:
- Vlad03.12.2014 at 22:21
Cool, no words. You are a hero.
Awesome...I really liked everything in the photos...once upon a time, I dreamed of it a long time ago and did almost the same thing...in the end, the beautiful edged boards were chewed, the floors turned into dust over time - they were crawling under the pigs.....since then I haven’t been chasing beauty and warmth , even in sheds made of unedged boards under the ceiling and ridge, I don’t seal up the cracks at all, because I’ve already received a thermos, where fumes flowed along the racks in rivulets in the cold and mold hung in caps on the roof ((((((((For the beauty, none of He didn’t even offer me an extra hundred rubles to the buyers))) What do they say, how beautiful, they’ll give you some more money... but that doesn’t matter... since then I’ve started making do with a slab and an unedged board. I also like the x11 impregnation and use it everywhere, too, but it’s exclusively for outdoor work.... I wouldn’t care if I’d spray the house with it, but for animals (((((((I don’t gnaw the walls, I have nothing to do with it. Otherwise, I couldn’t drive the goats away from the canister and the sheep came up to lick them... .I have salt and copper, so it’s clear that they weren’t coming to lick the salt and vitriol (((((And so, when I see such buildings, I get envious.
- Eugenia Posted on 12/04/2014 at 12:41 pm
The picket fence cost twice as much as an unedged board, that’s the thing
thanks, noted it
- Eugenia Posted on December 4, 2014 at 02:15 p.m.
Evgeniya, did you make the floor in the barn slope towards the center, but the hay doesn’t get wet there? I liked the idea of feeding, but the cleanliness... I have doubts. We also want a new flock, we need to choose a project.
I was afraid that it would get wet, and in this case I planned some boxes in the corridor for hay, but the second season everything is fine, there is no dampness from the goats. But there was no need to make a deviation; there was no great meaning in it.
Isn't it cold in very cold weather? What do you use for heating? They offer me to make a stove out of brick, and I can also heat water.
- Eugenia Posted on December 11, 2014 at 05:29 pm
Last winter there were severe frosts down to -10 inside, I don’t heat it, there is a stove there, but none of my animals are afraid of such cold snaps. A brick stove with a brick chimney is a good option; it holds heat for a long time and is better than a potbelly stove in terms of fire safety.
What about small rodents? Especially in winter. Don't they chew on polystyrene??
- Eugenia Posted on 02/12/2015 at 08:11 pm
As long as there is no sheathing on the outside, the rodents are uncomfortable. Well, cats do their rounds regularly.
Add a comment Cancel reply
This site uses Akismet to reduce spam. Find out how your comment data is processed.
Finishing the plank floor
The floor in a barn needs a high-quality finishing treatment, since the wood is regularly exposed to changing temperatures and moisture. After completing the work, apply synthetic impregnations that are harmless to animals against insects, accidental fires, fungi and mold to the surface of the boards. There are enough products in this category in hardware stores that efficiently impregnate the wood structure, penetrating deep into the fibers.
Finally, paint the floor. Pre-clean the board covering from dust and all kinds of debris. Fill any existing cracks. Sand the surface until smooth. Next, apply a primer coat. After the composition has dried, coat the boards with water- or oil-based paint.
Ventilation in a barn for keeping chickens
Lack of oxygen in poultry is caused by oversaturation of the airspace with hydrogen nitride (ammonia), moisture and carbon dioxide. To improve appetite and gain weight, sometimes you just need to organize high-quality air exchange in the house.
Forced ventilation in the chicken coop
Ventilation in a chicken barn allows you to:
- normalize the concentration of moisture in the air released by the bird when breathing; evaporated from food, bedding;
- eliminate stench;
- remove ammonia vapors formed during the decomposition of bird droppings;
- in hot weather, reduce the air temperature inside the chicken coop, promoting egg production.
To equip a poultry barn with natural ventilation, you need to build a ventilation duct from tightly fitted boards. Divide it along the crossbar into two gutters. One serves for air supply, the other for exhaust. Wooden boxes are placed in the shed so that they can be adjusted, closed or opened according to the situation.
The outlet pipe exits above the edge of the roof. It is attached with staples to a wooden base. The cross-section of the outlet pipe is at least 300 mm. To protect against the entry of insects, small birds, rodents and debris into it, the opening is covered with a grille. It is protected from precipitation by a “fungus” or an “umbrella”.
Another ventilation scheme. In the corners, two asbestos-cement or plastic pipes with a cross-section of both 100-150 mm are mounted vertically diagonally. They can be square or round. In order for the draft to be effective, the connections between the parts of the air duct are made completely sealed. The inlet is equipped with a gate that regulates the flow; it does not reach the floor by 0.3 m. The hood reaches right up to the ceiling. The elevation above the roof in both cases (exhaust, supply) is 1.5 m. The formation of condensation and ice on the exhaust duct is prevented by the thermal insulation of the pipe. Mineral wool is used for this. Insulation can be done by constructing a wooden box. Dry sawdust is poured between its walls and the pipe.
Design of a change house
A barn is a stationary building that should ensure the safety of country tools, personal belongings and other similar items. Based on your own preferences and free space on the site, you should determine the desired dimensions of the building. Ideally, the length, height and width should be multiples of the pallet dimensions. In this case, you will not have to cut the elements.
You may also be interested in the technology for building a woodshed in your country house.
Example: if pallets of 120x120 cm are available, then the optimal dimensions of the barn are 480 (L) x 240 (W) x 240 (W). You will need 24 pallets for the walls and 8 for the floor.
It is better to make the ceiling covering from boards. Also, boards will be needed to fasten the pallets together. And it is recommended to use timber 100x100 or 150x150 cm as the lower, upper trim and corner posts.
For construction you will also need: sheets of moisture-resistant plywood, fasteners, a screwdriver, vapor barrier film, insulation, fire-retardant impregnation, roofing material, roofing felt, bitumen mastic.
Calculation of approximate costs, prices of materials
New pallets are sold at a price of 250-300 rubles. Used pallets are half the price. Pine timber will cost approximately 5-6 thousand rubles per cubic meter, larch timber - two and a half times more expensive. A 25x100 mm edged board made of pine costs from 3,500 to 6,500 rubles per cubic meter.
Making the bottom trim (grillage)
To make a large shed with your own hands, it is advisable to use massive logs, and for a small structure it is permissible to use dried boards 40 mm thick, folded and fastened together.
We additionally check the installed logs against the horizon. We fasten them together with an end connection, which carpenters call half-tree. When using boards as a grillage, cut one end of the braid to size and connect it together with bolts or nails.
Photo 4. End connection in half a tree
Recommendations
It is best to line the outer surface of the shed walls with clapboard or siding. This will not only improve the appearance, but will also make the entire structure stronger at the same time. Often a situation arises when there is simply not enough money or time to build a shed in one go. In this case, the box of pallets can be treated with drying oil and covered with polyethylene.
If the shed is built on a foundation, then the box can be sheathed with clapboard without fear. For free-standing buildings, the walls are usually not lined in a continuous plane, otherwise the wind will topple the barn
If the barn had to be built without a foundation, then the walls cannot be covered with finishing until partitions or spacers are installed inside. Otherwise, a powerful gust of wind in winter can easily collapse the entire structure like a house of cards.