The self-leveling floor is a fairly liquid solution. During installation, it should spread evenly around the entire perimeter of the base under its own weight. This solution is in most cases diluted with ordinary water, so during installation it can easily leak to neighbors living below. In this case, you will not only have problems with your neighbors, but also significantly deteriorate the quality of the self-leveling floor, since all the moisture will leave it.
Self-leveling floor installation.
To avoid this situation, it is necessary to lay a layer of waterproofing material before pouring the self-leveling floor. Therefore, further we will consider how to install waterproofing under a self-leveling floor.
Preparatory work
Installation of self-leveling floors with anti-slip effect.
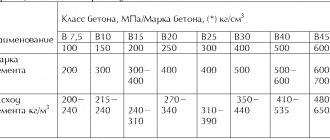
To carry out waterproofing under a self-leveling floor, you may need the following set of tools and materials:
- construction mixer or drill with a special attachment;
- putty knife;
- brush;
- roller;
- waterproofing material;
- primer;
- primer;
- waterproofing tape.
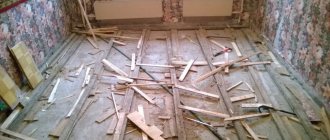
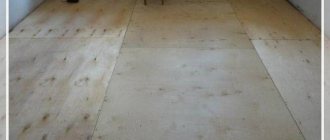
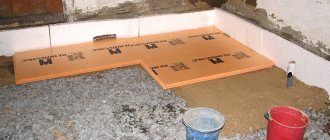
Before installing the waterproofing layer, it is necessary to properly prepare the base. It is necessary to ensure that the coating is horizontally even, dry and clean. If the floor is uneven, it is leveled using a special leveling mixture, which is poured according to pre-set beacons. Subsequent work can only be carried out after the leveler has completely dried.
The base should also be cleaned of dust, dirt, old peeling coating, paint and oil stains. If cracks and depressions are present, they are covered with cement plaster. All corners in the room are also processed accordingly, rounding them with a small radius of about 40 mm.
After this, the prepared surface is treated with a primer. Before laying a self-leveling floor, the base is primed until all pores are filled, and the consumption of the primer mixture directly depends on the quality of the old coating.
The primer mixture can be applied in several ways: using a roller, brush, airless spray or squeegee. The primer not only provides good adhesion, but also performs the function of primary water protection by creating a barrier against moisture.
Liquid insulation
A very modern and in demand today method of waterproofing a floor, which is based on the use of liquid solutions, followed by their application by one of two methods - cast or impregnated.
Now this method is very popular and in demand.
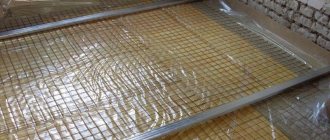
If in the first case the mixture is heated to 140 degrees and evenly poured over the floor surface, followed by leveling with a spatula, then the impregnation technique requires the use of a sprayer that creates a layer of liquid polymer primers on its base. After hardening, they form a reliable waterproof surface. It is possible to apply several layers, with them alternately reinforced with a metal mesh, which prevents spreading or deformation of the solution, which could compromise the integrity of the self-leveling floor.
Another type of liquid floor waterproofing method is the use of film-forming compounds, which are applied using painting tools or the same spatulas. A serious advantage of the technology is the speed of its hardening, which is only two days from the moment the work is completed.
With this method, the layer hardens very quickly
Waterproofing options for self-leveling floors
Today, the most popular methods of waterproofing the base under a self-leveling floor are: polyethylene film, rolled materials or cement-based coating.
Polyethylene film is an elastic, frost-resistant and moisture-proof material. It tolerates various mechanical stress well and can be used not only as protection from moisture, but also from cold. During manufacturing, polyethylene is reinforced with mesh, which significantly increases its strength.
This film is divided into perforated and non-perforated. The first type has micro-holes, which allows it to be used to a greater extent for waterproofing. The second option is used for vapor barrier. In both cases, when installing the film, it is necessary to leave a small gap between the base and the film coating.
The film sheets are connected to each other by welding. To do this, you need to place a sheet of paper at the junction and run a heated iron over it. In some cases, the film can be glued to the insulated base using plastic or bitumen mastic.
Roll waterproofing is carried out using roll materials made of fiberglass with the addition of bitumen and some synthetic compounds.
This type of insulation is glued or fused onto the insulating surface only after the base has been treated with a special bitumen emulsion.
Technology for laying self-leveling polymer floors 3d.
Sheets of material are glued overlapping. To achieve the required level of insulation, the material can be laid in several layers.
Waterproofing using a cement-based coating mixture can be used not only when installing a self-leveling floor, but also in all other waterproofing work required in private construction.
The mixture is applied in several layers. Their total thickness depends on the type of base and can range from 1 to 5 mm. When creating layer-by-layer protection, each subsequent layer is applied only after the previous one has completely hardened . In this case, special attention should be paid to the corners and other joints, so it is recommended to start processing from them. The joints can be strengthened by additional installation of waterproofing tape.
Primer
The finished base must be treated with a primer, several times if necessary. Priming is considered the first stage of installing a new floor. Before pouring the self-leveling floor, the base is primed until the pores are filled, while the consumption of material and the priming process depend on the quality of the surface itself. If it is quite porous, the first step is to apply a deep penetration primer, thanks to which it will become less permeable, and only after that a primer is applied.
The primer material is usually recommended by the manufacturer and is applied using a variety of methods using a roller, squeegee, brush or airless spray. In some cases, the primer turns white during application, then work should be suspended. Most often, the cause of this side effect is increased humidity in the room.
In addition to ensuring high-quality adhesion, the primer also performs the function of water protection by creating a moisture barrier under the base.
Recommendations for waterproofing under self-leveling floors
- Regardless of the material used for waterproofing, its layer must be continuous, which will completely eliminate the possibility of moisture penetrating into the base.
- To protect against leakage of the potting mixture at the junction of the floor and walls, a special sealing tape is installed along the entire perimeter of the room, which is attached to the wall with a construction stapler.
- Where the floor meets any vertical surface, the waterproofing material should cover such areas vertically upward by approximately 12-15 cm.
- If the surface on which the insulation layer will be laid is of good quality, then waterproofing can be done using insulating tape, which covers the joints of the slabs.
By following all the rules and recommendations of waterproofing installation specialists, you can be completely sure that the self-leveling floor will have the performance characteristics declared by the manufacturer. Quality work done will save you from many problems in the future.
If you see a surface that is striking with its exemplary evenness and smoothness, without a single hint of the slightest crack, it means that in front of you, most likely, is a self-leveling floor. In fact, any clean housewife dreams of such wealth, surrounding her loved ones with cleanliness and comfort. For self-leveling floors, a solution of special materials is used, which spreads equally over the floor under its own weight.
To mix the dry mixture, ordinary water is used, so there is always a possibility of liquid flowing to neighbors from the floor below or being absorbed by the concrete base. A decrease in the moisture content in the solution, for its part, leads to new complications - achieving the same surface leveling of the floor will be almost impossible. The solution to problems of this kind will be high-quality waterproofing
under
the self-leveling
floor.
How to make floor waterproofing for self-leveling floors
The general process can be divided into stages.
First of all, they begin to prepare the base. It must be:
A crooked floor is leveled using coarse levelers, which are poured along beacons set in advance. The next steps begin after the mixture has dried.
The surface is not only dust-free and cleaned of dirt, but also of outdated peeling coatings, paint, impurities, oil stains - in general, everything that can impair the adhesion of the surface to the material. Depressions, cracks, and sinkholes are also filled with cement plaster. The corners of the room are also trimmed: small radius roundings are made on them - 3-4 cm is enough.
The prepared base is finished with a primer, a couple of times if necessary.
Application of waterproofing to a porous surface is not permitted.
Priming is considered the first stage of installing a new floor. For self-leveling floors, the base is primed until the pores are filled, and the priming process itself and the consumption of material depend on the quality properties of the surface being treated. If it is quite porous, first apply a good penetration primer, which will make it less permeable, and then apply the primer recommended by the manufacturer. The primer material is applied in various ways, using a roller, brush, rubber squeegee or airless spray technology.
It happens that when applied the primer changes its color and turns white. In such cases, it is better to stop work. As practice shows, the basis for the undesirable effect is generally considered to be too much humidity in the room.
In addition to providing the necessary adhesion, the primer usually also serves as protection against moisture, creating a barrier to moisture under the base. in “rooms” where moisture is present, these issues need to be given special attention.
Preparing the base
First you need to prepare the base surface for the planned floor. It must be horizontally level, dry and clean. In case of unevenness, the floor is leveled with coarse levelers, which are poured using pre-set beacon slats. Further work can be carried out only after the solution has dried.
The surface must be cleaned of peeling coatings, impurities, paint, oil stains, dirt, and also removed from dust so that nothing can interfere with the adhesion of the material to the surface. Sinks, cracks, depressions should also be leveled with cement plaster. The corners of the room should also be processed: a small radius is rounded, no more than 3-4 cm.
General provisions
- This does not depend on the selected type of waterproofing; its layer must be continuous in order to completely eliminate the possibility of water penetrating into the base.
- At the junctions with walls or other vertical surfaces, the insulating layer should cover them vertically upward by approximately 10–15 centimeters.
- If there is no doubt about the quality of the base, then waterproofing the floor is done using electrical tape: it covers the joints of the slabs and covers them with a layer of mortar.
- In order to protect yourself from the seepage of the finished mixture into the junction areas next to the walls, a specialized impermeable tape is laid along the entire perimeter of the room, which is attached to the wall using a construction stapler.
In general, if floor leveling is being carried out, it is recommended to install it in advance, then you will not need to use such a film when installing the final coating.
Conventional polymer film: pros and cons
Polymer film has a number of advantages. Firstly, it is chemically stable. This allows you to use a wide range of glue, varnish, paints, etc. Secondly, it is applicable when installing heated floors, since the temperature range of its operation is quite large - up to 1000 ˚C. Thirdly, due to good elasticity, accidental ruptures of the insulation are excluded. An ordinary polyethylene film for waterproofing a floor can last 10 years or more.
Reinforced films have the highest mechanical strength.
Of the shortcomings, one of the most significant can be identified - the films are easily pierced.
Where can self-leveling floors be used?
Waterproofing under self-leveling floors is needed regardless of the installation location. The use of such floors is allowed in any room in the house, they are especially relevant where other types of flooring cannot be used: in rooms with high humidity, in which there is always a lot of fumes.
Note! In industrial conditions, self-leveling moisture-resistant coating is used in swimming pools, on ramps, in workshops, and canteens.
The main difference between self-leveling floors is that when moisture comes into contact with the surface, they do not swell and do not lose their appearance.
Other significant benefits include:
- No influence of chemicals.
- Moisture resistance subject to installation technology and installation of a waterproofing layer.
- Resistance to mechanical stress.
- Resistant to significant temperature changes.
- Durability and preservation of appearance throughout the entire service life.
When applying coating waterproofing, special attention is paid to the corners
Methods and types of creating a waterproof layer
The basic principle of applying any waterproofing under a self-leveling floor, regardless of the materials chosen, is its absolute continuity and tightness. It is especially important to follow these rules in those areas where the floor meets any vertical surface protruding above it, such as walls. To avoid water flowing there, the insulating layer there must continuously rise at least 10 cm above the level of the rest of the floor.
The main thing is to follow the rules of waterproofing the floor and then problems should not arise
There are four known types of waterproofing of the base under self-leveling floors, differing in the type of water-repellent element underlying them:
Each type of waterproofing layer can be implemented using several different materials and techniques, which we will describe in more detail below.
Different methods of waterproofing are interesting in their own way
Why is waterproofing needed?
If the self-leveling floor is so good, then the question immediately arises: is waterproofing necessary at all? Yes, it is needed for:
- Elimination of leaks.
- Protection of concrete, wood or any other base from destruction if the self-leveling floor cannot be made into a continuous layer.
- Extending the life of the floor itself.
The need for an additional moisture-resistant layer is also due to the fact that even the most durable polymer will not withstand significant water attacks and will allow moisture to pass through.
Options for materials used
Before waterproofing a self-leveling floor, it is worth understanding the types of materials used for this.
Film
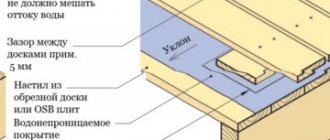
This is the simplest option, and also the cheapest. In this case, thick polyethylene film is used. It is laid with a margin (overlapping the walls) by 10-15 cm. Lay the sheets overlapping on the floor to prevent leaks. In order for the film to adhere well to the base, it is glued with a special compound that improves adhesion. Otherwise, it may come off and crack, which will lead to the waterproofing layer losing its properties.
Waterproofing film
Coating
Polymer (liquid) coating waterproofing is a convenient solution that will help qualitatively protect the base. The mixture is sold in dry form; it is dissolved with water in accordance with the instructions until the required consistency is obtained. Then the mixture is allowed to sit for several minutes, during which time the chemical additives have time to become active.
This waterproofing is applied in 1-3 layers, depending on the tasks assigned to it:
- 1 layer has a thickness of 1 to 2 mm. However, the possibility of leakage remains.
- 2 layers – 2-3 mm. Can withstand occasional or continuous contact with water, but should not be under pressure.
- 3 layers – 3-5 mm. Withstands constant contact with water.
Particular attention is paid to joints and corners; it is recommended to start processing from them. To prevent leakage, these areas are reinforced with tape, which is embedded in a layer of putty. The areas on top of the tape are additionally coated.
Apply the composition with a brush, spatula, or roller. In this case, the movements must go in one direction.
If the coating is applied in several layers, then each layer is allowed to dry for at least 24 hours. The next one is applied perpendicular to the previous one.
Important! The insulation must not be allowed to dry out too quickly; to do this, it is sprayed with water or covered with film for several days.
After complete hardening, the waterproofing layer is checked for leaks. To protect it from mechanical damage, a layer of concrete screed is poured on top.
Coating waterproofing in the bathroom
Pasting with roll insulation
This option is easy to implement; the essence of such insulation is to overlap the roll material and insulate the joints. The edges of the insulator need to be placed 10-15 cm on the walls. Before laying, the rolls are checked for defects.
Rolled waterproofing insulators have an adhesive strip along the edges, with which they are firmly connected to each other.
General recommendations
- Regardless of which waterproofing material is chosen, its layer must be continuous. If joints form, they are sealed, and the material itself is overlapped.
- To prevent leaks in the most difficult places on the floor - the joints of the wall and floor - a special sealing tape is installed around the entire perimeter. It is attached to the wall using a stapler.
- Rolled materials of any type should extend 10-15 cm onto the wall.
- In exceptional cases, if the quality of the base is high, only waterproofing tape can be applied to the joints of the base slabs.
- The insulation should only be laid on a flat and clean base.
Waterproofing installation diagram
The first thing you need to do is prepare the base - level it if necessary, repair defects and level differences. The floor may differ in level by no more than 4 mm per 1 m2 of area. If leveling is required, subsequent work is possible only after the screed has completely dried.
If a screed is not required, then the base must be cleaned of layers, dust, dirt, and old paint. The main task is to remove everything that may interfere with the adhesion of the waterproofing to the base.
Waterproofing tape is glued at the junction of the wall and the floor
Next is the primer. By using special primers, it is possible to close pores and small irregularities. This ensures final leveling of the base. The primer provides good adhesion and becomes an additional waterproofing layer.
After these preparatory works, waterproofing is carried out with the selected material and the floors are poured.
Implementation of different technologies
The most popular and quite simple are roll-type waterproofing, as well as mastic. In each case, it is necessary to carefully prepare the base.
More details about the preparatory work
You should start by removing the old coating if it is too deformed or crumbling. The surface is cleaned of various types of contaminants; the concrete must be washed to remove dust. If necessary, the base is degreased. Then you need to check it for differences in levels.