It is not at all difficult to insulate a floor with expanded clay even if you have no experience; the main thing is to carefully study the technology. Thermal insulation of the floor using expanded clay not only allows you to reliably protect your home from the cold, but also significantly saves on materials. This insulation is one of the most affordable and easy to use, and if installed correctly, it is also very durable.
Floor insulation with expanded clay
Characteristics of expanded clay
Characteristics of expanded clay
Expanded clay is a loose insulation material; it consists of oval and round granules with a porous structure. It is obtained by firing clay of low-melting types, due to which the material acquires high deterioration with low weight.
Expanded clay, its scope of application
Expanded clay of three fractions is used in construction:
- 20-40 mm – crushed stone;
- 10-20 mm – gravel;
- up to 10 mm – sand.
Technical characteristics of expanded clay
A 10-centimeter layer of expanded clay has thermal insulation properties equal to 1 m thick brickwork or 25 cm thick wooden covering. Other advantages of expanded clay:
- low cost;
- good sound insulation properties;
- environmental friendliness;
- durability;
- low thermal conductivity;
- resistance to high and low temperatures;
- light weight;
- strength.
Expanded clay
The disadvantage of expanded clay is its hygroscopicity; granules, saturated with moisture, retain it inside for a long time and almost completely lose their properties. Damp insulation sags unevenly and contributes to the deformation of the floor covering. To prevent this from happening, when using expanded clay, be sure to install reliable waterproofing.
Prices for expanded clay
Expanded clay
Use Cases
There are many options for using expanded clay, for example:
- You can use this building material for screeding. The presence of a porous structure characterizes the good thermal insulation property of the floor. You can use it to insulate the floor in a wooden or stone private house, or to insulate loggias, attics and balconies.
- Expanded clay is used to fill the foundation of a house and finish the basement to insulate the first floor and form a blind area around the house.
- Using expanded clay fractions, you can insulate a stone basement, walls, chimney, building ceilings, and steam room.
- Expanded clay mixtures are used to create concrete blocks that can be supported on screw piles. It is also used for timber frame floors.
- This material is used as a pillow for the subfloor.
- To preserve heat, communication and water pipes are insulated with expanded clay raw materials.
- At the dacha, the use of expanded clay is especially important. You can form paths, insulate a room built in half a block, and decorate flower beds and lawns.
Methods of insulation with expanded clay
In construction, 3 methods of laying expanded clay are used - dry, wet and combined. To choose the right option, you should first familiarize yourself with each in detail.
Dry insulation
Dry insulation
With the dry method of thermal insulation, the material is simply poured between joists or beacons, and a subfloor is mounted on top - boards, chipboard, plywood. To protect from moisture, the base under the insulation must be covered with waterproofing material. To increase the density of the thermal insulation layer, it is recommended to take expanded clay of different fractions and mix it before backfilling. This insulation is done very quickly and does not require much effort.
Wet styling
Expanded clay concrete screed
When insulating using this method, expanded clay is mixed with liquid concrete and fills the space between the beacons. This option is excellent for floors with large differences in height, where a thick leveling screed is required. Due to the lightness of expanded clay, the load on the base is significantly reduced; The screed itself dries faster and does not crack as much. When choosing a wet method, you should take into account that the thermal conductivity of the material increases sharply, which means that its efficiency will be much less than with dry installation.
Combined method
Combined method
In combined insulation, dry expanded clay is poured between the beacons, leveled, then the top layer is spilled with a liquid cement solution and, after drying, a standard screed is made. Cement mortar makes it possible to strengthen the expanded clay layer and avoid its deformation when pouring the screed. Additionally, reinforcing mesh is used if a large load on the floor is expected during operation.
Recommendations
Attention should also be paid to floors that are fixed to pile foundations. Stages of work:
- Tie the pile heads together with special screw beams.
- Lay a layer of waterproofing on a wooden base made of beams.
- Place rough timbers on the lower sides of the beams.
- Lay sheets of thermal insulation and cover them with waterproofing film.
- Apply a finishing coat.
Concrete floors in bathhouses need to be insulated. If this is not done, they will be very cold despite the heating of the rooms. For thermal insulation you need to choose one of several types of materials
It is important to take into account the features of insulation when carrying out work independently
Insulation of a wooden floor
Insulation of a wooden floor
For insulation you will need:
- nail puller;
- hacksaw or jigsaw;
- roulette;
- marker or pencil;
- building level;
- shovel;
- hammer;
- electric drill;
- self-tapping screws;
- sand;
- waterproofing film or coating materials;
- damper tape.
The option of installing a wooden floor on a concrete base is being considered.
Step 1. Dismantling the coating
Dismantling the covering
The floor boards are removed and taken out of the room; The logs are carefully inspected and level checked.
Checking lag
Checking the logs and partially replacing rotten ones
We set new logs by level
Expert opinion: Masalsky A.V.
Editor of the “construction” category on the Stroyday.ru portal. Specialist in engineering systems and drainage.
If the beams are in good condition and do not have sagging or other deformations, they are left in place. In case of minor damage, individual beams are replaced, and if the logs are very old, loose and rotten, everything is removed down to the concrete base.
If the logs are very old, loose and rotten, remove everything down to the concrete base
Step 2. Surface preparation
Cleaning the base of debris
The floor is cleared of debris, small cracks are rubbed, and corners are inspected.
Repair of small cracks
Deep cracks in the corners are covered with mortar or blown in with foam.
Sealing cracks
The joints around the perimeter of the floor and walls are also foamed. The surface is covered with a layer of sand, which is compacted well. When using coating waterproofing, sand is not needed.
Step 3. Waterproofing
Waterproofing
Polyethylene or a special membrane is spread on the floor so that the edges of the material cover the walls along the perimeter by 7-10 cm; in this case, the logs also end up under the film. If the whole canvas is missing, pieces of film are laid overlapping and the joints are secured with construction tape. On the beams, the waterproofing must be fixed with a stapler, carefully distributing the film in the recesses between the joists.
Waterproofing coating materials
When using coating waterproofing, the mixture is applied to dust-free concrete with a paint brush or roller, covering the walls to a height of 15-20 cm. In this case, the logs are installed on top of the protective layer. Bitumen mastic, liquid rubber, bitumen-polymer mixtures and cement-polymer based mastics are suitable for coating. The composition should be applied in 2-3 layers; Each layer takes about 3 hours to dry, so waterproofing will take time. Finally, a damper tape is fixed along the perimeter of the walls at the height of the subfloor, which will help avoid deformation and cracking of the screed during temperature changes.
Damper tape
Step 4. Installing the slats
So, if the logs have been completely dismantled, new ones must be installed. To do this, take strong wooden slats or beams, cut them to the size of the floor, prime them with an antiseptic solution and dry them. The height of the wooden frame for the floor should be at least 10 cm. The outermost slats are attached at a distance of 2-3 cm from the surface of the walls, between the rest there is a gap of 0.5 to 1 meter. Each rail must be level and parallel to the others so that no part protrudes from the horizontal plane.
Corners
Attaching corners for joists
Adjustable floors
The slats are screwed to the floor with screws using metal corner plates, one side of which is adjacent to the wood, the other to the base of the floor. The outermost fasteners are placed 2-3 cm from the ends of the slats, all subsequent fasteners are placed in increments of 50 cm.
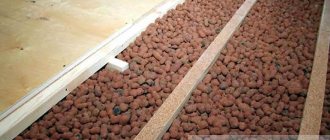
Step 5. Filling with expanded clay
Expanded clay backfill
Expanded clay filling
Mix large and small expanded clay, and then pour it between the joists or guide rails. In the corners, the insulation is carefully straightened with your hands so that there are no voids left. Having filled the entire space, the expanded clay layer is carefully compacted, trying not to damage the granules. Waterproofing is laid on top and secured with a stapler.
Step 6. Installation of flooring
Waterproofing and laying floor boards
Waterproofing and laying floor boards
A subfloor made of plywood, chipboard or boards is placed on the beams protruding from the insulation, and then the finishing coating is laid. The film protruding along the perimeter is cut off with a knife, and the joints are covered with plinths.
Laying linoleum on floor boards
Installation of plastic plinth Installation of plastic plinth
Insulation on the ground
Insulation on the ground
If there is soil under the floor instead of a concrete base, the insulation technology is performed slightly differently:
- the soil is leveled and compacted;
- pour a layer of gravel about 10 cm;
- then add a layer of sand and compact it well;
- the next layer is expanded clay, its thickness is from 15 to 25 cm;
- After leveling and compaction, the wooden floor is installed.
Which waterproofing to choose
The price range of materials in this category is as wide as their variety:
- Bitumen mastics;
- Polymer mixtures;
- Rubber hydraulic barriers;
- Polyethylene film;
- Roll materials of various compositions.
When choosing waterproofing that suits your financial capabilities, it is worth remembering that:
- Liquid mixtures and mastics require a clean and solid base, and sometimes priming. After all, they must form reliable adhesion to the surface.
- Rolled materials are laid freely, so they are indispensable for waterproofing expanded clay laid on the ground. It is necessary to ensure that the strips overlap by at least 10 cm; for some types of waterproofing of this group, manufacturers recommend gluing the overlapping edges of the strips.
Insulation under a concrete base
Dismantling and removing old floor screed
Floor cleaning
Expert opinion: Masalsky A.V.
Editor of the “construction” category on the Stroyday.ru portal. Specialist in engineering systems and drainage.
When insulating a floor under a screed, preparation of the base is carried out as standard: the old covering is dismantled, the cracks are sealed, and the surface is cleaned of dust. Then the base is covered with liquid waterproofing or covered with film.
Floor waterproofing
The joints around the perimeter of the floor must be closed, so the film is placed on the walls. The damper tape is attached last at the level of the future screed. Now you can start insulating.
Damper tape.png
Step 1. Installation of beacons
Beacons must be metal; it is best to use T-shaped aluminum slats. Mix a little cement or gypsum mortar to fix the beacons, take the first strip and lay it under the wall opposite the doorway on the mortar. Be sure to check the location of the guide with a level and, if necessary, press it into the solution or, conversely, lift it. The height of the beacons should not exceed 10 cm, and the distance between them should be from 0.5 to 1 m.
Installation of floor beacons
Lighthouses
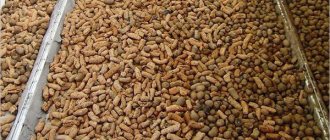
Step 2. Backfilling insulation
A mixture of expanded clay of different fractions is used to fill the space between the beacons and level it with a rule or a piece of plywood. Particular care should be taken to fill corners and joints where voids may form. After this, the expanded clay is carefully compacted so as not to damage the granules.
Expanded clay backfill
Expanded clay backfill
Step 3. Reinforcement
A metal mesh with large cells is laid on the insulation, leaving 4-5 cm indentations from the walls along the entire perimeter. The mesh should not have any dents or bulges or protruding sharp edges.
A mesh is laid on the expanded clay
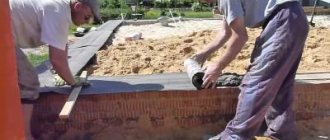
Step 4. Making the screed
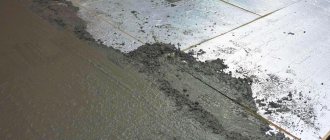
For the screed, take 3 parts of sifted sand and 1 part of cement, mix thoroughly with water to a uniform thick consistency and pour in portions onto the floor between the guides. Level the screed using a long rule, running along the beacons and removing excess mortar. Now you need to wait for the concrete to dry completely and you can lay the floor.
The screed is laid directly on the expanded clay, without additional insulation
Leveling the cement screed
Adviсe
Expanded clay as insulation is valuable because it allows you to equip reliable and effective thermal insulation without a blow to the budget. However, to improve the quality of the coating, you must follow several recommendations:
- to achieve maximum insulation effect, bulk material is used separately as an independent coating without mixing with cement mortar;
- the thickness of the backfill should first of all be calculated taking into account the permissible load and strength of the foundation, especially if the house is built on screw piles;
- any exposed beacons must be fixed with alabaster compounds - they tend to harden very quickly, which significantly reduces work time and improves their quality;
- to maintain the integrity of the coating and reduce the risk of deformation, it makes sense to additionally reinforce the expanded clay layer with a special metal mesh;
- to ensure maximum adhesion of the granules to each other, it is necessary to mix large granules with small ones;
- Despite the fact that the floor can be walked on after just a few days, its greatest strength and fixation will be achieved only after four weeks, so if possible, limit movements on the freshly installed surface during the first month.
All these recommendations are quite simple to implement, and, importantly, any thermal insulation work with expanded clay can be carried out independently with your own hands, even by a person who does not have any construction skills. You will learn more about how to insulate the floor of a frame house with expanded clay from the following video
You will learn more about how to insulate the floor of a frame house with expanded clay from the following video.
Expanded clay concrete screed
If the rough foundation is too uneven or it is necessary to significantly raise the floor level, use expanded clay concrete screed. First, the surface is cleared and cleaned of dust, cracks and joints are foamed, and waterproofing is installed. After this, the main process begins:
- beacons made of metal slats are installed on the floor, strengthening them with cement mortar;
Construction floor beacons
Beacons, damper tape - mix 1 part of cement with 2 parts of sifted sand, add 1 part of water and 3-5 parts of expanded clay, depending on the expected loads on the floor;
Preparation of the solution - fill the gaps between the beacons with the mixture, not reaching the top 2-3 cm; Expanded clay concrete screed
- compact and level the surface by immersing the floating granules in the solution;
- when the screed has set a little, prepare standard concrete without impurities and pour it on top, leveling it according to the beacons as a rule.
Screed with expanded clay
The beacons should be pulled out and the seams should be rubbed with a solution
It takes at least 3 weeks to dry, but it is better to wait a month. During the first days, the screed surface is periodically watered with water to prevent cracks from appearing. This base is quite durable and warm, and lasts a long time.
When you can carefully walk across the surface, the entire area of the screed must be covered with film or a water barrier
Which material is better for floor insulation?
| Advantages of expanded clay | Disadvantages of expanded clay |
| Good thermal conductivity of expanded clay - grade 500 has a thermal conductivity coefficient of 0.12-0.15 W/m*K | You have to fill in a thick layer of expanded clay - more than 50 cm, because... otherwise noise and heat insulation will be poor |
| The weight of expanded clay is only from 250 kg/m3 versus 2500 kg/m3 of concrete | It is an absolutely moisture-resistant material; it is recommended to use either a waterproofing film or not to use expanded clay at all |
| With its help, the service life of wooden floors is extended to 50 years. | |
| Resistance to chemically aggressive environments | |
| Environmental friendliness | |
| Relatively low cost |
Video - Floor insulation with expanded clay
Advantages and disadvantages
First, let's look at the positive qualities of the material. The main thing is the ratio of quality level and price. But in addition to the advantages, there are also disadvantages, so reviews about expanded clay as a floor insulation material are different.
Advantages:
- Excellent thermal energy retention. The stones are based on clay, in which, when foaming, pores filled with air are formed.
- A light weight. Even a thick layer of material does not create a large load.
- Easy to install. No special skills are required to work with such material; construction equipment is not required.
- Resistant to fire. Expanded clay is non-flammable and does not emit toxic or harmful odors.
- The insulation material is not destroyed by insects and rodents.
- The granules tolerate temperature changes well and retain their properties when exposed to household chemicals.
- The thickness of the expanded clay layer for floor insulation creates good protection from extraneous noise.
- The material is environmentally friendly for people and animals.
- Long operational period. When installed correctly, expanded clay will last at least a hundred years.
The negative aspects of the material appear during construction.
Many consumers are interested in what layer of expanded clay is needed to insulate the floor. It turns out that in order to get a good result, the granules are poured to a level of ten to forty centimeters. This will make the ceiling closer to the floor, which is not very pleasant and even unacceptable.
If the hard shell is missing or damaged, water gets into the granules. In its raw state, expanded clay is not used for insulation; it dries slowly. To prevent moisture from penetrating into it, additional waterproofing and vapor barrier layers are installed. Violation of these requirements will inevitably lead to wetness of the material. Expanded clay will increase its mass, sag in places, and lose useful qualities.
Cheap doesn't mean bad
Expanded clay is an inexpensive material. In order for repairs using it to be as cheap as possible, you should take care of purchasing the required quantity at once, since calculating the amount of expanded clay for the floor is not difficult. To do this, calculate the area of the room (length x width) and multiply by the thickness of the layer. The result is obtained in m3, and manufacturers often sell expanded clay in bags marked l (liters). Conventionally, we can assume that 1 liter is 1 dm3.
If the thickness of the screed is not uniform, then its average value is taken: the smallest and largest heights are summed up and divided by two. You should buy 10% more material than the amount received. Those who do not want to do calculations can use a special calculator, which is available on almost every construction site. By entering the numbers for the area of the room and the thickness of the screed, you can get the result in liters, bags or m3.
You can make expanded clay floors with your own hands, which will further reduce costs.