An uninsulated attic floor is one of the most vulnerable building structures in terms of heat loss. Through it, 20 to 40% of the thermal energy needed by residents easily “evaporates” into the atmosphere.
The percentage of losses depends on the material used in the construction of the rafter frame, and on the type of roofing used in the construction of the roof.
Insulating the ceiling in a house with a cold roof will significantly reduce heat loss. We will talk about how thermal insulation work is carried out.
We will list in detail what materials you will need. Taking into account our recommendations, you can significantly improve the energy efficiency of your building.
Ceiling height in a private house
The height determines the convenience of the room in a private home and the method of its operation. The volume of circulating air depends on it.
Minimum height
Safety standards require a minimum ceiling height of 2.4 m for a private home. In this case, it is allowed to install gas appliances: stove, boiler and water heater
This is also important from a practical point of view. Chandeliers are installed on the ceiling, and at a lower height it is uncomfortable for a person taller than 1.7 m to move around
The psychological factor is taken into account: low altitude is depressing, and causes panic in people with a fear of enclosed spaces. It introduces restrictions on the use of suspended structures and finishing
Optimal ceiling height in a private house
The optimal height for a ceiling in a private house is considered to be 2.5–2.7 m with finishing decorative finishing. There are no restrictions on choosing a larger indicator, since a small area in this case looks more profitable. This takes into account:
- service method;
- space heating;
- harmony.
Cleaning the floor will require a stable ladder. Replacing lamps in spotlights will be difficult. Great height negatively affects the comfort of the room, which is taken into account when choosing the finish and method of using the room. Heating costs will increase. To maintain a comfortable temperature of 22° under the ceiling, the air will have to be heated to 30° and higher. Heat loss through the ceiling increases, which leads to icing of the roof, the appearance of rot and fungus on the rafter system.
If a ceiling of 3 m or higher is required, the heating issue can be resolved by installing a warm water or electric floor. In this case, the surface is heated evenly and the air, rising, warms the entire volume of the room. In private houses with second light, where the ceiling is at roof level, convection heaters are not used. They are replaced with infrared ones or the above option with a floor.
Important! For private houses with convection water or electric heating, ceilings are not made higher than 2.7 m. This is interesting: Gluing foam plastic to concrete: disassemble it from all sides
This is interesting: Gluing foam plastic to concrete: disassemble it from all sides
Beam type ceilings
By design, all floors are divided into two types: beam and slab. Each of them has certain characteristics.
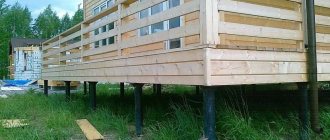
Beam ceilings are often found in private homes
Therefore, if you need to make your own ceiling base, you should pay attention to this type of structure. The basis of such a ceiling are wooden beams that rest on the load-bearing walls of buildings
Their cross-section depends on the distance between them, the planned load and the width of the span.
Before you begin creating the floor, you need to select the wood for the beams. They are made from both softwood and hardwood materials, but the wood must be thoroughly dried for at least 3-4 months. Before laying, beams must be checked for rot, cracks and other defects. If they are found, the material cannot be used.
Beams laid on the walls are leveled. To do this, parts of tarred boards of various thicknesses are placed under their ends. Untreated wooden wedges should not be used to level beams. The joints between elements on internal walls are reinforced with clamps or staples. Instead of a metal clamp, overlays made of boards more than 40 millimeters thick are also used.
According to fire safety requirements, the distance between the beams and the chimney must be at least 40 centimeters. When sealing the ends into the walls, they are impregnated with an antiseptic, tarred and wrapped in roofing felt. This allows you to protect the wood from rot.
To ensure the rigidity of the floor, every second beam is fixed to the load-bearing wall. Experts advise using steel anchors embedded in the masonry for this purpose. To create a rough ceiling on beams, cranial bars are used. They are attached to the sides of the base, and knurling plates are nailed to them to form a covering.
In addition to wooden beams, metal products are also used. They are smaller in size and make it possible to save on the total volume involved in covering. At the same time, metal elements have a greater load-bearing capacity, which is several times higher than that of wooden beams.
But metal beams also have disadvantages. These include susceptibility to corrosion and the inability to create effective sound insulation.
How to choose floor slabs, see details in the video:
Metal ceiling
Metal floor beams are made from low-alloy or carbon steel.
Metal beams are a more durable material than wooden beams and have a longer service life. Due to their strength, you can save space by reducing the thickness of the ceiling itself. It is worth noting that floors using metal beams are used extremely rarely; more often, builders opt for wooden floors.
The openings between the beams are filled with a mixture of lightweight concrete or wooden panels. The weight of one square meter of such flooring exceeds 400 kg.
Using metal beams with your own hands, you can cover large spans, from four meters or more. The metal floor is a non-flammable material and exhibits a high degree of resistance to various biological factors such as rot or termites.
The disadvantages of this overlap include the tendency to form corrosion in places with high levels of humidity. The ceiling made of such material has low sound and heat insulation properties. This situation can be corrected if the ends of the beams are wrapped with felt.
In most cases, a rolled profile is used as a load-bearing element: angles, I-beams, channels. During installation work, reinforced concrete slabs up to nine centimeters thick are laid between the beams. A layer of reinforced concrete screed and slag is applied on top.
For this type of flooring you will need the following materials:
- metal beams;
- prefabricated reinforced concrete slabs;
- plaster mesh;
- waterproofing materials;
- boardwalk.
In rare cases, reinforced concrete beams are used for flooring in a private house. Their disadvantage is that the work cannot be done with your own hands. The use of lifting equipment is mandatory.
Technical and operational requirements for the design
Much in the calculation of floors depends on the specific parameters of the house and external operating conditions. But there are also general technical rules that any design of this type must comply with:
- Sufficient strength that will eliminate the risk of deformation and deflection of the structure. By the way, for an interfloor ceiling slab, the average density of the concrete structure is 1400-2500 kg/m.
- Fire resistance. There are different classes of fire resistance, and the most heat-resistant designs are used when laying a chimney over the ceiling in the attic.
- Sound and heat insulation. There may also be different levels of insulation efficiency, but the minimum noise comfort and heat resistance in a residential building should be ensured by all levels of floors. Another thing is that in each case a material is selected that corresponds to the place of application in terms of protective properties.
- Special properties and characteristics. There may be special requirements for steam and water resistance, gas tightness and biological security, depending on the conditions of use of the structure.
[my_custom_ad_shortcode5]
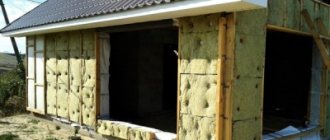
Two options for ceiling insulation. Advantages and disadvantages
Insulating the ceiling in a private house with your own hands can be done in two ways - from inside the room or from the outside (from the attic). Let's look at them from the positive and negative sides.
Application of different materials
When insulating from the inside, mineral wool is chosen, and for the external method, almost any insulation offered on the building materials market is suitable.
Interbeam insulation
Floor height in the house
For interior work, installation of a suspension system is required. It is also worth starting from your personal feelings whether a material similar to glass wool will suit you in the room, and how it will fit into the format of the room. During external work, this factor can be ignored.
Complexity of work
Not every person will be able to insulate the ceiling in a private house without professional skills. This especially applies to suspended structures, which must be not only reliable, but also aesthetically attractive. And external insulation will require less effort and is much easier to do.
Budget planning
There are cases when the laying of floor slabs in a house is done crookedly. The most current way to hide this misunderstanding is to create a suspended ceiling, which will lead to additional costs. For external insulation, any material for a smaller amount is suitable, for example, polystyrene foam, expanded clay or other similar materials. Let's take a closer look at some of them.
Video description
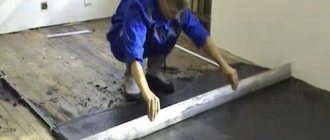
Insulating the ceiling from the inside, watch the video:
The process of insulating the ceiling from the inside with polystyrene foam Source nl.decorexpro.com
Thermal insulation of the ceiling from the inside with polystyrene foam boards Source barmanlive.ru
Assembly of hydro- and vapor barrier
First, you need to decide what the room will be used for; if there is another heated room on top, then there is no point in installing heat and sound insulation on the sub-ceiling; wooden surfaces distribute noise and heat quite well. The vapor barrier is installed along the entire perimeter of the ceiling, especially well stretched in the corners, laid with an overlap, the boards are mounted overlapping. This will help protect the rough base and wooden ceiling from rotting and mold.
Ceiling vapor barrier - effective and high quality
Subtleties of laying insulation
If the insulation is installed incorrectly, it is possible to destroy the baseboards and decor, the rough ceiling, even cause a fire, for which you should slowly study the instructions so as not to confuse the sides, because the markings of different companies may contradict each other.
It is enough to cut circles of about 20 cm in the material around the planned lamp; this will create good fire safety, which is extremely important for a wooden house and wooden decorative elements. It is important to establish these places during the installation of the material - we measure the places from the wall, then put a mark on top, in the form of a circle with a diameter of 20 cm
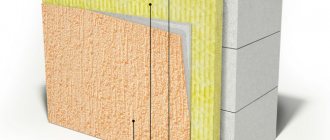
Integrated thermal insulation reduces building energy losses
The same applies to vapor barrier, although the material is quite durable, but unstable to high temperatures, it can melt and lead to a fire, especially if the rough, facing and decor are made of untreated lining. Thus, an emphasized design can lead to dire consequences for the interior and the integrity of the room. But since the lamps and decor are not mounted to the sub-ceiling, like the wiring, it is enough to install heat-reflecting foil, 20 by 20 cm squares, on the vapor barrier below, at the mounting points. It will not be visible, but it will help preserve the interior of the room and not damage the intended design with decor.
Installing thermal insulation in a wooden ceiling
As we see, it is quite possible to make a wooden ceiling with your own hands quickly and efficiently. In addition, you can hem the rough base yourself, faster, better than many workers.
Ceiling installation when the attic is cold
When the building is one-story, and only the roof is on top, the installation of the ceiling in a private house is carried out as follows.
Step one - filing the ceiling
. For this you need a shield made of boards. The material for it is ordinary edged or tongue-and-groove boards with a thickness of 25 millimeters or more. They are fastened “in space” using long nails, leaving minimal gaps. The tongue and groove boards are hemmed with a groove from the wall, from which the installation of the cold ceiling starts.
When deciding what to make a ceiling from in a private house, you can opt for lining it in another way - plywood or OSB, at least 15 millimeters thick (read: “Ceiling with plywood”). But it should be taken into account that in terms of one “square” this option is much more expensive and the possibility of the structure sagging under its own weight and the weight of the insulation increases.
As an alternative, in private houses of old construction, the board panel can be placed not below the beams, but laid on top of them. Thus, the height of the rooms will not be reduced, and the living space will not be reduced. If necessary, you can make a crate. You should not worry about the appearance of the rough ceiling, since finishing the ceiling in a private house will cover the surface, and the beams, painted in the desired color, will decorate the interior of the room.
Step two - vapor barrier of the ceiling
. First of all, you should take care of the vapor barrier. On the one hand, this layer should prevent the heat-insulating material from becoming damp, and on the other hand, due to radiation, it should reduce heat loss. This can be achieved using aluminum foil. Also used as a vapor barrier is foil insulation based on foamed polyethylene - this relatively recently appeared vapor barrier material for the ceiling creates an obstacle to heat loss due to both radiation and convection. When a chimney is laid in the ceiling, there must be a distance of at least 30 centimeters between the chimney and combustible material.
Step three - insulation of the floor
. The installation of a ceiling in a private house with a cold attic involves the use of insulation materials, the choice of which is huge (read: “How to insulate the attic of a private house”).
The most popular among them are:
- Mineral wool
. This material (see photo) is non-flammable and has excellent thermal insulation properties, but over time they begin to deteriorate. The fact is that even completely dry mineral wool begins to cake after a certain period. If the vapor barrier is not done well, this insulation picks up moisture and ceases to perform its intended function. It is impossible not to mention such a disadvantage of mineral wool as the presence of volatile small fibers that irritate the respiratory system. Therefore, they need to be isolated from living quarters especially carefully. The cost of mineral wool is affordable. When insulating the ceiling with mineral wool in a private house, it must be handled with care and not compacted, since the thicker the layer, the better the thermal insulation. - Basalt wool
. The ceiling in a country house is often insulated with this type of mineral wool. But there is a difference between these two materials. Basalt wool retains its shape better and practically does not cake, but, unfortunately, it can pick up moisture.
Styrofoam
. This thermal insulation material is flammable. Controversy continues regarding their release of styrene. Although foam plastic intended for insulation must meet environmental standards, in reality this indicator depends on the manufacturer. As for the thermal insulation properties, this material is excellent, since there is practically no heat loss due to air convection inside the foam layer (read: “How to insulate a ceiling from the inside in a private house”). This insulation does not change its shape and size - even after 10 years, the volume of foam sheets between the beams will not change from the moment they were laid. The material is considered non-hygroscopic and moisture-proof. There is an opinion that its use allows you to avoid making a vapor barrier at all. But thermal insulation using foam plastic is expensive and unaffordable for many consumers.
How to do the job yourself: step-by-step instructions
Purchasing finishing materials for home renovations is a very expensive pleasure, and ordering more craftsmen is an unaffordable expense for many. Therefore, the question of carrying out tiling and other work in a private house with your own hands is becoming more frequent.
If he has experience in performing such work, then he will not need hints or advice, but there are many who even held a hammer and nails in their hands only in childhood, when they helped their father make something. Beginners need detailed instructions on how to arrange a ceiling.
Preparation
Before finishing it is necessary to complete the following preparations:
- Clean the surface. Even if a suspended structure is intended, then mold, mildew, oil or other stains must be eliminated, and the surface treated with antiseptic compounds. This will protect against the development of harmful microorganisms in the future and protect the lining from damage.
- Take measurements of the ceiling according to the selected type, prepare the necessary tools and accessories.
- Prepare materials according to calculations, make a reserve of approximately 10–15%, since purchased consumables, even of the same brand, but from different batches may differ in color, texture and other properties.
- Clear the room of furniture or other objects that will interfere with free access to all corners and ceiling surfaces. If this cannot be done, then you need to move everything to the center and cover it with a protective film.
Important: Since a lot of heat is removed by the ceiling, you need to choose the type of thermal insulation, which for houses with a warm and cold attic differs both in type and in the method of installation.
Soundproofing
This barrier is necessary in several cases:
- for gable roofs, especially those made of metal tiles, since rain, hail, and other precipitation will create a lot of noise;
- for an attic room that has a thin layer of insulation with a roof covering;
- additional soundproofing for comfort and silence inside the house.
Rules for choosing soundproofing materials and their installation:
- If the floor is made of beams, then it will be necessary to add a layer of vapor barrier film between them, separating the surface of the floor and the ceiling. The most effective material is foil vapor barrier with the effect of additional heat reflection into the room, but its price is much higher than parchment or regular film.
- Mineral wool with a thickness of at least 0.1 m, a mound of lime-containing sawdust or sand can be used as a soundproofing barrier. You need to take well-dried materials, since moisture greatly reduces the insulating properties.
- When using mineral wool, it is necessary to separate its surface from the room with an additional layer of film to prevent fibers from entering the room air.
- At the final stage, the flooring and floor joists are laid out with plywood 1 cm thick or a board 0.3-0.4 m wide and 3-4 cm thick.
If the vapor barrier layer was not installed, you need to make holes around the perimeter of the room in such a floor to organize ventilation.
This instruction provided for soundproofing by finishing the floor in the attic, which serves as the ceiling for the lower room. If the roof does not allow this, you need lining from the inside. For this purpose, mineral wool and a vapor barrier film with the same type of installation are used.
separate article
Vapor barrier
A vapor barrier layer is necessary for any building, since it helps the structure to get rid of condensation in the event of a temperature difference on different layers of the insulating cushion. Moisture negatively affects wood, leads to its rotting, deterioration, and reduces its protective properties in all respects.
To organize a vapor barrier:
- A layer of aluminum foil is laid above and below the thermal insulation coating.
- An alternative to foil materials is insulation based on polyethylene film.
- The vapor barrier film is laid closer to the insulation.
Important: If the house has stove heating or just a working chimney, it is necessary to lay at least 3 cm of a non-combustible insulating layer around it along the entire height above and in the ceiling. This will make the building safer and prevent accidental fire as a result of the strong heating of the chimney.
How to properly insulate?
Today you can find many thermal insulation materials on the market. They differ in structure, physical properties, technical parameters and other qualities. This all affects the price, and it does not always obey the rule “the more expensive the better.” To understand the materials, you need to study the characteristics of the substances.
Mineral wool
A material with high fire safety, good thermal insulation, which deteriorates over time. A budget type of insulation, however, in order to insulate the ceiling with mineral wool, a special finishing is required during installation:
- an effective vapor barrier around the material is required to remove moisture from it;
- protection against fibers so that they do not enter the air of the living room;
- Warmth is best ensured by laying rolled material with overlapping joints to reduce cold bridges;
- It is not recommended to crush or compress the insulation structure, since an increase in its density leads to a decrease in thermal insulation properties.
Despite the ability to release fibers into the atmosphere, the material is environmentally friendly.
Basalt wool
It differs from mineral wool in its ability to preserve its structure and shape for a long time, and does not lose its thermal insulation qualities over time. However, the material also accumulates moisture in the structure, and therefore requires an effective vapor barrier and water barrier.
Expanded clay
This coarse bulk material is economical and can be used to organize an insulating layer only on the ceiling of the next floor or attic. This insulation is distinguished by its significant specific gravity and the ability to transfer heat due to convection. It is recommended to make embankments no thicker than 2–3 cm; boards must be fastened tightly under and above such an insulating layer so that no foreign odors are released.
Styrofoam
The advantage of the insulator is its relatively strong structure, which allows the slabs to be attached even to the ceiling. Many claim that styrene is released from the structure of the foam into the surrounding air, but so far there is no scientific and quantitative confirmation of this fact.
It should be noted that there is a fire hazard due to the flammability of the material, which does not allow its use near chimneys. It has good vapor permeability, provides good protection against heat loss, and does not deform over time.
Advice: This type of thermal insulation is more resource-intensive due to the significant cost of the slabs, especially the extruded type.
here
Selection of materials for the ceiling
What materials the finished ceiling is made of has already been described. Wood is usually used to create ceiling structures in private homes.
Here, as in the case of the floor, it is not necessary to pay attention only to the strength properties of the material. For the ceiling, it is better to choose light boards with an attractive texture.
Coniferous trees, as well as maple and birch, meet this requirement.
The main parameters when choosing wood are its class and grade:
- Class A selected grade without visible defects with a smooth surface, which may have a small number of knots inside.
- Class B of the first grade - wood with minor defects, noticeable only upon detailed examination.
- Class C second grade with a rough surface and knots. Cracks may be observed on the boards.
- Class D third grade. Such material is of such low quality that it cannot be chosen as a base for a ceiling.
If your budget is strictly limited, it is not necessary to purchase a selected variety of wood. You can completely get by with class C wood, but with its preliminary treatment with antiseptic solutions and a tinting composition. This will help significantly increase the service life.
The type of wood and its quantity are chosen with an emphasis on the type of ceiling surface that will be made in a private house. So, for the simplest hemming you will need boards and timber. At the same time, the width of the boards allows you to change the design of the ceiling. The wider they are, the rougher the finished surface looks. This allows you to get a unique rustic atmosphere in any room.
The timber is selected with a cross-section that is suitable for each specific case. So, if an additional insulating layer is required, then it is worth turning to larger options so that the insulation can easily fit inside.
Important! Instead of hemming boards, sheets of moisture-resistant plywood can be used. But such a design of the ceiling in the house will require finishing.
Pasting the ceiling surface with wallpaper or tiles
There are many options for what types of ceiling coverings there are. One of them is the use of wallpaper. Pasting the ceiling with them is an inexpensive finishing method.
Its main advantage over whitewashing or painting is the ability to give the surface an original color scheme, even an imitation of wood. In addition, when finishing with wallpaper there is no large amount of debris, dust and dirt.
By the way, such ceilings have a longer service life than painted or bleached ones. The advantage of wallpapering is that there is no need to seal even the slightest cracks and cracks, but you will have to level the base. Finishing materials similar to those for ceilings are available for sale. These are special wallpapers - they are denser than the usual ones that are used to cover walls.
The process of decorating a ceiling with wallpaper is no different from decorating walls with it. First, glue is applied, the material sheet is glued, and allowed to dry. When the ceiling was previously covered with paint, it does not need to be removed if it does not crumble.
This finishing method has disadvantages:
- if the wallpaper is applied incorrectly, they soon begin to lag behind;
- Inexpensive types of this coating do not tolerate high humidity.
What types of ceilings exist that are affordable, other than those decorated with wallpaper, painted and bleached? This is a polystyrene foam tile finish. 15 years ago this method was very popular, but now it has lost its leading position to stretch ceilings.
The advantages of tiles are that they are produced with a smooth and white surface, as well as with different patterns and textures. Having become familiar with the types of tile ceilings available, you can choose the finishing material for the ceiling in your home, taking into account your personal wishes. This ceiling surface is also painted with water-based paint.
The tiles have a number of advantages:
- Large range of products with a wide choice of patterns and textures.
- Affordable price.
- Good sound insulation, which some products have.
- There is no need to remove the previous coating and carefully level the rough base.
- The installation work can be done with your own hands without any problems.
- Easy care. You just need to periodically wipe the ceiling with a rag.
- The coating is not dangerous from moisture.
- During installation, a minimum of debris is generated.
Among the disadvantages of tiles, it should be noted:
- fragility, so it is easy to damage;
- sometimes there are noticeable joints between adjacent elements;
- If there are differences in height on the ceiling, it may be necessary to level its surface.
Nowadays there are seamless products on sale that, when installed, turn into a smooth, continuous coating. Regardless of the type of tiled ceilings in a house, their installation is simple: the sheets are attached to the adhesive, starting work from the center of the room. To determine this location, two threads are used, which are pulled diagonally from opposite corners.
Technology for installing ceilings on beams
If you want to figure out how to make a ceiling in a private house, the installation sequence given below will help you understand the specifics of the work.
Tools and materials for work
Before making a ceiling in a wooden house, prepare the following materials and tools:
- saw or jigsaw;
- hammer;
- stapler;
- screwdriver;
- cranial bars (used if the ceiling is hemmed above the bottom of the beams, the section of the bars is 5x5 cm);
- self-tapping screws (optimal length 4.5-5.5 cm);
- slats for making a supporting frame for sheathing made of plywood and other boards;
- material for filing;
- nails;
- building level;
- thermal insulation material;
- hydro and vapor barrier.
Laying vapor barrier
Before making the ceiling in the house, a vapor barrier membrane is laid. It is attached using a stapler to the supporting beams from the bottom.
For these purposes, the following materials are used:
- foil products;
- polypropylene films;
- reinforced polyethylene films;
- multilayer membranes.
Strips of vapor barrier material are attached with an overlap of adjacent elements to a width of 15 cm. The joints must be sealed with tape. To protect the film from damage, fixation is carried out through a strip of thick paper. The vapor barrier is installed on the walls to a height of 20-30 cm. All junction points are carefully insulated.
Laying insulation
After laying the film, insulation is laid on the back side (between the floor beams).
The following materials are used as a heat insulator:
- mineral wool;
- expanded polystyrene;
- Styrofoam;
- basalt wool;
- sawdust;
- expanded clay
Before installing the rough ceiling, only lightweight materials (construction wool, polystyrene foam and expanded polystyrene) can be laid on the vapor barrier membrane. Bulk insulation is poured into the gap between the beams after installing the rough ceiling.
Installation of a rough ceiling
When making a ceiling with your own hands in a private house, do not forget to mount the rough ceiling surface. It will be the basis for the finishing layer. In some cases, the rough base is used without finishing as a finishing coat.
Installation of the rough ceiling surface takes place in the following sequence:
- We attach a frame of wooden slats to the load-bearing beams on top of the vapor barrier layer. It will be the basis for the rough ceiling and support for the thermal insulation material, which is best laid after the frame is made. We make the lathing from slats with a cross-section of 3x4 cm. We attach the slats to the beams in increments of 50 cm. For fastening we use screws or nails. The frame will simultaneously serve as a ventilation gap between the ceiling itself and the ceiling lining.
- After this, we attach the selected material for making the rough ceiling. We attach plywood or ceiling slabs joint to joint so that the joint points fall in the middle of the sheathing strip. We attach the slabs to the frame with self-tapping screws, which we screw in at 150 mm increments.
- We periodically check the evenness of the surface using a building level.
After finishing the construction of a wooden house made of timber, you have to face this situation - you want to see a reliable rough foundation on top, instead of wooden beams, to implement the intended design, install decor and a spectacular interior. I didn’t have to hire craftsmen to file the ceiling; it was enough to follow the generally accepted rules to make the wooden ceiling with my own hands reliable for many years. Wooden beams are used mainly in private houses, while concrete floors are used in apartments. But it is quite possible to make a beam structure during a major renovation of the roof on the top floor; this is better than creating a concrete partition.
Wooden beams are mainly used in private homes
The main stage of installation
The beams are placed in the places prepared according to the plan. Then the position should be adjusted. Without paying attention to the tops, the lower parts are aligned in the same plane. Pre-prepared, tarred spacers and wedges are installed between the wall and the beam as needed. Check the horizontal position using a cord according to the marks on the wall.
It is easier to make a ceiling in a wooden house. There is no need to insulate the beams. It is enough to place the structural elements and securely fix them. The floor length is not recommended to exceed 6 meters, so the beams are often installed along a short wall. The step is calculated taking into account the length and is distributed evenly.
The quantity is calculated taking into account that the distance between adjacent beams does not exceed 60 cm. The optimal size would be 45-50 cm.
The presence of a stove, boiler and other heating devices may make adjustments. The distance to the outlet pipe must be at least 40 cm. The ceiling in a log house can be made from the material of the supplier. This practice has been widely used in recent years. Manufacturers of houses made of timber try to unify as much as possible all elements of house structures. A set of additional wooden and fastening components with detailed instructions greatly facilitates construction.
The required cross-section and the correct distance between the beams are guaranteed to withstand a load of up to 300 kg/m2, allowing you to subsequently lay a thermal insulation layer on top and finish any complexity from below. Suitable for slatted and suspended ceilings. Drywall or more traditional lining for a wooden house. It is quite possible to comply with all requirements, from the choice of material to its installation. By taking on the work yourself and successfully completing it, another task is solved. A great gift to your own self-esteem. Naturally in a good way. Pride in the work done and a topic for conversation among friends.
Operation of floors
If the design used beams with a large margin of safety, laid with a small step, then such an overlap will not need repair for a long time. But you still need to check the beams for strength regularly!
If the beams are damaged by insects or as a result of waterlogging, they are strengthened. To do this, the weakened beam is removed, replaced with a new one, or strengthened with strong boards.
I’ve been thinking for a long time about repairing the ceiling on my outbuilding at my summer cottage, but I still can’t get around to it. But here you need to seriously understand - I don’t really understand how the load on the beam is calculated if there are additional loads. We will need to seriously address this, most likely in the summer.
Nikolay, without special knowledge in the field of construction, you will not be able to correctly calculate the load on the beam. Too many factors and nuances need to be taken into account when making calculations. Believe me, it is practically impossible for a non-specialist to do this. First, try to at least determine the type and characteristics of the beam floors on your outbuilding. Even if you succeed, the work will stall at the calculation stage: the formulas (even their simplified versions) are too complex. My advice: leave the repair to professionals.
Good day. There is a wooden house, everything is clear to me about the first floor and floor. We'll most likely put a tarket or something similar. The second floor is only beams. A question arose for me: do I need to lay what kind of films? The house is residential, the second floor is residential. Or I’ll put insulation between the beams (since there’s some leftover, and it’s like sound insulation), and I’ll put a floor on top, a 35mm board. It seems to me that no films are needed.
General knowledge does not provide an understanding of approximate calculations of beam/floor load. Sofa + cabinet + table + 6 chairs, and 10 people = about one and a half tons - this is not a load. It’s another matter if you decide to place a brick warehouse on this floor. )
- How to lay tiles in the bathroom - step-by-step installation instructions
- Do-it-yourself laminate installation: rules and example of step-by-step work
- Installation of OSB boards - features of installation on a wooden and concrete base
Video about floor repair
We have put together a huge collection of video tutorials on repairing and laying floors
A collection of photographs showing floor design options and examples of using floor coverings
Strengthening methods
Using steel plates you can strengthen beams
Steel auxiliary materials
Steel plates fixed on different sides of the beam will help strengthen wooden beams. Steel tools must be treated with a solution that prevents corrosion, otherwise they will not last long.
Carbon fiber
The material, also called carbon fiber, is a modern technology in the construction world and is actively used during beam ceiling reconstructions. It comes in the form of plates, ribbons or threads.
This plastic material is applied in several layers to a wood surface, ensuring ease of work and reliable quality, which makes it quite popular.
Prostheses made of wood or metal in the end areas
Due to variable temperatures, beams in the area of the load-bearing wall are significantly weakened. It is necessary to make the main timber beam stronger to prevent negative consequences in the future, as well as to avoid repeated reconstruction in the near future.
To do this, additional prostheses made of metal or wood are attached to the edges of the wooden base, which are placed in the brick recess of the wall, thereby providing reliable protection for the central beam.
Installation of prostheses for a rotten floor beam
Supports for load-bearing beams
This method involves placing additional support structures under the load-bearing ceiling beams to distribute the load evenly.
Additional beams
If the work is completed, but the weight is distributed incorrectly, then the finished structure must be covered with additional beams that will take on the excess weight.
It is quite possible to bring ceilings to life with your own hands, but to do this you need to familiarize yourself with the necessary information in order to minimize unpleasant moments during work, as well as build a high-quality model that will last for many years.
Video description
Which insulation divides heat better, watch the video:
Advice! When working with penoizol, it is recommended to wait until it hardens completely; it has a slight shrinkage that will have to be compensated to prevent the formation of voids.
The process of thermal insulation of the ceiling with foam insulation Source lestorg32.ru