Beton-House.com
Website about concrete: construction, characteristics, design. We combine the experience of professionals and private craftsmen in one place
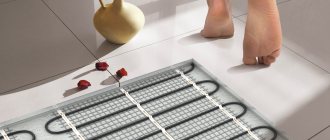
Modern heating systems - heated floors
A concrete base for a heated floor in the form of a screed is made for almost any type of horizontal heating. The main requirement for installing a heated floor is to lay the system on a flat surface.
The most common leveling method is to fill the floors with concrete. Let's consider the structure of the screed for heated floors, the need for such a base and the pouring process.
- Compound
- At the bottom
- Preparation
Necessary concepts
In order to understand how concrete can be used for heated floors, let’s define some concepts. It is important for us to distinguish between the types of floor heating systems, the levels and purposes of the screed, and the methods of its installation.
Classification of TP (warm floors)
At the moment, the market offers several different systems mounted in the horizontal plane of the floor. Some are used as the main heating, some only increase the level of comfortable stay in the room.
Heating systems can be water or electric. The latter are distinguished by the heating element used.
The device offers electric horizontal heating systems based on the following elements:
- cable;
- film;
- thermomat;
- rods.
Classification of electric heated floors
Stages of work on pouring screeds
Due to the design of the horizontal heating system, the screed is done several times.
To understand the process, we divide the filling into 3 stages:
- Rough screed . Apply to the intended base for leveling. Performed when necessary.
- Leveling screed , which is poured over the thermal insulation material. The system is directly installed on this layer.
- Final fill . This is a pour over the heating system. Arranged if necessary.
Types of screeds
In addition to different heating systems and the need for different levels of pouring, there are other screed options other than pouring the floor with concrete mortar.
There are 3 types of screeds used when installing heated floors:
- Wet screed: the usual method of pouring concrete or cement-sand mortar.
- Semi-dry screed: leveling the floor with a ready-made compound, a certain degree of humidity.
- Dry: an ideal way to level the floor, recommended only as a rough layer.
Concrete floor technology
For a wooden house, a concrete floor is well suited; the main thing is to know the technology for correct pouring. If everything is done properly, then there will be no problems. Concrete guarantees dryness and strength for many years.
In order to fill the floor in a private house, you do not need the help of builders and you can completely rely on your own strength. Proper preparation is the key to successfully pouring a concrete floor. It includes the selection of the necessary materials and tools - you need to calculate the required quantity. If everything is ready, then you don’t have to worry about anything, all you have to do is concentrate on pouring the floor. They say that the best concrete floor is the one that has the best base for the floor covering:
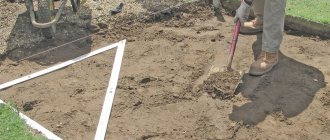
As described above, before starting work, you need to compact the soil. The area should be as flat as possible. The soil can be compacted either manually or using special tools.
Then you will need to take care of the insulation. The best option for this purpose is roofing material. Polyethylene can be a good means of insulation; this material can be used when you plan to spend less money.
Once the insulation issue has been resolved, the insulating material can be laid. If you have expanded clay, you can use it as a material. This is outdated but very reliable material. Another option for thermal insulation is glass wool. In general, you just need to correctly calculate the amount of material so that insulating the floor is not expensive.
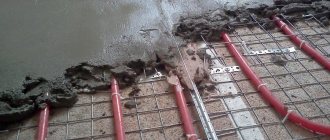
The next step is pouring the floor itself. You need to start pouring concrete from the far corner of the room, heading towards the doors.
When working, you need to use a limit rail
It is important to take into account that the last layer of the floor is reinforced with a metal frame. For reinforcement, you can use a regular chain-link mesh
This way the floor will be protected and resistant to various mechanical influences.
The last step should be the screed. Its device must be neat, made of pure cement, which will be diluted with water. For an ideal floor, you can purchase a self-leveling mixture.
Concrete is poured in one, and sometimes in two, passes. The second time will give solidity to the coating. If you purchase a ready-made solution, you don’t have to worry that the floor will be uneven. Once the concrete is poured, it must be left for two to four weeks.
From the above technology and tips for pouring a concrete floor, it is clear that you can do everything yourself and get an excellent result. If you purchase high-quality materials, the floor will be filled accordingly. The filling technology is quite simple, you just need patience and time, then you can enjoy the result of your work for a long time. Pouring a concrete floor will not require immediate repairs, this is its peculiarity. Concrete flooring is especially relevant for wooden flooring. It is reliable and capable of excellent heat retention, protecting from external influences
It is especially important to pour a concrete floor in a private house, since it is located on the ground and is subject to various influences
In the construction of private houses, wooden floors are more often used, and concrete as a flooring material is purchased less frequently, but it is very convenient to use. True connoisseurs have already checked the quality and reliability of the material. In cases where water passes close to the house, a concrete floor is simply necessary. For those who still want the floor to be wooden, you can lay the flooring from this material.
Fokin Andrey Evgenievich
Water heated floors
A water floor heating system is one of the most economical options for operation, but it is very expensive and complex to install. When installing it, it is very important to follow the technology. The system is poured with concrete and it is very difficult to correct any defect after pouring.
Purpose of screed for water floors:
- surface leveling;
- elimination of defects affecting heat transfer;
- formation of the heat distribution process;
- fixation of heating elements.
Installation of infrared film
A rational and economical option is to lay the heating film longitudinally (along the length of the room). In this case, the set of places where the connection will be made must be made as small as possible. In this case, the film will be cut into fewer sheets. On the surface of the film there are special lines along which cutting can be carried out.
The sheets are secured with construction tape to prevent them from moving while working on laying the remaining layers of the floor. Another fastening option is to use self-tapping screws or a construction stapler. Naturally, fasteners that cause deformation of the film should be used in those areas where there is no heating layer (for more details: “How to lay an infrared heated floor under a laminate - installation instructions”).
Wet screed
Concrete for water heated floors is a classic version of this heating system.
The advantages of this installation are that by pouring the solution and forming the surface, the following is simultaneously created:
- a thermal insulation layer that can significantly reduce losses in energy use;
- flat surface that can withstand significant weight loads;
- a system of uniform distribution of heat energy is formed.
Installation of this system assumes that the warm water floors will be finished poured with concrete.
Wet screed
Compound
When installing floor heating, the type of concrete for a warm water floor and its composition are very important. Due to the fact that the screed will experience constant thermal loads, its strength should be maximized while maintaining ductility.
For this it is recommended to use:
- not sand, but screenings with a fraction of 3 – 5 mm;
- cement M300 and higher;
- plasticizers;
- fiber fiber.
According to accepted standards for pouring in residential premises, concrete of a grade not lower than M150 is used for heated floors, for industrial areas - M 300 or more.
Important points when installing a rough screed
Based on the results of rough filling, the resulting surface must meet the following requirements:
- The corners of the floor and walls must be strictly at an angle of 900 - for the correct fit of the heat insulator and damper tape.
- A sector of one heating circuit should not have a depression or convexity of more than 5 mm.
After the subfloor has dried, it must be cleaned of dirt and dust and treated with a primer. The walls should be leveled and puttied. When the surfaces of the floor and walls are ready, a layer of thermal insulation is laid on the floor, covered with a reflective film, and the perimeter is taped with damper tape.
Before laying water floor pipes, you should draw on the floor plan a diagram of the layout of the pipes and the location of all control and monitoring elements. After the pipes have been laid, it will be necessary to ensure safe movement on the floor, for which it is better to install bridges from boards or shields.
Concrete water-heated floors: pipe laying schemes
Concrete floor in a private house
The easiest and cheapest way to make a floor is to fill its surface with screed. A mixture of sand and cement is much cheaper than other building materials, but this type of floor has the biggest drawback - the cold emanates from it. In winter, it is absolutely impossible to walk on a concrete screed without slippers. But today modern technologies have solved this problem. Insulation is placed under the screed layer, which, although a little, solves this problem. Expanded clay, granulated slag and polystyrene are suitable as insulation materials. Modern craftsmen generally give preference to foam plastic.
The cross-sectional structure of our concrete screed will resemble a pie that has several layers. First, foam plastic is laid on the floor surface for insulation, and then the screed is poured. The process of pouring a concrete screed occurs in approximately five stages:
- The first stage is surface waterproofing. It is best to lay special waterproofing materials on the ground to prevent the appearance of mold and various fungi. A suitable material for this task is thick polyethylene film, which is laid directly on the soil surface. But it is best to use a special waterproof barrier, which is made of bitumen mastic;
- The second stage is gluing porous material made of foam vinyl along the entire perimeter along the walls at a height of up to 15 cm. This material ensures the plasticity of the foam during temperature changes and protects it from cracking;
- The third stage is laying the foam itself. The foams should lie tightly to each other. If the concrete solution gets into the resulting cracks, then cold can penetrate from there, which makes our work completely useless. Therefore, the cracks that appear are filled with polyurethane foam;
- The fourth stage is the reinforcement of the screed. A concrete screed without foam reinforcement will not last even one year. A few months are enough for the concrete screed to begin to crack, and not even one year will pass before it simply falls apart. Therefore, reinforcement can be said to be a prerequisite;
- The fifth stage is the screed itself. After the reinforcement stage, the concrete solution itself is poured. The thickness of the concrete screed must exceed 50 mm. The concrete solution must be stronger than required, that is, the usual ratio of 1:4 is not suitable, it is better to use a ratio of 1:3. Also, to avoid cracking of the screed, plasticizers are added to the concrete solution.
The process of insulating a concrete screed goes something like this. Although concrete screed is the cheapest and most affordable type of flooring, it is not enough to make your home cozy and comfortable. To do this, they also resort to various heating systems.
Semi-dry screed
The main distinguishing feature of semi-dry screed is the use of a composition with lower humidity, namely, with a significantly smaller amount of water in the solution. The quality of the solution can be easily checked by hand.
A small amount of the mixture is clamped in a fist. Water should not flow from the resulting lump, and it should not crumble. The photo shows the composition of the correct consistency.
The composition of the semi-dry screed, when clenched into a fist, should not release water or crumble
Semi-dry screed has some advantages over concrete pouring:
- lower cost;
- ease of leveling the surface;
- the heat and sound insulation characteristics of such a floor are much higher;
- does not shrink when dried;
- the readiness period is much shorter.
The heating system is installed in a semi-dry screed
Tools and materials for pouring the floor
Pouring the floor is a very important part of home improvement. This stage of work requires special tools. To ensure that the work does not cause trouble, you should have a tool such as a vibrating rammer in advance. It will help to compact the concrete tightly so that it does not become porous in the future. To fill the floor you will also need:
- a certain amount of roofing felt to cover the floor;
- polyethylene film, it is used as waterproofing;
- expanded clay;
- reinforced mesh;
- limiting corners;
- level for measuring the surface;
- trowels and shovels for pouring and leveling the floor.
Dry screed
It is installed using special bulk compounds or materials on top of the waterproofing material. At the same time it performs the functions of insulation.
Compared to the classic screed, it has its advantages and disadvantages:
| pros | Minuses |
|
|
Dry screed for underfloor heating system
How to install a dry floor on a wooden base?
A floor without screed can be made using two systems:
- Polystyrene plates;
- Wooden slats and modules
Polystyrene mats, smooth or with bosses, are laid on the wooden surface. If they are smooth, then you need to cut holes in them for laying pipes. This dry floor installation system is not very expensive and is very convenient. Most often, ordinary polystyrene foam up to 4 cm thick or expanded polystyrene is used. If the slab has bosses, that is, protrusions no higher than 25 mm, then polyethylene pipes (diameter 16 mm) are placed in the grooves and secured with mounting locks.
Modules can be bought in a store and assembled at home. The pipes are laid in recesses on the surface. The rack system is made from planks 2 cm thick and 130 cm wide with a pipe pitch of 150 mm (MDF or chipboard material). Often metal plates are also installed, which create a continuous warm field. At the end, the underlay and laminate are laid on the surface of the heated floor pipes.
Tie size
Regardless of the type of screed, the basic requirement remains the same: the thickness of the concrete above the heated floor and at its base must be the same over the entire area of the room. This is important because otherwise, the process of heat transfer and heating will be at different levels, which will lead to the destruction of the floor cake.
At the bottom
Warm floors on concrete are laid on a rough screed, its minimum thickness is 5 mm. The size of the fill layer largely depends on the type of solution.
The height difference on the screed under a heated floor should be no more than 5 mm
On a note! If the base is in good condition and the thickness of the rough fill is minimal, transfer part of the floor pie under the rough fill.
By moving the thermal insulation and water barrier under the rough screed, you can begin work on laying out the heated floor immediately after the fill has dried. In fact, you will save a lot of time.
The whole pie
More often than others, warm floors are installed under concrete. The thickness of the fill with a regular cement-sand mixture is 50 mm. When adding plasticizer and fillers, the thickness decreases.
On average, you can calculate the size of the cake of a floor with a water heating system. Taking into account the laying of thermal insulation material, in urban apartments, this size will be from 8.5 cm to 11 cm, depending on the floor.
Important! To install water systems connected to central heating in apartment buildings, you must have a special permit obtained from the heating networks.
Tips for choosing laminate
Many people have heard about this characteristic - thermal conductivity. This is the ability of a substance to transmit or retain heat passing through it
It is important that this coefficient for laminate does not exceed 0.15 sq.m x K/W. The second mandatory condition is compliance with the heating temperature regime; the temperature of the floor surface should not exceed 26 degrees, otherwise the binding formaldehyde composition of the laminate begins to evaporate, which is not safe for humans
This situation can be prevented by installing a thermostat or programmer to automatically control floor heating. When purchasing a laminate, be sure to familiarize yourself with its performance characteristics.
Electric floors
When using electricity as a heat source for floor systems, everything is much simpler, but more expensive to operate. Installing an electrical system on a concrete floor does not reduce the height of the room; the thickness of the mats is only a few millimeters.
At the same time, modern infrared floors do not require a top screed; decorative roll or sheet material can be easily mounted on them.
On a note! The thickness of the tie for the cable system is 30 mm, and with the use of a plasticizer it can be reduced by a third.
Installation of an infrared floor does not require a top screed
Wooden floor heating system in a private house
Heating a wooden floor does not require much effort, since wood is a warm material that does not require additional heating. The only thing that can be done is to increase its efficiency through additional heating systems. But by laying insulation, we can deprive our floor of normal ventilation, causing the wooden material to deform. Therefore, you need to calculate the waterproofing system and the more carefully you think through everything, the better.
To insulate a wooden floor, it is enough to lay mineral insulation under the flooring. It is not recommended to use polystyrene foam, as it does not allow air to pass through. And as a result, the natural ventilation of the room is disrupted. All that can be done in this case is to leave space between the wooden flooring and the insulation. A space of 50 mm will be sufficient so that natural ventilation is not disturbed.
Pouring technology
Having understood the subtleties and nuances, let's look at how to make a concrete floor warm. When carrying out floor installation work, the room temperature should be in the range from 5 to 250C. If the base is in good condition, it should be cleaned and dusted. If necessary, a rough screed is arranged.
Preparation
Damper tape is glued over the prepared base and plastered walls.
This is done without fail in order to:
- prevent heat loss due to wall heating;
- avoid destruction of the screed as a result of thermal expansion.
If you decide to save money, you can lay strips of thermal insulation, for example, foam plastic, around the perimeter, the effect will be the same.
Important! It is necessary to install a thermal barrier not only between the system and the wall, but also between two systems. If the kitchen and corridor have different heating circuits, a damper tape must also be laid at their junction.
The perimeter of the room must be taped with damper tape
After thermal insulation of the joint area, a waterproofing film and heat-reflecting material are laid on the floor.
System installation
Laying a water floor, or any other horizontal heating system with your own hands, is done in strict compliance with the manufacturer’s recommendations. The instructions always come complete with the elements of the system itself. If a cable or pipe passes through an expansion joint, it must be protected with a corrugated hose.
Corrugated hose for laying a heating system element
After laying and fixing the system, the heating elements are connected. Before pouring concrete into the system, it is necessary to check the operation of all elements of the system. If the test run was successful, work can continue.
The video in this article will show the installation of a water floor.
Finishing fill
It is not always necessary to fill the system with concrete from above. Sometimes other materials are used for this.
- Some apartment owners, in an attempt to reduce costs and reduce the weight of the screed, are trying to fill warm floors with expanded clay concrete. What happens if you fill a warm floor with expanded clay concrete?
- The answer is nothing good. Expanded clay is a heat insulator. By adding it to the concrete solution, you significantly improve the thermal insulation properties of the screed. Therefore, it makes sense to install the floor system on such a base to avoid energy losses.
- There is no point in filling the floor heating from above with such a composition, because this will reduce the efficiency of the system. The fact is that the top layer of expanded clay will prevent the passage of heat into the room. In fact, you will simply be wasting your money this way.
Important! The layer with which the floor heating is poured must have the highest possible thermal conductivity in order to reduce the cost of operating the system.
Expanded clay concrete screed has excellent thermal insulation qualities, but requires a leveling layer
Infrared film
Infrared film heated floors are the latest successful development in the field of floor heating. The infrared film is spread on a heat-reflecting base. Immediately after this, you can begin installing the finishing coating.
Film heated floors have a lot of advantages:
- Durability;
- Reliability;
- Ease of installation;
- No additional repair actions, such as pouring screed;
- High installation speed. You can lay the laminate immediately after laying the film heated floor;
- Since the thickness of the film heated floor is insignificant, it will not affect the height of the ceilings;
- Low energy consumption.
There are also negative aspects of the film version of heated floors:
- The installation base must be perfectly level;
- Installation of film heated floors is only possible in a house where the humidity is not too high;
- High price.
Installation of infrared heated floor
Film heated floor cake
It is difficult to make a choice as to which floor heating option is better to choose. But if you analyze all the pros and cons, infrared heated floors can be considered the best option.
Before installing the film infrared heated floor, you need to calculate how much thermal film and reflective substrate will be required. The area of the substrate corresponds to the area of the floor in the house for which heating will be carried out, and less thermal film is needed, since it cannot be placed under furniture.
Materials and tools you will need:
- Thermostat;
- Temperature sensor;
- Heated floor kit;
- Thermal reflective backing;
- Protective
film; - Screwdriver;
- Pliers;
- Scissors;
- Scotch;
- Knife.
The base for installing heated floors is thoroughly cleaned and dried. Then thermal insulating material is placed
It is very important that it does not contain aluminum foil, since aluminum is unacceptable for infrared floors. The parts of the film are fixed together using tape
After this, the location where the thermostat will be located is determined.
The film floor is first cut into strips of the required size. To minimize trimming, it is better to lay along the length of the room in the house. The strips should not be pressed tightly. It is better to maintain a distance between them of 10 mm, and the distance from the strips to the wall is about 50 mm. Do not forget that the copper strip should be at the bottom.
The location of the contacts near the wall on which the thermostat will be fixed will reduce the length of the wires for connection. The strips are connected in parallel, so the wires can be hidden under the baseboard.
Having considered all the options for underfloor heating, assessing the complexity of their installation, how much they cost, and other features, we can conclude which is more suitable for a specific room in the house. If you plan to install it yourself, then you must adhere to the advice of professionals and follow the instructions. Add your comments and opinions!
Which heated floor is better to choose for laminate - advice from professionals
Tips and tricks
- The use of underfloor heating is limited by certain special properties. Thus, when the surface temperature is more than 30°C, dust rises from the floor, which is always present on it. Therefore, it is advisable not to raise the temperature above this indicator.
- When using combined heating in the house, you should reduce the temperature of the radiator section by setting the appropriate sensors on the water heating mixing unit. This will save on water heating and reduce the degree of oxygen burnout on radiators.
Types of substrates
To insulate the floor under linoleum, you first need to select a substrate. There are several types of such material. Here are the most popular:
- cork;
- jute;
- linen
Let's look at each separately.
Cork backing is made from compressed crushed cork oak bark. This insulation is produced in rolls. The advantages of this material include:
- environmental friendliness - made from natural cork;
- There is a pleasant feeling when walking on this surface, as it is quite soft.
It is precisely because of the last positive quality mentioned that a problem may arise: if you place a heavy object on the coating, then after some time dents may form on it. To avoid this, you should choose the hardest cork backing.
Jute backing is a material consisting of 100% natural jute fiber. It is made as follows: jute fibers are punched with a needle, then rolled on rollers under high temperature. This substrate is fire resistant, resistant to mold and rot.
Linen backing is 100% pure natural linen. It is made by double-piercing with a needle and then impregnated with anti-fire and anti-fungal agents. Linen backing is a good material for thermal insulation under linoleum.
Do-it-yourself installation of film heating
A brief overview of the various types showed that the best solution is to install a warm film floor under the laminate on a concrete floor. Let us consider in more detail the features of choosing and installing products of this type in order to provide for difficult aspects of self-installation.
What to look for when choosing an infrared floor
All types of i/k flooring can be divided into two large categories: film and rod. Films are sold in the form of rolls. Heating elements are sealed between two layers of heat-resistant film, which, in turn, can be carbon or bimetallic.
Scheme of the design of a carbon heated floor Slim Heat, consisting of interconnected steps (cells). Technical characteristics: polymer film thickness – 0.34 mm, cell length – 0.25 mm, voltage – ~220 V
In the manufacture of the carbon variety, carbon-graphite fiber is used, obtained from carbon paste. Electricity is supplied to the heating elements through copper (silver-copper) conductors.
The connection diagram is parallel. The basis is a film of lavsan, which is characterized by wear resistance, elasticity and high dielectric properties.
Bimetallic elements are made of two metals - aluminum and copper, which are attached to a polymer film. The system is equipped with a grounding wire, and when connecting, it is necessary to use an RCD or AVTD. Bimetallic heating is suitable for all types of flooring, except tiles.
Graphite-carbon rod elements are assembled into one mat 25 m long, with a gap of 0.1 m. The temperature of the heating rods reaches +60ºС
The rod type of heated floor is also sold in rolls, but has a different design. It is based on rods connected to each other by an electrical wire. The advantage of this system is savings of up to 55-60% on energy costs, the disadvantage is high cost.
Preparing the base
To avoid obstacles to the installation of the film system, it is necessary to prepare the base and remove all unnecessary things from the room.
If the room is small and the power of the heating elements is enough to create a comfortable environment, old heat sources (radiators) can be dismantled. But keep in mind that their removal requires permission from the management company, and before approval you will have to collect a large package of documents.
The next step is leveling the base. The leveling method depends on the condition of the concrete slab. If it is smooth and has no dents or bulges, it is enough to remove the dirt and clean out all the stains. If the concrete floor has an uneven surface that has weathered over time, it is necessary to level the surface with a leveling mass - self-leveling floor.
An uneven slab must be leveled using a thin screed - a self-leveling or leveling floor. To do this, cover the clean base with a primer, then apply the self-leveling floor. To create an even, uniform, smooth base, we use a studded roller
Leveling is necessary so that the underfloor heating elements are not damaged by falling into the hole, and the laminate lays perfectly flat.
We lay sheets of thermal insulation (backing) end-to-end on the prepared base and fasten them with tape. We make sure that the metallized layer is on top. As a result, the entire floor must be covered with a continuous sheet of insulating material.
Instructions for laying film flooring and laminate flooring
So, at the time the screed is ready, the following materials must be purchased:
- heated floor – rolls of i/c film;
- metallized thermal insulation;
- waterproofing (polyethylene film);
- laminate with backing;
- thermostat with temperature sensor;
- tape for fixation.
Be careful when choosing thermal insulation - aluminum foil rolls are not suitable for film heating. When drawing up a laying plan, take into account the arrangement of furniture - heavy objects cannot be placed on thermal film.
One of the options for installing infrared film. When laying, the following distances should be observed: between the strips - at least 1 cm, between the strips and the wall - at least 10 cm
Operating procedure:
- Laying heat-reflecting material on a prepared base or screed. We place individual pieces end-to-end and seal all seams with tape.
- Installation of infrared film - laying in rows, connecting and connecting (parallel). We attach the contacts to the copper strips and secure them with bitumen insulation.
- Installing a temperature sensor in the thermal insulation layer.
- Connecting the wire from the outermost cell to the thermostat (according to the instructions).
- Testing.
If the system is working properly, cover the entire structure with polyethylene, put a backing on top and assemble the laminate.
Many people doubt whether it is possible to install water or electric heated floors under laminate flooring. Taking into account the requirements for different types of flooring, any options are possible. However, the most suitable for city apartments and private houses is the infrared system, which can also be mounted on walls and even on the ceiling.
Video: installation of infrared heated floors under laminate
Selection of insulation materials for concrete
The insulation market now provides a wide selection of materials, both domestic and foreign. For thermal insulation of concrete floors, particle boards, fiber materials, and foam polymer boards are most often used. Sprayed insulation, which is applied using special equipment, is also gaining popularity. Among the inexpensive options for a private home, it is worth noting expanded clay - a natural, environmentally friendly material with excellent heat-insulating properties.
Expanded clay for floor insulation
The key characteristics of insulation are:
- density - the higher this indicator, the greater the amount of heat will be retained;
- strength - determined by bending and compression. The higher the expected loads, the stronger the insulation should be;
- thermal conductivity - the efficiency of heat conservation in the room depends on this indicator. Preference should be given to materials with the lowest thermal conductivity coefficient;
- moisture permeability - the higher the indicator, the faster the thermal insulation properties of the material deteriorate. Insulation saturated with water is not able to retain heat, so it will have to be replaced;
- durability - in order to save money, it is worth choosing a material with the longest service life, because frequent replacement of insulation and accompanying repairs are expensive;
- environmental friendliness - in residential premises it is necessary to use only environmentally friendly insulation, since the floor covering is not a good protection against toxic fumes.
The weight of the material does not play a big role, because, unlike a city apartment, there is no need to worry about increased loads on the floors between floors.
Expanded clay as insulation: characteristics
So, let's look at popular insulation materials, their properties, pros and cons.
| Material | Main characteristics |
Mineral wool | It has low thermal conductivity and perfectly muffles sounds. Available in rolls and slabs, differing in density. It does not burn, but has high moisture permeability, and therefore requires high-quality waterproofing during installation. The service life, subject to installation technology, is 25-30 years. Insulation with mineral wool is carried out only along logs, since the material cannot withstand high loads |
Particle boards and plywood | They have good strength and heat capacity, have soundproofing characteristics, and can be laid directly on concrete or on logs. For floor insulation, slabs with a thickness of at least 20 mm are suitable. Moisture resistance is average, so waterproofing is required on damp substrates. In dry rooms, the material can be laid directly on concrete that has been pre-treated with a primer. |
Foam insulation | This group includes polystyrene foam and EPS. They are lightweight, easy to install, and have very low thermal conductivity. They can be laid under a screed or between joists, and EPS can also be laid on the concrete floor itself. Polystyrene foam is cheaper, but less durable, so if there are increased requirements for floor construction, it is better to use extruded polystyrene foam. Foam insulation is resistant to moisture and lasts on average from 20 to 30 years |
Sprayed insulation | They form a seamless durable coating with low thermal conductivity and moisture resistance. They are used for insulating concrete along joists. Such thermal insulation is one of the most reliable and durable, but it is also much more expensive than other materials. This is due to the need to use a special installation, with the help of which spraying is carried out |
Expanded clay | The most environmentally friendly insulation at an affordable price. Used for insulation along joists and under screeds. To ensure maximum thermal insulation, the material must be covered in a thick layer - from 10 to 20 cm. Expanded clay does not burn, has a long service life, but is very fragile and loses its thermal insulation properties due to damage to the structure |
Cork | Lightweight, environmentally friendly insulation with water-repellent properties. Cork has a very low thermal conductivity, it is always warm to the touch, so it is ideal not only as a substrate, but also as an independent floor covering. It can be laid directly on a concrete floor, painted or varnished. The only disadvantage of insulation is the high price |
There is another type of insulation that appeared not so long ago and has not yet gained widespread popularity. This is liquid thermal insulation - a new generation material with unique properties. It looks like thick white paint, and is applied in the same way, forming an elastic, durable coating. A 1 mm layer can replace 50 mm thick rolled thermal insulation; moreover, such a coating is impervious to moisture, chemical attack, does not burn and does not emit toxic substances. This paint is used not only for insulating concrete floors, but also for walls, slopes, pipelines, facades, and various containers. The coating lasts for about 15 years if applied correctly.
Liquid thermal insulation
Liquid thermal insulation coating "Astratek"