Photo gallery of finished tracks
The photo below shows options for arranging garden paths with flagstone, which you can take note of.
Decorating alleys on a summer cottage with natural stone adds sophistication, neatness to the estate, and from a practicality point of view, it is a durable, affordable material, the masonry of which is easy to do yourself.
Automotive paving
a) Automotive paving with natural stone up to 30 mm with preparation of the concrete base
| 1 | Excavation of soil to a depth of 35 cm. | m.cub. | 0,4 | 400 | 160 |
| 2 | Tamping the base in 1 pass | sq.m. | 1 | 60 | 60 |
| 3 | Sand preparation 5 cm. | m.cub. | 0,08 | 400 | 32 |
| 4 | Tamping the base in 1 pass | m. linear | 1 | 60 | 60 |
| 5 | Construction of the geotextile layer | sq.m. | 1 | 40 | 40 |
| 6 | Crushed stone preparation 15 cm, fr. 5-20 mm. | m.cub. | 0,16 | 400 | 64 |
| 7 | Tamping the base in 1 pass | sq.m. | 1 | 60 | 60 |
| 8 | Preparatory work for pouring concrete (film, mesh, formwork) | sq.m. | 1 | 180 | 180 |
| 9 | Construction of a monolithic reinforced slab (manual concrete) | m.cub. | 0,12 | 4500 | 540 |
| 10 | Paving with natural stone | sq.m. | 1 | 900 | 900 |
| 11 | Filling joints with colored grout “Camonica” | m. sq. | 1 | 100 | 100 |
| 12 | Etching stone with acid solution | sq.m. | 1 | 150 | 150 |
| 13 | Hydrophobization of cladding in 2 passes | sq.m. | 1 | 100 | 100 |
| Total | RUR 2,446 | ||||
b) Automotive paving with natural stone from 50 mm on a sand-crushed stone base
| 1 | Excavation to a depth of 45 cm and leveling | m.cub. | 0,5 | 400 | 200 |
| 2 | Tamping natural soil in 1 pass | m. sq. | 1 | 60 | 60 |
| 3 | Sand preparation 10 cm | m.cub. | 0,13 | 400 | 52 |
| 4 | Compacting sandy base in 1 pass | m. sq. | 1 | 60 | 60 |
| 5 | Construction of a geospan layer | m. sq. | 1 | 40 | 40 |
| 6 | Crushed stone preparation 25 cm, fr. 20-40 mm. | m.cub. | 0,25 | 400 | 100 |
| 7 | Compacting crushed stone base in 2 passes | m. sq. | 1 | 120 | 120 |
| 8 | Crushed stone preparation 5 cm, fr. 5-20, (blade) | m.cub. | 0,06 | 400 | 24 |
| 9 | Compacting crushed stone base in 1 pass | m. sq. | 1 | 60 | 60 |
| 10 | Paving with natural stone | sq.m. | 1 | 1200 | 1200 |
| 11 | Filling joints with colored grout “Camonica” | m. sq. | 1 | 100 | 100 |
| 12 | Etching stone with acid solution | sq.m. | 1 | 150 | 150 |
| 13 | Hydrophobization of cladding in 2 passes | sq.m. | 1 | 100 | 100 |
| Total | RUR 2,266 | ||||
Note: 1) Paving with crushed paving stones on a finished base - from 1200 rubles per 1 sq.m., depending on the pattern and size of the tiles 2) Paving with clinker bricks on a finished base - from 800 rubles per 1 sq.m., depending on the pattern and size of the tiles
The variety of properties, textures, and colors of natural materials allows you to realize any idea when designing and implementing your project. Laying natural stone adds uniqueness and elegance. Among other advantages of natural stone as a finishing material, environmental properties should be noted.
Natural stone is used not only in landscape design, construction of paths, construction of building facades, but also as finishing in apartment renovation.
Laying natural stone on paths and pedestrian areas
Some types, especially sandstone and slate, require washing ; there is sand, dust, and clay residues on its surface; some areas may peel off and must be removed.
If the natural stone covering is planned for pedestrian use, and not for transport, and the thickness of the slabs is at least 4-5 cm, then the base does not have to be concreted. To create a gravel-sand base, geotextiles and geogrids are used; they protect the base from washing out and spreading.
If the groundwater level is high and often on the surface
standing water, it is necessary to make effective drainage around the perimeter to remove water,
drainage will greatly increase the service life of pedestrian areas , after winter you will not have to eliminate the consequences. Natural stone is laid using expansion joints , gaps between slabs of 3-5 mm, this method protects against destruction of slabs under the influence of different temperatures.
Laying flagstone on paths
Beautiful and durable paths made of flagstone on a personal plot or summer cottage allow you to simultaneously solve several functional problems:
- they combine a residential building and outbuildings into a single complex with convenient and practical passages:
- contribute to the preservation of beautiful grass cover on lawns and gardens without the formation of paths;
- Thanks to this coating, you will no longer have to walk on damp ground in inclement weather or after rain.
improve the overall appearance of the site, influencing the design of the area;
Using flagstone as a road surface
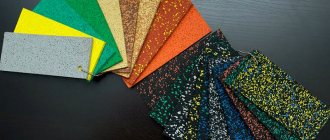
A variety of materials are used to cover garden paths. This can be a simple backfill with small colored crushed stone or monolithic concrete, rubber or wooden coverings, paving slabs or paving stones, but nothing better than inexpensive and durable natural stone has yet been invented. And flagstone is just such a material - a beautiful, fairly durable and relatively inexpensive stone.
It is a slate slab material made from sandstone or limestone, divided into flat slabs of different sizes and configurations with a thickness ranging from 15 to 150 mm. Thin slabs are often used for exterior and interior wall decoration, but thicker ones are perfect for road surfaces.
The advantages of garden paths made of flagstone:
- beautiful appearance and wide range of colors;
- smooth and, at the same time, rough surface;
- excellent environmental performance;
- good strength, frost resistance, resistance to moisture and abrasion;
- long-term preservation of color shade;
- simple laying technology and mechanical processing if necessary.
All this makes this material one of the best among road surfaces.
Recommendations for choosing quality material
If you want to buy and lay out a flagstone garden path yourself, then consider a few tips:
- The stone deposit must be in the same climatic conditions as the masonry site, otherwise it will negatively affect the durability of the coating.
- The color of the flagstone is no less important. Dark green is considered the most durable, while light yellow crumbles quickly. The surface should be in muted tones.
- The choice of thickness depends on the purpose and method of paving. For pedestrian areas, 1.5 cm is enough, for laying access roads - from 4 cm and above. When laying on cement, the thickness can start from 2 cm, and to create a path on sand, this figure must be multiplied by two.
- The texture of the stone is also important. A smooth, rough surface is optimal.
- It is better to buy raw materials from one batch - the shade of each slab will be approximately the same. But stone from different batches can differ significantly in color.
- The material must be dry. If stored for a long time in a damp place, it will quickly begin to crack and crumble.
To roughly calculate how much material will be needed for garden paths, it is worth considering that one ton 4–6 cm thick is enough for 10 m2.
A properly designed project determines the success of the work
To arrange paths on your summer cottage, you can invite specialists from a construction company who will develop a design project and complete all the necessary work in a short time. But this can be very expensive. It is much more profitable, and much more fun, to arrange your site yourself. This work is not that difficult and, with one or two assistants, you can handle it quite well.
You need to start with making a project or at least a clear construction sketch. To do this, draw a plan of your site with a schematic drawing of all existing buildings, trees, bushes, flower beds and other elements. Make several photocopies and distribute them to your family members so that anyone can draw their own version of the path layout. Then, putting all your thoughts together, create your own, the most compromise and convenient option.
When drawing up a project, keep in mind that the width of the paths should be such that it is enough for two people, but not more than 1.2 meters. Slopes are directed away from buildings. If materials of different color shades are used, indicate them on the diagram.
Now, using the drawing, you can correctly calculate the area of all road surfaces and determine the required amount of material to purchase.
How to lay flagstone on a sand base
An invited team of professional builders will help in arranging the flagstone path in the garden. They will develop the design project and do all the work in a short period of time. This option is far from cheap. Therefore, doing all the work yourself, without anyone’s help, is profitable and also exciting. In addition, the process is not complicated, you just need to invite an assistant.
Laying flagstones
1. Drawing up a project.
Before starting all work, it is necessary to make a clear construction sketch, which largely affects the future success of the project.
The drawn plan must show schematically all the buildings, plantings, flower beds and other objects located on it. You can make photocopies in several copies so that other family members can display their ideas for the location of the paths. All opinions are analyzed, and the best option for everyone emerges.
When drawing up a preliminary design, it is necessary to take into account that the width of the path should accommodate two people (up to 1 m). When using materials of different colors, you need to indicate the transition locations in the drawing.
2. How to choose material for installation.
Once you have a plan, it is very easy to calculate all the coating parameters and determine how much material you will need to purchase. Then, when everything is calculated, you can go to the store.
• When choosing flagstone, you need to ask the seller where the material was extracted. It’s good if its deposit is located in the same climate zone. Then it will have frost resistance appropriate to the climatic conditions. • Pay attention to the color of the stone slabs. The greener the flagstone, the stronger it is. The light yellow stone is softer than all the others. The brightness and saturation of the slabs indicates their greater layering and softness. To determine the strength, you can crumble a little of the edges of the tile. • Each batch may contain tiles of different sizes. In this case, try to choose as equal as possible with a thickness of 1.5 cm or more. If a large load is planned on the pedestrian path (for example, a car), then its thickness should be at least 4 cm. • Smooth edges are not so important when choosing, since they are perfectly processed with a grinder.
• A sign of a quality stone is its moisture content. Flagstone stored in the sun for too long dries out and its strength properties are significantly reduced. To determine the moisture content, feel the flagstone of the second row. In addition to flagstone, for the construction of a path you also need cement, sand, medium-fraction crushed stone, and a curb.
What construction and measuring tools will be needed?
To build a path made of natural flagstone, stock up on:
Purchasing material
After the amount of material required for construction has been determined based on the project, flagstone for paving paths can be purchased. Purchasing is not as simple as it might seem at first glance. Here you need to know what types of stone there are, as well as the external distinctive features of the quality of the slabs.
When choosing flagstone, try to find out as accurately as possible the deposit in which it was mined. The closer to your home it is, the better the material will match in terms of frost resistance for your climate zone. After this, pay attention to the color shade of the stone.
The strongest flagstone is greenish in color, while light yellow is the softest. The rule here is that the brighter the tiles, the more layered and softer they are. In addition, you can test the strength by touch by trying to crumble the edge of one of the tiles.
The thickness of the slabs, even within the same batch, can vary greatly. Therefore, try to choose materials that are as uniform in size as possible. The thickness of the tiles for pedestrian paths must be at least 15 mm, and if a car can run over it, then at least 4 cm. The presence of smooth edges is a desirable, but not mandatory condition. With the help of a grinder you can always process them. But so that the amount of waste remains within reasonable limits.
A very important quality factor is the moisture content of the material. If flagstone was stored outdoors for a long time, its strength could be significantly reduced. This can be determined by simply feeling the stone lying in the second or third row.
In addition to flagstone, you need to buy: cement, sand, medium-fraction crushed stone and curb fencing, if its installation is planned.
Calculation of quantity and choice of flagstone
You can calculate the amount of material by calculating the area of the future coating. They do this by multiplying the width of the path by its length. By adding up the calculation results for each section of the path and rest areas, the total area is determined. Flagstone is sold by the square meter.
The strength of a stone can be determined by its shade: greenish and gray are the hardest, and yellow are the softest. The middle position is occupied by reddish and brown stones. The shade can be chosen taking into account the decoration of the house and other buildings. If a stone is purchased to decorate not only pedestrian areas, but also the base, then the choice of shade depends on the taste of the designer.
For laying on paths, it is advisable to select slabs with a thickness of at least 1.5 cm. It is better to pave the parking lot with thick elements (more than 4 cm). When purchasing, you need to select 15-20% of excess material: some of the slabs will have to be adjusted to each other, and waste will appear.
Tool for the job
To make flagstone paths with your own hands, you will need the following construction and measuring tools:
- durable colored cord, pegs and a measuring tape at least 5 meters long for marking;
- building level at least 1 meter long;
- shovels and bayonet shovels;
- low wide container for mortars and mixtures;
- trowel and metal plastering rule;
- metal hammer and rubber mallet;
- steel or copper brush;
- vibratory ramming machine for compacting soil and bulk layers;
- concrete mixer if the total area of the paths is large and you do not want to mix the solution by hand.
If you don't have a full set of tools, you don't have to buy everything. You can simply rent it for the duration of the work.
How to make a path with your own hands
Do-it-yourself flagstone paths will perfectly decorate your dacha. In order to make a flagstone path with your own hands, you need to purchase all the necessary materials in accordance with the chosen base. Then you need to make a trench that will completely repeat the silhouette of the future path. Build a base and lay flagstone on it. The stone can be protected from environmental influences with a special protective coating. It will be required for damp areas where the flagstone can release salts. They are not dangerous in themselves, but they spoil the appearance of the path.
vote
Article rating
Types of work when installing flagstone paths
The construction of sidewalks and garden paths from flagstone involves the following types of work:
- marking;
- excavation;
- installation of a base for the walkway;
- laying tiles;
- finishing works.
Following the correct technology is very important, since if you make a mistake at one of the stages of work, you can get a poor-quality result.
Marking using pegs and twine.
Cost of stone - paving services
Manufacturers set the price for the material per 1 m2. However, the final figure depends on the thickness of the slab. So, 10 mm yellow sandstone will cost from 496 rubles/1 m2, 18–25 mm thick – 595 rubles/m2, from 25 to 35 mm – 728 rubles/m2, more than 36 mm – 860 rubles. /m2.
The popular breed lemezite or burgundy slate costs 330 rubles/m2 for a slab thickness of 10–18 mm, 25–35 mm – 550 rubles/m2, over 45 mm – 760 rubles/m2.
The average price of goldite is from 240 rubles/m2.
When ordering the services of craftsmen for the construction of a turnkey garden alley, the price list will be approximately as follows:
- planning, trench digging, other excavation work - 250 rubles/m 2;
- backfilling with sand and crushed stone cushion – 150 rubles/m2;
- creating formwork, pouring concrete mortar - 400 rubles/m 2;
- preparation from scratch of a sand base - 600 rubles/m2, gravel-sand base -1100 rubles/m2, concrete - 1500 rubles/m2;
- washing of stones - 150 rubles/m 2;
- trimming the edges of the material – 300 rubles/m2;
- laying flagstone by selection - 800 rub./m2, by chipping - 900 rub./m2.
If the entire scope of work is carried out by specialists, then the average price of a flagstone path will be 2,400 rubles/m 2 .
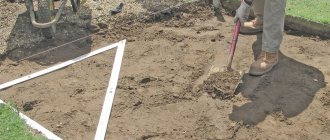
Lane markings
Marking is carried out according to a previously drawn up drawing using pegs, a rope stretched between them and a construction tape. The maximum distance between pegs is 5 meters. If the cord sags, the distance must be reduced. To mark smooth turns, make a compass from two pegs and a cord. By hammering one peg into the geometric center of the circle, you can use the second peg to draw a smooth and even arc.
Soil development
In the case when the surface of the earth is fertile or sandy soil, then under the foundation you need to dig a trench slightly wider than the marked path and about 30 centimeters deep. This depth is necessary for backfilling and laying:
- a layer of crushed stone for drainage;
- sand bedding;
- concrete or cement base;
- The thickness of the flagstone covering itself is 20-50 mm.
The bottom of the trench is covered with a thin layer of sand. It is leveled and compacted well along with the soil. The removed fertile layer is best scattered around the garden or used in flower beds and flower beds.
Schematic illustration of a concrete base.
Installing curbs and pouring concrete base
Unlike other materials, laying a path made of natural flagstone on a base of pure sand is not recommended due to the uneven load on individual elements of the coating. For paths of this type, the supporting base is made of concrete or a dry cement-sand mixture, which after some time will become monolithic. The construction technology for both options is the same (except for the material of the top layer).
Initially, the bottom of the trench is covered with a layer of crushed stone 10 cm thick, which must be compacted, sprinkled with a layer of sand no more than 5 cm and compacted again. This layer will serve as good drainage for the effective removal of flood, surface and groundwater.
If you planned to install borders, then it must be done after laying the textiles, supported by the drainage layer. If the height of the curbs is not enough, sand must be added along the edges.
The drainage layer must be covered with woven or non-woven geotextile with one-way flow. It will let water flow down without allowing it to rise up. In addition, geotextiles effectively prevent the germination of weeds, the seeds of which may remain in the soil.
Next, a layer of concrete mixture is poured or a dry mixture of cement and sand is poured. The thickness of the layer in the first case is at least 7-8 cm, and in the second - 8-10 cm. The surface must be well compacted using a vibration machine.
Laying flagstone on a prepared base
While the concrete is hardening, lay the slabs without adhesive next to the future path. This way you can choose the layout of the slabs so that they fit well together. Try to cut the material less, choosing its shape more. The peculiarity of flagstone paths lies precisely in its uneven pattern of seams.
Slate flagstones are fixed to a concrete base using an adhesive mortar, similar to ceramic tiles. To save money, it is allowed to add sand to the adhesive composition in a 1:1 ratio. The adhesive layer is applied in excess, which when installing the tiles in place will be squeezed into the seams and to the sides.
Laying methods depending on the type of base
Owners who plan to build paths in their summer cottage with their own hands need to choose the material for the future foundation correctly. It can be sand, concrete or crushed stone.
In addition, it is worth knowing about two types of masonry:
- Suture. The flagstone is selected so that 24 hours after paving, the gaps between the elements are no more than 1 cm.
- Seamless. Each stone fits closely to the other by cutting off excess parts with a grinder. The pattern of the path turns out more natural and beautiful than in the first version. However, the process is labor-intensive and will require a lot of time.
Photo: cutting tiles to the required size
To ensure that the edges of the flagstone are smooth and the tool lasts longer, you need to purchase a circle marked stone as an attachment disk for the grinder.
On a pillow of sand
The main advantages of this installation method:
- creation speed;
- ease of paving;
- practicality;
- affordable price of materials;
- easy to repair.
Photo: checking the laying horizon using a level
Cons:
- such a base cannot withstand heavy loads;
- Over time, the stones may begin to shift.
The laying technology looks like this:
- The site is being marked. Pegs are driven into the sides, along which the rope is pulled.
- The top layer of soil up to 30 cm is removed. The bottom is compacted.
- Geotextiles are laid. It will extend the life of the track. The base will not subsidence, and weed roots will not destroy the integrity of the alley.
- A 15 cm sand cushion is poured, moistened with water, and compacted. The surface is leveled.
- To prevent the edges of the path from moving, curbs made of stones, wood or plastic are installed on the sides.
- Each tile is pressed into the base with a rubber mallet. Seams between elements should be no more than 2 cm.
- The gaps are filled with sand or lawn seeds.
A sand cushion is great for decorating pedestrian areas and paths in the garden.
On concrete
Advantages of this type of paving:
- durability of the coating;
- ability to withstand heavy loads;
- resistance to environmental influences;
- the ability to create interesting mosaics from stones.
Flaws:
- the process of preparing the foundation requires time and labor;
- It is necessary to create a rough version of the track;
- the costs of purchasing materials will be significant.
Let's look at paving flagstone on concrete step by step:
- After marking, dig a trench up to half a meter deep and the required width. The earth at the bottom is compacted.
- On the sides, formwork is installed under the screed.
- Fill up with a 20 cm layer of rubble, crushed stone or broken brick.
- Fill the top with concrete mortar and level it. The base will be ready within 3-5 days depending on the weather. To prevent the surface from drying out, it must be moistened with water.
- In the meantime, the flagstone is cleaned of contaminants. A rough version of the trail is being prepared. If necessary, the edges of the stones are adjusted with a grinder.
- The material is attached to the concrete base using special glue. It is recommended to dilute it with sand and cement in a ratio of 1:2.
- Glue is applied to each stone. Then the stones are pressed tightly into the concrete, pressing them against each other. Excess mixture is immediately removed with a damp cloth.
- A few hours after finishing the masonry, debris is swept away from the surface. If necessary, wash it with water.
Concrete base should be used for laying car driveways and park areas with active traffic.
On the rubble
The advantages and disadvantages of this type of base are similar to sand paving. The sequence is also similar. Only a layer of crushed stone is still poured on top of the sand cushion. After which the contents are moistened, compacted and you can begin laying the flagstone. The gaps between the elements are filled with sand or fine gravel.
It is worth remembering that, regardless of the method of laying natural stone, the path should be created at a slope of 2–30. This will prevent water from accumulating on the surface.
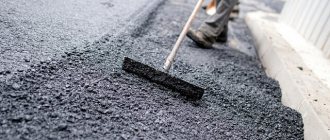
Flagstone paving on garden paths with concrete base
Paving flagstone on a concrete base
After the labor-intensive and physically difficult process of making a drainage base and concreting the base of the garden path, it would seem that only a trifle remained - paving the flagstone . But, like any finishing work that determines the final appearance of our product, this process requires knowledge of certain nuances. To decorate garden paths, as a rule, natural stone is chosen - flagstone, also called plastushka. This name does not come from the mineral, but from the appearance of the building stone, or rather its flat shape. Which is undoubtedly very convenient when decorating, since it requires almost no additional processing.
PRICES FOR CONSTRUCTION OF PATHWAYS. PAVING PATHWAYS. LAYING PAVES. STONE PAVING.
Prices for the installation of paths made of bulk materials (without the cost of materials):
- from gravel or crushed stone 15 cm on a compacted base and geotextile (geotextile, dornite)
- a 15 cm layer of colored granite screenings on a compacted base and geo-textile
Prices for laying concrete paving stones (vibro-pressed) on a prepared base:
- laying (paving) of rectangular paving stones, square paving stones - 100x100, 300x300, 100x200, 200x200.
- laying (paving) of figured paving stones - diamond, old town, steingot (zigzag, coil, plateau, oreto, arco, granito, grando), nobetec (wave, zigzag, classic)
Prices for paving (laying) granite paving stones (10X10X10) on a prepared base:
- straight paving with granite paving stones
- radial paving with granite paving stones
— segmental paving with granite paving stones
— decorative paving with multicolor granite paving stones
— trimming edge granite elements
Prices for laying (paving) with natural stone (sandstone, goldite, lamezite, slate, dolomite, quartzite) on a finished base (without the cost of materials):
— laying natural stone using the selection method on sand, a mixture of sand and cement.
— laying natural stone (flagstone, dolomite, slab) using the selection method on glue (concrete base)
— laying natural stone with cutting
- coating with a hydrophobic composition
— cutting edge elements of natural stone
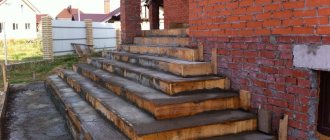
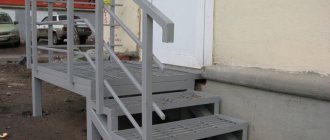
— facing steps with natural stone (step + riser)
- cladding the base of country houses (H
Our services
- Services Landscape design
- landscaping
- Lawn installation
- Automatic watering systems
- Reservoirs
- Paving
- Landscape design
- General price
- General types
- Stock
Recent Entries
- Exhibition Flowers 2020/Flowers 2020
- When ordering landscape design work, the project is 50% of the cost.
- II International Landscape Forum “Green Arrow”
- Zoning of a plot of 15 acres
- Zoning of a plot of 12 acres
Categories
- Promotions (8)
- Announcements (12)
- Exhibitions (4)
- Services provided (3)
- Publications (171)
- Seminars (1)
What is flagstone? Selecting the type of flagstone stone.
Specialized site for stone
Flagstone is a flat stone of arbitrary shape. It is formed from rocks that break up into flat slabs along parallel areas. Flagstone of the following types is found on sale: sandstones, quartzite-sandstones, shales, limestones and dolomites. The choice of natural stone for paving garden paths is a purely individual matter. Each stone, as a creation of nature, has its own individual character, history and healing properties. Many of them are powerful magical amulets. I will only note that not all stones are ideal for floor paving in paths. Thus, the most affordable flagstone, sandstone, which is well suited for vertical decoration, very quickly begins to delaminate on paths. Of course, a lot depends on the quality of the stone itself, but it’s not always worth the risk. The same drawback applies to slates; among them, only green slate is used for paving.
Natural stone is sold in pallets and per square meter. m.
Limestone is very easy to process, but is absolutely not suitable for lining paths; the stone is too soft and requires additional treatment to prevent moisture penetration, even with vertical cladding. A good option is to choose dolomite. Marble is a noble, almost eternal material; in the winter it becomes extremely slippery, and also accumulates radiation, but quartzite can be an excellent alternative. Flagstone is sold in large construction stores or specialized places - stone sites. A stone of approximately the same fixed thickness from 10 to 70 mm is selected, formed into pallets and sold from 1 square meter.
Selecting glue for gluing flagstone.
When choosing an adhesive, you need to make sure that it is intended for external cladding of the floor with natural stone, and not just walls, and that concrete and cement screed are suitable as the base. I recommend considering only specialized adhesives; universal ones do not always provide the desired result; you have to “pay” for universalism. We select, if necessary, special brands for paths with intense load or heating, look at the shelf life and operating temperature range, especially important if the work is carried out in the autumn-spring period. If necessary, we use the necessary additives produced only by the glue manufacturer. Please note that most adhesives for working with natural stone must be mixed twice after a certain period of time, so read the instructions carefully.
Getting ready to paving flagstone on the garden path.
Place for installing a built-in lamp
Flagstone paving is possible not only on a concrete base, but also on an old concrete path. If, when casting concrete, you missed the moment of creating places for installing lamps, then it’s time to arm yourself with a hammer drill or grinder to minimize further damage when lighting the finished path. Then we prepare the concrete base for work. If it was cast a long time ago or we want to cover an old concrete path, then it must be washed and treated with a primer. If there is still residual moisture in it, then nothing additional needs to be done.
Flagstone garden path
When paving flagstone on concrete bases, we select a stone 25-40 mm thick. We lay out the flagstone along the path, selecting the pattern and uniformity of the gaps. We trim the edges with an angle grinder - a grinder with a diamond wheel. If possible, it is better to do this with water supplied to the cut site. If not, then the circle should be for dry cutting. Usually it also indicates the types of stones for which it is intended to work. For dry pruning, it is better to do it in a remote place; there will be a lot of dust. Don’t forget to protect your eyes and safety precautions in general. This is perhaps the most time-consuming part of the work, but the entire aesthetics of the future garden path will depend on its result. The glue will harden quickly in air and there will be no time left for trimming and finishing. We wash the flagstone from dust and deposits on the side where we will apply glue or mortar. To do this, we need good water pressure, and possibly preliminary manual treatment with a brush.
Paving flagstone on the concrete base of a garden path.
Mix the glue according to the manufacturer's instructions. We apply it to the concrete base. We lay out the flagstones in accordance with the selected pattern. We start with the thickest tiles; thinner stones are brought below the level using a thicker layer of glue. Carefully press the flagstone into the adhesive mixture so that there are no voids left underneath. The glue must occupy the entire space, otherwise water may accumulate in the voids, which in winter will squeeze out the tiles when it freezes. We try not to apply too much, so that when pressed, the adhesive solution only fills the seams. We immediately remove the remaining glue from the front side of the natural stone, otherwise in a few days you will need a metal brush. We set the height of the tiles to the level and ensure the slope of the path for good drainage. Let it stand until the glue acquires operational strength, the period is indicated by the manufacturer.
We place the flagstone under the level
Apply glue to the concrete base
Mix the glue according to the manufacturer's instructions
How to properly prepare a drainage base, the quality of which largely determines the durability of a garden path or site, can be found in the article “Laying flagstone in garden paths with a seam of garden grass”, about the production of mortar and the procedure for concreting the base - “Concreting paths in the garden”.
Remember that with the money saved from making your own garden paths, you can purchase more expensive and high-quality natural stone. Good luck in your creation!
Plot
Today, wild stone is one of the most popular building materials for finishing work. Natural beauty and excellent physical and technical characteristics make it possible to use it to decorate the facade of a building and in the arrangement of garden and park landscapes. However, this material has a number of disadvantages. In addition to the high cost, which fully depends on the mining technology and production standards, laying natural stone itself is not easy and requires not only special tools, but also certain skills. This article will talk about cladding with wild stone.
Content:
Today, the market offers a huge assortment of stone of artificial origin, which flawlessly replicates the texture and texture of a natural solid mineral.
It also has such advantages as:
- resistance to temperature fluctuations;
- low specific gravity;
- wear resistance;
- color fastness;
- durability;
- affordable price.
Its advantages include absolute compatibility with other materials. A stone path will look harmonious in any landscape. And the finishing of the basement can be done on houses built from various materials.
Scope of application of wild stone
Depending on the material from which the piece elements were made, the scope of application is determined. Thus, gypsum-based stone is used for interior decoration. Its advantages include its light weight, excellent workability and environmental friendliness.
Cement-based tiles are intended for cladding fences, facades and basements of buildings. It is also widely used in the development of the surrounding area:
- when paving open terraces, driveways and walkways;
- when finishing stairs, steps, borders;
- when decorating pools, springs and other bodies of water;
- with the spectacular design of alpine cities, small architectural forms, sculptures.
Often this material is used for fragmentary finishing of walls inside a building. It should be remembered that to give fireplaces and stoves an aesthetically attractive appearance, a heat-resistant analogue is selected.
Laying wild stone
The process of laying both artificial and natural stone is similar to brickwork, so there should not be any particular difficulties during the work. There are two technologies based on bonding the material with or without binding solutions.
- Wet method. The masonry using this method is especially strong and reliable. Ideal for cladding vertical surfaces, it allows the construction of structures of any height and shape. With this method, there is no need to adjust the elements in size - the empty space will be filled by the adhesive mixture, and will also firmly connect the stones both to the surface and to each other. A sand-cement mixture or tile adhesive can be used here.
- Dry method. This technology is used in the construction of low fences, fences or decking of paths and platforms. Fitting stones with so-called ragged edges to each other will not be easy; it will require some experience and skill. The resulting voids are filled with small pebbles, clay or sand.
Everything you need to know about loads
When working with stone material, it is necessary to take into account the thickness of the flagstone; here we do not mean the type of stone, but free-form tiles with uneven edges.
- Vertical surfaces (walls, barriers, etc.) are faced with stones up to 2 cm thick;
- for arranging paths, pedestrian or bicycle paths, terraces or open verandas, material with a thickness of 2 to 3.5-4 cm is used;
- access roads and places with intense traffic are laid with flagstone, the thickness of which is 4 cm or more.
- When working on vertical planes, larger elements are placed on the lower rows. It is important to ensure that the horizontal joints are offset; here you need to use the rules applied for brickwork. To clad the corners of the building, stones that are stronger are used.
- Excavation of soil when terracing or arranging paths is carried out at different depths, this parameter depends on the operational loads. For sidewalks and walking areas, the depth under the base can be about 30 cm. If the passage of passenger cars is expected, then the height of the walls of the pit should be at least 50 cm.
- Concreting the base before paving is carried out for structures intended for intensive use, as well as if the soil is subject to displacement and with a small thickness of the material (up to 3 cm).
- A small bulge in their central part will help prevent moisture from accumulating on paths and platforms.
Flagstone path
What is needed and how much does 1 meter cost?
Laying flagstone has its own peculiarities, and in order for a path, driveway or parking lot to last a long time, you need to choose the right stone and follow paving technology. Laying flagstone is considered simple, but mistakes are possible and it’s worth learning all the details.
Choosing flagstone for a garden path
Flagstone is a natural stone of a flat, arbitrary shape, up to 15 cm thick. It is formed from rocks that break up into slabs. Flagstone is represented by the following rocks: sandstone, lemezite, slate, limestone, goldite, quartzite and dolomite.
The most commonly used stones for paving are sandstone, granite and quartzite.
- Sandstone is easy to process and cut, it is not afraid of frost and is not covered with ice.
- Granite is not afraid of sudden temperature changes and high loads. It absorbs almost no water and therefore does not deteriorate after freezing and thawing cycles. Granite flagstone is easy to process.
- Quartzite is difficult to process due to its high strength, so it is used in its natural form. It sparkles spectacularly in the sun and looks very solid.
For paving the parking lot of a passenger car (up to 3 tons), slabs with a greater thickness are used - from 50 mm, but in this case a strong concrete base is necessary, otherwise the flagstone will quickly collapse.
When choosing a stone, pay attention to the quality - if the stone is brittle, do not take it. The mining site should be close to the paving site. Flagstone from the southern regions cannot withstand severe frosts.
Flagstone laying technology
Depending on the purpose of the site, the technology for laying flagstone will vary - the main difference is in the type of base. Types of bases:
Path laying project and installation
To create a plan for placing flagstones, it is important to take into account the already trodden paths along which residents of a country house are accustomed to walking every day. You can slightly change the configuration of paving paths with flagstone, but the direction must remain the same. It is important to sketch a sketch of flower beds, recreation areas, houses, and technical buildings. Then apply the placement of pedestrian zones and platforms. Such a plan will help determine the amount of work and the amount of flagstone used for paving. Usually the material is sold by square meters.
The amount of stone can be calculated based on the length of the paths and their width. By multiplying the values, you can find out the area of the paving and compare it with the dimensions of the material. During installation, a number of tools are used to help correctly paving the elements:
- tape measure to determine the area of paving the path with flagstone;
- stakes made of any material;
- rope for fencing the area;
- level for determining the slope of laying elements;
- shovel for removing excess soil;
- hammer and rubber mallet for neat distribution of elements;
- soil compaction equipment;
- Bulgarian;
- a container for mixing concrete if it will be used for paving.
- additional tools for applying material to the track.
Before starting work, use a tape measure, stakes and rope to mark the area to be worked on. In the intended area, a layer of soil is removed along with grass up to 30 - 35 cm deep. Afterwards, the open area of land is compacted. Paving a path in such an area will result in almost no settlement. Next, sand, crushed stone, concrete, special mortar and material are laid in layers based on different indicators and installation options. There are three main installation methods:
- Paving on a sand-cement cushion
Sand 10–15 cm thick is poured onto the bottom of the prepared base. Such a base will provide excellent drainage. The sand is compacted and the next layer consisting of cement and sand is laid. When placing the composition, make a slight slope in one direction. Then sand is added again. The main pillow is no longer compacted. Stone paving is carried out with small gaps. The seams are filled with fragments.
Installation of stone on a sand and gravel base
Laying the material is not particularly different from the first option. Instead of the first sand layer, a mixed material of sand and crushed stone is used. This composition is preferable for areas with difficult soil. A slight slope is also made when pouring the base layer in a ratio of 6:1. Stone paving is carried out as in the first case.
Laying elements on concrete
This material is used on soils where there are underground springs and nearby bodies of water. The concrete base will withstand difficult soil perfectly. In this case, the trench is dug to a depth of 50 cm. The width is increased by 20 cm. That is, the base of the path extends beyond its limits. As in previous options, sand is placed at the bottom. Afterwards the trench is filled with concrete. Next, a reinforced mesh is laid and concrete is poured again. After 2 weeks, a sand cushion is applied. Afterwards the stone is paving using special adhesives.
Types of tiles
Concrete mosaic paving stones are replacing asphalt concrete sidewalks, which are much easier to install, more reliable and durable in operation.
Concrete paving slabs come in different shapes and colors, and their production technology also differs. To design concrete paths, playgrounds and play areas, the following types are most often used:
Products made under pressure are just as good as those made from the press.
- Manufactured by vibration casting. This is a decorative tile, characterized by the complexity of its geometry and the ability to create an unusual pattern. The product is durable, frost-resistant, waterproof, but it has a significant disadvantage - a high price, so not everyone can afford to buy such material.
- Produced by vibration pressing method. This is a tile of a standard shape and size, more affordable, and at the same time not inferior in quality to the previous one.
There are other types of decorative flagstone, but they are used much less frequently in construction. These include:
- natural stone product;
- polymer concrete tiles;
- porcelain stoneware elements;
- concrete lawn lattice.
When is it placed on concrete?
Concrete tiles can be laid on old concrete or on a newly laid foundation. In the first and second cases, it is possible to achieve a reliable, stable and durable coating that will be stable under the influence of weather and mechanical factors. It is recommended to lay flagstone on a concrete base in the following situations:
- the presence of constantly subsiding soil;
- clayey base, subject to swelling in some areas;
- significant loads on the working surface;
- you need to cover the old, unsightly base, the dismantling of which is impractical.
STEPS AND PROCESS OF LAYING NATURAL STONE
PREPARING THE BASE
Natural stone must be laid on a hard, dry surface. Concrete (preferably with reinforcement, but this is not necessary), carefully compacted crushed stone or slag, asphalt and other building materials with a slender crystalline lattice are perfect. The thickness of the base will depend on the load and the soil in which it is laid.
Applying a fastening composition to the base. It is recommended to use cement-sand mortar as a fastening composition (the ideal proportion is grade M150).
LAYING STONES
The second and third stages must be completed as quickly as possible. Immediately after applying the bonding compound to the base, begin laying stones before it has time to set. The ideal layer of mortar between medium-sized stones is considered to be 2-3 cm. Some deviations from this norm are possible - the technology for laying natural stone depends on the type of finishing material you use.
Advantages and disadvantages
If the laying of paving slabs on a concrete base is carried out strictly according to technology, the following positive aspects will be achieved:
- absence of shrinkage process;
- strength and durability of the structure;
- the opportunity to save money and do the work yourself;
- reliability of the lined surface;
- attractive design appearance;
- wide selection of tile geometries and colors.
However, the device also has disadvantages. The main ones are:
- surface destruction due to violation of masonry technology;
- difficulty removing moisture and water from a closed concrete box;
- the need to additionally arrange a drainage system.
Laying natural stone of all types inside and outside
Natural stone has always been valued as a building and finishing material due to its durability, resistance to the environment, strength, special unique structure and texture, and a wide variety of colors and shades.
Natural stone is perfect and combines with metal, wood, and glass. This makes it attractive to designers and architects.
Today, natural stone is very popular as a decorative and finishing material (it decorates floors, walls, fireplaces, columns, walls inside and outside houses, buildings, cottages, offices) and as a raw material for the manufacture of interior parts (cornices, baseboards, railings, countertops) , window sills, bar counters, mosaic panels, tables). Natural stone attracts the attention of many consumers.
A natural stone
- a combination of effectiveness and monumentality
- this is well-being and prosperity
Laying natural stone
If you comply with building codes, laying natural stone and stone slabs is not difficult. It is necessary to carry out all stages of laying marble and granite in sequence, which will save money and time. The base for laying stone slabs must be strong, level, free from dirt and cracks. Plaques are not allowed on the surface; putty or plaster should not crumble. Old layers of paint, wallpaper, and building cladding materials must be completely removed if they begin to peel off. To level the walls and fill cracks, you need to use cement-based putties.
To obtain the greatest effect and quality of installation, the cladding must be divided symmetrically.
It is necessary to draw a line exactly in the middle of the wall in order to get whole tiles (or cut ones) at the edges of the surface. To cut slabs lengthwise in straight lines, you need to use a special machine for cutting stone slabs. With its help, you can cut tiles precisely to a given size. For curved cuts, you need to use a hand grinder. Laying natural stone floors is carried out in two ways:
Laying factory-polished slabs on mortar
Laying 20 mm granite stone slabs on a concrete base using an adhesive mixture.
The solution is applied to the base with a comb spatula so that the solution is evenly distributed over the entire surface. We make sure that a film does not form - it reduces the adhesion strength of the tiles. The ambient temperature should not be lower than +5 degrees. and above 38 gr.
Laying granite and marble stone slabs with a thickness of 20 to 50 mm on a cement-sand mortar on a concrete base.
We begin laying the slabs immediately after applying the mortar to the base of the floor. This is a very important point. Laying of stone slabs must be completed before the mortar sets. This is a technology for laying stone slabs by pressing them into the adhesion layer. This is done manually or using vibration. After this, all joints are watered with cement-sand mortar.
Method of laying stone on a special solution
A method of laying stone on a special mortar that does not contain sand and sometimes moisture. Slabs of ground texture are laid, which are then polished using grinding and polishing machines. As a result, the floor takes on the appearance of a mirror, and its care is possible with the help of special chemicals and a polisher. The most popular thickness of granite slabs for interior decoration is from 15 mm, and marble - 10 mm. When laying on waterless special adhesives in the interior, this thickness is considered normal. Installation is simplified and the building structure itself is simplified and material is saved.
Laying stone on wall covering
Fastening of thin slabs up to 10 mm thick is carried out without the use of metal fasteners. Slabs up to 10 mm thick are attached to walls using adhesive mixtures. And to fasten slabs from 15 to 60 mm, metal anchors and hooks are used, the entire space between the wall and the cladding is filled with mortar. Fastening thin stone slabs to vertical and horizontal surfaces requires the use of adhesives and mastics on a previously prepared screed (floors) or plaster (walls). With this fastening method, we avoid the effects of shrinkage of the cement-sand mortar layer. All joints are given elasticity thanks to mastic and glue.
A large number of different adhesive compositions have been created, highly specialized for a certain type of work, their implementation, and the conditions that affect the strength and durability of the cladding.
Adhesive mixtures can be divided:
- high strength mixtures that are used for special systems
- universal mixtures that are suitable for slabs made of natural stone and ceramics
— superplasticized for grouting joints, which have elasticity to compensate for thermal expansion and provide protection from moisture.
Which stone to choose?
Granite is a volcanic rock that contains 15 to 35 percent quartz. This makes this material very durable; it does not weather or collapse under the influence of water or cold. For exterior finishing there is no better material than granite. It is also used outdoors in the construction of facades, parapets, benches, and steps. Paths and platforms are laid out with granite. Granite can withstand large crowds of people and wheel pressure. In the interior, granite is good for floors, countertops, window sills, fireplaces, steps, and porches.
Marble is a sedimentary rock. He's softer. Marble is limestone with crystallization. The more crystallization, the stronger and denser the stone. Marble has its own unique color range. Marble is also resistant to external influences. It is quite dense, has multi-colored varieties that can decorate any interior. In our latitudes it should not be used for exterior decoration. In interiors, they can be used to lay floors, columns, and stairs.
Stone care
During use, stains, chips, scratches and damage may appear on the stone. The stone “breathes” and can become dirty. It is necessary to care for the stone:
— you need to regularly treat it with protective compounds once every 6-10 months for marble, limestone, slate; and once every 1-2 years - granite.
- use a special means to protect the stone from exposure
After laying, the stone is cleaned of any remaining glue, grease, or dust. For severe contamination on unpolished surfaces, you can use active acid- or alkaline-based removers. After this, the stone is coated with a protective water-repellent agent. Then matte or glossy polishes are applied.
Limestone requires special impregnations. These compounds repel moisture and do not allow the absorption of dirt. To mask microcracks and revitalize the color of the stone, they are treated with special restorative agents. If there is major damage, the stone is repolished or resurfaced.
Requirements for a concrete base
Flagstone can be laid on an old, pre-prepared concrete surface, but more often laying is carried out on a newly laid base. Regardless of which option is chosen, in the first and second cases it is important to ensure effective drainage and drainage. To do this, the structure is arranged at an angle of 10-20 mm per 1 m of length. If this rule is not taken into account, the device will quickly begin to deteriorate due to the accumulation of excess moisture and water. This principle is used to lay natural stone, porcelain stoneware and other elements.
SALE OF NON-metallic materials
VOLUME OF PRODUCTS SUPPLIED AND DELIVERY CONDITIONS SENDING CARGO IN RUSSIA AND FOR EXPORT
DELIVERY IS AVAILABLE
Briefly about our company
Our company produces decorative chips from high quality marble, crushed marble for construction needs, fractions 2.5-200 mm. In addition, we offer white and black marble, rock of various shades.
Laying technology
Installing a curb or curb
Before you begin arranging flagstone sidewalks, the areas or paths where paving is planned are first laid out. Next, the area is soaked with pegs, between which a string is stretched. To construct an earthen box, it is necessary to remove 10-15 cm of the top earthen layer, lay a sand cushion at the bottom of the trench, compact it well, and along the edges there are boards that will serve as formwork.
Before completing the main work, you need to install the curb.
At the next stage, a curb or curb is installed. It is important that after laying the tiles, its edges rise above the curb by 2-3 cm. This will ensure normal water drainage, making the surface durable. To install the curb, you need to dig a small ditch, at the bottom of which a sand-crushed stone cushion 5 cm high is laid. Then the trench is filled with mortar, and then the enclosing elements are installed.
Backfilling the cement-sand mixture
Before you start concreting, you first need to clear the bottom of the trench from debris. Then a film is placed on the surface, which will prevent the crushed stone from mixing with the soil. The next stage involves backfilling, leveling and compacting of crushed stone. After this, the layer is covered with sand 2 cm thick. For waterproofing, roofing material is used, which is laid in 2 layers. To ensure that the surface is durable and the concrete mosaic tiles do not collapse, reinforcement is carried out. If the load on the surface is small, 1 layer of reinforcement is sufficient, otherwise a two-layer backfill is required. Do not forget about the drainage system, which is installed at this stage.
For pouring, a concrete solution is used, which is easy to make yourself. The composition of the mixture is as follows: crushed stone, sand, cement. The ratio of components is respectively 3:2:1. Water is added until the solution reaches a creamy consistency. The finished mixture is poured into a trench, then covered with film and left to dry for 15-20 days. To prevent cracking, the concrete pour is watered periodically.
Tile laying
Before you start gluing the tiles to the base, you should first lay them on the surface and understand the pattern of the pattern. The following is used as an adhesive mixture:
- tile adhesive;
- sand-cement mortar;
- dry cement-sand mixture.
Laying paving slabs on concrete is carried out in the following popular ways:
The material can be placed on the prepared base in several ways.
- herringbone;
- column;
- brickwork.
If you need to glue tiles to concrete, it is better to use a special glue. Concrete paving slabs hold up better when using sand-cement mortar.
The finished cement mixture is laid out on a surface 20-30 mm thick. Then the flagstone itself is laid. To ensure that the paving stones adhere well to the mortar, a rubber mallet is used, which is used to carefully knock down the masonry. To control the horizontal surface, use a building level. If the technology for laying paving stones is followed, you can walk on the paved surface within 4-5 knocks.
The master must check the quality of his work with a level.
Sealing seams
In order for concrete mosaic tiles to hold tightly and not collapse, it is important to properly design the seams. To seal them, a cement-sand mixture is used, which is poured over the finished surface of the structure. Excess grout should be removed immediately, because it quickly dries to the surface, as a result of which the masonry can be damaged. Then the laid area is moistened with water, this is necessary so that the fastening composition hardens faster. If you decide to glue ceramic tiles to a concrete base, it is also important to form the seams correctly. For this purpose, a special grout is used, which protects the masonry from excess moisture penetrating inside.
Methods of paving flagstone
The main options for paving slabs: dry mix and glue.
Based on the type of base provided, they are divided into laying on a bed of sand, gravel or reinforced concrete.
For a garden path, a sand base is quite sufficient, because there are no great load requirements for it.
The stone for laying should be within 5-8 cm thickness; the larger the slab, the better.
A layer of crushed stone is added if the site has clay soil, so the path will receive an additional margin of safety.
On a gravel base, you don’t need too thick pieces of flagstone, 4-6 mm is enough.
Masonry joints can be filled with a sand-gravel mixture or soil with lawn grass seeds.
In the latter case, the distance between adjacent pieces of sandstone needs to be increased.
The method, which assumes a base of reinforced concrete, is suitable if flagstone is laid with your own hands in places with a large load on the surface. Sidewalks and driveways, basement around the building.
The material acts as a cladding glued to a solid base.
DIY brick grill
To create a full-fledged recreation area in a private yard, a brick grill is one of the best options. This design has many design options, and also has a lot of other positive characteristics... “More details”