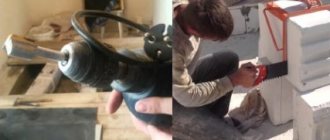
When laying aerated concrete blocks, it is important that the surface of the products is clean and smooth. During transportation, storage, and loading and unloading operations, the block may become dirty; dust, sediment, and traces of mineralization may appear on it. If the block is dropped, chips and shallow cracks will form on the surface. It is not advisable to reject an unsuitable block, but bringing the material into proper condition is not at all difficult. To do this, use a simple tool - an aerated concrete grater. With its help, you can significantly reduce the percentage of rejected gas blocks.
What is a plane needed for?
An aerated concrete planer (also called a grater) performs the function of leveling the protruding parts of aerated concrete blocks. The advantage of a planer is its ability to give the material a flat surface, which is especially important for subsequent stages of installation. When in contact with wood, the plane performs the function of planing, cutting off the top layer, which is not suitable for aerated concrete. If gas silicate (aerated concrete) is used in the work, the plow must have a different design so that it can be used for grinding and scraping. You cannot remove a large layer from the surface: such material is considered defective and it is prohibited to work with it. In professional planers for aerated concrete, the design resembles a kitchen shredder with a construction grater, which allows you to scrape and sand the material at the same time.
Sometimes correction of the gas block is necessary.
Graters have different areas of application. The planer is used for planing surfaces; it is also used for chamfering and cutting grooves. In general, there are different types of graters:
- sherhebel;
- zenzubel and folded gobel;
- double plane with a false blade;
- semi-jointer;
- double jointer;
- small plane;
- bear
Return to contents
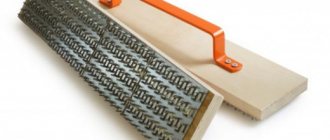
Bucket with teeth
A bucket with teeth makes it possible to apply an even layer of glue in any direction. A bucket for aerated concrete costs about half as much as a carriage (about 500 rubles).
Typical design
Planes for aerated concrete are designed to level the top layer of blocks, and consist of a handle with a body on which rows of blades are fixed vertically opposite each other. One side has five rows of knives that are parallel and angled to the body. The other side looks the same, only the rows are directed towards each other. The materials for the case are plastic and wood, although it is not so important what it is made of - the main thing is that it is durable and comfortable.
Return to contents
Drill (screwdriver)
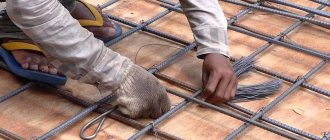
If it is necessary to make holes in aerated concrete for fasteners, for example, for anchors or dowels, then it is necessary to use non-impact tools so as not to destroy the already fragile material.
It is better not to use a hammer drill; a regular drill or screwdriver will be quite sufficient.
How to make it yourself?
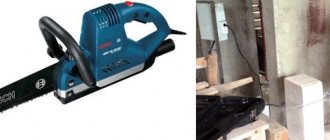
To mount a plane on aerated concrete with your own hands, wooden and plastic materials are used. To make a tool from wood, take a block 0.5 cm thick and 11 cm wide. The handle is also made of wood, and it is well sanded to a smooth state so that later the remaining chips do not get into the skin during work. The blade is a file with a density of 500 kg/cub.m. Next, the aerated concrete planer is glued together with a reliable adhesive.
Return to contents
Preparation of materials and tools
Planer design for aerated concrete blocks
Before making a planer for aerated concrete, prepare the following materials:
- wooden board, which has a thickness of 50 mm;
- glue that is suitable for gluing wood to wood and wood to metal;
- blades;
- pen.
To make a plane for aerated concrete use:
- ruler;
- hammer;
- grinder;
- electric jigsaw;
- calipers;
- chisel;
- brush;
- hacksaw;
- grinding.
Return to contents
Marking
Mark the future holes with a marker or pencil on the side of the board. After that, cuts are made from different edges (5 pieces each). The segments should be at an angle relative to each other. They also mark the place where the handle is attached, which should be located in the middle of the board.
Return to contents
Segment
Using a file, make cuts half the thickness along the previously marked lines. The block is processed with sandpaper, the blade blade is broken into pieces of the required length. The resulting segments are vertically inserted into the grooves.
Return to contents
Gluing
In order for the aerated concrete float to be solid and strong, you need to glue the cuts with reliable glue and let the product “rest” for several hours. To glue a plane, it is better to use Moment glue or the one you are confident in.
Return to contents
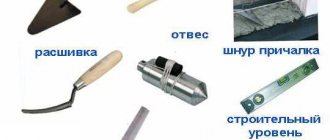
Construction level
A high-precision electronic device that emits two lasers, one strictly vertically, the other strictly horizontally. Levels differ from each other in accuracy classes and laser power.
The more powerful the laser beam, the better it is visible, this is especially important on a clear sunny day. In general, the level helps to construct planes at right angles.
Additional accessory
The additional design is needed for workers with little experience working with a gas silicate planer. The device is made in the form of a box that limits the deepening of the blades into the blocks. It turns out like a guide for a plane, while the height of the recess is set by the slats of the box.
An additional design can be made by yourself. For this you will need:
- two wooden boards with a thickness of at least 0.3 cm, one side of which must be well sanded;
- bars with a length equal to the width of aerated concrete blocks. They should be laid one on top of the other, after which a plane for aerated concrete is used and the ends of the boards are leveled.
Return to contents
Carriage
The aerated concrete carriage is the most convenient tool in our review. Working with it goes very quickly, and the thickness of the seam is as uniform as possible. During the work process, the carriage is filled with masonry glue and driven along a row of aerated concrete blocks, the glue is evenly distributed along the jagged edge of the carriage.
Carriages come in different sizes, and these sizes were created specifically for gas blocks.
Recommendations for use
You need to plan on your own.
When installing aerated concrete walls, they use a tool specially designed for this work - an aerated concrete planer. There is nothing complicated in its design, so it can be made by hand. However, when working with aerated concrete coating, you need to be careful not to remove a large layer of material and thereby render it unusable. The movement of the plane occurs by moving the base of the tool parallel to the working surface. Planing is directed away from you, and you don’t need to apply a lot of force, just make jerks with a slight movement of your hand.
A plane for aerated concrete is used only for this material; it is not recommended to use a tool intended for another type of material. Using wood planes can damage the tool and aerated concrete structures, since wood tools are designed to remove a thicker layer. At the end of the planing work, you need to remove the working surface from any dust and particles of matter that have formed. The planer is also cleaned.
To ensure quality grater work, it is important to avoid mistakes:
- Improper fixation of the tool may result in a convex surface. To prevent this from happening, watch the position of your hand and the force applied.
- Don't rush and do the work faster; the chips will be thick and the surface will be rough.
- The direction of the fibers should be in the direction of the plane; a reverse move will lead to roughness and scuffing on the surface of the material.
- To avoid flakes, planing begins from the edge to the middle of the board, achieving a flat, smooth surface.
Horizontalness is checked using a building level.
Regular trowel and notched trowel
You can use a regular construction trowel and a notched trowel . Apply glue with a trowel and level it with a spatula. This pair can be used to process both horizontal and vertical surfaces.
The disadvantages of these tools are that it becomes more difficult to regulate the thickness of the glue, and this thickness depends on the inclination of the spatula; the greater the inclination, the thinner the layer. You will always need to hold the spatula at the same angle.
Laying technique
Aerated concrete is laid using thin-seam technology. The thickness of the seams does not exceed 2-3 mm (ideally). This requirement is caused by the specific qualities of the material, which is unable to withstand the destructive effects of moisture. The small thickness of the seams eliminates the appearance of cold bridges, which are integral features of conventional masonry structures. the thermal conductivity of sand-cement mortar is much higher than that of aerated concrete. Because of this difference in the masonry, temperature differences occur, forming areas of moisture deposition from the internal air of residential premises. This water penetrates the gas blocks, accumulates in the mass and has a destructive effect during the cold season.
To solve this problem, thin-seam technology is used. It allows you to reduce the risk of cold bridges - due to the small thickness and large difference in mass, the seams cannot actively release thermal energy. Simply put, they are heated by the warmer gas blocks.
Specialized adhesives are used for installation. An ordinary sand-cement mortar is not suitable here, since with a small thickness of the layer, water will quickly drain from it into the aerated concrete. The hardening regime of the mixture will be disrupted, and it will not be possible to obtain the expected strength of the joints. Therefore, specialized glue is used for laying gas blocks. It consists of the same basic components - sand and cement, but with modifying additives that retain water and ensure the normal crystallization of the composition.
Thin seams can only be achieved if the surface of each row of masonry is ideal. This is not easy to achieve. It is required to use high quality material (for example, Ytong aerated blocks). In addition, the masonry must be carried out by experienced and skilled specialists who have undergone special training. Aerated blocks are distinguished by a very smooth and precise geometry, which allows for high-quality and neat masonry.
However, during work, the need to correct the plane of the row constantly arises. The reason for this is minor surface imperfections, small deviations from dimensions, mounting elements (grids, flexible connections, etc.). Almost every row of masonry has to be adjusted and processed to ensure the required thickness of the next seam. In addition, each row requires additional blocks, which are manufactured right there on the site. Their surface also has to be carefully processed to ensure the most precise fit of all surfaces. This is an important point, since poor fit immediately increases the thickness of the seams, and these are future cold bridges. They cannot be allowed to appear, therefore no time or effort is spared in treating surfaces.