More than one experienced specialist and private builder cannot do without such a tool as a plane for aerated concrete. Such a device will be needed to create smooth surfaces, eliminate differences, unevenness and roughness. When installing gas blocks on adhesive mixtures, the plane of the laid surface should be brought to “0”, this in turn will ensure thin seams equal to 1-1.5 millimeters.
Need for use
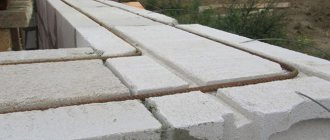
An important feature of working with aerated concrete blocks is the use of a special glue, which ensures a seam thickness of 1-3 mm. Large layers of mortar make it possible to level the row plane; this occurs due to the different alignment of masonry elements. When an adhesive composition is used, there is practically no possibility of extrusion, so all discrepancies in standard sizes will accumulate during the installation process. Such moments in the work require mandatory leveling of the surface of the aerated concrete slabs themselves. The products must be held together with a thin layer of adhesive and this will not allow their plane to be leveled when pressed.
How can you properly treat a surface? The answer is simple! It is recommended to use a principle that includes a slight cut of the top layer and sanding. A do-it-yourself aerated concrete plane should have these properties.
A planer is a device that is designed to level gas blocks using mechanical or manual planing. When processing wooden elements, a small layer of the workpiece is cut off. This technique is not suitable for gas blocks. Due to the fact that such a material has a cellular structure of different characteristics. If you cut off a thin layer, it will even out the heterogeneity and unevenness.
Features of leveling aerated concrete
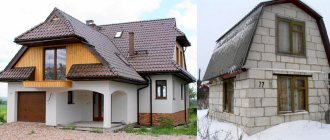
Before you begin designing a tool intended for processing gas blocks, it is recommended to understand the characteristics of the building material. Products are made from cement and sand with admixtures of gypsum, lime, slag, to which gas-forming mixtures are added. For example, to create gas cells, a component such as aluminum paste is added to the composition. After complete drying, a product is obtained with evenly distributed cells, the size of which is less than 3 mm.
Aerated concrete is cut into blocks of standard sizes - 25x62.5 mm and a thickness of 5 to 50 cm. Aerated silicate concrete has the best geometric parameters. When constructing walls and partitions, the following slab dimensions are used:
- 38-40 cm – for load-bearing walls;
- 25 cm – for partitions;
- 10 cm – for facing work.
When processing surfaces, it is recommended to take into account the strength and hardness properties of the blocks. Any sand-cement base leads to rapid wear of metal elements in tools. The strength of blocks directly depends on their density. Porosity, which ranges from 300 to 900 kg/m3, is responsible for these properties.
Products whose density exceeds 700 kg/m3 have the highest strength qualities. This type is used in the construction of load-bearing structures of large buildings and tall buildings. Also common models of aerated concrete are blocks with good thermal insulation properties, which have a density of 500 kg/m3. Panels with a density of 400 kg/m3 have lower strength and hardness. Such panels must be processed with extreme care due to the high cell content.
How to use a planer for aerated concrete
- After laying a row of gas blocks, you should use a spirit level to measure the flatness of the horizontal edge of the wall. The maximum deviation in no case can exceed 1 mm. But it’s better to remove this difference too.
- Sanding is done with smooth, strong movements. The force should be applied when moving “from yourself”: the operation as a whole is reminiscent of planing wood.
- The difference is that it is not chips that fly out from under the scraper blades, but cement-sand dust. Therefore, when working with a plane, you should follow the rules of industrial sanitation and safety precautions.
- It is forbidden to start work without safety glasses. You should definitely use respiratory protection - filters, respirators, or at least gauze bandages.
- If the planer is electric, it must be used with the limiting device set to minimum: the performance is so high that you can ruin the block - remove more layers than necessary.
- Let's say such a nuisance happened, and after measuring you determined that one block is lower than the others. Take your time scraping the shavings off the remaining stones in the row. It's easier to make a damper pad out of glue. To do this, first lay the first layer of glue 2.5–3 mm thick on the surface of the block, even before laying the next row.
- During laying, apply glue to the lower surface of the mounted block and again to the surface of the base. When performing this operation, it should be remembered that the total thickness of the masonry layer should not exceed 5 mm.
- In practice, experts have proven that hand tools are more effective than electromechanical ones. Although its specific productivity is lower, it takes less total time to complete all the work.
- When working with a plane, you should remember about replaceable working blades: concrete is a durable material, so the metal blades become dull quickly.
- Breakdowns are also common. However, the advantages of the tool include simplicity of design and high maintainability: minor faults are easily eliminated.
- Due to the simplicity of the device, many builders prefer not to spend money on purchasing a device, but make it themselves. This way you can save both time and money.
Types of planes
Of the large number of existing planer options, the following types of models are most suitable for aerated concrete:
Electric
The tool, equipped with an electric motor, allows you to increase your efficiency and productivity. This in turn helps achieve greater results by reducing labor costs.
Manual or mechanical
Devices can be made of materials such as PVC, metal, wood or combined elements. The technical qualities of the plane depend on the material. The tools are popular among private builders.
Design
An aerated concrete planer is used to level block rows during installation. During the working process, you will need to ensure that too much of the surface layer is not removed, otherwise this will lead to a situation that cannot be corrected and the block will have to be thrown away. In connection with such moments, it is important to select cutting elements that are suitable in all respects. The height of the parts is selected based on practical work.
Considering any model of a branded plane, in appearance it resembles a grater combined with a kitchen shredder. A handle is attached to the top of the main body, and rows of blades are attached to the working surface, which is located below. Lines must be drawn in two opposite directions. On one side there are 5-6 parallel rows of blades, which must be located at a certain angle relative to the body part. On the opposite side, identical blades are mounted, only oppositely directed. The knives themselves are fixed to the base in a vertical position.
This type of construction will allow you to cut off the top layer from the blocks and at the same time grind them. Finished plane bodies are usually made of durable plastic or wood. In practical application, the base material does not matter, the main thing is the strength characteristics. The handle is designed for convenient work, namely, it should not have a slippery texture and fit comfortably in the hand.
Any durable material can be used as a blank for the body!
DIY hand plane
The most difficult thing to make will be a hand plane made from saw blades. For a tool to be effective, its cutting parts must be positioned in a certain way. We will describe the assembly process in more detail below.
Materials and tools
In addition to the above, you will need:
- Wood glue, due to which the canvases will be held in the body of the board;
- The board itself for the sole is taken thicker - up to 50 mm;
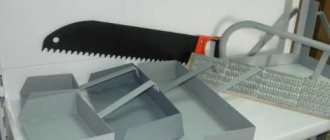
- 3-4 wood blades for a hand saw;
- The hacksaw itself;
- Brush and syringe for applying glue.
Drawings and markings
In this chapter, we will analyze in detail the structure of the plane and determine the optimal parameters of each part.
- The cutting part of the tool is presented in the form of six saw blades arranged in a certain way.
- The sole is visually divided into two parts, in each of which the angle of inclination of the canvases is changed to the opposite. The approximate tilt angle is 40 degrees. The length of the canvases is calculated using the Pythagorean theorem. If you don’t want to complicate the task with calculations, just use the average parameters: length of the working part 680 mm, width 140 mm, length of the blades 190 mm.
- To make the markings you will need a carpenter's square, a tape measure and a calculator. The length of the sole is divided in half, then the resulting halves are marked in the same order, but in different directions.
- From the outer corner we retreat to the side 130 mm and put a point. A line drawn from this point to the second outer corner will show the angle of inclination for the files. Using a ruler and a pencil, divide the halves into the required number of parts - mark with lines where the panels will be installed.
- The parameters of the cutting blade may vary, but a replacement wood saw is best. Thanks to the increased width of its blade, its parts can be recessed deeper into the sole of the tool, which will provide a more reliable fixation. The tooth height of such a file should be 4 mm.
How to make slits and glue canvases
In order for the metal to hold firmly in the wood, you need to make slots of minimal thickness in it. To do this, use the same file, but for metal.
- The thickness of such a canvas will be slightly less than for wood, which will allow the workpiece to be tightly driven into the body of the wooden base of the future grater. If the slots are narrow, then fixing with glue may not be necessary at all.
- It is recommended to secure the wooden workpiece well so that it does not move or wobble when cutting. The blade of the metal cutting blade is applied exactly along the line and carefully pulled in this direction to make the beginning of an even cut.
- Once the metal is sufficiently immersed in the wood, you can begin to work more confidently. Be sure to pre-mark the boundaries of the cut so as not to go too deep. The remaining slots are made in the same manner.
- Then you need to break the blanks from solid canvases. Use a vice and pliers for this. To achieve maximum accuracy, the workpieces can be sawed - since the blade is very thin, this will not take much effort and time.
- The resulting workpieces must be processed at the outer corners with a file to reduce their risk of injury. It’s better to do it all there, in a vice.
- Now the canvases need to be degreased to increase metal adhesion. Use kerosene, white spirit and similar products for this. Wood glue is pumped into the slots using a syringe. The side of the metal that will be immersed in the base is additionally coated with a thin layer of glue.
- Then the canvases are hammered one by one into the sole of the grater. To avoid dulling the teeth, use a spacer made of a wooden block - hitting it with a hammer will allow you to drive the entire piece of blade along its length at once. You can also make alternating strikes on the outer corners of the canvas.
- Please note that the teeth are initially inclined. When installing canvases, adjacent parts must be directed in different directions. Thanks to this design, the grater will not move to the side during operation. The cutting ability of the working surface also increases.
Now the tool must be left while the glue dries - 24 hours is enough, unless otherwise required by the instructions of the composition you purchased.
Recommendations for use
Mastering the grater you have made is not difficult. When working, it must be moved forward and backward along the masonry, parallel to its direction.
Vitaly Kudryashov
Aerated concrete blocks are easily susceptible to this effect, so there is no need to apply excessive force. Most often, the tool will have to be used when leveling the line of masonry rows, in which, due to the imprecise geometry of the blocks, differences often occur. If such differences are not eliminated, stresses arise in the masonry, which can subsequently cause cracks to appear.
Ask a Question
The grater removes such differences in just a couple of movements, increasing the strength of the entire wall, eliminating the need to increase the thickness of the seams.
Self-production
Although a plane for aerated concrete cannot be classified as an expensive and rare tool. You can make it yourself in half an hour and save about 800 rubles. There are two popular options for making homemade tools for aerated concrete blocks. More precisely, from two options for blade material:
- Using saw blades.
- Nail plates.
To make a plane for a gas block, you need to select available blanks of the component elements. It is best to make the body part from wood. To do this, take a board whose thickness is 40-50 mm and width 10-12 cm. Any handle that is at hand can be mounted. If desired, it can be made from wooden blanks - a board or timber.
Metal files made of hard alloys are used as the cutting elements of the tool. Wood saw blades are used when processing foam concrete or aerated concrete blocks with a density of no more than 500 kg/m3. To glue wood and metal, you will need glue; it is recommended to use the “Moment” brand or another adhesive mixture with high adhesion rates. This plane can also be used for processing gas silicate blocks.
Work progress
- A wooden blank for the base is cut, the recommended length is 30-40 cm. All corners are rounded and processed using carpentry tools for planing wood.
- Mark the locations of the knives. On the area of one of the sides of the base, 5 lines are drawn, which must be parallel to each other, the distance between them must also be the same. The lines must be drawn at an angle of 70 degrees relative to the longitudinal part of the board. The tilt is made to the right side of the cross section. The markings are carried out similarly on the other side, but the slope should be to the left. The result should be markings that will be directed towards each other on both sides of the base.
- According to the markings, make slots with a jigsaw so wide that the saw blade can freely fit there. You should start sawing by stepping back from the edge by 2-3 cm on both sides.
- The board must be carefully sanded.
- The cutting element blank is broken into pieces of the required length.
- Before placement, the blade section is thoroughly coated with an adhesive solution.
- The blades are inserted into the slots in a vertical position.
- The area where the cutting element will be placed is treated with glue.
- After the glue has dried, check the quality of gluing of all parts to the body. All excess glue is removed.
- A handle is attached to the top side of the base.
It happens that the cutting part of the file is not sharp enough, and working with such a tool will not be productive. It is recommended to sharpen the blades using a file or sharpening machine.
Additional tools
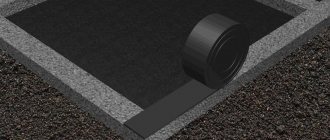
By making an additional device, you can get a tool that will limit the deepening of the cutting elements. This addition is useful for workers who do not have experience working with a plane for aerated concrete blocks. The principle of operation is simple, the slats of the device form guides for the movement of the base of the plane. In turn, the height of the bars will limit the deepening of the blades.
It is forbidden! Make the dimensions of the device smaller or larger than the dimensions of the block. It is better to select the length of the board in accordance with the width of the gas block. Additional length for fastening is also taken into account. The device is installed on the surface of the partition so that the dimensions of the bars coincide with the horizontal level of the aerated concrete product in the masonry row.
Scope of application (grinding)
Cellular concrete is a porous material that can be easily processed. For example, you can cut channels in it - grooves. In addition, it can be sawed, ground, ground - if only you had a reliable tool at hand. For grinding, they use a special device - a plane for aerated concrete.
The tool is inexpensive, but necessary: it will definitely come in handy during work. No matter how smooth and accurate the gas blocks are, when installing walls you will definitely come across two to three dozen at different levels. To remove differences in the masonry, a plane is required.
You will remember this useful device more than once. For example, in the following cases:
- if necessary, resize the edges of blocks after unsuccessful sawing,
- when you need to remove the waviness on the surface of the stones,
- if you have to eliminate roughness on already laid walls.
Builders use a planer to solve the main problem - leveling the upper surface of the newly laid row of gas blocks. By achieving ideal flatness, masons achieve two goals:
- save adhesive solution - if the surface of the row is smooth, the thickness of the seam between adjacent stones does not exceed 1.5–2 mm;
- achieve high thermal insulation parameters of walls: seams thicker than 5 mm should be made from CPR. Mortar, an analogue of heavy concrete, is an excellent heat conductor. Therefore, a wall with glue retains heat in rooms 2 times better than the same wall laid with cement-sand mortar.
Expert opinion Vitaly Kudryashov builder, aspiring author
Ask a Question
A strong fine-seam joint cannot be achieved without grinding the blocks. If at some point the gap between the stones is not filled with glue, the block may crack. Therefore, the strength of the entire building structure depends on the proper use of the plane.