Home / Plaster
Lime-cement plaster is suitable for both interior and exterior use
Today I will talk about the most budget-friendly option for plastering walls using a cement-lime mixture. We will analyze the characteristics of the composition, preparation options, and as a bonus, you will learn the technology for correctly applying the plaster solution, which even novice craftsmen can do.
Plaster allows you to quickly level any mineral surfaces
Preparation of masonry mortars
Since various types of mixtures can be used for masonry mortar, let us consider in more detail how to prepare mortar for bricklaying.
Cement mortar proportions
Sand-cement compositions are widely used in capital construction and other areas where increased demands are placed on the strength characteristics of brickwork.
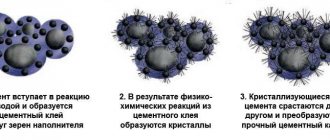
When starting to prepare masonry mortar, you should remember that excess cement in the working mixture does not increase its strength, and in some cases, even worsens its characteristics. Only strict adherence to dosage will ensure optimal performance properties of the masonry mixture. The proportions of the most common cement-based compositions are given in SP 82-101-98, which clearly regulates the percentage of ingredients in various types of cement masonry mixtures.
The table shows the percentage of ingredients in cement masonry mortar, depending on the brand of cement used.
| Brand of masonry mixture | Cement brand | Ratio cement/sand |
| M25 | M300 | 1/9,5 |
| M50 | M300 | 1/5,8 |
| M400 | 1/7,4 | |
| M 75 | M 300 | 1/4,2 |
| M 400 | 1/5,4 | |
| M 500 | 1/6,7 | |
| M 100 | M 300 | 1/3,4 |
| M 400 | 1/4,3 | |
| M 500 | 1/5,3 | |
| M 150 | M 300 | 1/2,6 |
| M 400 | 1,3,25 | |
| M 500 | 1/3,9 |
Scope of application of cement mortar depending on strength characteristics
Below is the scope of application of different brands of masonry mortars.
- M25.
Used for plastering and floor screeding. The composition does not contain any additional ingredients. - M 50.
Used for brick and stone masonry in the construction of low-rise buildings and structures. May contain plasticizers, dyes and other additives. - M 75.
Used for laying concrete slabs, installing reinforced concrete structures, erecting internal partitions and installing concrete floor screeds. - M 100.
Widely used in monolithic construction, masonry work and pouring light-loaded strip foundations. - M 150.
Used primarily for foundation work on loose soils.
Proportions of cement-lime mortar
The percentage ratio of cement, lime and sand in cement-lime mortar is given in the table.
| Cement/lime/sand ratio | |||||
| Cement brand | Masonry mixture M 50 | Masonry mixture M 75 | Masonry mixture M 100 | Masonry mixture M 150 | Masonry mixture M 200 |
| M 300 | 1/0,6/8 | 1/0,3/4 | 1/0,2/3,5 | 1/0,1/2,5 | |
| M 400 | 1/0,9/8 | 1/0,5/5,5 | 1/0,4/4,5 | 1/0,2/3 | 1/0,1/2,5 |
| M 500 | 1/0,8/7 | 1/0,5/5,5 | 1/0,3/4 | 1/0,2/3 |
The solution is prepared in the following sequence:
- Fluffed lime is diluted to the consistency of kefir, and then filtered.
- Separately prepare a dry sand-cement mixture.
- Strained lime is added to the cement-sand mixture and mixed thoroughly until a homogeneous mass is obtained.
Proportions of cement-clay mortar
The ratio of cement, clay and sand in a cement-clay masonry mixture is given in the table.
| Brand of masonry mixture | Cement M 500 | Cement M 400 | Cement M 300 |
| Cement/clay/sand ratio | |||
| M 300 | 1/0,15/2,1 | 1/0,07/1,8 | |
| M 200 | 1/0,2/3 | 1/0,1/2,5 | |
| M 150 | 1/0,3/4 | 1/0,2/3 | 1/0,1/2,5 |
| M 100 | 1/0,5/5,5 | 1/0,4/4,5 | 1/0,2/3,5 |
| M 75 | 1/0,8/7 | 1/0,5/5,5 | 1/0,3/4 |
| M 50 | 1/0,9/8 | 1/0,6/6 | |
| M 25 | 1/1,4/10,5 |
The addition of clay increases the ability of masonry mixtures to retain moisture.
The low strength of lime mortar prevents its widespread use in masonry work. Most often, lime mixtures are used for plastering work. The proportions of the working solution depend primarily on the fat content of the lime and can range from 1/2 to 1/5.
Advantages and disadvantages
The benefits of lime plaster are due to a number of factors.
- High adhesion ability, and this property does not depend on the raw material from which the surface to be treated is made. The finishing is particularly successful on surfaces made of stone and wood. We can conclude that lime is a universal material for construction.
- After the mixture hardens, high plasticity appears, due to which there is no risk of cracks.
- The ability of the solution to “breathe” and high vapor permeability guarantee a favorable indoor climate.
Along with its undeniable advantages, lime has some disadvantages:
After carrying out repair work, after several days, you may notice that the surface has acquired unevenness. This disadvantage can be easily eliminated if you follow the advice: since the solution is applied in several layers, you need to wait some time after the first layer, and only then proceed to the second. Usually the time depends on the type of solution. For some options, it is enough to wait an hour, and for others – a day. The disadvantage is the lack of sufficient hardness of the applied composition
It is important to know that after some time, the plaster will acquire sufficient hardness and it will be possible to drive nails. Before starting work, there is a need for a primer or a simple spray. It is prepared as follows: cement and lime are mixed until a creamy consistency is formed.
But after spraying, you must wait up to 10 hours for the mixture to harden.
- The protective effect against the appearance of mold and mildew is achieved due to the bactericidal properties of the material. Even with high humidity in the room there is no risk of microorganisms appearing.
- Affordable price for plastering.
- High plasticity of the solution, as well as ease of application during work. This makes it possible to do repair work with your own hands in the absence of the necessary experience.
- Using lime plaster on a wooden surface will protect the wall from various rodents and insects.
Application and consumption
Plaster is applied to the surface in several ways:
- With my own hands. In this case, throwing or spreading techniques are used. When spreading, the material is placed on a trowel or trowel, then the tool is brought to the surface at an angle. A layer of plaster is thrown on, and the trowel is sharply torn from the wall, but for this it is better to practice a little. Spreading on the base is done using a spatula, and this makes the task a little easier for beginners. It turns out that the material is initially applied to the tool, and then spread on the surface of the wall.
- Specialized units - mortar pumps. The mixture is pumped using a compressor unit through a hose on which a nozzle is installed on the base, and is supplied to the surface to be treated. As a rule, this method is used for large construction volumes.
The ratio of components in parts
The consumption of material depends on the thickness of the applied marking, that is, it turns out that the more irregularities, the more mixture needs to be prepared. You can independently calculate the amount of material for plastering operations. For this purpose, the following indicators are taken into account:
- type of mortar mixture;
- components of the mixture, including a plasticizer;
- evenness of the bases;
- material of plastered surfaces.
If the house is multi-story, then the deviation along the plane is approximately 2 cm. To reduce the plaster layer, primer treatment is necessary. To determine the thickness of the layer, you need to determine the curvature of the surface. For this:
- You need to lower a plumb line from the ceiling, find the most protruding point and measure the thickness from the found point to the base.
- The beacon slats are filled, and the depressions relative to them become known.
Detailed list and proportions
For example, a wall has an area of 12 m2, and with the help of beacons it is found that along the plane it is 2, 5, 3 cm. Then all the indicators are added up, and it turns out that (2+5+3): 3 = 3.3 cm. This will be the thickness of the layer.
Plastering
Sequence of work:
- First, you need to prepare the surface, that is, make cuts on concrete or brick, if necessary. Don’t forget to treat it to remove rust and oil stains. Then the surface needs to be moistened with water: this will give better adhesion.
- Applying the first layer, that is, spraying. The layer should set a little before applying the next one.
- Using the rules, the mixture is smoothed - up, along the sides, but in no case down: this way the tent will only fall away from the wall.
- The next layer is the primer. It is applied in the same way as the previous one, and then leveled with a rule or half-ter.
- Now the composition is on the wall, and then you need to perform the finishing operation - grouting. To do this, you need to take a grater and grind the base until smooth. The solution must be used more liquid.
Kneading
Everything is easy to do with your own hands, but before that you should practice a little.
Consumption
The mixture consumption is indicated on the packaging by the manufacturer, while the plaster layer is assumed to be 10 mm.
The thickness is multiplied by square meters of the surface being treated. This is how consumption is calculated.
Installation of plaster beacons
Plaster beacons are needed to simplify the process of leveling walls. These are perforated metal strips of different thicknesses that are easily installed on walls. Installation begins from the edge of the wall (approximately 30 cm from the corner). Using a level, draw a vertical line, apply several portions of the mixture along it and place the first beacon.
They act in a similar way at the other end of the wall. The beacons are screwed into the beacons from top and bottom using self-tapping screws, and nylon threads are pulled between them. Below them, the remaining beacons are placed on the solution every 1-1.5 meters.
Properties
Basic properties of cement-lime mortars:
- mobility;
- the ability of the solution to retain water must be 90%;
- the delamination of the prepared mixture should be up to 10%;
- application temperature up to 0 degrees;
- average density;
- humidity (this parameter applies only to dry mortar mixtures).
The composition of the mixture is selected depending on the type of material to which it will be applied and the conditions of further operation of the finished coating.
There is such a thing as the fat content of the finished mixture. The fat content depends on the amount of astringent included in the composition.
Cement-lime mortars are divided into three fat content categories.
- Normal are solutions with such plasticity that they are most universally suitable for use in various conditions. Solutions with such fat content do not shrink and, as a result, cracking of the finished coating.
- Skinny solutions are solutions with minimal shrinkage. They are ideal for cladding work.
- Fatty mixtures are mixtures with a high degree of plasticity, which is due to the large number of binders included in the composition. This material is best used for masonry work.
In this way, you can easily adjust the plasticity of the finished solution and adjust its properties to specific operating conditions.
Nuances of installation work
To achieve excellent installation results and get the most durable coating, you should consider some recommendations:
- Lay all necessary communications before installing plasterboard sheets.
- In rooms where the risk of fire is quite high, it is better to use plasterboard coverings that have a fire-resistant layer.
- Installation should not be carried out in the cold (the temperature during operation should be at least +5 degrees). Otherwise, it is quite possible that the cardboard or paper covering will separate from the plasterboard sheet.
- You should not use ordinary plasterboard sheets in rooms where the humidity is quite high. It is better to choose coatings for this that have a layer that is resistant to liquids.
- Dry plaster materials in sheet form should not be used for external walls.
Types of plaster mixtures for brick walls
Based on the type of most commonly used compositions, plaster mixtures for brick walls are divided into simple compositions, namely:
- Cement.
- Calcareous.
- Products intended for gypsum plaster.
There are dry mixtures on sale that can be used to plaster walls consisting of several components:
- Cement-sand.
- Cement-lime.
- Clay-lime and a number of others that can be used to process silicate brick walls.
Let's look at the plaster compositions that can be used to work on brickwork.
Cement-sand plaster mixtures
Considering this composition for plastering, we can say that it is universal. It is used for interior and exterior work. Advantages:
- Durability. Can last up to 30 years.
- Reasonable cost of the composition for plastering brick walls compared to other materials.
- Plastic. The layer can be adjusted within a few hours.
- Resistance to negative temperatures and high humidity. Cement-based plaster and sand are often used in the kitchen, bathroom and service areas, where there is high humidity.
However, with all the positive properties, the plaster mixture for brick walls in question has negative qualities:
- It is necessary to thoroughly study the technology of applying it to brickwork.
- The work requires a lot of effort.
- The plaster solution applied to the work surface takes quite a long time to dry.
It is important to consider the nuances:
- For example, the thickness of the plaster layer for brick walls should not exceed 30 mm.
- To apply a layer of more than 3 cm, it is necessary to use reinforcing material.
- When processing the facade of a brick building, lime is added to the cement-sand plaster mixture.
Gypsum mixtures for plastering brick walls
Gypsum-based plastering compositions guarantee that brick walls will breathe due to high vapor permeability. To improve plasticity and increase adhesion, gypsum is added to the composition. By using gypsum, it is possible to increase the thermal insulation properties of the plaster mortar. Gypsum absorbs excess moisture from the walls, thereby improving the indoor microclimate.
Decorative mixtures for plastering brick walls
The mixture for brickwork looks advantageous. The plastering solution is applied to a previously prepared surface. Decorative mortar has a number of advantages:
- Wall surfaces treated with decorative plaster look attractive and aesthetically pleasing.
- The use of a decorative solution allows us to talk about improving water-repellent properties.
- It is worth mentioning the antiseptic qualities of the decorative mixture when plastering.
There are a number of technologies to add texture and relief to walls. Most often, the fundamental component is synthetic resin. Various additives are used to give a beautiful appearance.
Carrying out installation work
Sheet materials can be installed in different ways. Two methods are commonly used.
On glue
With this installation method, drywall is fixed to the base using adhesives. You can purchase a special mixture, it is diluted in water. Manufacturers usually indicate proportions on packaging. The result should be a homogeneous and fairly thick material that can be easily applied to the base.
Drywall has a significant weight, so you should not carry out installation work alone. It is recommended to install such material with an assistant.
Installation on adhesives is carried out as follows:
- First, clean the base where the plaster will be applied. You can do this using a sander or sandpaper.
- Apply primer to the ceiling or walls. Thanks to this, the surface and the adhesive will adhere better to each other.
- Wait for the primer to dry and use glue, apply it in the center of the wall and around the perimeter. There should be quite a lot of adhesive on the surface. The glue can also be applied to the drywall itself.
- Place the sheet against the surface. Using a building level, you can check whether it is installed correctly.
On the frame
Installation on the frame is not similar to the previous method. You will first need to prepare the aluminum frame: then dry plaster is attached to it using self-tapping screws.
Installation work is carried out in the following order:
- Clean the surface and prepare it for installation of the structure. It is necessary to remove potholes and get rid of irregularities. Otherwise, the frame will not hold well.
- Install a horizontal profile at the bottom of the wall. The design is based precisely on this element. Using a building level, you will need to mark the base in advance.
- Then the top profile is installed on the ceiling.
- Then you should install the vertical racks. They will connect the lower and upper elements. To ensure that there are no gaps when installing drywall, maintain a step of 40 cm. Using a building level, check whether the vertical elements are level.
- Using a screwdriver and self-tapping screws, secure the drywall to the frame. Make sure that there are no gaps between the sheets: they should be placed end-to-end.
What solution is needed for plastering walls.
A practical, reliable and inexpensive finish is plastering walls with cement mortar. Technical characteristics made cement popular. True, it is not applicable everywhere.
Brand of mortar for plastering walls.
The brand is determined by the permissible degree of compression of the hardened and completely dried (28 days) solution. Adjustable by the ratio of binder and fillers. Sawdust, fine slag, polystyrene granules, perlite, etc. are used as the latter. But most often it is quarry or river sand.
The choice of brand is related to the characteristics of the plaster (external, internal, lightweight, waterproof, heat-insulating) and the purpose of a specific layer in the overall structure of the plaster mass (spray and primer, covering). The composition of the base is of decisive importance.
3be072818ab0367a28183b8064b824bf.pic
M50. Easy. When plastering, it is recommended only for grouting
The strength of the layer is not so high, but shrinkage is minimal, which is important when applying finishing plaster.
Proportions: when using M400 cement – 1:6.3 (for 1 part of cement 6.3 parts of sand).
- M100. A denser composition that is used for interior wall decoration.
Proportions: 1:5.
- M150. For interior decoration in damp and damp rooms, plastering facades and plinths of buildings.
Proportions: 1:3.
Consumption rate of cement-sand mortar for plastering walls.
It is easy to calculate the consumption of cement mortar per 1 m2 of plaster. It is necessary to multiply the thickness of the layer by the area of the working surface.
- Minimum plaster thickness. At least 6mm (size of the protruding part of the beacon).
- The maximum value is tied to the curvature of the wall. Plaster can reach several centimeters on one part of the plane, and 6 mm on the other.
The slope is calculated as follows:
- The entire plane of the wall is hung, the slope of arbitrary points is measured. The more such points, the more accurate the calculations. For example, 1, 2, 4 cm.
- All recorded deviations are summed up: 1+2+4=7.
- The amount is divided by the number of measurements: 7:3 = 2.3cm – average thickness of the plaster.
- The average is multiplied by the area of a particular wall.
Cement mortar for plastering walls is prepared in different proportions than concrete of the same brand. This is due to the difference in fillers: crushed stone is used for concrete, but not for mortars.
The strength of plaster depends not only on the saturation of the mixture with binder.
Requirements for plaster
To obtain the required level of durability and strength of the layer, it is necessary to know the properties that are important for the mixture when choosing. Experts note the following points:
- The strength indicator must be greater than M50;
- Frost resistance is at least 35 cycles of freezing and defrosting;
- The level of adhesion is approximately 4 kg/cm2;
- The grain size is ideal up to 1 millimeter;
- The optimal thickness for applying plaster should be in the range of 5-30 mm.
When purchasing, it is recommended to request a certificate of conformity from the seller.
To obtain the required level of durability and strength of the layer, it is necessary to know the properties that are important for the mixture when choosing.
Cement mortars
Cement is prepared from a mixture of ordinary cement and medium sand. The proportions can be different, they depend on the brand of cement used and can be: for one part of cement, take from three to six - sand.
Mix the dry mixture with the addition of water until a homogeneous mass is formed.
First, the dry mixture is mixed, then water is gradually added, then everything is mixed until a homogeneous, thick mass is obtained. But this option is not the best, since ordinary cement is inactive, even when using any brand it turns out to be too hard and too strong.
The cement-lime composition for bricklaying consists of lime and cement. The cooking process is as follows:
- Slaked lime, that is, lime dough, is diluted to the state of thick milk, and then filtered through a sieve.
- A dry mixture is prepared based on sand and cement, which is dissolved with lime milk, after which it is thoroughly mixed. Adding lime can increase the plasticity of the resulting mixture; this mixture is recommended for use for laying any type of brick.
Simple masonry mortar
The simplest solution is prepared from a binder (it can be ordinary cement or lime) and sand. In some cases, clay can also act as a binder, but this is very highly specialized work that is not performed very often.
The most common cement-sand mortar has the following proportions: one part of cement to three of medium-fraction sand. The resulting mixture is thoroughly mixed first in dry form, after which plain water is gradually added to it. Stirring is carried out until the resulting composition acquires the proper density and mobility.
Checking such characteristics is not so difficult: the container in which the solution is mixed must be tilted at an angle of forty degrees; if the mixture does not pour out, then you can begin the masonry process.
Complex installation solution
The solution should not spread or slide well off the surface.
A complex brick mix is a mixture of several components and a binder material that affects the physical characteristics. Among such complex mortars for brickwork, cement-lime-clay, cement-lime and others are used, thanks to which the masonry is simpler, but also reliable.
Clay, for example, is added to make the composition more plastic. It does not fall apart during operation and is installed very neatly and easily. The use of plasticizers makes the brick mixture indispensable when laying facade walls. This mixture is very economical, it provides uniform compaction, and when spread, it is conveniently leveled over the surface of the previous row. Therefore, many experts recommend spending a little more time preparing the solution, but then this will only help in the work.
Where is cement-lime plaster used?
The combination of lime and cement helps to obtain a universal product that can be used indoors and outdoors. You can use the composition in rooms with high humidity, such as a bathroom. But this option is not suitable for basements; such exposure to moisture will be unnecessary for a composition with lime.
As a guide, you should take an indicator of 65% humidity; exceeding it indicates the impossibility of applying a plaster layer of this type.
The combination of lime and cement helps to obtain a universal product that can be used indoors and outdoors.
Types of cement mixtures
In construction markets you can find a large selection of ready-made building mixtures. But more often mixtures containing cement are used. To improve the properties, developers include some components in the connections. The main types of mixture are:
- Sandy.
- Limestone.
The constant component in these types is cement.
Cement-sand mortar
This composition is popular for use in damp rooms. The main component of the mortar is considered to be cement of grades from mm 150 to mm 500. For internal work, a grade with a low index is used, and for external work, a grade with a large index is used.
Sand is an additional component of the solution. Recommended element ratios are 1:3 or 1:4 parts sand. For large leveling layers, it is better to purchase mixtures with medium-grained sand. This mixture will not crack after drying, and compositions with fine sand are used for final work. Suitable for street work.
To improve the quality of the solution, manufacturers use various additives. This combination of composition allows you to achieve improved strength, elasticity, frost and moisture resistance.
Cement-lime plaster
This is one of the mixtures in demand in repair work. Cement-lime plaster is easier to work with than sand mixture. It is more plastic, fits better on the surface and is vapor permeable. But in terms of strength it is inferior to sand mixture.
The composition of this solution includes: cement, slaked lime, quartz sand, polyoxymethylene, polypropylene fiber. This composition resists the development of fungus and mold well. Available in powder and diluted form. This solution is used for interior work or only for cladding buildings. Prepare the batch for work only according to the instructions in order to avoid deterioration of the properties of the composition.
Positive traits:
- Can be used on all known wall surfaces.
- Adheses well to the surface when applied.
- Has antibactericidal properties.
- The solution does not set for a long time after dilution, which allows long-term work.
- Maintains indoor humidity levels.
- The surface treated with the solution has a long service life.
Preparation of finished plaster
Do not add all the water to the mixture at once.
For best mixing, it is better to use a drill with a mixer attachment. The dry mixture must be poured into a clean container, add a small amount of liquid and stir constantly until the solution of the desired consistency is obtained.
If you add a large amount of water at once, the composition may turn out to be too liquid. To avoid the appearance of lumps in the finished solution, its mixing time should be at least 5 minutes.
After mixing, check the viscosity of the solution using a narrow spatula. The finished composition should have the consistency of sour cream. Use a spatula to scoop out the mixture and turn it over.
If the solution is too liquid, it will not stay on the surface and will fall off, in which case you will need to add more dry mixture. If the solution, on the contrary, is too thick, add a small amount of liquid and check again.
What you should pay attention to when making cement-sand mortar according to GOST
Professional builders focus on the following nuances:
- using only high-quality lime;
- the feasibility of performing a trial batch;
- portionwise addition of water when mixing;
- using proven proportions;
- compliance with safety requirements when extinguishing;
- kneading immediately before using the composition;
- mandatory sifting of dry ingredients.
By following these recommendations, you can prepare a high-quality solution on your own, saving financial resources. When preparing the lime composition, you should be guided by the requirements of the standard and use high-quality ingredients.
Peculiarities
A mortar in which cement is the binder ideally adheres to a brick, concrete or wooden surface. It can be used to level the base while filling holes and cracks. The coating is smooth.
Cement-sand mixture is used for the following work:
- Facade finishing.
- Plastering rooms without heating systems, as well as in rooms with high humidity.
- Carrying out repair work to fill potholes outside or inside the building.
- Leveling bases with significant defects.
- Preparation of surfaces for tiling work.
If there is moisture in the room, mold may appear on the plaster. In this case, additional treatment with antifungal compounds is necessary.
Mixing steps
Cement-lime mortar for plaster is best used for finishing stone and wooden bases, since the composition of cement and sand will not adhere well.
pros
Cement mortar for plaster has unique advantages. These include:
- Ensuring ideal coating strength. This is especially noticeable when compared with plaster, that is, the latter will not be difficult to crumble, but the former is unlikely to succumb to such efforts.
- Increased resistance to high humidity and temperature changes.
- Durability of the composition. This is noticeable when finishing the facade, and these surfaces are most susceptible to adverse external environmental factors. If you plaster the base with cement mortar, it is guaranteed that the building will be preserved for at least 15 years.
- Excellent adhesion of the composition to surfaces such as brick, stone, concrete base and cinder block.
- Affordable prices. The cost of dry plaster mixture is approximately 20% lower than gypsum, and if you mix it yourself, it will be even cheaper, at least twice as much.
Sealing seams
Cement is always available for sale; it is considered a cheap and affordable material.
Minuses
The advantages of cement plaster mixtures have been discussed, but there are a number of disadvantages:
- If the composition turns out to be thick, then this creates certain difficulties when working with it.
- After cement plaster is completed and its strength is fully achieved, its surface will definitely be rough. If you plan to paste wallpaper or paint, then it is necessary to additionally carry out finishing treatment with a gypsum compound.
- When developing design documentation, it should be taken into account that the load on the foundation from the composition of the cement-sand mixture will increase, that is, it turns out that you need to first calculate which foundation to lay.
- If the surface is poorly prepared for plastering, including painted or there are no notches on the base, then the plaster will not adhere.
- When applying the composition to a gypsum surface, the applied layer will simply tear it away from the base.
- It is worth considering that plaster shrinks, that is, if a very thin layer is applied, it can quickly crack. The layer must be at least 5 mm and maximum 30 mm. When it is necessary to plaster with a thicker layer, you should first fill the mesh, and then apply the composition three times.
In progress
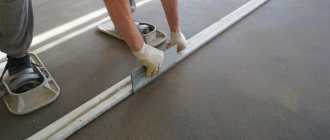
Plastering the surface along the beacons
The more beacons, the easier it is to make a flat surface.
Beacons are designed for faster and better leveling of wall surfaces. They are divided into the following types: metal, wood and plaster.
The first step is to level the outer beacons at a distance of 15-20 cm from the corners. Then we fasten the rest at a distance of 1 to 2 meters from each other. The more beacons are installed on the wall, the smoother the wall plane will be after plastering. For more information about aligning walls using beacons, watch this video:
After installing the beacons, they begin to spread a layer of plaster onto adjacent beacons using a ladle. Next, the solution is pulled to the top using a rule, and the excess mixture is removed back into the bucket. All walls of the room are aligned in the same way.
After the layer has completely dried, the beacons can be removed. If the beacons remain in the wall, then the surface must be coated with an anti-corrosion solution. The next step is to perform the tearing in the same way as without beacons. The final stage is to grout all microcracks and depressions.
Proportions and materials
Many people know about the brand of solution, but not everyone knows what it is. This concept is conditional and depends on a number of factors. This indicator is determined based on a number of data.
At a special test bench, observations of its condition are carried out for 28 days. As a sample, a small block of plaster mixture is made, which is then tested for compression.
By changing the ratio between the binder and filler, the permissible degree of the indicator is adjusted. But such difficulties are only needed in large-scale construction, and in ordinary activities they are guided by the brand of cement. For example, 4 parts of sand are taken if the grade of cement is 400, and 5 parts if it is 500. This is a generally accepted rule that gives average indicators.
The table of materials used is presented below.
Component ratio table
Mixture compositions in proportions for cement-sand mortars:
- for the first layer - spray - put from 2.5 to 4 parts of sand to 1 part of cement;
- for the main - primer coating - take from 2 to 3 parts of sand to 1 part of cement;
- for finishing, or finishing, 1.5 to 2 parts of sand are added to 1 part of cement.
Compositions of cement-lime mixtures:
- For spraying, take 1 part of cement, 0.3 to 0.5 parts of lime and 3 to 5 parts of sand.
- For the primer you need to take 1 part Portland cement, 0.7 to 1 part lime, 2.5 to 4 parts sand.
- For the finishing layer (grouting), prepare 1 part of cement, 1 to 1.5 parts of lime and 2.5 to 4 parts of sand.
Mix recipe
If the plaster is clay-sand, then for 1 part of cement take 4 parts of clay and from 6 to 12 parts of sand. By varying changes in proportions, you can either strengthen or weaken the strength characteristics of the solution.
Preparing the surface for processing
Before plastering the surface, it is cleaned of old finishes and all types of contaminants. Check the base for poorly adhering elements of the old plaster. When there are many such defects, the layer is removed completely.
A deep penetration primer solution is applied. To strengthen the base, a mesh made of plastic or metal can be installed.
Before plastering the surface, it is cleaned of old finishes and all types of contaminants.
Types of solutions
Depending on the intended purpose and qualities, all mixtures for bricklaying are divided into universal and special. The first type is used in the construction of structures made of all types of wall stone and their cladding. This includes simple cement-based mortars (with small additions of lime), complex compositions of Portland cement and polymer additives, and decorative colored mixtures. All of them, in turn, have different characteristics of mobility, adhesion, thermal conductivity and water absorption.
Complex masonry mortars are represented by compositions with the addition of refractory materials or fillers that enhance resistance to aggressive environments. They are used in the construction of facilities with non-standard operating conditions: chimneys, ventilation ducts, industrial premises. As for the universal variety, all their standards and characteristics are regulated by GOST 28913-98.
Depending on the composition there are:
- Cement mortars for bricklaying are rigid and inactive, but with strength suitable for the construction of structures with high loads.
- Lime mixtures are highly elastic and warm (minimum thermal conductivity), but are rarely used due to their fragility after hardening. Their compressive strength limit is 0.4 MPa, which is unacceptable for load-bearing walls. The scope of application is limited to interior work in low-rise buildings; these are general building mortars rather than masonry ones.
- Mixtures of sand and cement with the addition of lime milk in small proportions are universal compositions with excellent adhesion and mobility. But despite all the advantages, they are not used if there is a risk of intense exposure to moisture on the masonry.
- Cement-clay mortars are slightly inferior in strength to the first type, but gain in elasticity. They are easy to lay, but difficult to prepare: you not only need to purchase clay with the appropriate fat content, but also carefully knead all the lumps.
The classic masonry mixture of cement and sand is optimal for laying load-bearing and foundation structures of houses. Adhere to the following proportions:
Recommended scope of application
For laying stoves and fire-resistant structures, simple solutions prepared with your own hands, based on clay, or complex mixtures with cement, lime or fireclay chips are used. The water ratio does not exceed 0.25 parts of the clay volume. The exact proportions of sand depend on the fat content of the binder and vary from 1:1 to 1:2. When mixing cement-clay mortar, they are: 0.15:1:3 or 0.2:1:5, respectively.
A truly working legal way to save money. Everyone needs to know this!
Advantages and disadvantages
List of advantages that the mixture has:
- Versatile, can be applied to concrete, brick, plasterboard and wood.
- It is light in weight and will not load the structure like cement plaster.
- Plastic, easy to work with, long shelf life after mixing.
- It is vapor permeable, moisture passes through the walls, and the optimal microclimate inside is not disturbed.
- Lime mortar has good thermal insulation characteristics.
- If the application technology is followed, there will be no cracks.
- Alkali prevents the development of fungus and mold on the surface.
- Does not burn and does not support combustion.
As for the disadvantages, they are:
Insufficient strength
Before making a lime mortar for plaster, it is important to know the proportions and slak the lime in advance. This is a long process, taking approximately two weeks.
The material is afraid of moisture. It takes quite a long time to dry.