A canopy in a country or suburban area will protect part of the site from precipitation and sunlight. It can be installed for temporary parking of a car, tools can be placed under it, there are dozens more options for using a canopy made of polycarbonate or wood.
In order for it to serve for a long time, it must be installed on strong and reliable supports. Accurate calculations and adherence to installation technology guarantee that the canopy can easily withstand any vagaries of nature. How to properly set up poles for a canopy?
Preparation for construction of the structure
Before you begin installation work, you should:
- calculate the expected loads - if necessary;
- draw up detailed drawings of the canopy frame from a profile pipe - the dimensions must also be indicated on them;
- prepare a set of tools;
- select and purchase building materials.
You can build several canopy options yourself from profile products, namely:
- arched;
- single-slope;
- gable.
The appearance and shape of the future structure largely depend on the personal preferences of the owner of the dacha or house and the size of the unoccupied space on the land plot. The most rapidly erected and most compact relative to the occupied space is considered to be a shed made of corrugated steel pipe.
The effect of frost swelling
There is a rule that allows you to correctly use technologies for installing poles on heaving soils. Swelling occurs not due to the fault of the soil itself, but due to its oversaturation with water. When severe frosts set in, the ground begins to freeze. The water it contains turns into ice, causing the frozen layer to expand. Then any rod immersed in this layer is subject to buoyant forces in two directions:
- Down up. Deep horizons of waterlogged soil after freezing begin to push out the rod, affecting its lower plane.
- From the sides. These forces arise during the frost expansion of the upper horizons and act on the side surfaces of the rod.
As a result of the influence of these forces in wet clay soil, fence supports installed in the traditional way crawl out of the ground to a height of 4 to 10 cm during one winter. After spring thawing, the pillars raised by heaving rarely return to their reverse position. If you do not take any action, then after the second winter the racks will be squeezed out even more, they will become distorted and may simply fall from the wind.
Considering that a large number of private land plots are located on the site of dried swamps or in frankly swampy areas, the construction of reliable fencing is a rather pressing problem. It’s one thing to build a building that has significant weight and puts a decent load on the foundation, and quite another to put up a fence whose mass is small compared to the house.
Approximate calculation of a canopy made from a profile pipe
As an example, the initial data can be taken as the size of the building 6x9 meters. In front of one of its sides there is a free area with sides of 7 and 9 meters. Along the wall of a house 9 meters long, it is planned to build a canopy with an overhang of 6 meters (read: “Preliminary calculation of a canopy from a profile pipe, instructions for making trusses”).
As a result, the canopy area is 6x9 meters. In this case, the height of the edge that will be raised is 3.5 or 3.6 meters, and the low one is 2.4 meters. As a result of the difference between heights, the angle of inclination will be 12-13 degrees.
To determine the degree of probable loads, wind and snow maps of the specific area where the land plot is located are used. Based on the above data, do-it-yourself drawings of a canopy made from a profile pipe are made.
In addition to the fact that you can draw them yourself, there are special computer programs. To achieve maximum accuracy when carrying out calculations, it is advisable to be in the place where the structure will be placed at this time.
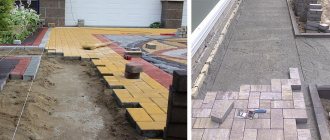
Alignment of pillars
The strict verticality of the supports plays an important role in the stability of the canopy, so during their installation it is necessary to verify the correct position of the posts using a plumb line. When concreting the base, the pillars are leveled using wooden or metal supports, which are dismantled after the solution has cured. Adjustments can be made in the first hours after pouring the solution.
After the final installation of the supports, it is often necessary to level them in height. On bumpy areas they use a hydraulic level, attracting help from household members, friends or neighbors. In planned areas, the opposite is true. Marks of equal height are made on the underside of the pillars, corresponding to the level of penetration of the supports into the ground and serving as a guide during installation work.
Canopy elements made from profile products
The design has several main elements, including:
- racks;
- mortgages;
- base plates;
- arches;
- guides;
- roof;
- others - these could be, for example, lighting and drainage systems.
For the manufacture of racks and poles, both profile pipes and products with a round cross-section are suitable. The latter option has a significant drawback, which is the more complex configuration of the support and fastening units of the elements.
To ensure mating of frame parts located at an angle of 90 degrees, the ideal solution is the square shape of pipe products. This type of section provides an equal degree of rigidity in both directions - longitudinal and transverse.
To build a canopy from a profile pipe of any shape based on a drawing, welding is used, as well as threaded or bolted types of connections. When creating trusses or purlins, experts recommend using rectangular products, since they are subject to a significant load in the transverse direction, namely from top to bottom. In this case, there is practically no effort along the axis.
Characteristics of profile pipe products
In order to build a canopy frame from a profile pipe and make all the necessary calculations, you should determine the characteristics of the manufactured pipe products. For products with a square cross-section, the required values are given in special tables.
For rectangular pipes, the maximum load size is calculated on the larger side. The result can also be seen in a specially compiled table, where, in addition to the desired value, the span length and pipe dimensions are indicated.
Calculation of values for canopy posts
When selecting the parameters of the racks, they first calculate the loads exerted and draw a detailed drawing. The rigidity of the product is affected by the width and thickness of its walls, which in turn depend on the length of the product.
For example, when choosing which profile pipe to use for a canopy, you can use either a thick-walled product with a small cross-section, or one with thin walls, but with a large shelf width.
It should be taken into account that the vertically directed load exerted on the rack by the canopy floors is insignificant and therefore a thin corrugated pipe will withstand it without the slightest deformation. The diagram of a canopy made from a profile pipe must contain the exact dimensions of each element. Quite often, a garage frame from a profile pipe is made using the same method.
For buildings with average parameters, the best option would be products with a cross-section ranging from 50 to 100 millimeters. If racks are located frequently, it is acceptable to reduce the size of the pipes used. In the case where a lean-to canopy has four supports, then large-section pipe products will be used.
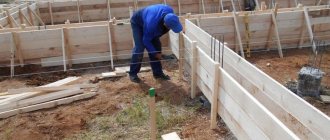
Support installation depth
Before proceeding with installation, you need to decide at what depth to bury the poles for the canopy. Each region of the country has its own soil freezing scale. Insufficient installation depth of the supports can lead to soil deformation moving them, violating the geometry and integrity of the entire structure.
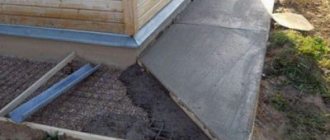
Concreting depth – at least 80 cm Source stroika-dom24.ru
In the middle zone, the freezing depth is about 1.2 m. This means that the minimum depth of the pillars for a canopy should be exactly this figure with a small margin. The parameter must be taken into account when determining the length of each of the supports. If the height of the canopy is about 3 m, each pillar, taking into account its immersion in the ground, should be at least 4.2 m. In the northern regions, the freezing depth is much higher. In southern latitudes, structural elements can be strengthened by 50-80 cm.
Trusses as frame elements
Trusses serve as an additional connecting part when arranging a canopy. They give the frame greater stability and strength (read: “How to make a frame from a profile pipe for a house - theory and practice”). You should draw a special drawing for them. According to the standards, calculations are required for pipe trusses with an inclination angle of more than 6 degrees. But experts believe that you need to start from 8 degrees.
The fact is that in winter, fallen snow will accumulate on the roof surface at a slight angle of inclination. The optimal value is 15 - 20 degrees. This slope of the roof slope is suitable for coverings made of corrugated sheets, slate, plastic, polycarbonate and other modern materials.
Farms can take the following form:
- triangular;
- arched;
- rectangular;
- broken;
- trapezoidal.
Inside the trusses, racks, purlins, braces, and struts are additionally installed. The drawing must indicate both the dimensions and the list and quantity of materials that will be required.
Since the trusses consist of hollow parts, the weight of the frame for arranging the canopy will be insignificant. Horizontally, they are fastened together crosswise using elements made from profile metal products with a small cross-section (read: “Characteristics of fasteners for profile pipes, “Crab”, clamps, advantages of use”).
Next, install a sheathing of timber 50 millimeters high. It is needed to fix the roof covering. Wooden beams should be pre-treated with an antiseptic or painted to prevent damage to the wood.
Construction of the structure
Installation work is carried out in stages:
- Before making a canopy from pipes, first prepare the foundation.
- Then the materials listed in the drawing are measured and cut.
- Trusses are made.
- The side walls of the structure are assembled.
- Connect roof trusses and finished sections.
- Check the correct assembly of the elements using a level and tape measure.
- Mount and securely fasten the frame to a previously prepared area.
- Metal surfaces are treated with protective compounds.
- Prepare materials for roofing, install them and fix them.
- Trim off excess roofing.
- They restore order in the surrounding area.
When preparing the foundation for the structure, soil is removed from the places where the supports from the profile pipe will stand. A layer of crushed stone is poured onto the bottom of the dug holes. Then, in order to secure the racks, a mortgage is installed on which bolts are welded. If desired, reinforcement is used to add additional strength to the structure.
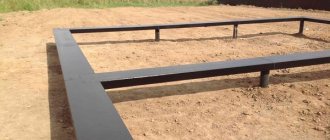
Installation of a fence on screw piles
The method is good for both heavily soaked soils and swampy areas. In places where it is necessary to place fence posts, steel piles are screwed into the ground. They come in two types:
- with one wide blade at the end (Fundex type);
Pile "Fundex"
- with blades in the form of thread turns, externally resembling a large self-tapping screw.
Piles in the form of self-tapping screws
The first type is preferable to use, since a wide blade, buried to the non-freezing horizon, will serve as a support and at the same time will not allow lateral forces to push the pile upward. For “self-tapping screws”, it is important to choose the correct length of the piles so that the threaded part of each of them passes through the water horizons and goes below the freezing layer. That is, the length of the threaded pile will be greater than that of the Fundex support.
Before using screw piles, it is necessary to make 1-2 wells for a geological study of the soil composition. This will make it clear at what horizon the groundwater flows and where the intumescent layer ends. However, such studies must be carried out with any method of installing pillars in order to correctly determine the immersion depth of the racks or piles.
The construction technology is as follows:
- The fence is marked and the locations of the supports are determined.
- The piles are screwed into the ground manually or mechanically to the calculated depth.
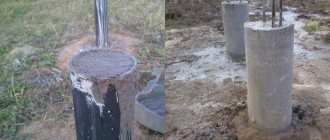
- The pile cavities are filled with concrete on fine gravel, after which flat platforms are welded on top.
- The above-ground parts of the poles are attached to the platforms by welding or bolting.
Selection of materials and preparation of tools
The main requirement for the quality of profile pipe products is strength. To ensure the stability of the load-bearing parts of the structure made from them, you need to select pipes with minimum parameters equal to 80x80 millimeters. For additional elements, the optimal cross-sectional size will be 40x20 millimeters.
To determine the amount of roofing material, first calculate the area of the surface to be covered, and then increase the result obtained by 5%. Fastening is carried out with roofing bolts and special gaskets.
The structure is assembled in one of the following ways:
- Welding . But for this you need not only to have a welding machine with electrodes, but also to know how to properly weld a canopy from a profile pipe. Without skills, such work cannot be done.
- Using threaded connections . This requires metal corners and mounting bolts.
- Using special clamps.
A do-it-yourself canopy costs much less than a purchased one. It will meet the requirements subject to strict adherence to the technology of its construction.