The foundation of the house must withstand heavy loads imposed by the walls of the building, communications, household appliances and furniture. The foundation must remain stable during ground movement, freezing and rising groundwater levels.
However, it is not always necessary to equip a solid reinforced concrete foundation. For a small house, a columnar strip foundation is suitable.
Brief description of the design
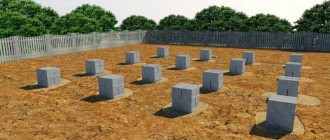
The structure of the strip-column base consists of concrete supports on which a grillage is installed, dug in to a shallow depth. The latter neutralizes the loads of the building. Reinforced concrete piles poured on site are used as supports.
The foundation of the house includes the following elements:
- concrete supports, the number and location of which are determined at the design stage;
- frame made of reinforcement immersed in concrete;
- the ground part of the belt type, constructed from blocks or bricks;
- internal pillars take part of the loads of load-bearing walls and partitions.
The technology for constructing a columnar strip foundation with your own hands is similar to arranging the foundations of urban apartment buildings. At the first stage, the required number of piles is driven in, at the second, a slightly recessed grillage is formed.
Limitations of using strip base
One of the key determining parameters of construction is the geological situation at the site. The strip foundation will have to be laid to a significant depth or various types of changes will have to be made, which are inconvenient and unprofitable. Among those limiting the use of the foundation, the following geological characteristics can be identified:
- The upper horizons of the underlying soil may have a high coefficient of frost heaving, which leads to seasonal destruction of the foundation.
- If in the construction region there is a large depth of soil freezing in winter, then you will have to go through this mark with a powerful concrete belt, which is very expensive.
- Deep occurrence of strong and stable horizons.
- The presence of a significant terrain slope on the site requires the adoption of an alternative solution so as not to equip the enormous height of the belt base.
Limitation of strip foundation
By carefully analyzing the current situation on the site and studying the available data from pre-design surveys, the architect will help you choose the optimal base design option.
If it is important for the building owner to have a basement or underground garage, then laying the foundation to a significant depth is inevitable. But if you do not need such a design, then it is enough to limit yourself to optimally selected columnar bases.
This type of foundation allows you to achieve excellent foundation characteristics due to uniform load distribution with minimal costs for passing soil.
Advantages and disadvantages
The construction of such a foundation is considered less labor-intensive than the construction of monolithic structures. In addition, the arrangement requires fewer building materials.
Other benefits include:
- resistance to vibration and ground movement;
- durable design of supporting elements that can withstand the load of a one- or two-story house;
- the possibility of using several types of materials when forming a grillage;
- good heat-saving properties (the floor covering does not come into contact with the ground);
- the possibility of construction in areas with combined terrain without prior leveling of the site;
- less excavation work;
- the possibility of constructing the structure with your own hands.
In addition to positive qualities, strip-column foundations also have disadvantages. Negative points include:
- the need to perform complex calculations, taking into account soil characteristics and building loads;
- difference in support sections along the height and perimeter of the house;
- the impossibility of determining the severity of changes that will arise due to the heaving of the soil (it will not be possible to calculate the required safety factor);
- impossibility of creating basements.
Books on the topic:
Modern work on laying the foundation. Types of work, materials, technologies - Valentina Nazarova - 29 rubles - link to book review Handbook of construction technologist - Gennady Badin - 239 rubles - link to book review
Calculation of foundations on subsidence soils - Vladimir Krutov - 250 rubles - link to book review
Design and installation of foundations and foundations of buildings and structures SP 50-101-2004 — — 372 RUR - link to review of the book Foundations and Foundations - Mikhail Berlinov - 2,121 RUR - link to review of the book
Selection of support pillar material
The strength and stability of a strip foundation with pillars depends on the type of materials used. You should not save at the stage of laying the foundation. This increases the cost of major building renovations in the future.
To create the structure, you can use the following materials:
- tree;
- a natural stone;
- red solid brick;
- concrete and aerated concrete blocks;
- asbestos-cement, metal and polypropylene pipes;
- reinforced concrete pillars;
- boring products for industrial production.
Wood
The main reason for the rare use of wooden products is their instability to negative factors. Treatment with antiseptic and insecticidal solutions slightly extends the service life of wood.
Wooden blocks are used to form non-buried grillages during the construction of auxiliary buildings - bathhouses, garages, outdoor toilets.
Rubble stone
Durable material has long been used for the construction of foundations. Laying a stone foundation requires the help of specialists. It is quite difficult to adjust different stones. In domestic conditions, such material is used extremely rarely.
Bricks and blocks
To build the part of the grillage buried in the ground, only solid or high-strength clinker bricks are used. Combined strip-column foundations necessarily include a concrete part. Brick absorbs moisture, so the masonry must be covered with bitumen mastic.
Pipes
Pipes made of polypropylene, asbestos cement or metal are used to install permanent formwork. A reinforcement cage is inserted into the cavity of the product and concrete mortar is poured.
The result is strong reinforced concrete supports. Metal pipes are treated with a waterproofing compound that protects the material from corrosion.
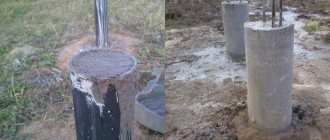
Concrete pillars
The vertical parts of the concrete pillar foundation are fabricated on site. Wells are pre-dug or drilled. Fixed or removable formwork and reinforcement cage are installed in the resulting channel. You can purchase ready-made concrete piles or pillars. They are installed in places with the highest weight load and connected with tape.
Rammed and bored posts
Products can be purchased at the factory or construction market. Installation requires the use of special equipment. The pillars are hollow supports, inside of which a reinforcement cage is placed and concrete is poured. It is possible to build combined bases from 2 types of pillars.
Combination options
In the process of designing, constructing or operating a house, circumstances arise that require the installation of different types of foundations in one building. In this case, the combination is carried out according to one of the following schemes:
- the piles are tied not with a grillage, but with a high concrete strip;
- Brick or concrete blocks are laid between monolithic pillars;
- the slab is supported not on a sand cushion, but on piles;
- the house is built on a strip foundation, and the extension is built on brick pillars;
- Prefabricated blocks are installed on monolithic pillows.
There are quite a lot of options for combined foundations. One of the most common options is the installation of a monolithic reinforced concrete belt around the entire perimeter of foundation walls made of piece materials. This combination increases the reliability of the underground structure, providing the opportunity to combine different sections into a common system.
Calculations
Calculation documentation helps to timely determine the following parameters:
- Height of supports. When building a house on stable soil, piles 2.5 m long are sufficient. When constructing a building on unstable soils, products with a height of 3.5-4 m are used. With increased soil mobility, the pile should penetrate 20-30 cm into solid layers.
- Number of supports. This parameter can be determined by calculating the total load on the base. In this case, the weight of 1 m³ of the wall structure is calculated, the resulting value is multiplied by the total cubic capacity. The weight of the floor, ceilings, roof, windows and doors is added to the indicator. The weight load is multiplied by the safety factor established by regulations. The value is divided by the bearing capacity of the column.
- Distance between piles. The recommended value is 1-2.5 m. The heavier the building, the smaller the distance between the pillars. The step should not be more than 2.5 m, this negatively affects the strength of the building. A distance of 3 m is allowed to be left when constructing light wooden houses. For brick buildings this value will be 1.6 m.
Determination of pile length
For areas with stable, dense soil, a support length of 2500 mm will be sufficient. If construction is carried out on a slope, height differences must be taken into account. On uneven areas, supports of varying lengths are used, depending on the height of the terrain.
When building on unstable soil, the length of the support should reach the layer of dense soil. Its location is determined by test drilling. Insert the drill into the soil, take it out after a short distance and look at the type of soil on the blades.
If there is peat, quicksand or wet soil on the drill blades, then you need to drill a well until a sandy or clay layer appears. After reaching a dense layer, measure the depth of the well using a stone or other heavy object lowered on a rope.
Preparatory stage
Arrangement of a columnar-strip foundation with your own hands includes preparatory and main stages.
Creating a Project
Creating drawings is an important step in the construction process. The work begins with determining the characteristics of the soil. The project will contain information about the loads the pillars can withstand, the size and number of piles. Foundations can be buried or shallow. In the second case, the pillars are driven into the ground 0.5 m, in the first - to the level of soil freezing.
The choice of technology depends on the characteristics of the terrain - soil mobility, groundwater level. The features of the house being built are also taken into account.
Site preparation
At this stage, the site is cleared of large debris and remains of destroyed buildings. After this, the layer of fertile soil is removed. When building on clay soils, sand is backfilled, which is compacted and leveled.
Site marking
When performing preparatory work, wooden pegs and rope are used. The threads are pulled at a distance that matches the width of the tape. It is necessary to monitor the intersection of threads at the junctions of the walls. The angles must be 90°. Marking is carried out at the intersections of load-bearing and auxiliary walls. Piles are also installed in areas experiencing increased loads.
Creating trenches and recesses for pillars
At the site of the strip foundation with pillars, dig a trench 40 cm deep. The width should exceed the height by 7-10 cm.
In areas subject to high loads, recesses are made for supports. The diameter is determined taking into account the load on the base. The higher this indicator, the larger the cross-section the pillars should have. A drill is used to create channels. When arranging long recesses, an auger is used.
When laying supports to a depth of more than 1 m, it is necessary to form supports from strong wood to prevent the soil from collapsing. When installing pillars shallowly, the use of such elements is abandoned. The bottom of each channel is covered with a layer of sand 10 cm thick. At a greater depth of laying, the thickness of the sand cushion reaches 50 cm.
Do-it-yourself columnar foundation step-by-step instructions
DIY strip foundation for a frame house step by step instructions Photo
The support system is placed at points of concentration of maximum load, and these are the corners of the building, the intersection of walls or beams. Each foundation column is connected to each other using a grillage - a reinforced concrete or log frame on which walls, partitions and other structural elements rest. The distance between supports is from 1.5 to 2.5 m.
Depending on the type of soil, columnar foundations are distinguished:
- Recessed. Its depth usually exceeds 1 m.
- Shallow. The laying depth is about 50-60 cm.
- Not buried. It is used in the construction of very light and temporary structures and its depth is no more than 20-25 cm.
To make a columnar foundation with your own hands, we recommend following these step-by-step instructions, which include carrying out such construction work as:
- Planning and cleaning of the construction site. Debris, uneven surfaces and fertile soil layer are removed.
- Marking the site and planning where each column will be located.
- Digging a hole with a diameter of up to 25 cm. If it is necessary to build a buried foundation, the side walls of the recess are strengthened to prevent the soil from collapsing.
- Installation of a sand cushion under each column. The installation of a reinforced concrete cushion will protect the structure from subsidence, but is used only in the construction of massive structures.
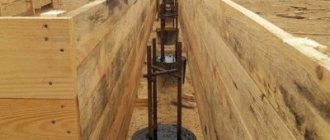
- Production of formwork. For this purpose, available materials or a board are suitable.
- Reinforcement with 12 mm rod. The reinforcement is installed longitudinally, and to connect the foundation with the grillage, about 20 cm is left above the top point of each column.
- Filling with mortar. During pouring, the mixture should fill the formwork space as tightly as possible. To achieve the goal, the solution is compacted tightly using a high-frequency vibrator.
Do-it-yourself columnar foundation made of pipes
The construction of a columnar foundation using pipes takes a minimum of time, and even a novice builder can cope with the work. Step-by-step instructions include the following construction work:
- drilling a well of the appropriate diameter;
- careful compaction of the base of each well;
- installation of plastic or asbestos pipes;
- fixing each column with soil;
- making concrete mortar using a concrete mixer;
- filling the lower part of the pipe with approximately 30 cm of solution;
- at the next stage, the pipe is lifted, and the solution from it will fill the entire space of the well, thus the master will receive a concrete pad at the base of each pillar;
- filling the inside of the pipe with concrete solution halfway;
- installation of a reinforcement rod 12-14 cm in diameter;
- Fill the remaining void again with the solution, but do not forget about the need to thoroughly compact the mixture.
Now it remains to give enough time for the solution to harden and gain strength. This usually takes 2-3 weeks. During construction, some craftsmen make formwork that is wide at the bottom and narrow at the top. This form has a number of advantages compared to the traditional one. With a wide base of a columnar foundation, its load-bearing capacity increases significantly, since the load is evenly distributed over the entire foundation. This form of foundation has high resistance to winter soil heaving.
Video about making a columnar foundation with your own hands, step-by-step instructions
Do-it-yourself columnar foundation, step-by-step instructions - this is what interests those who want to build a frame house or other building on the site. You will find important recommendations, tips, and features of pouring a foundation in this article.
Technological principles of construction
The process of arranging the foundation includes the following stages:
- installation of supporting elements;
- formation of reinforced concrete ligament, wooden or metal grillage;
- laying block or brick tape.
This division is associated with the possibility of continuous execution of work at each stage.
Installation of support pillars
The pillars need to be buried 30-40 cm below the expected soil freezing level. Step-by-step instructions for installing supports describe the following steps:
- removal of plants and leveling of the area allocated for construction;
- determining the locations of piles and grillage structures;
- digging or drilling holes;
- arrangement of sand backfill, pouring concrete solution to the level of the lower base slab;
- organization of a waterproofing layer that prevents the destruction of the foundation under the influence of moisture;
- installation of permanent formwork or finished columns;
- welding and placement of reinforcement cages;
- pouring concrete mortar into formwork or pipes.
When concreting, take into account the need to expand the base of the pile to a size twice as large as the diameter of the pillar itself. Filling the solution is carried out in 2 stages.
Prepare the sole first and wait several days. After the base has hardened, the supports are poured.
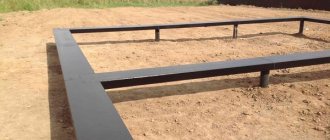
Grillage installation
If the grillage is slightly deepened, work begins with digging a trench. The height of the concrete tape should be 40-60 cm.
The construction process includes the following stages:
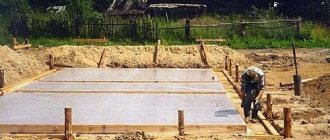
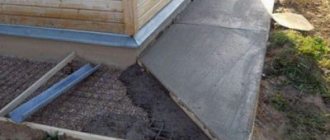
- Formwork assembly. The structure is constructed from elements of the required sizes. At this stage, boards or plywood panels are used. The assembled formwork is covered with plastic film or roofing felt. This material prevents the removal of water from the concrete solution.
- Manufacturing of a reinforcing frame. The structure is assembled according to a pre-drawn diagram. All elements are placed in formwork and connected to pillar strings protruding to a height of 30 cm. The reinforcing bars are welded together.
- Pouring concrete. The mixture is laid in layers. The work must be planned so that all actions are completed in 1 day. The above-ground part of the belt is built from blocks or bricks. This allows you to create an additional protective layer between the underground and supporting parts of the base. The formwork is removed 2-3 days after the concrete has hardened.
At the last stage, the grillage surfaces are coated with bitumen mastic or covered with rolled waterproofing materials.
Types of supports
Brick.
Iron ore brick is best suited for our purposes. Experts advise installing supports with a width of 400-500 mm.
Tree.
Wood is a rather controversial material. This is due to its relative fragility. The tree is well suited for arranging a gazebo. Before lowering the racks into the ground, treat them with an antiseptic and bitumen-based mastic. This will increase the wood's resistance to rot.
Concrete.
Reinforced concrete piles are rightfully considered the most reliable. That's why they are more common. The minimum width of the supports should be 40 centimeters.
“The greater the load on the foundation, the wider and more reliable the piles should be. This applies to any materials.”
Pipes.
Asbestos cement, metal. Very comfortable to install. The reinforcement is immersed inside the pipes, after which concrete is poured.
To determine the type of material, find more detailed information on the Internet. Available photos and videos will help you make the right decision.