When building any house, you should never forget about creating a blind area. It is necessary to remove excess moisture from the foundation. Concrete is a porous material: if it is not protected, changes in temperature and humidity will create conditions for cracking. Cracks will appear on the foundation, and the geometry of the house will “shift.”
However, the blind area comes in different types: both hard and soft. We’ll tell you what the fundamental difference is and how you can make the necessary design inexpensive, but of high quality and aesthetically pleasing.
How to make a soft blind area around the house: step-by-step instructions
Laying a soft blind area around the house with your own hands is quite simple.
Especially if you have step-by-step instructions at hand. An ideal option if it is possible to create a blind area at the stage of building the foundation of the house. This will make it easier to excavate the soil. When laying the hydraulic barrier, it is important to bring it under the house about 40 cm
Preparatory stage of work
The process of creating a soft blind area around the house begins with excavation work - by digging a trench under the hydraulic barrier. To do this, at the smallest level of the site, it is necessary to remove a rectangular layer of earth about 40-45 cm deep. If you decide to use insulation when creating a soft blind area, the depth should be increased by another 10 cm.
The bottom of the trench must be level. It is advisable to control this process with a level or a special building level. It should also be well compacted - fine gravel is perfect for this.
Along the edges of the trench you need to dig a small groove about 4 cm wide - this will be a hidden stormwater system. Then the bottom should be covered with clean, damp clay. The thickness of the layer is about 20 cm. During the leveling process, the layer is given a slight slope in the direction away from the house. Once the clay is laid, it is allowed to dry, slightly moistening it from time to time to prevent it from cracking.
Important! The process of laying layers can be continued only when the clay loses its viscosity.
Laying the drainage system
The system is created with the expectation that the flow will be directed to the drainage. The drain should not be directed directly into the ground, as excessive moisture may result in erosion and subsidence of the soil.
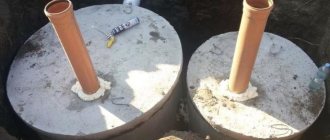
Drainage pipes 10 cm in diameter are perfect for draining. They must be wrapped in geotextile in advance to insulate them. All corners and intersections must be equipped with tee manifolds, whose function is to connect the channels with the upper outlet. It is best to create a 1 m deep trench for drainage, and then fill it with earth and gravel in a ratio of 3 to 7.
Layering
When the clay dries, medium-sized crushed stone can be poured onto it. The thickness of the layer is about 10 cm, also with a slope in the direction from the house. Subsequently, the slope can be leveled with sand. Each layer must be tightly compacted and moistened. It wouldn’t hurt to add geotextiles between crushed stone, clay and sand.
After compaction, a geomembrane must be laid on top of the sand. It is laid at the bottom of the trench, then pipes and collectors are installed. The membrane should be covered with a layer of drainage so as not to retain moisture.
Afterwards a leveling layer of gravel and sand is laid. Its maximum thickness is 4 cm. Then there is a layer of geotextile. Everything that will be installed in the future will relate to the external decor. And for a soft blind area, many other options are offered.
Insulation
The insulation must be laid at the very bottom of the waterproofing, and covered with exactly the same layer on top. It is necessary to insulate the structure if the house has or is planned to have a basement. This layer will protect other materials from the cold, increasing the service life of the soft blind area.
Waterproofing
The remaining layers of the hydrobarrier are laid on top of the waterproofing. This stage involves laying the material over the insulation. It would be better to choose a profiled type membrane.
The waterproofing is laid with an overlap. The textile must be separated from the tenons of the fabric, secured onto four tenons and pressed tightly into the grooves, and the resulting joints must be covered with adhesive tape.
Protective outer coating
At the end of the work, the barrier is covered with crushed stone with a fraction size of about 2 cm. The layer should be even and dense, thickness - 6 cm. Since all the lower layers are delimited, the top one will be dense, and the legs will not get stuck in it. If the edges of the blind area are moved about 10 cm, you can sprinkle it with a small amount of turf and bring the lawn closer to the house.
Instead of turf, the barrier can be decorated with colored crushed stone of various sizes or pebbles.
The correct technology for constructing the simplest and most cost-effective design option with photos
The simplest and cheapest way to strengthen the soil and protect the foundation in the local area is a soft blind area. Its distinctive features: the absence of concrete in the structure, the top layer of crushed stone, gravel or lawn.
Step by step construction instructions:
Where to start: mark the location of the blind area with pegs, stretch the thread along the entire perimeter. Measure the correct width relative to the roof overhang. Remove the fertile layer of soil and compact the bottom (it is advisable to use a vibrator). Already at this stage it is necessary to make a slope so that all subsequent layers lie correctly - at an angle from the wall of the building. Along the outer edge of the trench, a depression is made along the entire length with a shovel. A storm drain will be laid into it, and drainage pipes will be installed in the corners of the building.
Drainage needs to be given special attention, especially in areas where there are heavy rains. One option: installing storm water inlets directly into the blind area and draining the water downhill through plastic channels to a specially designated place outside the site or to a storage tank for further use.
Place clay at the bottom of the trench (at an angle), layer thickness up to 20 cm, compact well. Wait for it to dry (wet it periodically to prevent cracking). Lay a waterproofing layer - lay it with an overlap of up to 20 cm on the wall. Sprinkle a layer of sand on top, 10 cm is enough. Lay geotextiles, which serve as a layer between sand and crushed stone, preventing their mixing. Fill with crushed stone in an even layer up to 15 cm thick. We make the finishing layer from any material you like
It could be: crushed stone, gravel, lawn. Multi-colored granite chips look beautiful.
In regions where winters are harsh, it is recommended to lay a thermal insulation layer
- penoplex (durable, durable),
- polystyrene foam (inexpensive, insulates sound),
- foamed polyurethane (not susceptible to mechanical and chemical influence, installed using special equipment, expensive).
Marking:
Overlapping waterproofing layer:
Sand layer 10 cm:
Schematic structure of a soft blind area:
Option for placing a drainage pipe on top of a soft blind area:
Drainage inside the blind area:
How to properly make a blind area around the house
A blind area is a protective path with a hard or bulk coating, arranged adjacent to the wall along the entire perimeter of the building. Its main purpose is to drain rain and melt water falling from the roof near the foundation and contributing to its premature destruction.
In addition, it is used as a convenient pedestrian passage and decorative design when landscaping the area adjacent to the house. The use of dense or bulk insulation when constructing a blind area allows you to protect the foundation from the effects of low temperatures and reduce heat loss through the enclosing structures.
A fairly simple device for such a protective coating simultaneously solves several important problems related to protection and improvement, without requiring large financial investments. At the same time, you can do it yourself, without inviting specialist builders for this.
For pile, deep columnar and screw foundations, the presence of a blind area is not mandatory, but it is often made as an element of landscaping and as a convenient pedestrian path.
Design of the blind area
Protective coating must be done around the entire perimeter of the house, since it is necessary to protect the entire foundation mass. The basic requirements on how to properly make a blind area around a house with your own hands are set out in SNiP 2.02.
01-83, which says that on normal soils its width should be at least 600 mm, and on subsidence soils - at least a meter. In general, the width of the covering should extend at least 200 mm beyond the protruding roof section.
The maximum width is not regulated.
General drawing of the blind area.
The hard covering must be laid on a dense base with a thickness of at least 15 cm. The slope of the blind area from the building is at least 0.03%, with the lower edge exceeding the planning mark by more than 5 cm. Storm water must be drained into storm drains or gutters.
A high-quality insulated blind area should consist of three main layers:
- surface waterproof;
- underlying gravel or a mixture of crushed stone and sand;
- insulating polystyrene foam.
Geotextiles can be used as an additional layer, which will be a fairly reliable waterproofing against groundwater rising in the spring, and will also prevent the possible germination of weeds.
Top layer coating materials
The materials used for the top layer when constructing a blind area are quite diverse and have their own distinctive features. The simplest and most inexpensive is ordinary clay.
With its help you can create a fairly reliable hydraulic lock. Such protection is often found in rural areas.
However, modern developers have long abandoned such primitive materials and are using more efficient technologies.
Options.
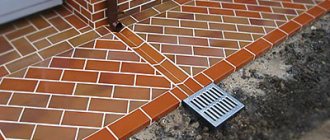
The most common option for making a blind area is to install a concrete covering. You can simply and quickly install it yourself without investing large amounts of money. At the same time, concrete is characterized by high strength and durability, and also allows it to be subsequently covered with paving slabs to improve its appearance.
The paving stones can be laid on a compacted sand bed. It has a beautiful appearance, but is more expensive than tiles and somewhat more difficult to install. When using paving stones, it is necessary to ensure high-quality sealing of the seams to completely seal the top layer.
Sectional diagram of a concrete blind area.
A blind area made of natural stone looks very beautiful and will last for many years without repair. However, the high cost of the material reduces the possibility of its widespread use.
Asphalt is rarely used in hot weather due to its unpleasant odor. In addition, such home-made material is not very durable, and buying a factory-made one is much more expensive than installing a concrete screed.
Along the outer perimeter of the blind area, it is recommended to lay ceramic or asbestos-cement trays for organized drainage of water from the building area. A properly executed drainage system also plays a very important role.
DIY concrete blind area
To install a concrete protective coating, you will need the following materials:
- cement grade PC400 or PC500;
- river or washed sand;
- gravel or crushed stone fraction up to 40 mm;
- expanded polystyrene insulation boards;
- board and bitumen for treating it from rotting;
- reinforcing mesh with a cell of 100x100 mm;
- clay or geotextile.
What it is?
A soft, or flexible, blind area is a protective layer located along the perimeter of the structure. The main function of the structure is to drain melt and rainwater from the foundation. It does not have a continuous hard surface; instead, decorative stone, soil with lawn grass or paving slabs are used.
The soft blind area has a longer service life, it is more durable than the hard one.
The structure does not collapse due to soil heaving , since the concrete blind area is susceptible to the formation of cracks and splits. In addition, this is the simplest and most economical finishing method that does not require concreting or asphalting.
Requirements for the blind area and marking
The standards contain information about the purpose of the blind area, its linear dimensions, slope and position above ground level. In particular, the following are regulated:
Tape width
Construction rules provide for a relationship between the type of soil and the width of the blind area: for sandy soils it is 70 cm, for clay soils - 100 cm. For soils prone to subsidence, the value can reach 2 m;
Length
The soil adjacent to the foundation must be protected from moisture along the entire perimeter. The “ribbon” can only be interrupted at the location where the entrance group is installed, if “your own” foundation is laid under the porch. If the porch is light, the concrete strip will go under it;
Laying depth (depth)
The depth of the pit should not exceed half the depth of soil freezing adopted when calculating the foundation. The parameter differs for different regions - it can be found in reference tables or from the local urban planning department. If the depth is excessive, the blind area will not be able to move with the soil and provide thermal insulation - its role will be reduced to removing moisture;
Top layer thickness
Typically, 100–120 mm of concrete is poured for the blind area. If you plan to use the “path” intensively (for example, driving cars), it makes sense to increase the thickness to 150 mm;
Slope
According to SNiP III-10-75, the range of slope values is 10–100 mm per 1000 mm of length (from 1 to 10%) - the choice depends on the type of soil and the amount of precipitation. Typically, for concrete, the slope is taken to be 2–3 degrees. You can increase the slope to 5 degrees, but then in winter the icy blind area will not be able to function as a path;
Height above ground level
It is recommended to provide a height of 50 mm above the ground. In practice, taking into account the depth and other layers, the visible thickness of the concrete blind area reaches 100 mm or more. You should not compare the “tape” with the ground - water will accumulate and freeze at the edge, causing deformation of the concrete layer;
Border
It is installed for beauty, so there is no question of requirements - this part of the work is left to the owner of the house. An exception is the presence of shrubs (blackberries, raspberries) or trees (poplar, oak, ash, sycamore) near the house (less than 5 m): the border will protect the concrete from roots growing “broadly”.
If this information is not enough, it makes sense to get acquainted with the following documents:
- SNiP 2.02.01–83 (clauses 3.182 and 4.30);
- SNiP III–10–75;
- GOSTs 9128–97 and 7473–94.
Having taken note of the theory, you can proceed to the construction of a concrete blind area.
Estimated cost
The cost of restoring the blind area depends on the cost of the materials used during the work.
We will give approximate prices for drawing up estimates (for example, material consumption per 1 m2 is taken) when carrying out work with your own hands.
- Concrete blind area:
- concrete preparation – 318 rubles;
- pillow – 340 rubles;
- reinforcement – 180 rubles;
- formwork - 800 rubles.
- Tiled blind area:
- pillow – 420 rubles;
- finishing layer – 110 rubles;
- front layer – 2360 rubles.
Carrying out repairs by specialists will require large material costs.
Here is the approximate cost of the work (per 1 m2):
- excavation of soil to a depth of 25 centimeters with removal of plant fragments – 160 rubles;
- laying and compacting a lining layer of sand (height 10 centimeters) - 500 rubles;
- construction of formwork and formation of an expansion joint around the perimeter of the house - 50 rubles per linear meter;
- backfilling a drainage 10-centimeter layer of crushed stone and compaction;
- laying reinforcing mesh measuring 1x2 m - 50 rubles;
- installation of drains – 100 rubles per linear meter;
- pouring concrete 10 centimeters high with the formation of an angle of inclination from the wall to the edge - 1000 rubles.
Materials required for construction
Before starting work, you must prepare all materials:
- The base is clay. You need fat plastic clay with a small amount of sand.
- You will need bitumen mastic and roll waterproofing. Modern material is based on fiberglass. It is better not to use prehistoric paper-based roofing felt.
- Thermal insulation material is extruded polystyrene foam 100 mm thick. Expanded polystyrene foam (made from white grains) is not suitable.
- Sand for drainage is coarse, with a fraction of 3-5 mm.
- Geotextile is a rolled non-woven water-permeable material. Density 100-150 g/m2.
- Crushed stone.
When to finish the base?
Finishing the base above the blind area
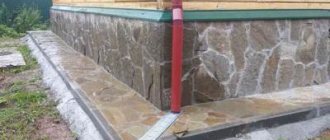
Usually it is recommended to do the blind area as the very last thing, after finishing the base. But these tips go back to the times of Khrushchev-Brezhnev mass construction, when plinths were, at best, plastered. And now, for example, how to make a waterproof thermal joint between the blind area and the base, trimmed with relief stone or base siding?
Taking into account the use of modern finishing materials, the base of the building should be finished after installing the blind area. It won't get worse, it will only get better. Look at fig. In the place marked with a red dotted circle, above the thermal seam, the finishing of the base forms a small cornice - a teardrop. Now only a tropical hurricane can drive moisture into the seam.
Feasibility of construction
A solid blind area is the most popular option used to remove moisture from the foundation, thereby extending its service life.
But it will not always function correctly, for example, in conditions of heaving soil, a solid structure is rarely used .
In this case, it is advisable to install a soft blind area, which is simpler, cheaper and more repairable. In addition, you can put insulation and waterproofing, as a result of which the structure will perform the same functions as a solid one.
Tile blind area
In general, the correct diagram of a slab blind area with internal slopes has been circulating on the RuNet for a long time, but along with it there are also inaccuracies. Since the original information is advertising and commercial, perhaps the authors protected their know-how in this way. Let's try to supplement the source material until it is suitable for use. The correct blind area from paving slabs is made according to the diagram in the figure:
Scheme of a blind area made of paving slabs
First, pay attention to the outer bend of the waterproofing up to the crushed stone. Its purpose is to prevent the first layer of sand from spreading
And drainage of a thin (3-5 cm) layer of sand will be ensured through the crushed stone layer overlying it.
Drains for tile blind areas
Secondly, the recommended total cushion thickness of 30 cm is only valid if the blind area lies entirely in humus. If the humus layer is thinner, then the drained layers should not be buried in dense soil; The layer of crumpled clay is in any case 15-20 cm. What if there is less than 20 cm of humus or no humus at all? Install drains, see fig. on right. Prefabricated gutters are placed on the ground 1-2 m from the lowest corners along the overall slope. In general, drains are desirable for slab blind areas on any soil, and it is better to drain the collections into a storm drain (storm drain) or drainage well, if there is one.
Third, the thickness of the crushed stone layer is 3 times the thickness of the first sand layer, and the upper sand layer is 2 of them. For the blind area to function properly, the proportions must be maintained, but the thickness of the lower sand layer must be at least 3 cm. The thickness of the overlying layers is calculated along the wall and increases outward in accordance with the slope.
Finally, the slopes. They should decrease slightly from bottom to top. In this case, the slope of the clay preparation outward is 0.08-0.12 (8-12 cm/m), the lower crushed stone is 0.05-0.07, the upper crushed stone is 0.03-0.04. The top of the tile cushion is horizontal.
Purpose of the blind area
As we already noted at the beginning of the article, the blind area performs a number of important functions, the main of which are: protecting the foundation from freezing, shifting, and moisture ingress.
However, these are not all of its useful functions. The blind area is necessary for:
- providing additional rigidity to the foundation frame;
- heat preservation and protection from temperature changes that negatively affect the durability of the concrete base and foundation of the house;
- protecting the foundation from subsidence and swelling of the soil;
- relieving stress on the supporting structures of the building.
It is impossible not to note the aesthetic component provided by the blind area. This is an additional decoration of the building, an opportunity to create a single space for the entire local area
Aesthetic function of the blind area
A building made with an aesthetic, complete blind area from a design point of view looks more complete. Moreover, it is not necessary to use only concrete or crushed stone. It is quite possible to use different materials and design techniques.
Protective function of the blind area
However, the main task and purpose of the blind area is to protect the foundation from moisture, freezing, and swelling. These are the most important tasks, the solution of which determines the durability of the entire building. That is why the protection must be of high quality.
For example, for soils with high groundwater levels, additional waterproofing of the blind area must be a prerequisite, and here a layer of clay is not enough. Modern waterproofing materials come to the rescue.
Scheme of blind area with waterproofing
If in the design we described above, the top layer of the blind area is made of crushed stone, then the concrete base will provide 100% complete protection of the foundation from water. No other building material or mixture will provide such high-quality protection. However, a rigid blind area has its drawbacks, which we will talk about a little later.
Related article:
Thermal insulation function of the blind area
Everyone knows how damaging temperature changes are to the foundation. This significantly reduces the strength of the structure and leads to the slow destruction of its elements. In this regard, the blind area is a kind of “scarf” that creates the necessary heat and evens out sudden temperature changes. If you are planning to set up a billiard room or gym in the basement or basement, then be sure to consider installing a blind area, this will help retain heat.
Scheme for arranging a blind area with insulation
Blind area to prevent soil heaving
A mandatory requirement for the construction of buildings on sandy, heaving, mobile soils is a high-quality blind area. The level of its occurrence in this case should be at least 30 cm. In addition, it is necessary to use an additional reinforcing layer.
Variations of execution may be different, however, the main task is to ensure the stability and strength of the foundation along the entire perimeter
Additional function of the blind area as a path or support platform
The blind area can be part of the facade of the building. Perform an additional strengthening function. This is true when the house or building is equipped with an entrance or parking area. In this case, the foundation of the building is constantly experiencing considerable loads. To lower them there are special support platforms. They can smoothly “flow” from the basement of the building and have their own structure, differing in the type of material used and decorative elements. The main task is to create a well-groomed space that would strengthen the weak points of the foundation.
Device technology
Any blind area consists of an underlying layer and a protective coating.
Backfill: what materials to use
The purpose of the underlying layer is to create a level base for laying the protective coating. Its thickness is about 20 cm. Sand and crushed stone are often used for these purposes, but native soil or clay can also be used.
The simplest design of a blind area made of clay
Sand and crushed stone are used on well-draining soils. In this case, sand is first laid, spilled and compacted. Then there is a layer of crushed stone, which is also compacted.
If the soil on the site is clay or loam, then it is better to use native soil. If, with such soils, crushed stone or sand is laid around the foundation, then water will certainly be present near the house. Because it turns out that the density of the soil outside the underlying layer will be higher. This will cause water to accumulate under the blind area. If, with this design, a drainage pipe is laid around the perimeter of the bedding, the problem will be solved. And it’s effective. But there will be more work, and the cost of the blind area with drainage will be higher.
Types of protective coating
The covering for the blind area must meet many requirements:
- should not allow water to pass through;
- must be frost-resistant;
- have increased abrasion resistance;
- should not be destroyed by water.
This could be paving slabs or paving stones. The shape and color can be very different - you select based on the general design of the territory and the houses of nearby buildings. The thickness of these materials is at least 6 cm; only in this case will they withstand harsh operating conditions.
The protective coating can be made of natural or artificial stone
You can use slabs or tiles made of natural or artificial stone, you can lay out the paths with large pebbles or pour crushed stones on top of all layers.
There is another type that is becoming increasingly popular - this is a soft blind area. It has few layers but works effectively. There may not be any hard or waterproofing layer on top: you can pour soil and plant grass or flowers. An interesting solution for a summer house or country cottage.
The principle of constructing a soft blind area
All these options are not bad, but the cost of their arrangement is quite high. If there is a need or desire to do it cheaply and cheerfully, your choice is a concrete blind area. There will be a lot of work, but the total cost is low.
General principles
Depending on the soil on the site and the purpose of the building, different materials and layer structure can be used, but there are some points that are always present:
- the blind area has a general slope “away from the house”, its minimum value is 3% (3 cm per meter);
- There must be an expansion joint of 1-2 cm between the protective coating and the foundation (lay roofing material in two layers, polystyrene foam or EPS, cover with sand, fill with sealant);
- when waterproofing and insulating the foundation, the material rises to the level of the blind area;
- the base should hang over the expansion joint and it should not interface with the protective coating (a gap of 1-2 cm is left).
Another popular type of protective coating for house formwork is paving slabs or paving stones.
How to make a blind area at home with your own hands
First, markings are made along the perimeter of the building using pegs and laces. The following is the order of work:
- The plant layer and some soil are removed. The depth of the trench depends on the size of the underlying layer and the thickness of the protective coating. Usually - 25-30 cm.
- The bottom is treated with herbicides. This is necessary to prevent plants from growing in this area. They are able to destroy even concrete and asphalt, and they grow instantly between tiles or paving stones.
- The bottom of the trench is leveled, forming the required slope and compacted.
- The underlying layer is laid and compacted, maintaining the slope. It is advisable to compact everything using a vibrating platform. Manual tamping is ineffective. Density is especially important when laying concrete, but it is advisable to compact it well under tiles or paving stones: it will not collapse or warp.
- A protective coating is laid.
- A drainage groove is formed.
It's very short and sketchy. Each coating has its own characteristics, and each needs to be discussed separately.
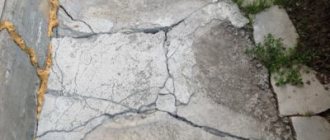
Mistake #3. Violation of regulations for concrete work
This often happens if they are measured by eye. Experts strongly recommend abandoning such frivolity. Making concrete is not a case where you can count on chance. You can accurately dose the components even in country conditions. How? In my opinion, nothing better than ordinary buckets has yet been invented, and if in addition you use a steelyard (even a very simple one), the weighing accuracy will be sufficient. Cracks in the blind area are the result of an incorrectly prepared concrete mixture
Concrete mix proportions
Traditionally, the proportions of the mixture are calculated based on 1 m³ of the finished batch. As an example, I propose to calculate the proportions for concrete M 250 (the most popular brand of mixture for low-rise construction). For getting
1 m³
M 250 solution will be needed:
cement grade M 400 – 332 kg;
- crushed stone – 1080 kg;
- sand – 750 kg;
Mixing time
How long does it take to rotate the bulb of a household concrete mixer? To mix the dry ingredients, 2 minutes are enough, and after gradually adding water, another 2 minutes. Not only the sequence of adding components is important, but also the mixing time
Compaction and tilt
The final stage of concreting is compacting the concrete mixture and imparting a slope in the transverse direction. You will have to rent a vibrating plate, the operation of which will ensure high quality finishing work.
To eliminate small gaps from temperature effects, it is enough to use sealants and fillers. The wide hole is filled with sand and cement with fine crushed stone to ensure optimal insulation.
The dry coating is treated with a primer. The same actions are performed with cracks in the surface of sections.
The presence of a concrete strip around the perimeter of the house is a guarantee of the reliability and durability of the foundation of the house
But in order for the structure to be as durable and functional as possible, it is important to follow the rules of its construction and follow the instructions exactly. It is also important to correctly calculate the thickness of the concrete blind area, apply all the required markings and be careful at each stage of construction
We suggest you read: How to make a hamam dome
Common Mistakes
Without sufficient experience, owners often make the following mistakes when filling themselves:
- The soil is lightly compacted provided that it is backfilled into the pit. Over time, the soil will begin to shrink, which will cause damage to the waterproofing layer and the formation of deep cracks in the blind area. Some areas will have to be repaired or the tape around the building will have to be completely re-filled.
- The bottom of the trench is not level. If in some places the bottom has differences, then the layers of sand and crushed stone will be uneven. The base will be of different densities and will have unequal load-bearing capacity in individual areas.
- The angle of inclination is not controlled. An incorrectly chosen angle or its absence will cause precipitation to flow under the house, and not away from it. There will be no benefit from such a blind area.
- mixing bad concrete. To mix concrete, you need to take clean sand without any impurities of soil or clay. This also applies to water purity. Otherwise, the working properties of concrete are reduced.
- They forget about expansion joints. They should be. Their absence threatens to rupture the concrete surface. When heated, the raw material begins to expand, and internal stress increases. Seams should be provided not only between the blind area and the house, but also across the tape.
The roof drainage system must be properly designed so that rainfall collects and flows down the gutters rather than under the foundation.
Proper arrangement of the blind area allows you to protect the foundation of the house, garage and other buildings from moisture penetration. It can become a beautiful path between buildings or even the basis for a flower garden.
Main types of structures
Depending on the material used, are given below.
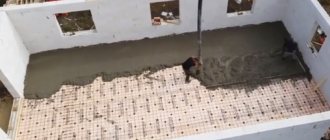
Concrete blind area
The surface ensures the blind area is waterproof. This method is the most common due to its ease of execution and accessibility.
Laying features:
- It is necessary to lay a lower underlying clay layer (15 cm) and sand (8 cm), which play a shock-absorbing role.
- To prevent cracks from appearing in cold weather, expansion joints must be provided before laying concrete. To do this, guide rails are placed every 3 meters, located across the platform, the top of which should be at the same level with the cement mortar. They are used as a guide when leveling the concrete mass.
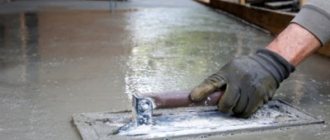
- The wet layer is covered with cement in several approaches, then smoothed.
- It is advisable to use reinforced concrete to increase its service life. Steel mesh is used.
Soft blind area
Its advantages are its beautiful appearance and the ability to perform the functions of a sidewalk.
Laying features:
It is necessary to lay a lower clay layer (15 cm), then compact it and level it
It is important that there is no sand in the layer, otherwise there is a high probability of swelling of the entire structure. A waterproofing film is applied over the clay layer. Important note: roofing felt cannot be used. Laying a layer of sand (5 cm). Geotextiles are laid on top, the peculiarity of which is the transmission of moisture, while there is no likelihood of sand filling the voids between the drainage components. Laying a 12-15 cm layer of crushed stone, which serves as drainage; water passes through it to the waterproofing layer, and then is diverted away from the building. Laying the second layer of geotextile. Filling the second layer of sand (5 cm). A special coating that is resistant to temperature and humidity and has a beautiful appearance.
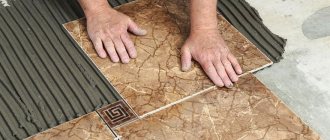
Blind area made of paving slabs (paving stones)
The blind area has an attractive appearance and can serve as a pedestrian path.
Advantages:
- resistance to cold and heat;
- variety of tile shapes;
- large selection of colors;
- the ability to combine different colors and shapes to create an ornament.
Paving stones are made from concrete or stone (granite, basalt). Stone tiles come in a limited range of shapes.
Laying features:
- A layer of clay is laid (about 10 cm).
- It is covered with waterproofing material, which is attached with its edge to the wall using a metal strip.
- A sand layer (15 cm) is laid out.
- The sand layer is covered with tiles.
- The gaps between the tiles are filled with sand.
Paving slabs
The advantage is the simple replacement of worn-out elements. The slabs are laid on top of a concrete base. The process of preliminary soil preparation does not differ from that indicated above.
There are square and rectangular slabs of various sizes. Based on the type of material, slabs are divided into reinforced concrete and stone. The surfaces may have incisions and reliefs that serve as decoration.
Crushed stone blind area
The simplest type of blind area. It is used when there is a high level of groundwater and when it is necessary to provide drainage around the building. Crushed stone can be replaced with pebbles, expanded clay, and gravel. Geotextiles are placed on the compacted soil, and a layer of crushed stone about 10 cm thick is poured on top of it.
How to insulate the blind area around the house? You will find the answer to this question here. And this article talks about entrance doors for the house.
Technology for creating a soft “path”
It is not difficult to make a soft blind area. Don't believe me? However, now you will see this. Shall we start?
Necessary tools and raw materials
To ensure that nothing distracts you from your work, you need to take care in advance about the availability of tools and material for the soft blind area.
Stocking up:
- waterproofing - roofing felt, polyethylene, PFC membrane (optional);
- geotextile for blind areas – protects drainage from silting and prevents different soils from mixing;
- clay without any impurities;
- drainage - sand and gravel;
- bayonet shovel;
- cord;
- pegs;
- gloves.
Work order
We follow the step-by-step instructions:
- we mark the site;
- drive in pegs;
- stretch the construction cord;
- we dig a trench 30–40 cm deep and 60–80 cm wide (between the wall of the structure and the cord);
- fill the trench with clay without impurities (at least 10–15 cm) and compact it well. As a result, we get an excellent hydraulic lock, which was used by our grandfathers;
- we put a waterproofing material (the material produces excellent ones), make sure that it extends onto the wall, 10–15 cm is enough;
- cover the waterproofing material with a layer of sand;
- we lay geotextiles, which make an excellent pair with drainage, since it does not allow sand to mix with crushed stone;
- fill the trench with crushed stone (thickness at least 15 cm);
- lay another layer of geotextile;
- fill the material with sand;
- We directly lay the blind area from the raw materials we like (multi-colored granite chips of medium and fine fractions look amazing).
Also, if desired, the blind area can (sometimes should) be insulated. For what? The coating will increase the temperature in the basement, save on fuel, and also prevent the ground from freezing. Most often used:
- extruded polystyrene foam (penoplex) - durable, strong, easy to process (from my point of view, this is the best material for this purpose);
- polystyrene foam - has long been known for its heat and sound insulation properties, reasonable price;
- foamed polyurethane (so-called sprayed thermal insulation) - durable - service life more than 20 years, wear-resistant, does not rot, is not afraid of sudden temperature changes, does not absorb water, however, its price is high, since it requires special equipment.
Of course, you can use other insulating materials, but these are the most relevant...
If everything is done correctly, the work will bring not only excellent results, but also pleasure. The protective “path” will allow you to enjoy the comfort of the family hearth in the arms of your home for decades!
This is what I wanted to tell you about today, but now I’m finishing it and recommend (to anyone interested) to subscribe to our public VK. And if you have friends whose construction of a house, bathhouse, etc. is “at the right stage,” recommend the article to them, maybe it will benefit them... Good luck to everyone, and a beautiful warm area for the house, bye!
Wisdom Quote: It doesn't matter what you give, it matters how you give (Bruce Lee). https://www.youtube.com/embed/K3dcI_dVKJo