One way to prevent this is to heat the concrete with wires. For this purpose, there are different brands of heating wires: PNSV, PGPZh, PNVZh. The most popular method is heating the concrete with PNSV wire.
We recommend watching a short video where a specialist from a construction company shows how concrete is heated using PTPZh wire, and why it is more profitable:
Why is concrete heated?
The construction of buildings, structures and other structures using mortar in winter cannot be done without heating. As a rule, the hydration of the solution at subzero temperatures does not completely occur. You can also read about the brand of concrete for a strip foundation, its types, pouring technology, and independent calculations. It does not harden completely; some areas of the mixture freeze. After thawing, the bond of the mixture will be broken, which will certainly affect the quality and durability of the structure.
In winter, electrical heating of the structure is required. The hardening process of the mixture accelerates under certain (plus) temperature conditions. In this case, the structure of the binder mixture is not disturbed, and the strength of the structure itself does not suffer. This is why concrete is heated with wire in the cold season.
Application
Using the PNSV cable, you can immediately solve two problems that arise with concrete in winter. The water included in the solution goes into a crystalline state. As a result, the hydration reaction stops completely. Everyone knows from the school curriculum that when water freezes, it expands. In such conditions, it is impossible to form strong bonds in concrete, so it will not be possible to achieve the required strength.
In order for the composition to harden correctly, it is necessary to ensure an ambient temperature of +200C. When it decreases to zero, this process slows down even if heat is released as a result of hydration. To maintain the required parameters, you cannot do without the PNSV wire. The need to warm up concrete arises in the following cases:
- Insufficient thermal insulation of the monolith or formwork.
- Low air temperature.
- Monolith dimensions are too large.
What material should I use?
The most common material for this is PNSV heating wire. It is easy to use and relatively inexpensive. It consists of a galvanized or steel single-wire core having a round shape and polyethylene or PVC plastic insulation. This material is used for heating in temperature conditions from + 5 degrees and below. On this page you can learn about the proportions for preparing concrete, its components and parameters.
The method of heating concrete with PNSV wire is quite simple. PNSPs become very hot and transfer heat to the structure. To carry out the procedure, one heating element is not enough. You will need a transformer substation (step-down), which has a system responsible for regulating the thermal force. Based on external changes in temperature, the device regulates the thermal power. It is from such a substation that heating will occur. This installation allows you to heat the mixture up to 30 cubic meters.
Length calculation
When calculating the length of the PNSV cable, it is necessary to take into account a number of factors, the main one of which is the amount of heat supplied to the monolith for the purpose of its high-quality hardening. This parameter is affected by air temperature, shape and size of the structure, humidity, and the presence of thermal insulation.
You also need to determine the wire laying pitch, taking into account the average loop length (28-36 m) in the calculations. If the air temperature is -50C, then the pitch should be 200 mm, -100C – 160 mm, -150C – 120 mm.
When calculating the cable length, you need to know its power. For a wire with a diameter of 1.2 mm – 0.015 Ohm/m, 2 mm – 0.044 Ohm/m, 3 mm – 0.02 Ohm/m. The operating current should not exceed 16 A. In the case of a 1.2 mm PNSV, the resistivity will be 38.4 W. To calculate the total power, you need to multiply this number by the length of the wire used.
The same circuit is used to calculate the voltage of the step-down transformer. If the diameter of the PNSV is 1.2 mm, and a total of 100 m are laid, then the total resistance will be 15 Ohms. The current strength is still the same (16 A). Voltage is the product of resistance and current. In the example under consideration it will be 240 V.
How to calculate the heating of a structure?
The calculation for heating concrete with wire is as follows: for one cubic meter of mixture you will need approximately 60 meters of PNSV. The area, type of structure, and required electrical power are also taken into account. The required length of the heating element section may also depend on the voltage of the transformer substation. That is, the lower its voltage, the shorter the length needed. Before you start calculating, read about concrete for the foundation: composition, proportions, main grades. And also about the consumption of cement in a concrete mixture: the main qualities of the components, the proportions of cement in various grades of concrete, permissible errors.
The PNSV wire, when immersed in the solution, functions normally at an operating current of 14-16 Amperes. Therefore, it is preferable to choose exactly this operating current indicator. At the same time, in the open air with such an indicator, the heating element quickly fails. As a result, its cold ends (the part that should remain outside the structure) must consist of another wire - the automatic reclosure. Their length usually ranges from half a meter to a meter. The optimal voltage will be the third stage of the transformer substation - 75 Volts.
Before heating the concrete with a wire, you should develop a technological map that is subjective for a specific design and draw up a diagram for laying the heating element. The scheme for heating concrete with wire usually looks like this: a drawing of the structure indicating where the wire will be laid. It is usually laid like a snake, without touching each other. The drawing must indicate the exit points (cold ends) of the heating element.
Wire characteristics
The PNSV cable consists of a core with a cross section of 0.6-4 mm2 and a diameter of 1.2-3 mm. Some brands are galvanized to suppress the negative effects of aggressive components of the solution. Polyvinyl chloride or polyester is used as an additional coating. This heat-resistant insulation is characterized by high strength and resistivity, bends well, and is not subject to abrasion.
Technical characteristics of the PNSV cable:
- Operating temperature range – from -600С to +500С.
- Specific resistance – 0.15 Ohm/m.
- Wire consumption is 60 m for each cube of concrete.
- Permissible installation temperature is -150C.
- The lower temperature threshold for use is -250C.
The cable is connected to the cold edges using an aluminum recloser wire. The wire is powered by a three-phase 380V network. In some cases, with correct calculations, it is possible to use a 220V home network. The main condition is that the cable length must be at least 120 m. It is also necessary that a current with a nominal value of 14-16 A flow through the system.
Warm-up technology: step-by-step guide
After all the calculations have been made, a technological map and diagram have been drawn up, you can begin the warming up process:
- The heating element should be placed evenly in the filling areas. It should not come into contact with its other parts. You should also ensure that the heating element does not extend beyond the structure and does not touch the formwork.
- Before taking the ends of the cable beyond the heating, you should connect the cold ends to the heating outputs by soldering them. In order for the thermal field to be well preserved, it is recommended to wrap the soldering areas with metal foil.
- A test should be carried out using a megger to ensure a measured current load across phases.
- The structure is filled with concrete solution.
- At this stage, current can be supplied through the transformer substation (step-down).
This is one of the simplest ways to heat concrete with wire. A video on the topic will help you better understand and understand what technological heating of concrete is.
Operating principle and types of wires
After installing the reinforcing frame, the heating cable is placed directly on the working surface. The cross-sectional area and maximum allowable stress depend on the specific situation. Then the concrete mixture is poured, followed by connecting the heating cable to the power supply network (or transformer). The concrete gradually heats up, begins to harden faster and (most importantly) evenly. The structure remains homogeneous, therefore eliminating the possibility of bubbles and cracks.
Three main types of cables are used to heat concrete:
- A two-core cable for concrete in sections (KDBS) can be switched to a 220 V electrical network, so there is no need to use a step-down transformer. Of the three products, it is much easier to install, no trimming is required, and the presence of convenient couplings ensures easy installation according to the desired pattern. On the other hand, KDBS has a high cost (from 1000 rubles per 1 linear meter). The second disadvantage is related to single use. Once the concrete mixture has hardened, it will not be possible to dismantle the product.
- Two-core cable made by Finnish BET. Again, it does not require a step-down transformer and is connected directly to the mains. It is characterized by efficiency, and to heat one cube of concrete mass, no more than 20-25 linear meters are needed.
- A single-core heating wire with a steel conductor and polyvinyl chloride insulation (PNSV) is the cheapest product for heating the concrete mass (about 20-50 rubles per 1 running meter), therefore it is most used in the construction of private houses. The power supply circuit must have a step-down transformer. However, if a number of conditions are met, direct switching to the network is possible. After the concrete has been heated, the wire can be reused (as a “warm floor” or an “anti-ice” system).
Let's take a closer look at the most popular and simple PNSV wire.
Features of PNSV heating wires
Structurally, the product consists of one steel core, the diameter of which ranges from 1-3 mm. The cross-sectional area of a round conductor can reach 4 square meters. mm. Polyvinyl chloride or polyester is used as insulation, which eliminates strong kinks, protects the wire from fractures and increases resistance to fire.
The most common are wires of small diameter - about 1.2 mm, but since the cost of the product is minimal, it is better not to save money and take a 3 mm PNSV cable. This is especially true if you plan to manually compact the cement mortar. In this situation, the insulation will be much stronger, so even during power failures, the possibility of overheating is eliminated.
Be sure to pay attention to another distinctive characteristic of heating cables - cold ends. These structural parts are located outside the concrete slab, and for their production they use conventional aluminum current-carrying conductors (ACV). Their main task is to connect the heating cable embedded in concrete with the electrical network.
Features of KDBS and VET cables
PNSV is not ideal, and the main disadvantage of the heating cable is associated with the extreme need to use additional equipment - a transformer used to lower the voltage and regulate the power of heat generation. Simply put, to prevent the device from burning itself out, you have to reduce the voltage.
The use of two-core sectional conductors simplifies the task of heating the concrete mixture. These products are characterized by self-regulating properties. We are talking about the domestic KDBS or the Finnish VET. There is no need to connect additional devices for heating. It is enough to switch to a 220 V electrical network and enjoy the result.
In the image below you can see the cable structure for heating concrete:
Let's decipher the notation:
- A – stripped heating cores;
- B – cold termination (regular installation cable, for example, with aluminum conductors, which is necessary for connecting to the network, but is not used as a heating element);
- C – coupling for fixing the installation cable with heating sections;
- D – end sleeve for insulation;
- E – heating cable for heating concrete of a specified length.
The design of the Finnish VET cable is almost identical to KDBS, but the technical and operational characteristics are still different. Their comparison is shown in the table below:
| Parameter name | VET | KDBS |
| Operating voltage, V | 220-230 | 220-240 |
| Linear power, W/m | 35-45 (depending on model and length) | 40 |
| Insulation resistance, Ohm | 103 | 103 |
| Bending radius, mm | 25 | 35 |
| Diameter, mm | 6 | 7 |
| Heating section length, m | 3,3-85 | 10-150 |
| Dust and moisture protection class | IP67 | IP67 |
To mark domestic heating cables KDBS, the general marking scheme AAKDBS BB is used, where AA is the linear power value, BB is the length of the heating section. For example, if you see the marking 40KDBS 20, then it indicates that the power of one linear meter of this cable is 40 W, and the length of the heating section is 20 m.
Heating a structure without a transformer
Heating of concrete by wire without a transformer is carried out using a special Finnish cable “BET” or an electric rubber cable heating section. Both “BET” and the heating cable operate from a regular power outlet with a voltage of 220 Volts. Just like heating concrete with a PNSV wire, the process of heating it without a transformer is simple: the material is placed in the pouring areas according to the appropriate scheme, concreted, and the lead-out ends are connected to the network.
From all of the above, it follows that the technology of heating concrete with wire is not particularly difficult. The main thing in this matter is the correct calculation and precise scheme according to which the heating element should be distributed as accurately as possible over the concrete structure. And here you can learn about M200 concrete.
Why do you need a transformer when warming up?
It would seem, why can’t the heating elements be directly connected to the network? The reason is simple - the voltage is too high. On the one hand, it is dangerous to life, on the other hand, it will require too much load (in the form of very long wires, for example). And the risk of local overheating is too high. Therefore, in order to carry out a process that is correct from a technological point of view, it is necessary to lower this voltage. This is exactly what special transformers are used for. They are even called “step-down transformers”.
In principle, a wide range of transformers can be used to heat concrete, but there are also specialized models (warming stations), which can be found on our website in the “Equipment” section. They differ in power output. The larger it is, the larger volume of concrete can be heated.
Method of heating reinforced concrete
The main advantage of this technology over other heating methods is the absolute absence of heat loss, since thermal energy remains in the surrounding concrete mass. The costs of heating the cable and transferring heat into the body of the concrete structure are minimal compared to other heating technologies.
The next, undoubtedly, big advantage is the ease of implementation of this method. After calculations, it is enough to select the right heating element, connection and installation diagram, select the appropriate voltage, and the final result can be achieved without resorting to the services of builders and electricians.
The technology itself consists of several stages, the first of which is the construction of formwork or a form of the corresponding structure, into which the reinforced frame, heating wire will be laid and concrete will be poured, which must be compacted with an in-depth vibrator before applying voltage to the circuit.
Pouring the solution into the prepared form
https://youtube.com/watch?v=Mi9bK_pcfcI
Some features that PNSV or KDBS have, which are used to warm up the concrete mass, allow the circuit to more efficiently convert voltage electricity into heat, the main thing is to calculate everything correctly. This heat warms the concrete, speeding up its setting and hardening.
Professional builders know and understand the difference between heating wire and cable, and individual developers will find it useful to have an idea about this, which will help them use the technology correctly and more efficiently. The heating method using a cable is more expensive for the following reasons:
- Heating of reinforced concrete is carried out by connecting the circuit to a reduced voltage through a special step-down transformer in order to prevent the leakage of dangerous voltage into the structure through wet metal reinforcement in the event of accidental damage to the insulation.
- The heating KDBS can be connected to a network of at least 220V. Optimally - 220V or 380V without reducing the mains voltage.
Connecting PNSV or KDBS is easier in terms of organizing the workflow - connections are made through special couplings, and the cable does not need to be shortened or extended. But a heating cable is more expensive than a wire, so in individual construction it is used at the discretion of the owner. Another disadvantage of cables is that they cannot be reused.
KDBS for heating concrete
Wire differences:
- Externally, a wire can be distinguished from a cable by the following characteristics: a wire usually has one core, a cable has two or more.
- The wire has nominal temperature limits when heating concrete – ± 55°C.
- Maximum current – 16 A.
- The cross-section is 0.6-3 mm, which allows you to bend the wire in any direction and use complex laying patterns. You can use a special calculator to calculate the wire cross-section.
- Wire consumption for heating 1 m3 of concrete solution is 50-55 m.
Advantages of heating the soil with a heating cable
Such a system is ideal for Belarusian climatic conditions; it will not only protect the soil from severe frosts, but also preserve its fertility and quality. Depleted soil is unable to produce the desired harvest; if you take care of it, then it will take care of us. Frost does not allow the soil to be saturated with moisture, heat, or useful minerals, and the heating system will provide the soil with the opportunity to feed and produce fruit at any time of the year.
Thus, we can highlight the following advantages of purchasing a cable heating system for plant soil:
- Early sowing. Thanks to the warm soil, you can plant seedlings in a greenhouse about 1-1.5 months earlier than usual and harvest until late autumn. This way you can get 2 harvests in 1 year;
- Comfortable and safe growing conditions. Seedlings and seedlings will not freeze in case of frost and will grow and bear fruit more intensively;
- Relatively inexpensive components. The price of the entire system, depending on the size of the greenhouse, will cost $100-300;
- Economical consumption of electricity. We are not required to heat the entire greenhouse. The cable warms the soil and plant roots. To do this, for 1 sq. meter of beds the power is about 80 Watt/m2. The use of thermostats reduces energy consumption by another 30-70%;
- Quick installation. Unlike boiler water heating, the system can be installed in 1-2 days. If you use water boiler heating, then its installation will take more time and money.
Electric soil heating systems equipped with thermostats monitor the temperature in the greenhouse and will become indispensable assistants for every landowner. Previously, much more effort and time was spent on providing plants with a comfortable existence even in cold seasons. Thanks to soil heating systems, you can easily manage your site and vegetation. Heat, moisture and mineral decomposition are the main elements that provide the earth with vital force; this issue is resolved much faster today thanks to these systems.
Generally speaking, this whole system is something like heating for the soil and plants during the cold season. Why not allow nature to exist even in frost, taking into account the needs of each plant and the ability to provide complete comfortable conditions? If modern technologies can provide warmth to the soil and plants in the cold winter, then all that remains is to choose the most optimal option!
Technological warm-up map
Special rules and recommendations should be observed when choosing the length of the heating section, laying and fixing the wires.
How to calculate the length of a wire in a section
If it is necessary to heat concrete using a single-core PNSV wire, two main variables must be taken into account:
- The temperature of the concrete mass depends on the street temperature, the presence and speed of wind, how correctly the thermal insulation is installed, and the geometry of the formwork. The type of concrete used is also important.
- Cable power density (P). With concrete reinforcement, this value is about 30-35 W/m, without reinforcement - 35-40 W/m.
Certain difficulties arise when it is necessary to calculate the maximum length of a separate segment of the PNSV. To do this correctly, you need to find out the value of the resistivity (p) of the metal core depending on its cross-section. The ideal option would be a current strength of 14-16 A per section. Otherwise, Ohm’s law is used for calculations – U=I*R, where:
- U – voltage;
- I – current strength;
- R – resistance of the selected segment.
For example, with a voltage of 90 V and a current of 15 A, after using a step-down transformer, you need to get a resistance of 90/15 = 6 Ohms. With a core cross-section of 1.5 mm, a similar resistance is obtained for a wire 60 m long. It is calculated using the formula 6 Ohm/100 Ohm/km = 0.06 km (60 m).
This example can only be considered as a simplified calculation method. In reality, cable resistance changes according to temperature fluctuations, so some adjustments will need to be made to each result.
When the concrete gains the necessary strength, it can be subjected to mechanical stress - drilling, cutting, chipping. To perform such operations, choose diamond-coated tools to prevent the occurrence of microcracks. The diamond bit can even be used on reinforced concrete.
Heating technology and laying scheme
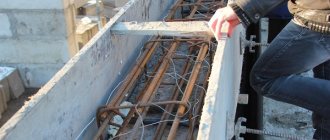
Before installing a heating system for concrete, formwork and reinforcement cage must be installed. Then the PNSV is laid while maintaining an interval of 8-20 cm. The final choice is influenced by air temperature, wind speed and humidity. The wire does not need to be pulled tightly; it is attached to the fittings using unique clamps. The distance between bends should not be less than 25 cm. Crossing of current-carrying wires is not allowed. They should be placed at least 1.5 cm apart from each other, which will provide protection against short circuits.
One of the most popular installation schemes for PNSV is the “snake”, used in “warm floor” systems. This approach guarantees the necessary heating of a large volume of concrete mixture and saves heating cable. Before pouring concrete into the formwork, make sure there is no ice. Maintain the temperature of the mixture at least +5 degrees. Celsius. It is important to bring the cold ends of the cable, made of ordinary aluminum, to the required length.
When purchasing PNSV, pay attention to the availability of the necessary technical documentation and instructions for use. Familiarize yourself with it before heating concrete. For connection through sections of busbars, two main topologies are used - “star” and “triangle”. In the first case, three identical conductors are connected into a common node, then the same number of free contacts are connected to a step-down transformer. In the second case, the system is divided into three parallel sectors, which are switched with the terminals on a three-phase step-down transformer. The device itself, used to change the voltage, is installed at a distance of no more than 25 m from the connection point. The area where heating is carried out must be fenced.
The system is connected to the power supply after the concrete mixture has been completely poured. The general sequence of the heating technology is as follows:
- When heating, the rate of temperature rise does not exceed 10 degrees. Celsius per hour. This is necessary for the process to proceed smoothly.
- When the desired temperature regime is reached, heating is carried out for as long as necessary to gain half the technological strength of the concrete mass. The maximum permissible temperature is 80 degrees. Celsius. However, 60 grams is considered optimal. Celsius.
- The rate of temperature decrease when concrete cools should not exceed 5 degrees. Celsius per hour, which will eliminate potential cracking and guarantee the uniformity of the massif.
Strict adherence to the listed technological recommendations will allow the concrete mixture to gain the strength indicator indicated in the passport data. Upon completion of the work, the PNSV is left in the concrete mass and used as an additional reinforcing element (less often - as a “warm floor” system).
Operating a KDBS or VET cable is much simpler than using a single-core PNSV. The main reason is the ability to directly connect to a 220 V network through a socket or electrical panel. Both types of heating cable are divided into different sections, which eliminates overloads. On the other hand, the cost of products is higher, therefore, from an economic point of view, their use at large facilities is irrational.
In addition to heating wires, other technologies are also used. For example, heating elements and electrodes are installed in the formwork. Reinforcement is inserted into the solution, for which a welding machine or step-down transformer is used. In this case, there is no need to lay a heating cable, but energy costs will be much higher, since water in concrete is a conductor, and the resistance of concrete during hardening increases significantly.
Location and fixation of wires
When performing installation work, make sure to follow several important recommendations:
- The cable must be laid between the walls of the formwork so that all parts of the wire are located at a depth of 20 cm and below (starting from the top point of pouring the concrete mass).
- To avoid cracks and breaks in the insulation, make the most smooth bends in the heating cable. The permissible bend radius depends on the specific cable model. However, most often builders choose products with a bending margin (30-40 mm).
- To ensure uniform temperature distribution throughout the concrete mass, the conductors are laid out at a predetermined pitch (equidistant from each other). Avoid any intersections, maintain a minimum gap between heating circuits of up to 40 mm.
When the entire cable is laid out in the right place, it should be firmly fixed to the parts of the reinforcement frame. The main reason for such actions is to protect the insulating shell. A flexible wire is suitable; you don’t need a special tool to twist it. Instead, you can use soft plastic clamps.
Subsequently, the concrete mixture is poured into the formwork. As the process progresses, you will need to align the array. This is done carefully so as not to accidentally damage the heating cable or disrupt the sequence of its installation. Since VET and KDBS can be operated under various vibrations, any available method can be chosen to compact the poured concrete. Having completed these procedures, the cable cores should be connected to each other and then connected to a transformer or directly to the electrical network.
It is quite obvious that direct connection of the heating cable to the electrical network is much more convenient and economical. The cost of the cable is higher than that of a single-core PNSV wire, but still the reliability of the system is much better. It will be possible to easily maintain a given temperature regime at all points of the concrete mass, which guarantees better setting (solidification).
Treatment of concrete after heating
After heating the concrete, when the minimum recommended strength is achieved, you can perform any operation - cutting, drilling or crushing the surface. Even in cases where the strength differs from the brand name. The only thing to avoid is shock loads. Ideally, you should use diamond-coated tools, as discussed above.
Heating concrete using PNSV is a cheap but labor-intensive method, more suitable for professional builders. However, the product can be used in domestic conditions, but you will have to correctly calculate the power consumption. The presence of thermal insulation materials is an excellent way to reduce the cost of heating the solution. They will speed up reaching the desired temperature, maintaining it and ensure smooth and uniform cooling. This will have a better effect on the quality of concrete. If you plan to pour small volumes of concrete during private construction, it is recommended to use VET and KDBS heating cables.
Heating concrete with electrodes
Electrode heating is one of the most popular methods of heating a cement-sand mixture in cold weather conditions.
Schematic diagram of a transformer for heating concrete.
There are several types of electrodes used for this type of work:
- Lamellar. The conductive elements are made in the form of a plate. Such heating elements are installed on the inside of the formwork to ensure good contact with the sand-cement mixture. Concrete is heated due to the appearance of an electric field near the plate heating elements.
- Stripes. A similar version of heating devices is mounted on both sides of the formwork. The principle of operation of strip electrodes is identical to plate electrodes: when current is supplied, an electric field appears around the heating elements, heating the concrete structure.
- Strings. String-type heating elements are often used when heating cylindrical concrete structures, such as columns. The electrodes are connected to the center of the structure, surrounded by conductive formwork. To simplify the connection of conductive elements with each other, the power wires visible from the formwork are bent in the shape of the letter L.
- Rod. In appearance, this model of heating elements resembles fittings. The rod elements are installed inside the concrete, which allows heating even the most complex structures.
There are cases when, instead of electrodes, longitudinal metal rods placed in the formwork can be used. This method is simple and effective, but has a high consumption of electrical energy.