Wooden floor structures
Before you start talking about screeding a wooden floor, you need to understand the designs of wooden and plank floors.
It hardly makes sense to screed a wooden floor that is laid on joists and a 220 mm thick floor slab. The thickness of such a wooden floor is 70-77 mm and the best solution for such a floor would be to remove the wooden floor along with the joists and make a screed over the concrete floor slab.
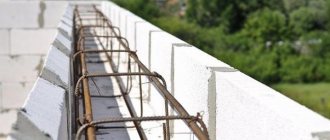
Screeding a wooden floor makes sense if the floor joists are on high brick pillars. The height of such pillars can reach 30-40 cm (or more) and it is not possible to replace them with a screed. You can see two photos of schemes for such floors below.
It is precisely floors of this design that can be discussed as a possible basis for a screed.
Possible options
If you have already decided that you need a concrete screed for the joists, then expand your options by considering alternative pouring options. Concrete, of course, wins in price, but its weight is very heavy, and mixing it with your own hands while maintaining the proportions is quite difficult.
In the table below, we compared the characteristics of the materials available for the wood screed device:
Before making a choice, evaluate the advantages and disadvantages, as well as alternative options. Some mixtures of self-leveling floors allow you to work with wood, creating durable and even surfaces that are not afraid of high humidity.
For example, epoxy mixtures for self-leveling floors provide a surface that is absolutely insensitive to chemical and physical influences. Instructions for installing self-leveling floors are prescribed by the manufacturer on the packaging.
Features of screed on wooden floors
Before deciding to screed a wooden floor, pay attention to the following:
A screed on a wooden floor is an unconnected screed, that is, the layer of such a screed will not be connected to the bottom layer of the base and will be an isolated layer of the floor, not connected to anything. This leads to some features of screeds on wooden floors.
Firstly, the wooden base for the screed must be very strong and completely motionless. Depreciation, which is so characteristic of a wooden floor, should be completely eliminated. If the wooden floor possibly vibrates, the screed above it will crack, which is unacceptable.
Secondly , depending on the selected material for the screed, the thickness of the screed can be quite thick. For example, when using a cement-sand mixture for screed, the thickness of the screed should be from 10-12 cm. The weight of such a screed will significantly increase the load on the wooden floor. If we take into account that the wooden floor is laid on joists, and there is a step between the joists (the distance between the joists), then as the load on the wooden floor increases, the distance between the joists must be reduced. In large rooms, the distance between the joists can reach 85 cm. Therefore, if you decide to make a cement-sand screed in a large room, you will have to dismantle the floor, reduce the step between the joists, install new joists and restore the wooden floor again.
It’s a lot of work, and perhaps you should think a hundred times before making a cement-sand screed on a wooden floor in a large room.
In order not to disassemble the floor and not reduce the distance between the joists, use not a cement-sand mixture, but, for example, anhydrite floor levelers. The thickness of such a screed is from 30 mm, the leveler does not require reinforcement and can be used for unbound screeds.
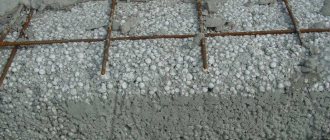
Thirdly, a cement-sand screed on a wooden floor is made, always with a reinforcing mesh. This is done, again, to increase the strength of the screed. Moreover, fiberglass in the screed will not save you from using reinforcing mesh. That is, for a semi-dry screed, you will also have to make a reinforcing mesh with cells of 100x100 mm.
Conclusion. The use of cement-sand screed for large rooms with wooden floors is not justified by labor-intensive work. However. If the circumstances and conditions are such that it is impossible to avoid screeding a wooden floor, then to install the screed it is better to use a leveler suitable for independent screeding rather than using a cement-sand mixture. And in general, I would not consider a cement-sand screed as a priority for screeding on a wooden floor, although the use of a high-quality leveler will significantly increase the cost of the screed material.
Laying flooring along joists on a primer
Work on arranging the floor using this technology in wooden buildings begins with calculations to determine the size of the step between the supporting elements and logs. This parameter directly depends on the thickness of the bars. The more significant it is, the greater the distance between the lags.
Further:
- since foundation columns are used to build the base of the structure, they need to be dug into the ground;
- then a waterproofing layer is laid between the ground and the concrete base using roofing material and a wooden spacer treated with impregnation;
- Brick columns are placed on top of the foundation columns. As a rule, the height of the subfloor is approximately 20 centimeters;
- a layer of insulation is placed in the space between the pillars, for example, expanded clay is chosen;
- After laying the heat-insulating layer, antiseptic impregnation should be performed. It can be used to treat the underside of the boards from which a rough version of the floor covering is made.
Material for screeding on wooden floors
To make a screed on a wooden floor you will need the following material:
- Polyethylene film with a thickness of 200 microns, for waterproofing the screed layer from wood and walls;
- Mixture for screed. Read about choosing a mixture a little higher. If you choose a cement-sand mixture, then prepare a reinforcing mesh, preferably with a stainless steel coating. The mesh should not be in rolls. Why not in rolls?
You have to fix the reinforcing mesh on a wooden base, but you must not disturb the waterproofing, that is, do not tear the film. Think about how you will attach the mesh. At the same time, think about how you will attach the beacons for the DSP screed, because there is nothing to attach the beacons to, the base for attaching the beacons is polyethylene.
Why am I making these notes? In my opinion, it is better not to install a cement-sand screed on a wooden base in large rooms. The amount of work and problems will completely overshadow the result. Replace DSP with “Rovnitel” for isolated bases (unbound screed). For example, an anhydrite floor leveler.
Cement-sand or concrete
Necessary materials for preparing the mixture:
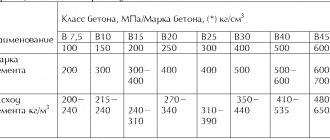
Concrete mix composition table.
- river sand - for cement-sand;
- crushed stone (fraction 5-10) – for concrete;
- cement;
- shovel;
- container for mixing;
- wooden hammer;
- rule;
- fittings;
- lighthouses;
- level;
- putty knife;
- damper tape;
- grout.
There is a table of the proportions of the components required for the preparation of concrete and cement-sand screeds.
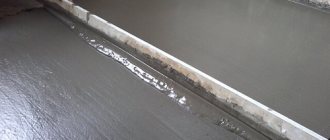
In order for the screed to be perfectly level, the beacons must be installed strictly level.
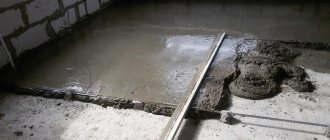
If there are large cracks, they must be repaired using a special mortar made from thick cement. Next, you can begin to isolate the grooves formed by the floor and walls, columns, pillars, and technological outlets. To do this, use a damper tape. The screed must contain reinforcement; as a rule, metal mesh is used, offered in rolls or cards. The reinforcement should have a thickness of 3 mm, the cell should have dimensions of 100x100 mm. During the laying process, an overlap should be ensured, which should not be less than 100 mm. It is preferable to install the mesh at the bottom of the floor, raising it to a maximum level of 25 mm in relation to the bottom edge. After the foundation preparation process, you can proceed to the installation of beacons.
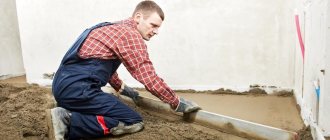
When carrying out work with your own hands, it is important to correctly install and securely fix the beacons, which will guarantee the evenness of the floor without level differences. Metal profiles (beacons) should be installed on tubercles prepared from gypsum or cement mortar parallel to each other at a distance that will allow them to support the rule
The prepared mixture should be laid within a couple of hours and in one go. A freshly laid screed needs maintenance, which requires regular moistening for a maximum of 6 days. A couple of days after installation, you should get rid of the beacons, and the remaining recesses and depressions should be primed, rubbing them using a solution. After the first 3 days of hardening, it is recommended to moisten with water and cover with plastic wrap; leave the base in this condition for 10 days.
Quality of the resulting coating
The finished screed should be checked for the presence of internal voids.
To check the quality of the floor, you should use the rule that the gap between it and the surface should not be more than 4 mm. The percentage of deviation from the horizon should not exceed 0.2. After the screed has been checked for curvature, uniformity and horizontality, you can begin tapping it. For this you will need a wooden hammer; the sound should be solid at all points, but not empty. If the filling gives non-standard deviations from the level, the flaws can be eliminated using self-leveling mixtures.
If the screed, which you built yourself, has formed cracks, they must be enlarged, primed, and then eliminated using a thick solution. If voids are identified, it is recommended to remove the exfoliated areas. The bare surface must be primed and sealed with mortar.
Screed on a wooden floor: technology
The wooden floor must be strong, immovable, dry and not rotten. The same applies not only to the floor boards, but also to the joists and pillars on which it is laid. Rotten boards need to be replaced.
Important! Do not screed on a newly laid wooden floor; it may become deformed. The age of the wooden floor for screed must be more than one year when the floor is used in the range of home temperatures. Although I can’t imagine who needs to screed a new wooden floor.
The heads of the nails with which the boards are nailed need to be recessed a few millimeters so that they do not tear the layer of waterproofing film that needs to be laid on top of the boards.
If your apartment is on the ground floor and there is a basement or ground below you, then the seams between the boards need to be filled with epoxy putty. Epoxy putty is chosen because it does not allow moisture to pass through. The seams are sealed so that evaporation does not form between the film laid under the screed and the boards.
If the joints between the wall and the floor are wide, then seal them with construction foam, and on top with epoxy putty and liquid waterproofing.
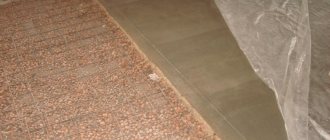
After the putty has dried, polyethylene 200 microns thick is spread on the wooden base. Polyethylene is spread with an overlap of 10-15 cm on the walls. Two adjacent pieces of polyethylene are laid with an overlap of 20-25 cm. Seal the joint between the pieces of polyethylene with non-wetting mounting tape. Tape the overlaps to the wall with tape.
The polyethylene should lie flat, without folds. Under the polyethylene there should be a clean wooden base free of debris.
Materials and tools used in the work
The mixture required for semi-dry screed in a wooden house consists of the following components:
This mixture cannot be called liquid; rather, it is dense and wet, reminiscent of sand. It is prepared directly on the work site; it does not need to be mixed in advance and delivered ready-made.
The floor intended for screeding is pre-cleaned. Then the machine - a pneumatic blower - mixes and delivers the mixture to the work surface (this is very convenient, since the room is not at all contaminated when preparing the mixture). The poured surface is leveled using a grinding machine.
For which rooms is semi-dry screed suitable?
The scope of application of screeds created using the semi-dry method is quite wide. They are used both in new buildings, where the floor is usually of quite high quality, and in old houses, where the floor seems to have survived carpet bombing (in advanced cases, it is simply necessary to lay the mixture in a thicker layer).
The semi-dry method is also successfully used in offices. Country cottages and private houses, industrial premises - such a screed is appropriate everywhere, as it perfectly levels out unnecessary slopes of floors and surfaces of complex shapes.
This method is very attractive for everyone who has a deadline for repairs - with a semi-dry screed they turn out to be as compressed as possible, and the quality of the repair does not suffer at all! A semi-dry screed will also help out when the building has thin, “flimsy” floors - nothing will collapse or crack, since this screed weighs relatively little without losing its insulating qualities.
What types of screeds are made using the semi-dry method?
This method is quite universal. It allows you to create the following screeds:
Advantages of semi-dry screed in a wooden house
You can evaluate the advantages of this method for yourself:
Source
Preparation of mortar for screed
Let me remind you that we make a screed from a mixture of leveling agent. Make the solution according to the instructions on the package. The leveler mixture is added to the water, not the other way around. The mixture is stirred mechanically with a mixer at low speed until it becomes thick sour cream.
How to check the thickness of the mixture
To check that the consistency of the mixture is correct, find a container with a diameter of 70 mm so that it can hold 1 liter of solution. From this cylinder, pour 1 liter of solution onto a 50x50 cm plexiglass plate. The diameter of the spread solution should be 34-38 cm. This means that the density of the solution is correct. The density of the solution must be checked constantly.
Which plywood to choose
Plywood is a multi-layer wood-sheet material that is made by cross-gluing an odd number of layers of rotary-cut veneer. For production, birch raw materials or technical grade conifers are most often used, less often - oak, beech, linden and others.
Advantages of plywood:
- high mechanical strength to any load;
- relatively light weight;
- low thermal conductivity coefficient;
- acceptable level of humidity (8–12%), which allows the use of some types of plywood in damp and unheated rooms: kitchens, bathrooms, balconies, loggias, etc.;
- use in combination with water- and infrared-type “warm floor” systems.
The disadvantage of sheet material is that the production uses adhesives that are unsafe for human health. As a rule, products are assigned an emission class of at least E1.
Plywood products are classified according to the following criteria:
Scope of application.
The areas of application of sheet material are limitless - from construction to electrical engineering. But to form a prefabricated screed or finished floor, it is recommended to use structural and construction varieties.
Brand.
This parameter is determined by the type of adhesive used. Let's consider three basic types:
- FSF (plywood glued with phenol-formaldehyde resin glue). The product is considered moisture resistant and is used for finishing rooms with normal and high humidity levels.
- FC (plywood glued using urea-formaldehyde glue). Refers to products with average moisture resistance, recommended for use in dry rooms.
- FBA (plate on albumin - casein glue). Positioned as a material of limited moisture resistance.
Variety
According to GOST 3916.1–96, products differ in the number of permissible defects and defects of wood, as well as defects during processing. There are five degrees of quality:
- E – extra or elite. The product is made of oak, alder, birch and other species, has a perfectly flat, smooth surface, without the slightest defects. Slight deviations in the structure of random wood are allowed.
- I – pin and healthy light or dark knots are possible – no more than 3–5 pieces. for every square meter of surface. Cracks (except for closed cracks) and other types of defects are excluded.
- II – healthy, partially fused, unfused and falling out knots with a diameter of up to 6 mm, wood inserts and open cracks up to 200 mm long and no more than 2 mm wide are allowed.
- III – there are: a) wormholes and holes from fallen knots with a diameter of up to 6 mm in an amount of no more than 10 pieces. per 1 m² of area; b) diverging cracks 300–600 mm long and up to 5 mm wide (subject to sealing with putties or sealants); c) dents and scallops.
- IV – surface with all kinds of defects: from fused and fallen knots without limiting the number to defects along the edges up to 5 mm deep.
For subfloors on joists, as a rule, sheet material of quality grade 1–4 is used. Please note: Plywood is usually double marked, such as 1/2 or 2/2. Matches the grade of each side. That is, a product of class 1/3 is characterized by the fact that one surface is assigned category 1, and the second - 3.
Nature of processing.
Sanded and unsanded plywood.
Plywood boards can be sanded or unsanded. Marked:
- Ш1 – processed only on one side.
- Ш2 – polished on both sides.
- NS – unpolished.
Laying the floor along the joists is done using slabs of any type. But common sense dictates that it is better to use products that are polished on at least one side. This will allow you to create the most even and smooth floor for installation of linoleum, laminate, etc.
Dimensions.
The length of plywood sheets can reach 6 m, width 3 m, and thickness starts from 3 mm. For roughing and finishing work on horizontal bases, the following material is used:
- 1525x1525 is the most commonly used size for floor joists. The amount of waste is small and convenient to transport.
- 1210x2440 – for leveling bases in multi-storey buildings of standard series with elongated room shapes.
- 500x3000 - convenient for multi-storey or commercial new buildings, where the principle of studios or open plan is implemented.
The optimal thickness of plywood for floor joists depends on the type of prefabricated screed and the level of load. If installation is planned in two layers, then it is better to choose products with a cross-section of 8–12 mm, and for single-layer installation – 8–22 mm.
Caring for a poured screed
There should be no drafts or low temperatures in the room with the screed. If you did use a solution from CPS, then cover the screed with polyethylene. The anhydrite self-leveling floor must be protected for 2 days from excessive insolation (direct rays of the sun), too high a temperature, drafts and water. After two days the room needs to be ventilated.
Some conclusions of the article
- Before screeding, evaluate the structure of your wooden floor;
- Cement-sand screed is very heavy and will put a lot of stress on the wooden floor, so you may have to reinforce the wooden floor;
- If possible, replace the DSP with a high-quality leveler for an independent screed;
- DSP screed on a wooden floor is cost-effective only for small rooms, kitchens, and bathrooms;
- Think a hundred times before using a screed on a wooden floor in houses with wooden floors, remember the load.
- And one last thing. If you plan to use tiles as finishing, replace the screed on the wooden floor, if possible in level, by laying cement bonded bonded boards (CBB).
©Opolax.ru
Other articles on the topic: Wooden floors
- Home wood protection
- How to level a wooden floor
- How and with what to drill wood correctly?
- How shelves and paintings can change the interior
- How to choose the right tongue and groove floor board
Installation of beacons
Laying reinforcing mesh and guide beacons
It is strictly forbidden to attach guide beacons to the floor with screws or nails. It is best to lay them on flat cakes or beds of mortar.
The outer beacons are installed at a distance of 20 cm from the walls (see video). And the step of the guides relative to each other is 1-1.2 m, but not more than the length of the rule.
It is better to use guide profiles for drywall as beacons.
Installing beacons along the mortar beds will make it easier to level them to the level of the finished floor. The beacon can be sunk deeper into the solution or raised higher by adding more mixture, thereby achieving the desired mark (see video).
Advice: if you do everything yourself, then keep in mind that after preparing the solution, it is better to lay the beacons within an hour.
Basic information
Pouring floors with a corrugated sheet base is the creation of a monolithic slab with increased strength and a margin of safety. In production, galvanized profiled sheet is used, a material with polymer protection, which is the basis. It performs the function of a stationary formwork, filled with concrete mortar. Metal frames absorb the force load.
Floors based on corrugated sheets and concrete mortar, if calculated correctly and in accordance with all design rules, have a long service life and high strength. Compliance with all necessary requirements and proportions determines the reliability of the building and the safety of the people in the building.
Specifics of reinforcement
Thanks to reinforcement, the strength characteristics of one material are increased with the help of another, which has increased rigidity. If we talk about corrugated sheets, the reinforcement is done with steel wire. The power circuit located inside the structure allows the concrete to withstand increased loads.
Longitudinal rods with a diameter of 12 mm form the frame. Laying is carried out along the channels of the sheets. The frame parts are attached to each other by welding or wire.
When the corrugated formwork is constructed, you can begin concreting
Preparing the base
Before you make a screed on a wooden floor yourself, you must carefully prepare the surface. For this:
- Dismantle the boardwalk and carefully check all elements for damage and the presence of mold and mildew. Degrease the surface and get rid of any remaining glue. Be sure to remove any debris that has accumulated under the floor. For this, it is best to use a construction vacuum cleaner (if you watch the video below, you will understand why).
- The distance between the logs should be no more than 40 cm. If they are located further from each other, then install auxiliary beams between them.
- If wooden joists are not securely fastened, secure them with self-tapping screws.
- Reinstall the boardwalk and secure it with nails, recessing their heads by 2-3 mm.
- Turn over damaged floorboards (if the damage is too severe, it is better to replace them).
- Remove the baseboards and install thin slats instead that will cover the gaps between the wall and the base. There is no point in attaching these boards “tightly”, since they are then dismantled anyway.
- Seal all cracks in the base. For small potholes, you can use sealant or parquet putty based on wood dust (4 parts sawdust to 1 part oil paint), and for deep ones, use mounting tape.
After this, marking is done. To do this, using a level, mark a zero level around the perimeter of the room (approximately at a height of 35 cm from the wooden base) and set equal distances from it, taking into account the thickness of the screed.
Important! The thickness of a floating floor screed in a wooden house should not exceed 5 cm. Each extra centimeter of the slab will exert a load on the plank base equal to 110 kg per 1 m2.
At this point, the preparation is complete and you can begin waterproofing.
Advantages of overlapping with corrugated sheets
Overlapping with corrugated sheets is characterized by the following advantages:
- Low cost of material and installation work. Since installing the ceiling is easy with your own hands, financial costs remain minimal. The material itself is sold at an affordable price.
- Possibility of implementing any architectural solutions and installation of different geometric shapes.
- The pouring process is relatively simple and eliminates the need for formwork. The use of ridges reduces the consumption of concrete mixture, which also has a positive effect on the final cost of the work.
- Even an inexperienced beginner can complete the installation of the system.
- The finished floor is lighter than a reinforced concrete structure with removable formwork, while the strength properties remain at the highest level. As a result, the system does not place large loads on the foundation and remains an effective solution for old buildings. With the help of a profiled sheet, you can achieve proper distribution of effort.
- Being an indispensable component of a monolithic structure, corrugated sheeting takes on the role of a reinforced frame.
- The thickness of the floor is determined by the location of its operation. In order for them to meet the required standards, a number of calculations need to be performed.
- The finished slab has good strength, and the presence of a metal profile strengthens the structure and gives an increased degree of rigidity.
- There are different brands and types of corrugated sheets available in the market. This expands your choice and allows you to find the best option for any application.
- The material is characterized by increased resistance to ignition. Fire resistance indicators are 30 minutes, and if we are talking about a monolithic system with a reinforced span - 45 minutes.
- The ceilings between floors are characterized by reinforced formwork, which allows you to install the ceiling without a finishing layer or other installation work.
- Corrugated sheets are indispensable for rooms with a metal frame. To connect the columns, reinforcement is used, making the frame rigid and resistant to various negative influences.
Due to its light weight, rigidity and resistance to corrosion processes, corrugated sheeting is very popular and is used for the construction of buildings for various purposes.
When bound to the concrete mixture, it takes on part of the loads on the floor slabs. The monolithic element is fixed on a lightweight supporting frame, which reduces the cost of forming foundations and purchasing wall materials. They use lightweight gas blocks or foam blocks. The concrete solution is poured onto corrugated sheets without the use of complex formwork.
If you follow the basic rules of operation and maintain the structure on time, it will demonstrate better strength and resistance to negative influences.
Also, slabs based on corrugated sheets are characterized by minimal weight and look neat. By installing such a solution in your home, you don’t have to worry about finishing or insulating layers.
The material is convenient to use and easy to transport.
Protection, operation, storage
In order for plywood to serve for many years, you should know some of the nuances of working with it:
- The material should be acclimatized. 24 hours - with minimal temperature deviation in the store and the room for working with it. 4-6 days – with a difference of 9-12 °C, taking into account the humidity in the room. More than 7 days - with significant differences in temperature conditions, with defects in sheets, and high humidity.
- The damp atmosphere will destroy the material. Use in a damp area is prohibited.
- Laying is carried out only at 19-29 °C.
- Auxiliary processing of the material improves wear resistance and protection against fungi. The use of varnish improves strength, and the use of glue improves moisture resistance.
According to the above data, we can say with confidence that this is the best material for laying on the floor.
What do you need to know before installation?
To check the room for humidity, lay out a film
How to make a plywood floor in compliance with all technological requirements so that it lasts a long time and you don’t have to regret your decision to use such a material?
To do this, you need to perform several steps and only then proceed with installation. First of all, it is recommended to acclimatize the sheets to the place of application. To do this, the material must be brought into the room that is planned to be covered.
The material must be allowed to rest at room temperature.
The period after which work is allowed to begin depends on changes in temperature and humidity conditions. If the conditions are almost identical, installation can begin the next day. With a difference of 10 degrees or more, acclimatization will take more than a week. All this time, the sheets should be stacked in a horizontal position.
While the material is acclimatizing, you can check the floor surface for the presence of condensate vapor. To do this, a polyethylene film is spread over an area of 1 m2, the edges of which are pressed tightly to the floor. The central part should be raised by 5 - 10 cm. Then you need to observe and draw appropriate conclusions from what you see:
- The film fogged up within 1 day - it is not recommended to make plywood flooring for this room.
- Within 2–3 days, small drops appeared. The concrete base must be insulated and covered with waterproofing. It is recommended to disassemble wooden floors, dry them, treat them with antiseptics and eliminate the cause of high evaporation. Otherwise, they will rot in 5–6 years. Only after this can you begin laying plywood sheets.
- In 5 days no drops of condensation appeared - a plywood floor can be made using all known methods.