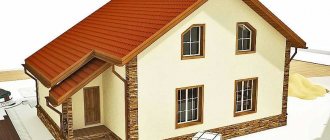
Wood concrete is a very unique building material and various technologies are used for its finishing. Plastering wood concrete walls with a plaster mixture is the first and main method of exterior finishing of a house. The principle of finishing is that it is necessary to avoid materials that can harm the wood concrete. Due to the fact that this building material has a large-porous structure, it must be finished to prevent moisture penetration. If moisture gets inside the material, it will begin to deteriorate from the inside. The type of protective and finishing coating is determined in each specific case depending on the purpose of the building, its location, as well as the amount of funds invested in construction.
Moisture absorption of wood concrete
So, the water absorption of wood concrete is 85%.
Essentially, this characteristic shows how much water or moisture a material can absorb in relation to its own weight. And 85% is a very high figure. If you conduct an experiment by pouring a bucket of water onto a block of wood concrete, then in a few seconds some of it will appear on the back side of the stone. This only means that finishing the walls with wood concrete from the outside is the only possible option to prevent the irreparable consequences of the negative effects of moisture or water (for example, slanting rain). But here another question arises: how to decorate the house from wood concrete from the outside, because there are certain requirements for finishing.
Therefore, most often the external finishing (outside) of a house made of wood concrete is carried out using the following materials and technologies.
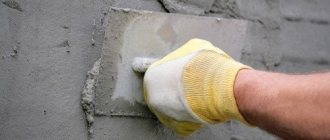
Plaster
This old-fashioned method of separating walls is ideally suited for wood concrete. In addition, manufacturers of plaster mixtures offer a huge range, where you can choose an option with the optimal price-quality ratio. Today, plasters on the market are presented in several compositions:
- cement-based;
- gypsum;
- limestone;
- decorative.
Cement plasters have minimal vapor permeability, but are suitable for outbuildings such as a barn, bathhouse and garage. It is better not to use gypsum solutions for the external cladding of houses made of wood concrete. They are well suited for interior decoration.
Decorative ones themselves are not used for exterior decoration. It is necessary to first prepare walls made of wood concrete blocks, for example, apply a rough layer of cement-sand mixture, and only then apply decorative solutions. But they are still rarely used.
And the best option is lime plaster, which has maximum vapor permeability.
Plaster application technology
In principle, for wood concrete, the traditional option of applying plaster mixtures using meshes is used. And although the surface of the blocks is quite porous, which ensures high adhesion, when plastering walls of a large area, it is recommended to install metal mesh with cells of 20x20 mm on them.
If there is a need to achieve maximum evenness of the walls with plaster, then use metal beacons, which are attached to the walls with self-tapping screws. Beacons are installed in increments of a maximum of 1.5 m.
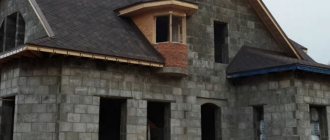
Brick cladding
Facing wood concrete with brick is another frequently used option. This technology has a fairly large number of advantages:
- presentable appearance;
- the sound insulation of walls and waterproofing are increased;
- the thermal insulation characteristics of the structure are increased;
- lined wood concrete is not exposed to the negative effects of moisture;
- its service life increases several times.
Cladding technology
Before you line arbolite walls with bricks, you need to understand that under the brick itself you need to pour a base of durable building material. Therefore, even at the stage of constructing the foundation of the house, it is necessary to take into account its width, where the addition in the form of brick cladding is taken into account. For example, if a special brick with a thickness of 60 mm is used for cladding (this is half the standard size), then 5-10 mm of the thickness of the bonding mortar layer must be added to its parameter. It is to this general value (65-70 mm) that it will be necessary to fill the width of the foundation structure. That is, this parameter is in addition to the standard width.
Decor and protection
Walls made of arbolite blocks can be plastered or sheathed with sheet material or panels.
The material shrinks by about 0.5% during the first 4–6 months (then the shrinkage practically stops), so it is better not to start finishing earlier than six months after construction, or to use elastic plasters and sliding lathing for a suspended facade.
The higher the density of wood concrete, the stronger the walls, but the worse the thermal insulation. The optimal value for low-rise construction is 500 kg/m3.
The plaster facade must have a vapor permeability coefficient of at least 0.09 mg/(m • h • Pa). The surface of the wood concrete firmly adheres to any plaster compositions - there is no need to use a mesh.
When installing a curtain wall, the walls are protected with a wind- and moisture-proof membrane, then a sheathing made of galvanized steel profiles or antiseptic slats is installed. Then you can choose any modern finishing material - wooden imitation timber or logs, vinyl siding, fiber cement or wood-polymer.
Features of internal and external finishing of arbolite walls
If you plan to use plaster as a cladding, then you must take into account that this building material should not be used for interior decoration of rooms with aggressive conditions.
Plaster mixtures containing perlite are good insulators, so after treatment the surface can be covered with wallpaper.
Also, lining is used for interior decoration, however, such cladding has its own disadvantages:
- high cost;
- high fire hazard;
- During installation, it is necessary to prepare a wooden sheathing.
For interior decoration, plasterboard is used, with which you can make any shape and create a unique room design. However, it also requires preparing a frame.
If we talk about how to cover the walls of a house from the outside, then the cheapest and most affordable option would be the same plaster. Some people prefer brick because of its heat and sound insulation properties, but in addition to its high cost, it requires constant maintenance. Although when installing bricks it is not necessary to prepare a layer of insulation, a gap of 40-50 mm must be left between the wood concrete and the brickwork to avoid moisture. In addition, for brick cladding it is necessary to install a good ventilation system, otherwise the wood concrete blocks will quickly collapse.
If you plan to do the work yourself, spending a minimum of effort and money, then it is better to give preference to ordinary plaster.
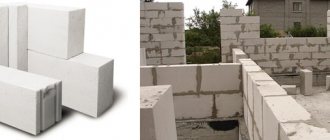
Arbolite blocks
is a building material for the production of which crushed waste from woodworking and sawmilling, water and high-quality cement are used. A small percentage of chemical additives is allowed. Depending on the components in the composition, there are different types of finished products: - made from sawdust.
To give them greater strength, manufacturers increase the mass fraction of cement. Due to this, strength increases, but the heat efficiency of the finished product decreases:
- Made from wood chips. A large percentage of wood chips ensures high elasticity and strength of the blocks.
- From a mixture of wood chips and sawdust. This type has average strength and thermal conductivity.
Based on their purpose and application, finished products can be divided into the following groups:
- Structural
- for the main masonry of walls (walls), construction of partitions, installation of armored belts, use as lintels over windows and doors. - Thermal insulation
– for insulating floors and walls (arbolite thermal panels).
The difference in the cost of 1 m² of wall of a standard block and a block with finished finishing
Attention! The calculations presented below, including the cost of wood concrete blocks, are current at the time of writing; current prices for wood concrete blocks can be found in the Price List.
To compare the cost per 1 square meter of wall, two types of wood concrete blocks were taken - a standard block without finishing and a block with external finishing “Mosaic” and internal porous finishing (warm plaster). In 1 square meter of wall there are 10 blocks of dimensions 500x300x200 mm. Let's consider the price of work and material for building a wall from a regular block and a block with finished finishing in order to understand the obvious difference in price.
One square meter of wall from a standard block without finishing:
- Blocks – 1470 rub/m² (10 blocks);
- Masonry adhesive – 120 RUR/m²;
- Work on laying blocks – 600 rub/m²;
- Work + material (mixture M150 consumption 19 kg/m² with a thickness of 10 mm) for external plaster – 400 rub/m²;
- Work + material (gypsum plaster consumption 8 kg with a thickness of 10 mm) for interior plaster with glossing and priming – 700 rub/m²;
- Work + material – primer and painting to match the color of the outside with silicone breathable (vapor-permeable) paint and – 900 RUR/m².
TOTAL: 4190 RUR/m² of finished wall.
One square meter of block wall with external finishing “Mosaic” and internal porous finishing (warm plaster):
- Blocks – 2630 rub/m² (10 blocks);
- Masonry adhesive – 120 RUR/m²;
- Work on laying blocks – 600 rub/m²;
- Work + material – puttying with gypsum putty (if you plan to paste wallpaper) and priming the surface – 600 rubles/m².
TOTAL: 3950 RUR/m² of finished wall.
As can be seen from the calculation, the difference in price per 1 m² of wall between a standard block and a finished block is 240 rubles. At the same time, the material used to finish the outside of the standard block is not decorative, and the internal plaster is not warm. If we take this fact into account and use external decorative plasters on a grid, tinted in color, and warm plaster for interior decoration, the cost of finishing a standard block will increase by more than 1000 rubles. per m² of wall and will amount to more than 5,000 rubles. In total, a house made from a more expensive block is cheaper than a house built and finished from a cheaper one, and the time saved and money spent on searching, purchasing and delivering finishing materials and qualified specialists is still the same plus for a block with ready-made finishing.
Manufacturers
When choosing suitable wood concrete panels for the construction of load-bearing partitions or other structural elements, one cannot limit oneself to only assessing their dimensions
It is very important to take into account the reputation of manufacturers and their compliance with standard requirements
First of all, it is worth considering the products of the Ivanovo Design Bureau "Sfera". Dozens of other Russian factories produce wood concrete using the equipment of this particular company, and this fact already means a lot. No less high-quality blocks are made at another enterprise from the Ivanovo region - at the TPK “Pilim Doski”. This company has allocated a separate heated room for the so-called maturation of its products.
Slightly less advanced, although larger, panels are made in the vicinity of Dmitrov near Moscow. Tver LLC "Arbolit 69" only recently began work. But in the Arkhangelsk region, in the town of Nyandoma, Monolit LLC has been operating for several years. They make blocks of a special, “northern” format.
Differences in wood concrete production technologies
Calling things the best, of course, we can say that they must be of high quality. A high-quality product is the key to your growth, trust in you, peace of mind for each unit sold and to the consumer.
Speaking about the best wood concrete, it must be said that the best wood concrete is a wood concrete manufactured without violating technology, shipped to the client on time, and serving for decades. Today there are two main methods for producing wood concrete products. The first production method, which all our equipment uses, is based on the method of sealing wood concrete into molds and then keeping them in a drying chamber. The second production method is based on instant formwork, when a newly formed block on a press matrix is transported on a pallet without formwork to a drying chamber. Let's look at these two methods and see which one is preferable.
Errors allowed
Errors that result in a house being deprived of heat:
- It is imperative to plaster the walls of the house on both sides, otherwise the wall will be blown through, or the wood concrete itself will no longer retain heat. It is necessary to create conditions under which the air in the pores of the wood concrete will be motionless.
- According to GOST, for external arbolite plaster a layer of at least 2 cm thick is required. For internal – 1.5 cm.
- Before plastering, some limit themselves to just priming. This does not solve the problem of water being drawn out of the solution.
Plastering wood concrete is not such a complicated procedure in itself. But the entire result depends on the thoroughness of the work.
Facade arbolite blocks
Arbolite façade block
Size – 20*30*50 cm
Size – 20*30*40 cm
In 1 2 m – 33 / 41 pcs.
Arbolite façade block
Size – 20*30*50 cm
Size – 20*30*40 cm
In 1 2 m – 33 / 41 pcs.
Arbolite façade block
Size – 20*30*50 cm
Size – 20*30*40 cm
In 1 2 m – 33 / 41 pcs.
Arbolite façade block
Size – 20*30*50 cm
Size – 20*30*40 cm
In 1 2 m – 33 / 41 pcs.
Basic materials for insulation
Wood concrete and insulation are recommended to be used in tandem for the construction of a building in Russian conditions. Some owners decide to leave the material without an additional layer. In this case, the wall should be at least 30 cm thick. This is a budget option. A facade should be built with a thickness of 37 cm. Thanks to this, significant savings will be possible. How to insulate wood concrete, the thickness of which is 30 cm? The layer must be at least 5 cm. Additionally, vinyl siding is mounted on top.
It is not recommended to insulate a house with polystyrene foam. In this case, the wood concrete will completely lose its vapor-permeable properties. When using this material in a building, additional ventilation will be required. This option is unacceptable, because it leads to significant heat loss. However, penoplex can be used to seal cracks on blind areas. What is the best way to insulate a house made of wood concrete? It is recommended to choose materials that do not interfere with the natural circulation of air inside the wall surface.
In central Russia, it is recommended to install walls made of wood concrete with a thickness of at least 30 cm. Insulation on top is carried out with mineral wool. Its thickness on the outside of the building should be at least 10 cm. We have already figured out whether the walls need to be insulated. Now let’s highlight the advantages of this type of material:
- A simple and cheap way to insulate. The surface will be properly ventilated.
- There is no need for preliminary preparation of the wood concrete surface. Mineral wool is attached to the sheathing or without it.
- The material retains moisture, but does not interfere with natural evaporation.
- Insulating a wooden house from the outside with wood concrete also requires an outer layer of mineral wool. Over time, you can only change one slab, and not the entire surface.
Ecowool is also considered an excellent option for insulating wood concrete. The material is completely natural. It is made from cellulose with the addition of a small amount of boric acid. It is recommended to insulate wood concrete in a bathhouse with this material, because it cannot harm the human body. Installation is carried out using glue or dry method.
Ecowool, as a material for wood concrete insulation, has the following advantages:
- Environmentally friendly composition.
- Installation is carried out by blowing. Additionally, you can use the dry or glue method.
- The composition does not contain harmful toxic components that can negatively affect human health.
- Insulating the ceiling with wood concrete will cost much more. Ecowool can be combined with wooden coverings. The material will not allow mold or mildew to form. Insects and rodents cannot live and reproduce in such a surface.
- To install insulation, special equipment is required. The result is a coating without seams. To do this, you will need to contact specialists in this matter. Unfortunately, you will have to pay extra for their services.
- The work is done quickly and efficiently. In this case, the coating will last a long time and without visible damage.
The choice of insulation directly depends on the preferences and financial capabilities of the owner. In this case, one should take into account the main features of the material that was used to build the walls. Proper insulation of wood concrete will create optimal conditions for indoor living at any time of the year. Otherwise, the risk of walls freezing in winter increases.
How to insulate a house made of wood concrete?
If the decision to insulate a house from wood concrete is nevertheless made, then almost any thermal insulation material can be used for these purposes. The walls of an arbolite house are usually compared with wooden ones, and wood, as is known, has excellent vapor permeability, which allows you to choose from any insulation material you like.
This can be either polystyrene foam, as a budget option, or something more expensive, for example, the same penoplex. The difference will only be in the density of the insulation, its cost and some other performance qualities. It should be understood that arbolite walls are very fragile, which negatively affects the fixation of fasteners inside them.
Therefore, before insulating a house from wood concrete, you should think about this point in advance and choose dowel umbrellas of a suitable diameter and size. You can insulate a house made of wood concrete using mineral wool. However, this will require assembling a sheathing, into which this insulating material could then be laid.
In addition, the sheathing will have to be finished with something on the outside; perhaps someone will prefer siding, while others will prefer lining; there is not much difference (except for aesthetics).
Wood concrete wall blocks
Arbolite wall block
Size – 20*30*50 cm
Arbolite wall block
Size – 20*30*40 cm
Arbolite wall block
Size – 20*20*40 cm
Arbolite block for partitions
Size – 10*30*50 cm
Arbolite block for partitions
Size – 8*30*50 cm
Arbolite block for partitions
Size – 10*30*40 cm
Arbolite block for partitions
Size – 8*30*40 cm
Arbolite block for partitions
Size – 10*20*30 cm
Arbolite block for lintels
Size – 20*30*50 cm
Arbolite block for lintels
Size – 20*30*40 cm
Arbolite block for lintels
Size – 20*20*40 cm
Features of plastering indoors and on the façade of a building
In addition to the fact that the plastering materials used and plastering of OSB boards, performed indoors, differ from plastering outdoors in working conditions. During facade plastering work, select several days of dry, windless, warm weather. The workplace is covered with a canopy from the sun and unexpected rain. The air temperature should be above +5, but not more than +35°C.
Indoor conditions are more comfortable. Humidity (no more than 65%) and the absence of drafts are of great importance here. Fans and heaters cannot be used to speed up the drying process of plaster solutions. Violation of the conditions will lead to the appearance of cracks. Before plastering, de-energize the electrical wiring.
Thermal panels
Thermal panels combine the appearance of facade tiles and the thermal insulation properties of insulation. This building material is valued for its visual appeal, reliability and excellent technical characteristics. Thermal panels are made of polystyrene foam and polyurethane foam.
Advantages of thermal panels:
- Moisture resistance.
- Excellent performance properties.
- Immune to sun exposure.
- Possibility of mounting on a variety of surfaces - wood, brick, concrete, stone, etc.
- Natural and environmentally friendly.
- High thermal insulation properties.
- Excellent sound insulation.
- Possibility of installation under any weather and temperature conditions.
- Ease of installation.
- Inability to spread fungi or mold on thermal panels.
- Huge selection of colors.
The only downside is the cost of materials. The price includes both external finishing and additional insulation.
How to plaster wood concrete
To understand whether wood concrete can be plastered, and how the plaster coating and wood concrete are adjacent to each other, it is useful to know more about the material itself. This is lightweight concrete in the form of blocks, the base (binder) of which is cement, and the filler is wood chips, that is, organic matter.
The blocks are manufactured in factory production conditions. Their shrinkage also occurs there, so it is believed that arbolite walls do not shrink. This is not entirely true, but the shrinkage is really negligible.
Arbolite blocks readily absorb water when immersed in liquid, but, absorbing moisture from the air, they do not accumulate it. Walls must be protected from moisture, since the influx of water has a destructive effect on the composite.
The blocks breathe well (up to 35% vapor permeability), so the protective coating should not be an obstacle to this breathing. On the contrary, there is a rule that each overlying layer must have a vapor permeability higher than the underlying one.
This requirement sharply reduces the choice of material for protecting arbolite walls. Therefore, the protective finishing of walls mainly comes down to rough plastering.
For example, for a heat-preserving plaster mixture, crushed expanded clay, vermiculite granules or perlite are used as a filler. You cannot use slag, foam glass or foam chips for insulation, since they sharply reduce the vapor permeability of the coating.
In addition to protective rough plastering, the walls need to be improved in appearance. That is, finishing is needed. They improve the appearance by resorting to decorative plaster or cladding with other finishing materials, for example, clapboard.
Wood concrete plaster can be:
- single-layer (rough);
- two-layer (rough + finishing).
In addition to the mentioned properties, wood concrete has a surface roughness suitable for plastering. This frees up the hands of plasterers, since there is no need for special preparation of wood concrete walls for plastering to increase adhesion. However, the structure of the wood concrete itself contributes to an increase in the consumption of the plaster mass of the first layer.
Let’s move on to what is used to plaster wood concrete, not forgetting to take into account the characteristics of the material. Increased consumption of the solution affects the cost, therefore, for rough plaster, compositions with binders such as:
- cement (suitable for facades, as well as for wet rooms);
- cement with lime or gypsum additives (additives increase the vapor permeability of the coating);
- lime (used for interior work and leveling facades);
- clay (successfully used for leveling and decoration);
- gypsum (finish plastering for interior work);
- other types of bases (for decorative finishing of facade surfaces and plastering of room walls).
Plaster compositions can be prepared from individual components with your own hands, knowing the proportions (the cheapest way). Dry mixtures can be purchased. If the compositions are made on site, then there is no need to introduce anti-corrosion and antiseptic components (arbolite does an excellent job with its “remedies”). You can also buy a ready-made solution.
Considering that the blocks are capable of absorbing a large amount of water from the applied solution, measures are taken to protect the plaster compositions from dehydration.
There are two ways:
- block wetting;
- adding a water-retaining additive to the mixing water.
If such measures are not taken, the wood chips draw from the solution the liquid necessary for the chemical reactions to take place; as a result, the solution cracks and dries out without gaining its strength.
Basic Process Stages
This instruction is intended to review the main stages of the work, so that it is easier for novice craftsmen to navigate when applying the mixture. According to this scheme, both internal and external plastering of walls is carried out. In this case, the material of the side planes does not matter much, however, there are some subtleties when working with certain types.
Surface priming
The adhesion of the solution to the base can be improved if the vertical edges are treated with a special compound. Concrete contact is usually applied to smooth surfaces. When plastering arbolite walls, as a rule, a primer with deep penetration is used, because this material has a porous structure.
Installation of guide profiles
To determine the location, preliminary marking is carried out, after which the elements are attached to the surface.
The main advantage of using guide plates is the possibility of quick installation, with no special skills required.
- First, the side surface is examined for vertical deviation, for which a two-meter level is applied to it. If there are depressions and bumps, they are marked with a marker.
- Next, markings are carried out to determine the location of the metal beacons. The distance between vertical elements depends on the length of the rule used.
- Self-tapping screws are fixed along the edges using dowels. If the walls are to be plastered from timber, then the fasteners are screwed directly into the side plane.
- Before metal profiles are installed, all screws must be aligned. To do this, the cord is usually pulled diagonally. With this option, it is possible to correctly set the beacons.
- After installing the landmarks in the form of self-tapping screws, the profiles are fastened. Small piles of the mixture are made between the fasteners. By pressing through the rule, the beacons are deepened until they stop.
Note! When plastering walls in a Khrushchev building, special attention is paid to the evenness of the guide profiles, since most often such buildings have curved surfaces.
Self-application of the mixture
At this stage, the side surfaces are coated with a special composition, the price of which is usually not very high, unless it is necessary to improve the characteristics of the finishing layer.
To avoid deformation of the wooden rule, it is advisable to cover it with waterproof paint, then the main tool will serve for a long time.
- Immediately after installing the beacons, you can begin applying the solution to the side edges of the room. To do this, fill the bucket one third with water, and add the dry mixture inside and mix thoroughly with a mixer.
- Using the cape method, the finished composition is applied to a vertical surface. A spatula is used as a basic tool. The layer of finishing mortar must be sufficiently dense and protrude beyond the profiles.
- Using the mixture, the mixture is evenly distributed between the vertical beacons. The movement is carried out from the bottom up along a zigzag path, and the solution is thrown from above.
Attention! If you are plastering walls made of shell rock, it is recommended to wet it before applying the mixture, otherwise the finishing material will quickly give up moisture and crack.
Grouting the surface
The final leveling of the finishing layer is carried out after it has hardened. During the work, a wooden grater is used, which is applied to the side plane and moves in a circle, producing high-quality grinding.
- Any irregularities and bubbles that appear must be repaired without fail, because this is due to the fact that the main composition does not completely reach the side surface.
- When plastering wood concrete walls, it is recommended to use a vapor-proof mixture with good moisture-resistant characteristics on the outside.
- If differences on one plane exceed 5 cm, then the solution must be applied in two layers. The first of them is thrown on immediately without preliminary leveling, and the second is laid after a couple of days.
Peculiarities
Since ancient times, builders have been continuously looking for an answer to the question - how to lighten the walls of houses while maintaining their strength, normal thermal protection and other valuable parameters? The appearance of each new type of wall materials immediately causes a stir precisely for this reason. Arbolite panels have a number of positive aspects:
- they are environmentally friendly;
- do not allow heat to pass through;
- effectively suppress extraneous sounds;
- allow for decent air exchange with the external environment.
Wood concrete wall blocks are made by combining crushed wood and carefully processed cement. This combination allows you to simultaneously achieve:
- significant strength;
- resistance to insects and microorganisms;
- minimal thermal conductivity;
- resistance to open fire and strong heat.
If the production technology is followed, the mechanical strength of wood concrete sheets can reach 30 kg per 1 sq. cm. This material withstands impacts very well. Its bending resistance can vary from 0.7 to 1 MPa. The difference is associated not only with the nuances of technology, but also with the degree of wear and with the peculiarities of the use of structural material in construction. As for the class of biological resistance, the manufacturers of the material guarantee complete immunity to pathological fungi, including any form of mold.
It is worth noting that wood concrete sheets transmit more heat than other conventional building materials, including brick and aerated concrete. Therefore, it is necessary to increase the thickness of the walls to compensate for heat losses. A much more serious problem, however, is the high level of moisture absorption. It can reach 75 and even 85%. Because of this property, wood concrete cannot be used to construct entire walls: the base has to be made of a different material, and all structures are carefully covered with decorative protection.
A positive feature of wood concrete is its high vapor permeability. It allows you to maintain normal humidity in the house, even if the weather is damp and chilly. The material is considered to stably withstand frost (30 and even 35 cycles). Therefore, it is recommended for the construction of country houses and other buildings that do not have constant winter heating.
A minimum of sounds with a frequency from 126 to 2000 Hz leaks through SIP panels made of wood concrete. Namely, it is in this frequency range that the lion’s share of the noise that so disturbs owners of private homes is located. The shrinkage of an arbolite wall, subject to construction technology, is 0.4 or 0.5%. This level is completely uncritical for any residential building.
Wood concrete walls are easy to cut, drill and saw. It is easy to hammer nails into them, screw in self-tapping screws or bolts. All this allows us to significantly speed up repair and construction work. Since the structures are relatively light, a simple foundation can be made for them with minimal costs of materials.
How to choose a bathhouse project?
If you have firmly decided to use wood concrete, it is time to decide on the dimensions. Quite often, a bathhouse on a suburban site is built with a second residential floor, and in this case, the search for a suitable project has its own characteristic features. The total size of the building is selected according to how many people will use it at the same time. For the constant, systematic use of a bathhouse of this kind, it is necessary to build an almost complete suburban dwelling. In this case, it is also recommended to choose projects that allow, in addition to the steam room, to place on the ground floor a leisure room, a gym and some other utility rooms.
Since even when using lightweight wood concrete, the total mass of a two-story bathhouse is quite large, placing it on a lightweight columnar base is irrational.
As for heating, perhaps the best choice is heating with a double-circuit gas boiler. At the same time, on the ground floor, in order to maintain traditions and the necessary color, an ordinary heater stove is installed.
In places with a harsh climate, it is useful to place such water sources inside the bathhouse itself. For obvious reasons, it is worth placing a staircase leading to the second floor inside. Since it is difficult to place everything you need in a limited area, sometimes you have to turn to professionals to create an individual project.
Advantages of plastering arbolite walls
When applying plaster to wood concrete, you can significantly improve its characteristics, since such a coating performs the following functions:
- Heat-protective. The house remains warm without the “steam room” effect. Due to its good vapor permeability, the plaster allows the wood concrete to “breathe”.
- Soundproof. If the plaster is not painted, it will reliably protect you from unwanted noise.
- Waterproofing. Plastered wood concrete repels water, so rooms with high humidity (but not more than 70%) do not require additional finishing. To enhance the water-repellent properties when applying plaster, it is recommended to use a shotcrete machine.
Plaster is also necessary if the walls of the building are exposed to aggressive acid fumes.
Another advantage of plaster is its composition, which forms a rough surface, allowing for a high level of adhesion of the plaster material to the wood concrete surface. In this case, you will not have to additionally process the walls and prepare them for finishing.
In addition, the plastered facade of the building needs to be updated no more than once every 8-9 years. To do this, it is enough to “walk” the walls with a primer, spending a minimum of money on it.
If we talk about what exactly can be used to plaster wood concrete walls, then it is worth highlighting several types of this finishing material.
In forms or instant demoulding
Each produced wood concrete product must be stable both in characteristics and in geometry. Having many years of experience in research in the technology of manufacturing wood concrete products, it is not easy to obtain truly high-quality classic wood concrete with stable characteristics. Using the sealing method, we can say with confidence that this method is the best today. The production of wood concrete using this method will reduce defects to zero, and the geometry and performance properties of such a product will be the best.
Why is this method the most effective over another and why can’t it be produced with high quality on instant formwork. This is all due to the wood chips, which are in a chaotic state during laying, and when the block is pressed, at the moment the cement sets, the wood chips begin to return to their original volume, thereby breaking the nascent cement bonds.
Features of the use of wood concrete
When using construction technology from monolithic or block wood concrete, you need to remember some important rules. First of all, we are talking about waterproofing measures, which must be carried out with the highest quality and in accordance with standards due to the high hygroscopicity of the material.
Rules for waterproofing wood concrete structures:
- The distance from the ground mark to the bottom of the wall should be at least 50 centimeters.
- A waterproofing layer is laid on the top of the foundation/basement or a cement-sand screed is made, waterproofing it with liquid glass.
- All facade surfaces are reliably protected with cladding, plaster or hanging ventilated systems.
- The overhang of the cornice must be at least 50 centimeters.
Structural wood concrete is used in the construction of external monolithic walls with removable/non-removable formwork made of moisture-resistant chipboard, plywood, OSB, and boards. Permanent formwork also acts as a finishing layer. If a sliding or removable formwork structure is used in order to reduce the consumption of materials for finishing, it is advisable to wrap the boards with polyethylene or PVC film.
Even structural wood concrete when constructing a building of 2 floors or more requires mandatory reinforcement, a load-bearing frame and the creation of a reinforcing frame for installation of the coating.
Wood concrete of the heat-insulating type is used as insulation in three-layer walls of well masonry. It is also used in the construction of frame houses to fill cavities. Provided that strong waterproofing is installed, a screed made of monolithic wood concrete can be used as floor insulation.
What you need to remember when pouring monolithic wood concrete in winter:
Use of modifiers - to increase the plasticity and workability of the material, plasticizers (polymer gels, lime, dispersions) are used. The strength of the mixture can be increased by reinforcing and structuring additives
It is important to include antifreeze additives in the composition, which slow down the process of water crystallization. Optimal conditions at the construction site - for this purpose, heating structures (heathouses) are created in the form of greenhouse pavilions erected around the site. Such a pavilion can be covered from the outside with tarpaulin, nylon, film, and a heat gun, convector, fan heater or infrared heater can be installed inside. Heating of concrete mass by electric waves - electrodes of different shapes are usually used: plate electrodes are placed inside on the formwork panels, rod electrodes are placed in the cement between the reinforcement, strip electrodes are attached on both sides of the formwork
Thanks to heating, it is possible to achieve full setting of the mixture and an optimal set of design strength.
additional information
This guide examines the main stages of wet finishing of premises and facades, as well as the requirements for the quality of the work carried out. To create a high-quality finishing layer yourself, it is enough to study the sequence of basic operations. In addition, there is a video in this article for an object lesson.
Arbolite houses are one of the most common today. Arbolite combines all the advantages of concrete and wood. This building material is very unique and various technologies are used for its finishing. The principle of finishing is that it is necessary to avoid materials that can harm the wood concrete. Due to the fact that wood concrete has a large-porous structure, finishing of wood concrete must be carried out to prevent the penetration of moisture. If moisture gets inside the material, it will begin to deteriorate from the inside. The type of protective and finishing coating is determined in each specific case depending on the purpose of the building, its location, as well as the amount of funds invested in construction.
What is wood concrete
Arbolite is a mixture of concrete and sawdust. Thanks to a carefully developed recipe, panels made from this material from the manufacturer are very attractive due to the following characteristics:
- building houses from such a “mix” guarantees low thermal conductivity of the walls and, as a result, comfortable rooms;
- wood concrete has a low mass, so the requirements for the foundation of houses are low;
- the material is absolutely environmentally friendly, there are no harmful emissions or dangers to human health, the scope of application is not limited in any way;
- wood concrete has the highest level of sound insulation, which makes it extremely attractive in the eyes of many consumers;
- frost resistance and effective service life of 25 years are guaranteed;
- There are no problems with finishing wood concrete panels. The walls of houses adhere well to plasters and adhesive masonry compounds; they can be painted, ventilated facades installed on them, or sheathed with siding;
- the material perfectly holds any fastener, which also looks like an attractive feature for the consumer - there are no restrictions on the installation of, for example, wall cabinets, especially considering the large thickness of the wood concrete panels.
Today, manufacturers offer several types of structures that can be used to build houses. These are panels with a thickness of 20 to 30 cm, dimensions 1200x2300 mm, as well as blocks, for example, 200x300x500 mm, the laying technology of which is the same as that of brick.
Advantages and disadvantages of wood concrete over other materials
Wood-cement composite is popular for several reasons:
- Low thermal conductivity, insulation for walls is not needed if calculated correctly;
- The house is almost as cozy as a wooden structure;
- Construction using wood concrete is accelerated thanks to large-sized blocks;
- The strength of wood concrete is equivalent to ordinary concrete, so it can be built using traditional technology;
- The blocks are easy to saw;
- The low weight of the products does not make transportation and transfer around the construction site difficult.
- Ventilation when filling the space between the chips loosely. The problem is solved by good façade cladding.
- The need for reinforcement creates cold bridges in the wall if the reinforcement protrudes beyond the wall plane.
To build or not to build a house from wood-cement composite material? Reviews about wood concrete blocks are mostly positive. A prerequisite is strict adherence to the technology of production of elements for construction and their installation. In this case, questions about the quality of house structures have not arisen for more than five decades.
Nuances of choosing exterior finishes
When deciding what to cover external walls with, you should take into account the climatic features of the region, the type of insulation used and the intended purpose of the facade
Experts recommend adhering to the following rules:
- For rainy, damp areas, it is better not to use a block house and wood analogues. Residents of cold regions should abandon metal siding, giving preference to thermal panels or DSP.
- Walls insulated with mineral wool can be lined with siding, block house or clapboard. The least suitable option is plaster. The wet façade is suitable for polystyrene foam and its derivatives.
- If the main purpose of the cladding is decoration, then the choice of material depends on the personal preferences of the home owners. If you need to additionally insulate a building using cladding, then it is better to use thermal panels and curtain wall facades (siding, fiber cement boards).
The exterior finishing of a frame house is made using various materials. From the standpoint of price-quality ratio, the best options are: thermal panels and DSP sheets. Expensive cladding from a block house can be adequately replaced by composite plank, and it is better to refuse façade bricks and labor-intensive plastering of walls.
Arbolite panels - raw material base, characteristics
Arbalite panels are a universal, environmentally friendly building material belonging to the group of lightweight concrete.
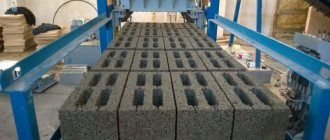
Like the more common wood concrete blocks, this wall material is made from recycled materials - wood industry waste (chips) and a binder - cement. There may be a small proportion of other plant raw materials (haylage, hemp meal). Treating wood with fire retardants ensures fire resistance of the slabs, while antiseptics and water repellents prevent putrefactive processes and reduce the hygroscopicity of the material.
During the processing process, the chips are transformed into a homogeneous needle-like mass, mixed with other components and loaded into molds, where they are compacted and pressed by vibration. What is typical is that the impact time of the vibration press on the workpiece is only 20 seconds - significantly less than the duration of molding other lightweight concrete. If the processing time is increased, the binder and filler may separate into fractions - the cement will settle and the characteristics of the slabs will decrease. Pressed slabs are left in a room with a certain humidity and temperature for several days to gain brand strength.
The finished wood concrete slab acquires a number of impressive characteristics:
- Reduced thermal conductivity – about 0.09 W/(m*C);
- High density - about 700 kg/mᶟ;
- Frost resistance – 25 cycles;
- Strength – M25;
- Flexibility - due to wood filler;
- Environmental friendliness - natural ingredients, the share of chemical additives is insignificant;
- Versatility - suitable for the construction of one-story houses and low-rise private construction.
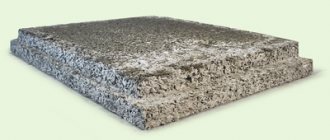
Arbolite slabs for external walls are produced with a facing layer - cement-sand plaster 1.5 cm thick, which greatly simplifies the external finishing.
The smooth surface, impervious to external influences, does not need finishing, only the finishing layer of any façade materials. If necessary, houses made of arbolite panels can stand for several seasons in a rough version until the owners have the funds for finishing.
Wood concrete wall panels
In addition to high performance, wood concrete wall panels have another advantage - the speed of box construction is superior to a similar process, even compared to large-format blocks and permanent formwork. The manufacturer produces wall elements of several configurations, from which the box is mounted without additional manipulations. When ordering material, the quantity of all segments is clearly calculated.
- Large slabs - main wall panel: 230x118x30-40 cm or 229x118x28 cm (height/length/thickness);
- Narrow panels - addition, top lintels (230x60x30-40 cm or 229x58x28 cm);
- Panels for windows – 80x118x30-40 cm and 80x60x30 cm, 81x118x28 cm and 81x58x28 cm.
- Ordinary lintel block – 58x178x28 cm;
- Reinforced lintel block – 58x238x28 cm.
Dimensions and equipment differ depending on the manufacturer, but all slabs are characterized by the presence of a grooved connection system that eliminates cold bridges. Since work with slabs is carried out using lifting equipment, each has fastening reinforcement loops.
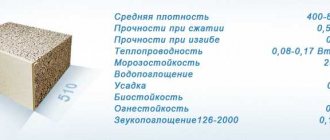
Specifications
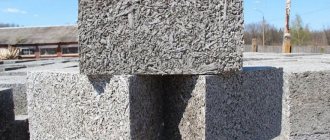
Wood concrete is produced in the form of gray wall blocks measuring 500x300x200 mm and partition blocks measuring 500x150x200 mm. The thermal panel has dimensions of 820x620x80 mm.
Here are some basic technical characteristics of wood concrete and compare them with other building materials:
- The average density is 650 kg/m3, and for structural blocks it is higher than for thermal insulation blocks, and amounts to 700-750 kg/m3. The density of wood concrete is higher than that of wood and aerated concrete, but less than that of brick and expanded clay concrete.
- The material has low thermal conductivity - 0.12 W/(m x °C). Of all the building materials, only natural wood has the lowest thermal conductivity.
- The compressive strength of the material is 0.5–8.5 MPa. For aerated concrete, the tensile strength is 2.5–15 MPa, for ceramic brick 2.5–25 MPa.
- Frost resistance indicator – 25–100 cycles. It is the largest among all building materials, with the exception of wood.
- Water absorption of wood concrete is 40–85% by weight. This is the maximum figure. For other building materials, the average percentage of water absorption is 16%.
- The material has a shrinkage of 0.4–0.5%.
- The bending strength is 0.7–1.0 MPa. It is the bending strength that distinguishes wood concrete from other cellular concretes. Under the same load, aerated concrete or foam concrete may crack, but they will not appear in wood concrete.
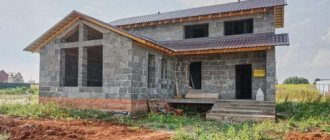
Construction of houses from arbolite blocks
Wood concrete has been known to mankind for a long time, but it undeservedly remains in the shadow of such popular components as wood, concrete, and brick. To this day, it is periodically used by designers and developers to increase the stock of private housing. Wood concrete has absorbed all the advantages of artificial stone and natural wood, so it deserves attention; we will tell you about this material in all the important details.
The procedure for plastering aerated concrete with your own hands
Preparing the walls
Before applying plaster indoors, it is necessary to prepare the aerated concrete surface. It is necessary to inspect the aerated concrete walls for defects.
- If there are protrusions and irregularities, it is necessary to cut them off with a plane or aerated concrete float. If you neglect this, in the future it will lead to excessive consumption of the plaster mixture and an increase in the thickness of the plaster, which contributes to the formation of cracks.
- If there is a through gap in some places between the blocks, it should be sealed with plaster mortar to the level of the wall. You can use special glue for aerated concrete blocks; you won’t need much of it.
- After the repaired areas have dried, you should clean the wall with a stiff brush to remove sagging and random pieces of mortar.
Through gaps between gas blocks
Next, a primer is applied.
Primer for aerated concrete under plaster
Using a primer for aerated concrete allows you to reduce the moisture absorption of the wall, while maintaining the vapor permeability of aerated concrete. The primer fills the pores of aerated concrete, creates an additional protective layer and improves the adhesion of the plaster solution to the base.
To answer the question of which primer to use for aerated concrete, let’s consider the types of primers depending on the type of room:
- For dry rooms, universal primers are suitable, for example Unis, Volma Plast primer, TEX Moisture Protection Profi.
- For bathrooms and kitchens, it is better to choose a deep penetration primer. It is recommended to use brands such as Ceresit CT 17, Prospectors, Knauf-Mittelgrund.
Primer Volma Plast
Before applying the primer, it is recommended to remove dust from the surface of the aerated concrete; to do this, you can moisten the brush with water and walk along the wall once. This will not only improve the quality of primer application, but will also reduce its consumption.
You can apply the primer to aerated concrete walls manually with a brush or roller, or you can use a spray gun to speed up the process and spray the primer in an even layer over the entire surface of the wall. Let the primer layer dry and proceed to the next stage of work.
Applying primer to aerated concrete blocks
Is a mesh needed when plastering aerated concrete?
The mesh is necessary to prevent cracking of the plaster. We recommend using fiberglass mesh that is resistant to alkaline environments.
The mesh is attached to the wall using ordinary nails, which are driven in one-third, after which the nail is bent to limit the movement of the reinforcing mesh. Ideally, there should be a few millimeters between the wall and the mesh.
Fiberglass mesh
Installation of beacons
If the thickness of the planned plaster layer is more than 10 mm, then it is recommended to plaster the aerated concrete walls along the beacons. Beacons are necessary to obtain a perfectly flat plaster surface. Usually a metal beacon profile is used; a profile for plasterboard sheets may also be suitable. Beacons are usually installed at a width greater than the width of the rule by 10-15 cm.
Beacons on aerated concrete wall
Applying plaster
To apply the plaster solution you will need a trowel and a rule or trowel, the length of which should correspond to the distance between the beacons (no more than 150 cm), if any.
As a rule, facade plaster of wood concrete is carried out in two stages - a rough and finishing layer.
The process of applying the rough layer
- Apply the solution to the trowel using a spatula;
- Apply the trowel to the wall surface at an angle of 45 degrees and apply plaster to the facade using a bottom-to-top motion;
- Carefully level and remove excess.
Important! If there are beacons, the solution is spread with a spatula into the space between the profiles in a layer no thicker than 20-50 mm, and then leveled using the rule.
The finished surface is left until completely dry, this may take 24-48 hours, it all depends on the type of plaster used, then the beacons are removed. The resulting defects are repaired using plaster, the surface is primed, dried and then proceed to finishing.
Important! In the case where the plaster serves as a rough finish for a ventilated facade, the beacons do not need to be removed.
Finishing layer
For the final coating with plaster, decorative solutions or mixtures based on silicone are used; they have an original appearance and a wide range of colors.
The solution is applied to a cleaned and primed base, carefully leveled and protected with a plastic trowel until the required relief is formed. After the putty has completely dried, it can be coated with a special varnish or glaze if desired.
Its disadvantages
Experts highlight the disadvantage of this material associated with high water absorption, so its use in rooms with high humidity or in areas where precipitation predominates is not recommended. This in no way means that the structure will collapse after rain, like a house of cards, but the service life of the building will be reduced significantly. To avoid this, you need to take some measures to waterproof the structure during the construction stage.
If you use blocks for the foundation, then you definitely need waterproofing and they need to be located at least 0.5 m above the ground level. If you use wood concrete in roof construction, then you must protect the walls from rain with overhangs. Plaster or other finishing will protect the outdoor units from the effects of rain and snow. Among the shortcomings, one can also highlight the imperfect shape of the block, which affects installation and finishing. However, some enterprises began to produce tongue-and-groove blocks, which make it possible to increase their adhesion area, thereby reducing the seams and making installation easier.
Not recommended insulation
Wood concrete is rarely used as insulation. It is also not recommended to seal it with polystyrene foam. The material has the following disadvantages for this design:
- Expanded polystyrene suffers from direct sunlight. It releases toxic substances that are dangerous to humans and the environment.
- Steam cannot pass through penoplex. When using the material, you will need to additionally think about room ventilation. Arbolite is used to maintain heat indoors. In combination with polystyrene foam, this advantage will be completely absent.
The material can be used as thermal insulation for blind areas and utility rooms. The outside of the house is insulated with penoplex only in case of emergency.
Construction stages
When planning to build a house from wood concrete according to the chosen project, it is necessary to carefully study all stages of the construction process
Regardless of whether you plan to do everything yourself or with the involvement of specialists, it is important to familiarize yourself with general information about the main tasks
If a standard project is chosen, then it needs to be adapted to wood concrete. Almost any project is suitable for building a house from this material, you just need to finalize certain nuances.
What stages of work need to be worked out when adapting the project:
- Geodetic studies - check the depth of groundwater, choose the optimal type of foundation and determine other important points.
- Floors – wood concrete is strong enough to withstand both prefabricated reinforced concrete and wooden floors.
- Waterproofing must be made from materials suitable for wood concrete.
- Insulation is a frost-resistant material, so at this stage of work you can save money (not do it at all or to a minimum).
- Finishing is carried out using materials that are suitable for wood concrete and reliably protect it from negative influences.
The main stages of constructing a house made of wood concrete:
Geodetic survey, selection or creation of a project. The choice of foundation is most often a strip or monolithic option. Wood concrete is lightweight and does not require a very strong base. Shallow tape will be an ideal choice and will reduce construction costs. If the groundwater lies high, it is better to make a columnar foundation or arrange a basement. Plinth - is installed above the foundation due to the fact that wood concrete is hygroscopic (absorbs water), the height of the plinth is 50 centimeters, it is well waterproofed. Wall masonry is made of wood concrete, with or without a frame. External walls are made from 30 centimeters thick, internal walls can be narrower. For masonry, special glue or cement mortar is used (but in this case, cold bridges may appear). During the laying process, the blocks are moistened with water or treated with moisture-retaining impregnation so that moisture from the solution is not absorbed into the material. If wood concrete is used as insulation, then it is placed between brick walls. Rafter system - can be of any configuration. But the edges of the roof should be 30-50 centimeters from the wall. Roof - an arbolite box can withstand any type of roof, so the roof can be made of slate, ceramic tiles, but the best choice is bituminous tiles
It is important to make the overhangs wide so that slanting rain cannot reach the wood concrete. Insulation – there is no need to insulate walls made of wood concrete, but it is advisable to conduct a heat audit of the house to find places where heat may be lost. Most often, heat is lost: in the floor due to its proximity to the ground (insulated with expanded clay or mineral wool), through the ceiling/roof (if there is a non-residential attic space, you need to insulate the ceiling, otherwise, insulate the roof), windows (all cracks are filled with polyurethane foam , seals or silicone sealants). Protecting walls from dampness is an important point that must be taken into account when performing exterior/interior decoration. Finishing work can be carried out immediately upon completion of construction, because wood concrete shows shrinkage at the level of 0.4%.
Exterior finishing usually involves plastering. The consumption of plaster when working with wood concrete can be one and a half to two times more in comparison with finishing a concrete wall. The layer will be smooth and durable even without the use of reinforcing mesh.
Suitable types of plaster for finishing a house made of wood concrete:
- Limestone – requires additional treatment (primer, putty).
- Cement – for a standard block, a layer 2 centimeters thick is enough.
- Decorative - compositions based on acrylic, lime, latex are suitable.
Sheathing is most often done with the installation of a ventilation gap in the form of a wooden sheathing.
Which exterior finish is suitable for wood concrete:
- Clapboard, block house, imitation timber - housing decorated with such materials looks like a wooden house.
- Facing brick - the house will be no different from a brick one.
- Vinyl siding - there are a huge number of options, the material is practical, non-flammable, and attaches well directly to the wall.
Interior finishing is most often carried out in the format of plastering or cladding with sheets of plasterboard on the frame. Then the walls can be covered with cardboard or painted.
It can be finished with clapboard, which is mounted on the sheathing, which acts as a ventilation gap and allows you to effectively hide all communications.
Features of using natural stone for decoration: pictures of village houses
Stone of natural origin is considered the most expensive cladding option, because its production requires a large amount of material and labor. But even despite the cost, it is this material that can be seen more often than others on the facades of houses, because the stone is distinguished by its versatility and durability.
A house decorated with stone on the outside is not afraid of even large temperature amplitudes, does not change color under the influence of sunlight and is not exposed to humidity. If you follow all the rules for installing wall cladding, it will be impossible to damage the cladding, which is a guarantee of durable use. The following types of rocks are used to make stone slabs:
Finishing the facade of a house with natural stone is the most expensive option
- Sandstone. A high-strength stone that consists of individual parts of sedimentary rocks. After processing, the stone takes the form of polygonal or rectangular slabs. To give an aesthetic appearance, each stone is polished.
- Limestone. It is considered a more common finishing stone due to its ease of extraction. Limestone finishes are distinguished by pleasant light tones, less often they are gray in color.
- Slate. In nature, it is formed by displacement of rock thickness and, in addition to wall decoration, is used as a roofing material. The disadvantage of slate is its ability to delaminate along the fibers as a result of damage.
- Granite. A noble stone with the greatest strength and hardness. Thanks to increased wear resistance, it maintains a smooth surface for a long time and does not allow moisture to pass through. The main disadvantages are heavy weight and high cost.
- Labradorite. An unusual and beautiful stone, characterized by the presence of iridescence on the cut surface. The facade of a house made of labradorite looks unusual, but at high temperatures the stone can crack.
- Porphyrite. It is quite often used when finishing the base. The stone is red in color and polishes well. The parameters of the rock mainly depend on the place of extraction, but in any case, the slabs are resistant to mechanical stress and are non-hygroscopic.
- Marble. The basis of the rock is calcite. Inexperienced builders often call limestone or dolomite marble, but unlike them, marble has a light shade and a large number of inclusions of red, black or green. The material is characterized by a large number of advantages, but is prone to yellowing of the surface, which spoils the appearance of the facade.
Natural stone is not afraid of temperature changes, humidity and sunlight
How to cover the outside of a house: the advantages of finishing the facade with artificial stone
Another important advantage over natural stone is its lower weight, which will help simplify the installation process and reduce the load on the base of the building. In addition to standard-sized parts, corner tiles are available for sale, with which you can neatly finish the outside of windows in a wooden house
The installation technology is similar to the process of wall cladding with ceramic tiles.
Artificial finishing stone is much cheaper than natural stone, but is almost as good as it in terms of characteristics.
Individual tiles of artificial stone have different shapes; they are made both in the form of tiles with the correct shape, and in the form of fragments of natural stone with chips and unevenness on the surface. If you follow the recommendations and lay the tiles in accordance with the technology, it will be impossible to distinguish the masonry from natural ones. A significant disadvantage is the need to periodically repaint parts with façade varnish.