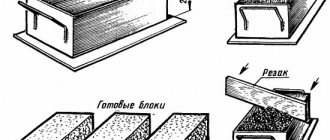
Making an arch out of brick is not an easy task even for an experienced home craftsman. This action requires certain skills and knowledge. And if skills need to be acquired in practice, then knowledge can be obtained by reading the recommendations and instructions on how to make a brick arch. For clarity, we provide photo and video materials.
Scheme
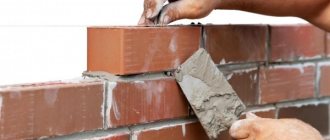
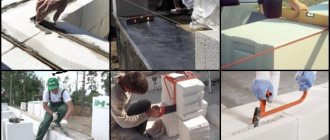
Do-it-yourself laying of ordinary lintels for openings
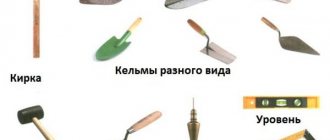
To lay a brick over an opening, you need the same tool as for ordinary brickwork:
– Trowel.
-Plumb line.
-Level.
-Kyanka.
The work of laying an ordinary brick lintel is not fundamentally different from laying walls.
When laying an ordinary lintel of openings with your own hands, you should adhere to these rules:
– Bandaging the seams when laying lintels is mandatory. Also, when carrying out work, it is necessary to monitor the evenness of the rows and maintain their verticality. Since this masonry will experience additional loads not only in compression, but also in bending (since it has no support), the quality of the work must be high
Particular attention should be paid to filling the joints with cement mortar. The grade of concrete must be at least 25
It should contain more cement than regular mortar.
–The number of rows above the opening, which must be laid with special quality, must be at least six.
-The depth of embedding of lintels in brickwork should be half a meter on each side. If its width is 1.5 meters, then the length of the row must be at least 2.5 meters.
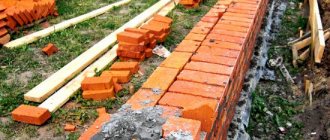
Between the rows, vertical brick lintels are reinforced with structural steel. For these purposes, steel reinforcement with a diameter of 6-8 mm or a smooth rod of the same size is used. The reinforcement is laid on top of the row and covered with mortar, on which the next row of bricks is laid. The ends of the reinforcement are bent in the direction of the top row.
–In order to lay the brick evenly and prevent the mortar from leaking, formwork can be mounted above the opening. A layer of roofing material should be laid on the bottom board. Next, a layer of cement mortar is laid on the surface of the formwork. Then it is necessary to drown several rods of reinforcement into it, which is covered with a second layer of mortar.
– The support of the lintel on the brickwork will be carried out precisely thanks to the reinforcement. After this, the procedure is repeated. To ensure that the reinforcement does not corrode under the influence of moisture, the layer of mortar above it must be at least 30 mm. Laying bricks on the prepared bed can be done the next day. However, the formwork should not be dismantled for 2 weeks in the summer or 3 weeks in the fall and spring.
Recommendations for choosing colors
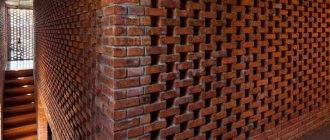
When designing an arch, it is important to pay special attention to the choice of its color, as well as the shade of the finishing material around it. A light palette can be considered ideal, which will transform the element into a lighter, “non-pressing” structure in the overall setting.
This is an important nuance, since the arch is an overhanging object. A dark shade will visually cramp and reduce the space of the room.
Laying bricks for the arch
Laying bricks for the arch.
On the pre-fixed template, mark the brick laying lines, and do not forget about the seams. The installation should be checked at all times. To do this, you can use a cord coming from a brick hammered in the center of the arc, a ruler or a level.
If you plan to arrange a vault of several rows, then carefully monitor each level in the same way as the first, so as not to destroy the arrangement of the brick.
Lay the material in transverse strips on both sides from the heels to the interlocking brick. In this case, the seams must correspond to the radius of the template. In addition, please note that the seam at the bottom of the arch must be at least 5 mm, and at the top no more than 2.5 cm. The arches are laid on both sides of the arch at the same time. Upon completion of the process, it is necessary to lay support beams on both sides of the arch. Between the rounded chipboard parts and beams, special wedges should be placed, which will be useful in the process of leveling the structure. In addition, these wedges will ensure easy dismantling of the template later.
Be sure to fill the transverse and longitudinal seams entirely with mortar.
Take into account the fact that masonry works in both bending and compression. If you forget about this nuance, the arch may eventually collapse
Don't try to upholster the material to accommodate it. If such a need arises, then simply increase the layer of the mixture. Be sure to control the filling of the seams; they should be free of voids and gaps.
If you want to look at the arch first, you can lay bricks without mortar on wedges.
When laying the material, be sure to ensure that it remains level on both the front and back sides. The bricks must be correctly combined with each other, laid clearly according to the drawing. Lastly, the keystone is placed, which should be positioned vertically.
When laying out the arch, it is necessary to maintain the thickness of the seams.
Carefully check the masonry again using a ruler or level.
Laying out the final row requires a special approach, since the keystone must be clearly in the middle.
After the solution has hardened, its surface must be cleaned with a dry brush. Remove stuck lumps of the mixture with a damp brush until the solution has completely hardened.
After the brick laying process is completed and the mortar has dried, you can remove the template.
At this point, the arrangement of the arched opening can be considered complete.
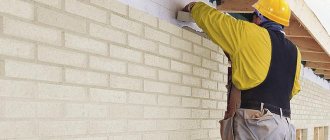
Brick finishing
The finishing of the arch with brick is carried out after smoothing out the irregularities with sandpaper. Treated areas must be primed and covered with putty. Then an adhesive solution is prepared, which has a cement-sand base. You can also use liquid nails to lay decorative bricks.
The work is carried out from the bottom up, it is necessary to follow from the corner of the wall opening. A distance of 5 mm is maintained between bricks. The edges are sanded with a file. Once the solution has dried, you can create the seams. To do this, use grout of the desired color. A construction syringe is filled with it. You can also use a rubber spatula. The grout is rubbed into the seams, but the composition should not get on the front of the stone.
Step-by-step instructions for building an arched opening
Design and drawings
If the decision to lay a brick arch is final, first of all you need to draw up a template with which you can evaluate the shape and dimensions of the future structure. To create a template, it is recommended to measure:
- thickness of supporting structures;
- distance of the top point relative to the ceiling;
- wall height;
- required opening width.
When these parameters become known, an initial sketch of the future template is created, which is made from chipboard. For drawing:
- an arc with optimal bend is drawn;
- the optimal radius of the structure is set, taking into account the width of the opening underneath it.
If the masonry of a brick arch is complicated, and the number of bends and levels is non-standard, each element should be calculated and drawn separately. After, when making a sketch, all the elements are added up
It is important to pay attention to the fact that the size of the template should be smaller than the actual parameters of the arch. This will help remove the layout from the opening without additional effort
Calculation of material and design parameters
Before you start modeling the sketch, it is worth measuring the wall, the height of the ceiling and the desired width of the opening. The calculation of a brick arch is carried out as follows:
- the radius of the semicircle is determined, as well as the width;
- Using a compass, the required radius is drawn.
The calculation of the arch and its dimensions is carried out using the following formula:
R=L2+H2/2H, where R is radius, L is ½ chord, H is height.
Arched doorway masonry
When all the parameters become known, the wooden sketch is installed, followed by the brickwork itself. The distribution of bricks is carried out from below, while the laying is carried out on both sides of the future arch. In order not to violate the distance between the supports, a board of the required length is placed, which is supported on the pillars and moves as they increase. Afterwards, it is necessary to install a beam on both sides of the structure, which will serve as a support.
When laying out columns, it is worth considering that the number of rows laid out to form an arch should not be even
It is important to carefully fill all seams and jumpers with mortar, otherwise the structure will be unreliable. Having reached the central arch, you need to install a “locking” brick, with which you can fix the entire lintel of the opening
When the structure is completely laid out, the wooden template is removed. To finish the arch, you can use decorative plaster that imitates red brick. If the arched structure is erected on the street, for example, over a gate, plaster for external use is selected for cladding.
Subsequence
In general, the procedure is different for all types of arches, but the main stages of this event can be identified:
- creating a project;
- building a template element;
- its installation;
- masonry;
- removing the template;
- finishing.
It is worth noting that the template element can be made either from wooden blocks or from chipboard. Dimensions are determined in advance. And the attractiveness of the brickwork depends on the quality of the template.
Installation of formwork
Even if the weight of the bricks is supposed to be small and the arch is at a height, we strongly recommend installing the formwork on vertical posts. They can be fixed to the supports with dowels in the seam, and an additional support can be placed in the middle. Be sure to make spacers for the racks.
As a rule, the arch is laid out simultaneously with the plane, so the place of the “heel” (the supporting platform of the arch arch) is determined by the level of the row of masonry. Its height must be known in advance (within tolerance).
If you decide to make a beam (segmental) jumper, you will have to additionally lay out stops for the heel. To do this, the brick is cut in place. The shape of the trim is in accordance with the position of the first brick of the vault. The formwork is installed so that the beginning of the arch falls on the plane of the heel.
Laying the arch and trimming the heel, video
The vaults of a regular arch start with a brick lying horizontally, then rise, gradually changing the angle of inclination. Therefore, the formwork should be installed after laying the first brick in the support. The beginning of the vault will be on it (on the first brick).
Making an arch
Construction requires the use of tools such as:
- hacksaw;
- trowel;
- hammer;
- jointing;
- building level;
- bracing cord.
Onion arch.
The masonry must be completed in one step. Otherwise, varying drying of the solution will cause destruction of the finished product. The laying of the arch begins with the insertion of fines into the arched opening. They easily clamp the structure. The set of structures goes from bottom to top. Bricks are laid simultaneously on both sides. At the very top, a castle is made of tightly packed bricks. The laid arched masonry is fixed quite firmly. After the solution has dried, the template is disassembled and removed. Drying time is about 2 weeks. To give the structure a neat appearance, the entire surface must be cleaned. It is recommended to do this carefully, removing all pieces of remaining mortar and cleaning all seams.
It is better to lay vaulted ceilings using wedge bricks. Its trapezoid shape helps to better fix the entire structure. You can buy the material in construction stores. You can do it another way: cut a regular building brick of a grade no lower than M-150 to a trapezoidal shape.
Brickwork is usually done using a special mortar. Stove arches require a clay-based solution, to which fireclay sand and gravel up to 0.8 cm in size are added. This solution makes it possible to make seams of minimal thickness.
Installation of castle bricks.
The remaining structures are laid on a mortar of cement and sand. If the technology is followed, they last a long time and become a decoration of the building.
The causes of destruction can be the following factors:
- a wide opening with insufficient height of the arched vault provokes the formation of cracks;
- using a template made of metal parts leads to cracking of the masonry;
- a template made of wood and chipboard that is removed in an untimely manner absorbs a lot of moisture from the solution, causing excess stress in the masonry;
- a weak foundation of a building can sag and destroy the vaults.
What is necessary?
To lay an arch out of brick, you will need a formwork template, which is made from boards and two racks for support.
The laying is done without gaps using wedge bricks. The thickness of the joints is allowed up to 1 cm. When using cement-sand mortar, the template can be removed only after two weeks.
Related article: Shower stall in a wooden house
If there is no wedge brick, you can remake a rectangular one. For a stove arch this parameter should be small. In addition, it is not recommended to use the solution for such a case, otherwise destruction is likely.
Varieties
When the conversation turns to an arched vault, you need to clarify what type you mean. The fact is that there are several of them and each of them is unique and individual in its own way. The laying of these brick vaults is carried out differently in each type.
An arched vault is a semicircle in the opening between two vertical bases, which are the walls of the building. As for the species mentioned, there are three of them.
Arched vault on the street
In first place is the usual or, as it is also called, a full arch. This variety is considered one of the most popular for a number of reasons. We can safely say about this look that it is made simply, but tastefully. A vault of this type is made in the shape of a regular semicircle.
In second place is a wedge or rectangular arch. Posting it without proper experience is problematic. Therefore, this is not the best choice, even for people who are used to doing everything on their own, using instructions found on the Internet. This warning is relevant because without the proper experience, you risk building an arch that will not last even a couple of years. Externally, it looks good and resembles the letter P.
In the last, third place, there is a bow arch. Its arch has a low semicircle.
Types of arches and opening in a brick wall
Before you choose what type of arch you would like to see in your home, you should talk about some nuances, such as the distance between the supporting columns.
You will not lay a tapered arch in a wide opening. This limitation is explained by the fact that it will not be strong if the distance between the supporting columns is wider than one meter.
At the arched arch this distance is greater. It can be built between columns located at a distance of up to one and a half meters from each other. If you want an arched vault, and the load-bearing columns are located at a distance of two or even two and a half meters from each other, then a full arch will do.
From order to construction
“It is necessary to erect gates here! They will welcome guests and report on our greatness!” - Nicholas I ordered.
Then a competition was announced. There were plenty of options, but they were all either too lush or too heavy. The Emperor liked the design of engineer Albert Kavos (he, by the way, designed the Mariinsky Theater), which consisted of a three-span Doric colonnade, a three-span triumphal arch and two pyramidal obelisks. The latter would be stamped with the names of the cities near which the battles took place. On the Moscow side, it was planned to erect a three-span triumphal arch topped with the “Chariot of Glory” monument. However, the project turned out to be very expensive.
Vasily Stasov was eventually appointed as the architect, who was about to finish with the Narva Gate. He had to develop the most “modest” solution, so he abandoned the rich sculptural decoration and reduced the number of columns to 12.
First, a wooden model was erected. Nicholas I made his comments about the passages between the columns and the height of the attic. The installation location of the arch has also moved slightly. Stasov finalized the project and then it was approved.
The construction of the gate took quite a long time - from 1834 to 1838. This is not surprising, because at that time no one in the world had made such large structures from cast iron. The height of the gate turned out to be slightly lower than the Clerisso version - 24 meters, the width - 36 meters, and the height of the colonnade - 15 meters.
The columns were built according to principles known since Ancient Greece: the column trunks are hollow, each of them consists of nine precisely fitted ring blocks. The total weight of the columns is 450 tons.
Arched lintels and vaults
Arched lintels, as well as arches or vaults, are laid out in a similar sequence to wedge lintels. The seams between the rows must be perpendicular to the curved line that forms the lower plane of the arch, and accordingly to the outer surface of the masonry.
The beds of the masonry rows are perpendicular to the direction of the load (example in Fig. 76).
Rice. 76. Laying lintels:
a – wedge-shaped; b – archery. 1 – direction of the reference plane; 2 – castle brick
The laying of the arched lintel is carried out using pre-assembled formwork of appropriate shapes and sizes in the same sequence as the laying of the wedge lintel. The direction of the radial seams of the masonry, as well as the correct placement of each row of the arch, is checked using a cord, which is fixed in the center of the arch being built. Using a cord and a square template, which has the outline of one of the sides corresponding to the curvature of the arch, the position of each of the rows of masonry is determined and checked.
Rice. 76 (continued). Laying lintels:
c – arched; d – masonry seams; 1 – direction of the reference plane; 2 – castle brick; 3 – cord; 4 – square template
The design of the formwork when laying vaults and arches must be such that they can ensure their uniform lowering when removed. To do this, it is necessary to install wedges under the circles, with their gradual weakening the formwork would lower evenly.
As for the holding time of arched or wedge lintels in the formwork, they directly depend on weather conditions and the brand of mortar that was used during the construction of the structures. So, in the summer, arches can be maintained for 5 to 20 days, but lintels can be maintained for 8 to 25 days.
Also watch the video:
Brickwork of arched vaults
After you have determined the design of the future arch and drawn a schematic sketch, you should prepare the tools and materials for the work.
To perform installation work you will need:
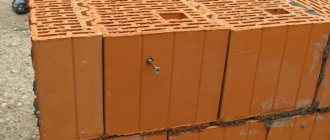
–Bricks for the construction of an arched vault. When purchasing material, it is better to give preference to wedge bricks, which have a trapezoidal shape.
– Mortar – intended for fastening bricks. It consists of sand, clay and gravel.
- I was circling.
–Container for mixing the solution.
-Reiki.
-Nails.
– Spacers (wedges).
–Construction level – designed to monitor the correctness of the work.
-Hammer.
-Jigsaw.
-Marker or pencil.
Installation procedure:
–Initially, the heels should be made according to the template. When installing the heels, you should rely on the dimensions of the structure indicated in the sketch. To make a template, high-quality chipboard sheets and wooden blocks are pre-prepared. Then, using a marker, mark the extreme points of the structure on the chipboard panel. It should be remembered that it is better to make the template 1-2 cm smaller than the planned vault, then it will be easier to install. Next, the points are connected to each other by an arcuate line.
–According to the markings made, you need to cut out a template from the chipboard sheet. It should consist of two arched parts fastened together with wooden blocks. Self-tapping screws must be used as fasteners for fixing the beams. The finished template should be fixed in the opening using supports and wooden wedges (where further installation of the brick arch is planned).
–Next, it is necessary to strengthen the foundation of the arch, since additional load on the supports can cause their deformation. In addition, an unstrengthened arch may collapse over time. Concrete and bricks are used to build the base.
–Then we move on to the construction of the arched lintel for the brickwork. To do this, grooves should be made on the sides of the template, in which additional fastening elements of the structure are subsequently placed. In the center of the upper arc it is necessary to fix the locking brick, thanks to which the vault will be secured
–At the next stage, the side elements of the vault and columns are installed, on which the formwork is attached. Columns are erected from concrete or brick. In order for the distance between the side posts to be the same over the entire height of the supports, you should first cut a board whose length will be equal to the width of the arch span. This board must be used to control the correctness of installation work.
–After the template is fixed on all sides, we proceed to laying the brick. The masonry is carried out in transverse strips on both sides of the arch in the direction from the heels to the fixed castle brick. In order for the side supports to be the same, the material should be laid simultaneously on both sides. After the arch supports have been erected, a wooden support beam should be secured on both sides of the structure. The length of the lower seam of the arch should be 6-7 cm, and the upper one - 3 cm.
–When laying out the vault of the arch, focus on the previously fixed template. Fill the seams between the material with mortar. While laying the vault, secure the bricks with wedges so that they take the desired shape. Mount the vault on both sides at the same time. Make sure that the fixed key brick remains strictly in the middle of the arch.
–When the bricklaying is finished and the mortar has hardened, remove the excess with a brush. Then you can remove the template.
Rules and secrets for laying facing stone from specialists
To create a natural look for the masonry, the stone in places around the edge is decorated with decorative chips. To do this, draw the desired line with a knife, and bite off the excess along it with pliers, trying to snatch off the excess in small pieces. Chips are smoothed with a file.
Large and small stones are alternated, and the joints of the slabs should not coincide from row to row. When finishing, which is not done from the floor, an auxiliary metal profile is fixed to the wall, which is removed after the structure dries. Clear and even corners and shaped parts are obtained using a grinder using a diamond wheel.
You can protect the arch from abrasion with acrylic varnish. When cleaning, use a broom, vacuum cleaner, or spray bottle, after which the drained water is simply removed from the floor with a rag.
Arches, as a rule, do not stop at finishing with decorative stone. This element looks more advantageous, echoing the same fragments on the walls of the room. The process takes a lot of time, but an arch designed in this way will decorate the house in an original way and bring additional comfort.
Common mistakes when creating an arch
Even though the process of creating an arch may seem quite simple, various problems often arise. Often failures are associated with insufficient experience of people involved in construction, and in fact there is some truth in this.
It is not so rare that problems begin to make themselves felt if the arch is large in width but too small in height. In this situation, various cracks often appear. And after some time, the arched structure may even begin to collapse.
As already mentioned, often the template used in the construction of the arch is simply removed after the process is completed. However, owners often delay this, leaving the template in place. At the same time, the wood base (chipboard) can absorb a lot of moisture. First of all, this applies to those arches that were erected in open areas. Thus, the template can gain considerable weight, which will negatively affect the integrity of the arch. Experts advise covering the structure with polyethylene or removing the template immediately after the cement has hardened.
As has already become clear, the template is the main obstacle to obtaining the optimal result of construction work. In this case, it must also be said that various metal elements are often used as this element. However, they turned out to have a negative effect on the arched structure. The wooden base of the template promotes uniform shrinkage, which metal cannot boast of. Thus, the metal template may cause cracks.
It is worth knowing that the integrity of the arch depends not only on the technology of creating the structure, but also on some other factors. The foundation has the biggest impact. If the foundation of the structure has numerous flaws, then the arch may begin to collapse at any moment. There are also areas in which the foundations of buildings gradually settle. This, in turn, again negatively affects the integrity of the arch. If this is possible, then a full range of measures should be carried out that can strengthen the foundation of the home. Otherwise, it is better not to build an arched structure, as this may turn out to be a waste of money.
Of course, the difficulties can be very diverse. They all depend not only on the foundation of the home and the materials used, but also on some other factors that may not be noticeable at first glance. Thus, it makes sense to turn to specialists who will analyze every detail associated with the creation of an arched structure.
Risks of breakdown
A brick arched opening may break if constructed incorrectly and the calculations are not followed. If the radius of the structure is large, the load increases several times. As a result, cracks form first, so the opening gradually collapses. The reasons why arched windows sag are the same - incorrectly calculated opening width. Also, the structure collapses if the foundation of the house is unstable; in this situation, the structure needs to be strengthened along the entire perimeter, because even a reliably built arch will not withstand such a load.
Bricklaying
An arch is not much different from ordinary masonry - the main difficulties are related to the correct calculation and production of even formwork. If you are making an arch of a “cold” structure, use a cement mortar of increased proportion (1 part cement, 2.5 parts sand). If it will be a stove or barbecue, you should use a special solution on clay.
Bricks are laid on the formwork from both sides at the same time. Use thickness gauges on the bottom layer and check for flatness. It should coincide with the plane of the supports, and the seams should be filled with mortar. The circles can be dismantled no earlier than 21 days from the date of installation.
Outdoor fireplace - video of masonry walls and arches
Having mastered the main principles of calculation, formwork creation and the general approach, the novice master develops his own techniques and know-how. The more practice, the better the result will be. Based on the data in this article, you will be able to master the laying of any type of stone lintels.
The firebox is in the form of an arch. Step-by-step video with comments
rmnt.ru
Bricklaying
An arch is not much different from ordinary masonry - the main difficulties are related to the correct calculation and production of even formwork. If you are making an arch of a “cold” structure, use a cement mortar of increased proportion (1 part cement, 2.5 parts sand). If it will be a stove or barbecue, you should use a special solution on clay.
Bricks are laid on the formwork from both sides at the same time. Use thickness gauges on the bottom layer and check for flatness. It should coincide with the plane of the supports, and the seams should be filled with mortar. The circles can be dismantled no earlier than 21 days from the date of installation.
Outdoor fireplace - video of masonry walls and arches
Having mastered the main principles of calculation, formwork creation and the general approach, the novice master develops his own techniques and know-how. The more practice, the better the result will be. Based on the data in this article, you will be able to master the laying of any type of stone lintels.
The firebox is in the form of an arch. Step-by-step video with comments
Vitaly Dolbinov, rmnt.ru
Arched windows and doors can often be seen in historical films. Semicircular windows of castles, palaces, monasteries - without them it is impossible to fully imagine medieval architecture. But even in the designs of modern buildings this seemingly ancient element is not uncommon. Many people believe that the arch is exclusively a design element of the building, but this is far from the case. In addition to its stylish appearance, the arched lintel evenly distributes the weight of the upper rows of bricks above the opening, which improves the reliability of the structure. The natural disadvantage of the arch is the need to use curved frames and jambs, the cost of which is significantly higher than straight ones.
Today, the two most common types of arches are arched and semicircular. A beam arch is an arc of a circle, and its degree is less than 180. Simply put, the diameter of such an arch should be greater than the width of the opening. A semicircular arch has the shape of a semicircle.
The main difficulty in building an arched lintel is the correct calculation of the circle. A circle is a special device that supports the brick during the laying of the arch. The circle is usually made of plywood or chipboard, less often - of wood. To do this, two semicircular elements are cut out of a sheet of material, after which they are fastened with jumpers. The circle is calculated in such a way that it can fit the required amount of brick along an arc. In this case, you need to take into account the thickness of the seam between the bricks. The seam is a trapezoid shape, the smallest base of which is 5 mm. Thus, the circle can be divided into equal sectors, the chord of which will be equal to the sum of the width of the brick and the thickness of the seam. To simplify dismantling, the width of the circle should be slightly less than the width of the opening.
An important element of the arched lintel is the lock. The key brick plays the role of a wedge that pushes the arch apart, strengthening the entire structure. The castle must be installed strictly vertically, so the number of bricks in the arch must be odd. Sometimes the castle brick is installed so that it protrudes somewhat from the lintel, while playing a decorative role.
The laying of an arched lintel begins with the installation of a circle in the opening. The circle is installed on wooden spacers and leveled
Laying begins simultaneously from both sides towards the center, with special attention paid to the thickness and identity of the seams. The key brick is installed with some force so that the arch is securely fixed in the opening
In this case, the use of a hammer is excluded, since sharp blows can damage the structure. After 1-2 hours, the supports are relaxed, and the arch is covered with plastic film to prevent swelling of the wooden templates. The circle is removed after a few days, after the solution has gained the necessary strength.
An arched lintel can often be found not only in window openings on external walls. An arch in a room can significantly increase its volume, while outwardly it is more attractive than a standard straight jamb. In addition, arches are found above the fireboxes of stoves and fireplaces, in the vaults of buildings, in the construction of gazebos and canopies.
Architects often use architectural and design elements in their work that give the building originality and beauty. One of these decorative details is the arch. Internal structures are easily decorated using plasterboard. Brick is used to construct external geometric elements. Many novice craftsmen are interested in the question: how to make a brick arch with your own hands?
Forms
A brick arch with your own hands can be created in a variety of shapes, taking into account the required architectural style. Types of openings, taking into account the masonry:
- classic – the height of the semicircle is half the width of the opening;
- bow - a trimmed cone, characteristic of the oriental style;
Construction process
- wedge-shaped - in the form of a wedge, secured at the top with a locking element, which is characteristic of the Gothic style;
- modern - an arc like a truncated cone;
- romanticism - rectangular in shape with slightly rounded corners;
- ellipse – used in postmodern or new wave;
- the portal is rectangular in shape.
This or that brickwork of arches is characterized by features that need to be taken into account, especially harmony with a certain style.
Preparing for work
To lay the arch, it is necessary to assemble a temporary load-bearing formwork from wood (block, lath, sheet material). This is a wooden support that follows the shape and dimensions of the inner plane of the arch. In order to do it, you need to know the following parameters of the future design:
Vault shape. There are two types of arched vaults - regular arch and beam lintel. We talked about them in more detail in the article “Window lintel”. In the work itself, the chosen form does not play a big role, so here you should be guided more by the combination of appearance with other architectural elements.
Arch radius. In a regular arch, the radius of the semicircle (arch) is equal to half the distance between the supports (along the internal plane). The radius of the arch of the beam lintel is determined arbitrarily (individually) for reasons of appearance.
The distance between the internal planes of the supports. Determined by location. The circle should pass freely between the supports.
Wall thickness. The arch can be of any thickness, even a continuous tunnel. To begin with, we recommend building a structure 1 brick thick (250 mm).
Advance paynemt. The main condition for the stability of a brick lintel is an odd number of bricks. That is, the stone must be at an equal distance from the supports or their projections. If it is slightly smaller than the standard, you can trim it with a grinder. In this case, the thickness of the seam in the lower part of the masonry should be at least 5–6 mm, in the upper part no more than 30 mm.
When all dimensions have been taken and the desired result is completely clear, you can begin assembling the formwork.
Design features for the garage
You can give a sufficient number of photos of brick arches that are used in garages. To ensure its durability, it is recommended to take into account several features.
For example, many strive to make the arc minimal, but this only reduces the reliability of the design. It is also recommended to compare the strength of the template and the weight of the arch.
The posts must fit tightly so that the arch does not sag. Before starting the process, you should determine the required amount of bricks. If the arch is large, thick seams should be avoided. The thickness of the bottom seam should be 3-6 mm. Laying is done from the edges to the center. We lay the central brick last.
If the arch is made for a garage, the distance in the opening will be greater. To increase the strength of the wall above the arch, it is worth laying reinforcement.