Laying aerated concrete in winter is accompanied by some difficulties, inconveniences and additional costs. But it’s not all that scary, you can cope. Let's start with the fact that it is better to start laying in the spring, when there is more daylight and there are six months of warm days left. But what to do if you still have to build from aerated concrete in winter?
The construction site must have electricity for heating, warm water, frost-resistant adhesive for masonry, a good source of lighting and film, which is needed to cover and warm the aerated concrete blocks. As you understand, due to additional measures related to heating materials, the speed of construction is slowing down.
But in winter they offer good discounts on building materials; moreover, many builders sit without work in winter, which increases competition between builders, and they can also make a discount on their work.
At sub-zero temperatures, a special frost-resistant adhesive must be used for masonry, which is suitable for working at temperatures down to -15. But all the same, we would not recommend laying at temperatures below -10.
The cost of glue for winter masonry is only 10-20% more expensive than usual. The differences between winter masonry adhesive are anti-frost additives: special salt and other components that prevent the water in the adhesive from freezing at sub-zero temperatures (down to -15).
Advantages and disadvantages of winter construction
First, let's go over the disadvantages:
- The main disadvantage of winter construction work is clearly considered to be frost. It is quite clear that when the temperature drops to minus 20 or 25 degrees Celsius, it is very difficult to work. In any case, you need to buy special clothes for this time.
- Next is the question of foundation and brick laying. An important point, since the base support on which any building rests must be stable and in accordance with GOST 22266, and the concrete solution freezes. However, this can be solved in several ways, which we will discuss below; the choice is yours.
- But work on plastering and facing masonry will still have to be postponed until spring, since, whatever one may say, they cannot be carried out at low temperatures.
Laying bricks in winter has its pros and cons
. But there are also advantages.
- The most advantageous thing is that purchasing blank materials will cost you several times less. This is an indisputable fact. And, if necessary, it will be much easier to find a team of developers.
- Everything needed for construction is easier to transport along frozen roads. It is known that on a construction site in rainy weather there can be a lot of dirt, which creates particular inconveniences; in winter this is eliminated, leaving everything around clean.
Foundation cover
A situation often arises when it is not possible to carry out work in winter.
To minimize the effects of exposure to sub-zero temperatures, it is advisable to cover the young foundation for the winter.
The most vulnerable in this regard are slab and strip foundation types. Plates of polystyrene, slate, and polystyrene are laid on the surface of the base. The top is covered with reinforced film. If the filling was done in late autumn, a layer of expanded clay is poured on top. It retains heat quite well.
It is important to cover the surface of the foundation, on which ice can form, which, during a thaw, will compromise the integrity of the structure.
To what temperature can bricklaying be done?
Now let’s take a closer look at winter construction chores. The fact is that even the lowest air temperature during bricklaying with ordinary cement mortar will only have a detrimental effect on the result. And to be even more precise, you won’t be able to do anything at all, since the water in such a mixture will not allow the solution to bind, and therefore there can be no talk of any strength.
It is imperative to add chemical impurities to the winter solution that have special frost-resistant properties. You can purchase them at any hardware store. To what temperature can masonry be done?
You can work with special chemicals even at zero air temperature, even at a fairly low temperature, but not below 30 degrees Celsius.
Prepare the foundation in the summer
The warm summer season pampers you with the opportunity to do a lot of different work - from planting trees to building a house. This also applies to the foundation of the building - from early spring to autumn is the optimal period for its construction.
Advice - the heat will not be good for the concrete mass; it must be watered while it hardens. The top should be covered with available materials - roofing felt, slate. It is not advisable to cover it with film, it will cause condensation and the moisture will not evaporate.
Conclusion - it is better to fill the foundation in early spring, before the onset of heat. Or start in September, when the daytime heat subsides. The hardening period of the solution is 25 - 30 days, after which you can begin laying the walls. Although the process of gaining strength will take a long time.
You might also be interested in: Insulating the foundation of a house from the outside: how and with what to insulate
Heating methods
There are several of them and they are all suitable for beginners.
Heat shield
The setting and good hardening of the solution with this method is very effective, since it independently releases thermal energy. To begin with, they install a wooden frame, which is covered with tarpaulin or polyethylene, and heat the air inside this structure with any heating devices. Work is carried out in such conditions simply.
Construction of a greenhouse
The device of the greenhouse is also called the “thermos method”. Before work, the brick is heated with a special installation, and every two to three square meters the lined wall is thermally insulated.
Use of chemical additives
If you decide to use chemical additives, then use Sodium Nitrate (provided that the temperature outside is down to – 15 degrees) or Potash (it can be used in temperatures down to – 30 degrees). Such impurities significantly reduce the moment of freezing of water in the solution, it is fixed quickly enough, and all this does not affect the quality at all.
Chemical additives for concrete
Solution freezing method
The freezing option is suitable for brickwork in frosty outdoor conditions. The mortar is prepared separately with a high degree of heat, and during laying it freezes in the seams and hardens in stages - from the beginning of work until spring.
The height of the structure with this approach should not exceed 15 meters according to safety standards.
Materials that don't freeze
In the cold, the difficulty of work can be:
- when working with concrete;
- facade work with facing bricks;
- installation of flexible tiles;
- impossibility of external plastering work;
- finishing work with tiles or stone.
On the advice of experts, winter work can still be done. Certain factors need to be taken into account:
- It is advisable to do the exterior finishing before the onset of cold weather. An aerated block can stand for several winters without finishing, but this should not be neglected;
- A solid foundation under the blocks is important. A strong foundation copes well with heaving of the soil under the building. Heaving of the soil bends the gas block, it can crack;
- the solution must contain antifreeze additives and plasticizers.
Linking articles
Permissible temperature range
Provided that you are erecting a low building, laying aerated blocks in winter can be done at temperatures from minus ten to minus fifteen degrees Celsius. Other options are not valid.
It is permissible to lay aerated concrete in winter, taking into account some points
Concreting in winter
The main task is to prevent the solution from freezing and the cement from drying out. Cement requires moisture, this is its strength. Therefore, winter technology is associated with protecting the solution from freezing before hardening occurs.
There are several options for this:
- adding antifreeze additives to concrete;
- electric heating of the concrete mixture;
- covering the poured mass with film. insulation, tarpaulin...;
- installation of a temporary tent with heat guns.
The most popular is the addition of anti-frost components and plasticizers at the same time. Concrete is produced in factories with different percentages of additives. The concentration depends on the external temperature at which the concrete will be worked.
Electric heating is rarely used; this method requires a powerful power plant.
Partial cover is also used on small construction sites. This method is used in mild frosts, up to minus 5 degrees. The solution is covered so that the cement has time to set before it freezes, otherwise the whole mass will crack.
Expert advice - the industry produces antifreeze additives for different temperatures. The use of a concrete mixer will allow you to obtain a uniform, plastic winter mortar.
Selection of winter glue and additives
Let us pay special attention to what needs to be added to the solution in winter:
- Aerok brand winter glue. Used down to minus fifteen degrees. Suitable for both external and internal work. Shows high quality indicators, thanks to a base based on fractional sand and polymer impurities.
- Glue Tytan Professional. Can withstand temperatures down to ten degrees below zero. Has excellent thermal insulation properties. The base is polyurethane.
- Glue brands such as Polygran, Volma and Kreps Antifreeze are also suitable. Use any of them strictly according to the instructions.
Peculiarities
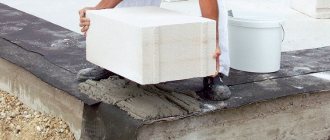
with hot water 60 o C. A properly prepared adhesive composition should have a temperature of 10-20 o C. The adhesive composition is applied to the blocks using a ladle-shaped trowel.
For this purpose, you need to build a frame base around a pallet with building material, cover the frame with a film or fire-resistant awning, and then warm it up using heating elements or a heat gun. It should be noted that insufficient or poor-quality heating of aerated concrete sharply reduces the final strength of the joints , which is caused by the crystallization of water, which accumulates in the pores of the building material.
- When laying in frosty conditions, it is necessary to use winter adhesive for aerated concrete or anti-frost additives in regular glue.
- The adhesive mixture is diluted with hot water strictly according to the instructions, which must be read on the packaging.
- Blocks need to be heated immediately before laying.
Technological process of laying blocks
The process of laying aerated concrete blocks in winter is absolutely not complicated:
- First, heat the blocks until they thaw.
- In a plastic container, dilute the glue with water heated to plus 60 degrees Celsius.
- Carry out the laying itself, but quickly, so as not to let your object freeze too much.
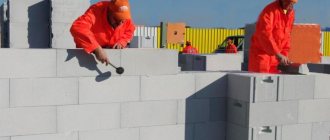
- Periodically tap the laid walls with a rubber hammer to ensure their strength.
- Be sure to check the heat of the adhesive base from time to time so that its temperature does not drop below the zero mark of the thermometer.
- Do not stop construction until you install the partitions for the first floor.
- Complete the construction by installing the roof. If you do not have time to cover your building with a roof, then cover all its partitions and constructed walls with polyethylene material, securing it well from the bottom and top.
- Lay straw insulation on the floor. Cover the door and window openings with sheets of roofing felt or plywood.
Laying aerated concrete: technologies, recommendations, features of work in winter
How to build a house from aerated concrete blocks? Which masonry mortar is best to use? Is reinforcement of aerated concrete necessary? How is aerated concrete laid in winter? Let's try to answer these questions.
Under construction.
Let's start with a brief overview of prices for work with aerated concrete blocks. It is needed for the reader to once again evaluate his strengths and think whether it is worth trying to do this work with his own hands or is it better to trust the professionals.
| Parameter | Meaning |
| Cost of laying 1 m3 of aerated concrete in load-bearing walls 300 mm thick | 1300 - 1400 rub. |
| The cost of aerated concrete masonry per cubic meter with a wall thickness of 375 - 400 mm | 1500 - 1600 rub. |
| The cost of laying aerated concrete in partitions with a thickness of 80 - 100 mm, per square meter | 500 - 600 rub. |
Let us clarify: the prices shown are current at the time of writing the article for the Leningrad region. In different regions of the country they can be significantly higher or lower.
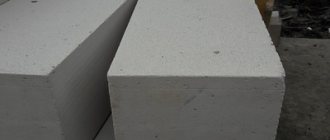
Recommendations for use
The mixture is applied to 2 - 3 installed stones at once, and the layer should reach a thickness of 3 mm to allow for adjustments. It is obligatory to bandage the vertical joints in each subsequent row. You can use tile adhesive, but it is better to take a special one for foam blocks.
Masonry features:
- if the foam blocks contain reinforcing fibers, you can lay the solution only in a horizontal row;
- for foam concrete without fibers, the vertical spaces between the stones must also be treated with glue;
- after every 4 rows, reinforcement in the form of a mesh is placed 2/3 of the width of the wall, for the strength of the masonry;
- the stones are adjusted with a wooden or rubber hammer, if this is not available, they substitute a board, hitting it;
- On top of the wall, before laying beams and slabs, a reinforced concrete belt is placed.
It is better to take even blocks to save on the small thickness of the seam. Uneven or used stones are placed with excess glue.
Consumption
The volume of glue depends on the curvature of the elements and their size. Consumption is also affected by:
- degree of skill of a mason worker;
- weather conditions (frost, heat);
- levelness of the base of the house.
The label usually contains information on the consumption of glue for foam blocks. Typically this rate is 3 – 4 kg/m² or 1 bag (25 kg) per 1 m³.
The area of the wall is calculated by multiplying the length by the height. From the result obtained, the square footage of window and door openings is subtracted. To calculate cubic capacity, the area is multiplied by the width of the wall (block).
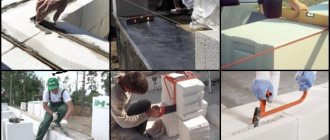
Preparing the mixture
Information about the mixing proportion is on the bag. For mixing, use metal buckets or round containers made of thick plastic. There should be no deposits of dried mixture on the walls from the previous batch, otherwise the hardening of the solution will accelerate. The temperature of the water and powder should be the same (exception is winter).
Rules for mixing the composition:
- the dry mixture is added to water, and not vice versa;
- if the result is a thick, sedentary solution, you can add a little water to it;
- after the first stirring, wait for swelling for 10 minutes, then shovel again;
Rules for laying foam blocks with glue
It is convenient to apply the glue with a spatula with a serrated edge, and the protrusion of the elements should be to the depth of the intended seam between the foam blocks. If you apply a large volume of solution, it will be squeezed out of the seam. The excess should be picked up with a trowel and placed further on the wall, which will speed up the hardening. It is also undesirable to return such portions to the bucket, so the composition is applied accurately.
Rules for installing blocks on glue:
- work starts from the corner, then proceed along the length of the row;
- check horizontality using a cord that is placed along the corner elements;
- foam concrete, unlike aerated concrete, does not absorb moisture, so it is not necessary to moisten the stones;
- reinforcement mesh is placed in the corners for dressing;
- adjacent stones are tapped against each other to ensure a tight fit.
Winter glue does not harden for about half an hour, so it is produced during this period. In the cold season, take water heated to +60°C. Ice and snow on the walls of foam blocks are cleaned off before installation.
Necessary equipment
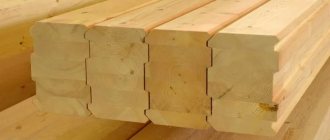
The lightness of the material and simplicity of construction allows you to do without serious equipment and only with your own hands. To lay gas silicate blocks you need the following tool:
- An electric drill or jigsaw is a tool for adjusting the sizes of individual modules.
- Construction level - for assessing the verticality and horizontality of the rows.
- Trowels.
- Spatula - a tool must be chosen with teeth.
- Mallet hammer - needed for tightly joining stones.
- Container for solution.
In addition to gas silicate blocks, the necessary materials include roofing felt or other rolled waterproofing material, as well as masonry mesh as a reinforcing mesh with a wire diameter of 3-4 mm.
The feasibility of insulation
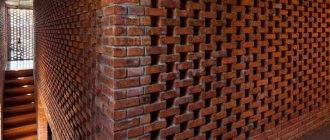
Some experts say that insulating facades made of such bricks is impractical. In their opinion, such a building is best lined with facing or decorative stone.
This will significantly increase the strength of the facade and protect it from damaging moisture.
In addition to the article materials:
In fact, there are many technologies for insulation. They provide for significant savings in thermal energy, which allows owners to save money.
Tools
What will be required to carry out the work? Considering that you will have to mix the glue, prepare:
- electric drill with attachment or mixer;
- kneading container.
- a brush with which we will brush off dust;
- hacksaw (it is better to use a special one for aerated concrete);
- a ladle with which the adhesive composition will be poured onto the block surface;
- spatulas;
- hand graters;
- rubber mallet for leveling blocks;
- plumb line and building level;
- hammer drill