Laying the first row of aerated concrete blocks is a very important stage of construction, since the next rows and the evenness of the walls as a whole depend on it. In order not to complicate the laying, the first row should be laid as evenly as possible.
So, to begin with, we will briefly describe the masonry algorithm, and for more details about each stage, see the text below. Tools, waterproofing, preparing mortar, leveling blocks, reinforcement, we will talk about all this in this article.
Brief technology for laying the first aerated concrete row:
- Level the surface of the foundation with mortar;
- If it is already very smooth, then remove dust from the tape;
- Spread bitumen mastic on the tape;
- We lay waterproofing, for example, roofing felt;
- We determine the highest angle with a hydraulic level;
- We lay gas blocks in the corners on the solution;
- We align the blocks horizontally and vertically;
- We stretch the thread between the blocks;
- We lay the remaining blocks on the solution along the thread;
- We reinforce the first row of blocks with reinforcement.
Tools for aerated concrete masonry
Before starting construction work, you should prepare the necessary tools:
- Construction level or laser level;
- Hydraulic level;
- Roulette;
- Cord plumb line;
- Special saw and trowel for aerated concrete;
- Square;
- Trowel;
- Rubber mallet;
- Wall chaser.
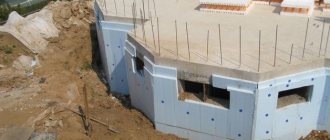
Horizontal waterproofing under masonry
Laying the walls must be preceded by waterproofing the foundation, so that in the future the moisture of the foundation cannot be transferred to the aerated concrete. For this procedure, modern bitumen materials are best suited, which are sold in rolls, are easily cut into pieces with a construction knife and fit well.
Brief instructions for horizontal waterproofing
- Dust the surface of the tape;
- Apply bitumen mastic to the tape;
- Cut the waterproofing rolls into strips of the required width;
- Lay on the tape with an overlap of at least 150 mm;
- You press.
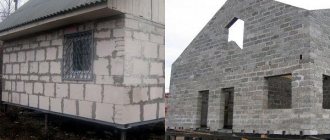
Rules and nuances of installing walls made of foam blocks with your own hands
Material such as foam blocks first appeared in Sweden at the beginning of the last century. In our country, similar products are used for installing walls of private country houses, constructing garages, and constructing fencing for balconies and loggias. The popularity of cellular blocks among developers is determined by their precise overall dimensions, low weight, high installation speed, and excellent technical characteristics of the material. Even an inexperienced builder can lay foam blocks, but before installing the walls it is necessary:
- Lay high-quality waterproofing on the foundation, which will prevent the destruction of the blocks.
- Maintain horizontal position when laying products (this can be achieved by adjusting the layer of cement mortar). A correctly installed first row of foam blocks allows you to align subsequent products on thin seams of the adhesive mixture.
When laying the first and subsequent rows of blocks on the mortar, it is necessary to take into account the purpose of the enclosing structures. Walls can be main, load-bearing and non-load-bearing (interior partitions).
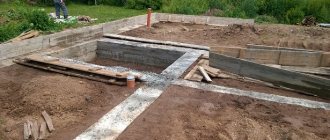
How to Find the Highest Foundation Angle
First, it is necessary to determine the highest corner of the foundation, where the first aerated concrete block will later be laid. It is determined using a laser level or hydraulic level.
Proper marking is the most important factor influencing the correctness of the masonry and the speed of work itself. Using a laser level will help you avoid mistakes, but if you don’t have one at your disposal, a level, tape measure and proper professionalism will be enough.
The construction of an aerated concrete foundation requires great care and attention in terms of the horizontal plane, because the future stability and reliability of the structure depends on this.
The first row is laid only when the difference between the highest and lowest angle of the foundation does not exceed 3 cm.
Types of adhesive mixtures
If foam concrete blocks are used in construction, special adhesives should be used for their installation.
The most commonly used types are:
- standard adhesive composition. Designed for installation of most materials used in private construction;
- frost-resistant compounds. Able to withstand low temperatures without losing their properties;
- heat-saving compounds. When creating seams, the area of freezing is limited.
The price of adhesive solutions depends on their brand and manufacturer. Domestic options are cheaper than imported analogues. To prepare the glue, just follow the instructions on the package. The dry powder is mixed with water, and a construction mixer is used to combine the ingredients.
Construction mixer
Preparation of mortar for laying the first row
For laying the initial row of aerated concrete blocks, as a rule, an ordinary cement-sand mortar is used, which is prepared using standard technology with a substance ratio of 3:1. In this case, thick seams will be more of an advantage, because they will allow you to make adjustments and achieve the ideal horizontal position of aerated concrete.
Calculation of the required number of blocks
You can calculate the total number of gas silicate blocks by calculating the volume of all walls of the house according to the project.
A more accurate calculation is carried out for each wall separately. To do this, you need to take the dimensions of the wall from the project, and the dimensions of the gas silicate block will become known when purchasing it. Knowing the width of the block and the length of the wall, it is possible to calculate the number of blocks per row of masonry. If half a block is needed, it is counted as a whole block. The number of rows of masonry is calculated in the same way. The number of rows is multiplied by the resulting number of blocks in one row. The final number is the number of blocks per wall.
If there are openings for doors and windows in the wall, an approximate calculation is also made. Then, after counting the blocks for each wall, all the numbers are summed up.
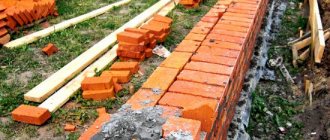
Laying the first row
The first block is laid in the previously determined highest corner, after which its correct position should be checked on all sides. Next, three more blocks are laid in other corners. To adjust the height on the solution, a rubber mallet is used. The use of metal tools is excluded, as they can easily damage porous aerated concrete.
When the corner walls are laid, a cord is pulled between them. The cord will help control the correctness of the masonry.
If the length exceeds 10 m, it is necessary to secure another block in the middle of the span.
Also, in order to control the quality of masonry, a comparison of diagonals is performed. Equipped with a tape measure, you need to measure the distance between diagonally opposite corners. The resulting values must be identical.
Each block of the first row is aligned plane, vertically and horizontally. For leveling, use a rubber mallet.
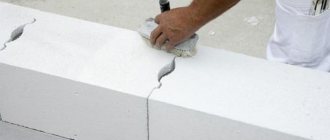
Most often, at the end of laying a row, an additional element is required, which is prepared from a whole aerated concrete block. An even mark is carefully applied to the surface of the latter, along which the excess is then cut off, or a special triangle is used.
Aerated concrete can be sawed very easily using a hand saw with large teeth.
Adjacent blocks must have the same height, so to maintain it you will need a level and a special grinding float. All dust and small particles must be removed immediately using a soft brush.
It takes approximately 2-4 hours after laying the blocks (depending on temperature) for the solution to harden well. After this, you can begin further construction.
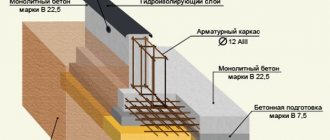
Process Features
Technology of laying aerated concrete walls:
- Lay out 2 cm of mortar on the foundation or base and then a layer of waterproofing: waterproofing, roofing felt or rubemast.
- The first row of aerated blocks is laid on the insulating layer using classic cement mortar.
- At this stage, maximum adjustment of the surface is performed to ensure even laying of the next layers of the wall.
- The blocks are bandaged while controlling the vertical seams of all rows that should not be combined.
- Close up irregularities.
- When using blocks using the tongue and groove system, external corners, dents and chips are filled with mortar.
- The remaining unevenness is rubbed with a grater, and the resulting dust is removed with a brush.
Reinforcement of the first row of aerated block
Aerated concrete blocks, due to their cellular structure, are easily susceptible to physical impact, so in the future, due to changes in humidity and movement of the foundation, cracks may form. To avoid such troubles, reinforcement is used - strengthening the masonry with metal reinforcement. The profile of the latter should be corrugated, the cross-section of the rods should be about 8-10 mm.
It is optimal to use rods A-III for reinforcement. For aerated concrete blocks with a width of over 250 mm, a pair of rods is required, while for partition walls with a similar indicator of 150-200 mm, one metal rod is sufficient.
Grooving and laying of reinforcement
The reinforcement is placed in recesses made in advance with a wall chaser, and all dust and sand particles must be removed with a brush. The size of the grooves must be larger than the diameter of the cross-sectional rods so that they fit inside without resistance.
The grooves are made at a distance of 60 mm from the edges of the block, and a special aerated concrete adhesive is poured inside, which will secure the metal rods and protect them from corrosion.
Due to the fact that it is extremely difficult to make an even strip of grooves along the entire length of the first row of blocks, a template is used, which can serve as a fixed board of the required width.
It is necessary to make grooves with rounding at the corners; a similar bend is first given to metal rods. The reinforcement is connected by an overlap with a length of about 30 cm.
The grooves with the laid reinforcement are once again filled with glue and leveled with a spatula flush with the plane of the gas block. The laying procedure of the first row is completed.
Many self-builders want to save on everything, including reinforcement, but such savings can lead to even greater costs in the future.
Subsequently, ignoring this process can come out sideways in the form of cracks on the walls and violation of the integrity of the structure, so we advise you to resort to reinforcement without fail, and in general, to do all the stages according to the technology. Then your aerated concrete house will last a hundred years.
Gas silicate construction technology
You can build a house yourself from gas silicate blocks even if you only have basic knowledge about construction technologies, but you have hard work and enthusiasm. To build walls you will need the following tools and materials:
- To dilute the glue you need a container and a puncher.
- You can apply the glue with a special ladle or a notched trowel.
- A hacksaw with a large tooth will help you cut the block into pieces of the required size.
- Uneven surfaces can be smoothed out with coarse sandpaper.
- Scrub brush.
- Metal square, level.
- Mortar of sand and cement.
- Gas silicate blocks of the D400 or D500 brand.
- Mineral wool vapor-tight insulation.
- Masonry fiberglass mesh or reinforcing bars.