Brick is reliable and durable. This material looks attractive and presentable. But brick walls have one significant drawback: thermal conductivity. Even relatively warm ceramic material conducts heat well and does not sufficiently protect the building from the cold. In our climate, it will be necessary to build walls 64-90 cm thick to provide sufficient thermal resistance. A more rational option would be to make the external walls of the building from other materials with insulation and cladding. How to cover a house with facing bricks? It's not difficult if you know the technology and the nuances of the work.
The house, lined with brick, looks solid and presentable, it is protected from wind and other unpleasant weather phenomena. This finishing option is used for both lightweight concrete and wooden houses.
How to choose facing bricks for your home
Before you line your house with brick, you should carefully select the material. It is important to select cladding not only by cost, but also by technical characteristics and properties.
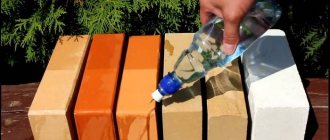
Ceramic bricks are most often used in construction. This material has fairly good (compared to other types) thermal insulation properties. The disadvantage in this case will be high hygroscopicity. The technology involves the use of both ordinary ordinary material and special facial material.
Ceramic brick is simple, durable and easy to use
In the first case, it is strongly recommended to treat the outer surface after installation with a hydrophobic composition. Facing brick does not need such treatment. The composition for treatment is selected with sufficient vapor permeability. This is especially important when finishing a wooden house with brick. It is required that the impregnation does not form a film on the surface that prevents the permeability of the walls to air and steam. Which brick to choose for frost resistance? The brand must be no lower than F35 according to the standards, and no lower than F50 according to the recommendations of the builders.
Another popular option is silicate material. It is the cheapest, but is not durable. Facing a house with this type of brick conducts heat well and absorbs moisture. Most often, silicate is heavier than ceramic. This option is not recommended when finishing a timber house (we also include a frame house and a log house).
Sand-lime brick is less durable than ceramic brick, but for 20-30 years you won’t have to worry about the problem
To decorate bricks with your own hands, you can use clinker material. It is specially designed for cladding a house, therefore it has low moisture permeability and high strength. Clinker finishing looks attractive, but this pleasure is not cheap: prices are on average 50-150% higher.
Undoubtedly, clinker brick is the best choice among all options. You can choose almost any color and shade
General points
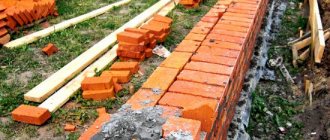
To get a smooth and beautiful wall, laying bricks with your own hands must be done along a tightly stretched horizontal cord, and to maintain vertical joints you must use a plumb line. Laying begins from the top level of the plinth and using mortar the horizontal level is leveled. To obtain identical seams, metal rods are used. The rod is laid on the edge of the previous row, and then the solution is placed. Using a trowel, the mortar is leveled and the brick is placed on it. After laying the brick, the rod (template) is removed from the seam and cleaned of the mortar.
It is best to use ready-made masonry mixtures as a mortar for masonry.
How to cover a wooden house with bricks
Brick and wood have very different characteristics, so certain difficulties may arise during the work process. When facing a wooden house with bricks, it is imperative to provide for sufficient ventilation of the main part of the wall. Otherwise, the wood will begin to rot or become moldy. Before covering the house with facing bricks, it is worth carefully examining the wall pie. Three-layer walls with brick cladding in this case will include:
- wooden supporting part;
- vapor barrier;
- insulation;
- waterproofing and wind protection;
- ventilation gap min. 50-60 mm;
- brick lining.
1 - ventilation layer;
2 - fastening the cladding to the wall; 3 - facing brick; 4 - additional insulation with windproof membrane; 5 - vapor barrier; 6 - finishing; 7 - thermal insulation; 9 - log wall It is important not to confuse vapor barrier and waterproofing. The latter must be permeable to steam so that it can easily escape from the insulation and brick into the ventilation gap. It is recommended to use modern vapor diffusion windproof membranes.
To ensure free movement of air, when clad with bricks on a wooden house, it is necessary to provide vents in the lower part and outlet openings in the upper part. It is recommended to use mineral wool as thermal insulation. It is characterized by low cost, ease of installation and good air permeability.
Before properly covering a wooden house with bricks, you must wait time for the walls to shrink. This process can take a couple of years, so it may be easiest to re-clad an older house.
Preparation
Before starting work, it is necessary to determine what type of brick will be used. The choice of brick is varied: silicate, clinker, ceramic. It all depends on the goals pursued during cladding. If the goal is only to insulate and improve the characteristics of the house, sand-lime brick is suitable; if you want to clad the building in order to improve its appearance, you need ceramic brick; you can use clinker brick, but it is much more expensive. You can use building grade bricks, but after construction there will be additional waste of time and money on plastering the outer surface.
If you use building grade bricks for cladding, you will need to plaster the surface
In the process of work, in addition to bricks, you will need sand, cement, crushed stone and reinforcement. Bricks can be purchased immediately by making a preliminary calculation of the required quantity. It is better to make a purchase with a reserve of 10-15 percent more than the calculated quantity; during cladding or transportation, the possibility of damage cannot be ruled out. Cement and sand, as well as other materials, can be purchased as they are consumed.
How many bricks will be needed? On average, up to 50 pieces are required per square meter of cladding. Cement should be chosen grade 200 or 250. You can buy a ready-made mortar to fill the foundation, this will significantly reduce the work time and save money.
Advantages and disadvantages
In construction it is very difficult to combine materials with different properties. In this case, nuances and negative aspects always appear. Finishing the facade with brick for a wooden building has three disadvantages:
- decreased ventilation, likelihood of moisture accumulation in the insulation;
- different shrinkage of parts of the wall, which does not allow rigid connection between the cladding and the main wall;
- the high mass of brick compared to wood (more than 3 times) forces the construction of more powerful and expensive foundations.
In general, we can say that it is better to decorate an old house with brick. For new construction, it is recommended to consider other more economical and efficient options.
But the technology has its advantages:
- improvement of thermal performance (especially when using ceramics);
- reducing the level of fire danger;
- reliable and durable protection of wood from negative weather conditions.
Types of masonry
The pattern of the seams on the cladding depends on the method of laying. To understand the varieties, you need to clarify the basic terms. The brick is a block with six planes, they are called edges: the largest is the bed, the smallest is the butt, the long side is the spoon. The last one in most masonry is the front one.
- Spoon masonry is the most common type of masonry; the spoon edge extends outward, and the stones are butted together. The dressing is carried out halfway across the block, which means that the vertical seams fall in the center of the brick of the top row.
- Spoon with offset - similar to the previous one, but subsequent rows are shifted only by 1/4. This makes the masonry pattern more interesting.
Spoon methods of laying cladding are the most profitable from an economic point of view, since the length of the ceramic is used to the maximum.
- Chain masonry - the row includes butts and bricks, which are directed with a small lateral plane towards the facade. The vertical dressing seam falls in the middle of the poke. It must be understood that this type of masonry increases material consumption, since every third brick is located perpendicular to the row. The bonded beams must be cut or tied with ordinary masonry, which generally complicates the complex of work.
- Bonded - masonry in which all the facing bricks are located perpendicular to the wall. The wall becomes thicker and the costs of their construction increase.
There are many types of masonry, but they are all, to some extent, variations of the simplest ones.
Technology
Cladding the façade of a house with brick is done after treating the wood with an antiseptic. You should choose a special composition for impregnation - for outdoor work. It will protect the wall from mold, mildew and other dangerous microorganisms. Next, a vapor barrier is attached to the wall using a construction stapler. Installation is carried out with an overlap of at least 10 cm.
A vapor barrier located on the inside of the wall will prevent moisture vapor from entering the insulation from the room
Facing the facade with brick begins with the installation of the sheathing. The dimensions of the frame bars depend on the required thickness of the insulation. The thickness of the thermal insulation can be selected approximately based on the recommendations of neighbors or the Internet, but it is better to use a special calculation. Using the fairly simple Teremok program, even a non-professional can make thermal calculations. You only need to know the thickness of the wooden wall and its thermal conductivity, as well as the thermal conductivity of the selected insulation. The brick (and all layers after the ventilation gap) are not taken into account in the calculation.
The frame block is attached to the walls with screws or nails. Next, the house needs to be sheathed with insulation. Mineral wool is placed tightly between the sheathing. To do this, the distance between the bars should be 2-3 cm less than the width of the insulation.
Methods for attaching insulation to a wooden frame
Waterproofing and wind protection are fixed on top of the insulation. Fastening is carried out using a construction stapler. After such preparation, they proceed directly to lining the house with bricks.
The hydro-windproof membrane protects the insulation from wind and moisture, but does not prevent excess water vapor from escaping from the wall to the outside
The thickness of a brick verst is usually 120 mm. This is not enough to ensure stability, so the wall must be connected to the main part of the external structure.
This can be done in two ways:
- attaching a reinforcing mesh to the wall and inserting it into the facing layer by half the width (such a mesh is installed across the entire width of the wall with a certain vertical pitch);
Fastening the cladding using reinforcing mesh (steel or flexible) is only possible for new construction - separate special bindings that are nailed to the wall and inserted into the masonry.
The fastenings are located in the places where the supporting frame passes.
The finishing installation technology is also relevant for frame buildings. The only difference is that the connections between the wall and the external materials are attached to the frame posts. In all cases, cladding must take into account the ventilation gap.
Work order
In order for the work to be completed in the shortest possible time, you should count and prepare consumables, prepare access roads, clear the work site and prepare tools.
Materials and tools
The set of tools and materials needed to expand the foundation are practically no different from those needed when carrying out standard concrete work to pour the main foundation. You should prepare:
- shovels (bayonet and pick-up), trowel;
- measuring instruments (tape tape, level, water level) and marking devices (pegs, construction cord);
- electric tools (grinder and hammer drill);
- axe, hammer, wood saw;
- cement, sand, crushed stone, reinforcement, formwork boards, binding wire.
The bricks for facing the house should be counted. It is advisable to deliver it to the construction site after the additional foundation is ready. This will allow you to move around the area more freely.
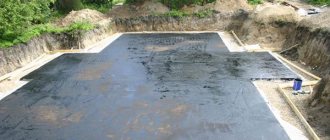
Making the foundation
The place for the additional foundation is thoroughly cleaned, the formwork, if any, is dismantled, only cleaned soil is left, and markings are carried out. Add 20 cm to the width of the future additional foundation - this will provide space for formwork and simplify work in the trench. Using pegs and a cord, the building is demolished, focusing on the width.
A trench is dug to a depth of up to 0.5 m; this should be done carefully, trying not to “injure” the soil at a given depth, since loosened soil, even carefully compacted, subsequently gives sediment.
In the old foundation, at a distance of 10 - 15 cm from the upper boundary, holes for reinforcement are drilled with a hammer drill. The pitch between the holes is 50 cm, the depth is 15 - 20 cm, the diameter corresponds to the reinforcement (10 -12 mm). The reinforcement is cut into segments of 30 - 35 cm and hammered into the holes, leaving 15 cm outside. This reinforcement will serve as a kind of anchor fastening, ensuring rigid adhesion of the old and new foundations. After this, the trench is cleared of crumbled earth, a sand cushion is poured onto the bottom, which is spilled and compacted.
Preparing the reinforcement frame
The formwork is made from planed boards and installed at a given distance (30 cm), secured with struts. Then they begin to reinforce the future foundation. You can tie the reinforcement directly into the trench, but given its small width, it is wiser to prepare sections of the reinforcement cage at the top and then secure them in the trench.
After this, you can begin pouring concrete, which is best ordered from a specialized enterprise.
If the volume of work is too large and interruptions are inevitable, then concrete should be poured in sections to the full height, creating working joints perpendicular to the axis of the foundation. The working seam is placed at a distance of 1/3 from the corner. It is unacceptable to pour concrete in layers.
After 2 - 4 weeks, when the concrete has completely set, the formwork is dismantled. Then the foundation is protected with waterproofing, the remaining ditch is filled with earth, after which you can begin to clad the house.
Reinforcement
To cover a building with brick, it is recommended to provide reinforcement for the finishing. To increase strength and rigidity, a wire mesh with a diameter of 3-4 mm and cells of 50x50 mm is used. The mesh is laid in the seams between the horizontal rows. The frequency depends on the brick:
- covering the building with a single brick (65 mm high) - every 5 rows;
- one and a half (88 mm high) - every 4 rows.
The dimensions of seams with and without reinforcement must be the same. To control, the mesh on one side is moved slightly beyond the masonry. This option increases reliability, but increases the cost and complexity of the work.
Features of wall cladding made of different materials
The facing masonry runs in half a brick.
The self-supporting capacity of such a false wall is low. It must literally be tied to the facade. For this, different materials are used: ready-made flexible connections, anchors, nails, strips of sheet metal, masonry mesh.
The method of bonding, the need for insulation, the presence of a ventilated gap and vents depend on many properties of the facade material: strength, vapor permeability, holding force of fasteners, size of building blocks, etc.
How to clad a house with lightweight concrete
In this case, a lined house can be built from aerated concrete, gas silicate, foam concrete, cinder blocks, and expanded clay concrete. A house made of facing bricks allows air to pass through worse than the listed materials. For this reason, just as in the previous case, it is necessary to provide a ventilation gap.
The installation method is very similar to a wooden house. The only difference is that you can use rigid connections between the wall and the cladding. The minimum number of connections is 3 pcs. per 1 sq.m. Ties are not allowed to be placed in the seams of the main wall; they are nailed to the surface.
When constructing a building from fragile cinder blocks, it is recommended to build a frame that will take the load from the floors and other building structures. In this case, the walls will be self-supporting. Finishing the house with facing bricks is attached to the cinder block very carefully.
Your own brick-lined house is beautiful and reliable. But when carrying out work, you must follow certain recommendations.
Useful tips
You cannot lay out more than 6-7 rows at a time, as the masonry may become deformed under heavy load. Every 3-4 rows are checked with a level to achieve maximum verticality. You cannot fill the gap between the cladding and the wall of the building with anything; the air gap is necessary for ventilation of the surfaces, in addition, it also performs thermal insulation functions. Slope jointing can be done immediately after laying, so as not to rearrange the scaffolding twice.
Brick cladding
Prices for construction and facing bricks
Construction and facing bricks
Design
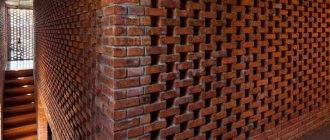
Brickwork may look so that, by looking at it, you can immediately understand what material the walls are decorated with. But the appearance of the products can be so diverse that the facade turns out to be truly unique. You can achieve an unusual effect using glazed, smooth or embossed brick. But engobed products have a smooth surface and a special production method. Using these products, you can clad the facade using bricks in unusual shades, for example, purple.
Smooth
If the aging effect is not suitable, you can choose smooth brick as the façade cladding. It can be based on different ingredients, and the color can also be selected from a wide variety of shades. But the appearance of the cladding allows you to decorate the walls in a classic style. Quite often, texture or its absence allows you to save money, because products from designer collections are usually more expensive. If the budget is limited, smooth brick is just right.
Embossed
Aged brick has a relief that makes the product look like cladding made centuries ago. Brick with relief can imitate natural materials, for example, wild stone.
Glazed
If you want to give the facade a shine, you should choose this cladding effect. It is usually combined with other trim or brick in a different color, size or shape. Glazed bricks usually have unusual shades. It is the wide range of colors that is their main advantage.
Engaged
Modern architects quite often began to use engaged brick for the reason that its appearance immediately catches the eye. The products can be successfully combined with other cladding options, giving the building sophistication and unique charm.
Requirements for external finishing
In order not to get confused with the large selection of different materials on the market, first of all, it is important to decide on the design, draw up a sketch, and a work plan. Decorative finishing of a brick house must meet the requirements for materials, namely, in addition to aesthetics, it must:
- protect walls from precipitation, wind, mechanical loads;
- do not let moisture in;
- isolate from noise;
- have low thermal conductivity to prevent the formation of condensation;
- be subject to repairability.
Finishing the outside of a brick house additionally insulates and protects the walls from rodents and insects.