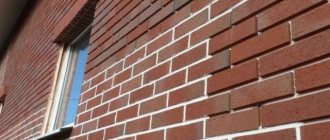
Brickwork is a trend that never goes out of date. Brick is used both as the main material for the construction of walls and for decorative cladding of facades. Recently, brickwork has begun to be left inside rooms, creating so-called “loft” interiors.
Of course, in such cases, quite high requirements are applied to the quality of the masonry. The wall should look aesthetically pleasing and neat, because it is, so to speak, the front side. The mortar that hardens in the brick joints usually does not look the best. And to give the masonry an attractive look, you need to work with it. To make the wall look beautiful and noble, the brickwork is jointed. We will talk about what types of jointing there are and how to do it correctly in this publication.
Joint jointing of brickwork
It is advisable to join the joints of brickwork only if the brick walls will not be plastered or finished with another type of finishing that will completely cover the surface of the brick.
Often, jointing of brickwork is necessary when the brick wall will be painted or varnished.
Brick jointing tool
The seams are opened with a special jointing tool, which can be convex or concave. In the process of jointing the seams with your own hands, it turns out that you can achieve not only clear shapes and sizes, but also strengthening, giving the brick seams greater strength.
Considering the fact that in order to joint the brickwork, the surface of the walls must be prepared in a certain way, to perform this process you will also need a brush with a hard bristle and a roller for painting the walls.
Joint solution
The technology for jointing brickwork with your own hands will be discussed below. Now it’s worth talking about the solution that is used for jointing, since it can be either dry or ready-made, diluted with water or other means.
If you need to make a mortar for jointing brickwork, which is presented in dry form, then it is better to use an electric drill with a mixer attachment for this purpose. The proportions of water and dry mixture of jointing mortar must be observed as recommended by the manufacturer.
Brick jointing technology
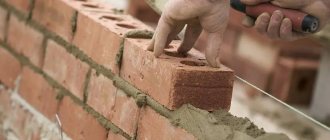
As mentioned above, jointing brickwork requires special preparation of surfaces. To do this, you first need to deepen the existing brick joints. To do this, use a hammer drill or other convenient tools to remove the old mortar between the bricks.
In this case, it is necessary to act carefully so as not to destroy the seams too much and not to damage the brick surface itself. It is enough to select the old solution to a depth of 1-1.5 centimeters.
Then, using a stiff bristle brush, clean the brick joints from chipped mortar and dust accumulation. Next, using a roller and plain water, the recesses between the brick joints are generously moistened with plain water.
Only after all the above preparatory work can you make a mortar for jointing the brickwork and begin applying it to the seams.
What to consider when doing this:
- The prepared mortar is rubbed into the brick joints with a tool, and its excess, if any, is immediately removed with a trowel.
- The mortar for jointing brickwork must be pressed in, not rubbed in, this is the only way to remove excess air from it.
- To carry out horizontal jointing of brickwork, you should use an oblong tool, and vertical jointing, on the contrary, with a narrow and short one.
- According to standards, the thickness of horizontal brick joints should be in the range of 12-15 mm, and vertical ones 8-15 mm.
Joining the joints of brickwork is actually not difficult. The most labor-intensive work here is precisely related to the correct preparation of the seams between the bricks.
However, there are many videos on this topic on the Internet, and if you prepare properly in advance, unstitching the seams will not cause much difficulty.
Advice from professionals
Professionals with extensive experience in construction offer several tips that will help you avoid common mistakes when jointing joints in brickwork:
- A high-quality solution using plasticizers significantly extends the life of the structure.
- First of all, you need to process the vertical seams, and then the horizontal ones.
- It is important to choose the color of the grout correctly if you intend to add a color additive to the solution. It is necessary to correctly combine the color of the brick and the seam. For testing, you can first grout on a small area in order to remove the solution in time.
- If it rains during work, it is better to stop work and cover the treated areas with plastic film.
- After jointing, you must immediately clean the brick from the mortar. Water and a clean rag will do for this. If the solution hardens, it will be difficult to get rid of. In addition, the brick itself may be damaged.
Such recommendations will help you cope with the jointing of brickwork without any problems. This protects the structure from future destruction of the seams and the formation of cracks in them. Strong wind and moisture will no longer destroy the structure.
Jointing technology during construction
In this case, the seams are finished immediately after laying several brick lines. The starting point for work is the beginning of hardening of the composition. The composition itself must maintain its own elasticity.
It is important to follow this sequence:
- When laying this material, the entire composition that protrudes outwards is cut off along with the laid masonry. This pruning significantly increases the rate of jointing. An example of this is shown in the figure below:
- The wall surface is thoroughly cleaned. The tool for work is a stiff fleecy brush.
- Sewing vertical seams. The tool moves from top to bottom and is pressed into the masonry. Air is removed from the composition by pressure. The density and strength of the composition develops. Short seams must be unstitched in a vertical position.
- To give the seams evenness in a horizontal position, a wooden strip is attached to their underside. You should lean on it and guide it along the masonry line. The same pressure here will create a pleasant aesthetic cladding.
- Filling joints in a vertical position. Then - in a horizontal position. Movement on the surface for work: from top to bottom.
- When the composition has completely set, the parts of the jointing mixture are removed from the wall. A broom or brush is used here.
Joining the seams of internal walls
If a room requires grouting material for brick joints, for example, between gypsum tiles or decorative stone, it is necessary to select the color scheme of the grout to match the basic tone of the interior. Or you can choose a color in the same shade as the tile. If, for example, there is only one wall in the interior reserved for tiling, you can choose a grout of the same shade as the walls. If this is the floor, then you need to choose a tone so that the walls do not merge with it. Thanks to grouting, you can quickly, without any problems or significant costs, update and refresh the color of the space between the tiles.
Advantages
This design method has its positive aspects, of which the following can be highlighted:
- reducing costs for materials;
- does not require restoration;
- ease of performing the task;
- the opportunity to later use another design method without dismantling.
Self-leveling floor in kitchen design
Loft style in the interior of a modern apartment
Thanks to these advantages, this method is increasingly used in the construction of country private residential or country houses. It is also relevant when creating other objects.
Types of jointing
The jointing tool gives the seams a clear pattern. The size of its edge can be of several types:
- Recessed rectangular shape.
- Convex oval.
- Rectangular cut with bricks.
- Concave oval.
- Triangular concave.
- Triangular convex.
- Single cut concave.
The recessed rectangular one provides for the removal of mortar from the joints to a depth of 6 mm. After which they are filled with new mixture and smoothed with a rectangular trowel. If a brick building is subject to high humidity, then it is better to avoid this type of jointing.
Rectangular jointing is also used to make an undercut seam with two bricks. To do this, simply carefully remove the mortar from the seam, without deepening it.
Concave oval is made by removing excess mortar from the seam, then filling it with a new mixture and processing it with a special joint. The convex oval one is made using a similar technology.
Triangular and single-cut joints differ from the previous ones in that they cut the mortar at an acute angle.
Choice
How to choose a tool? The devices differ in characteristics. But there are basic selection criteria:
- Bend shape. The device can be rectangular, rectangular recessed, concave, convex, or beveled. Which option to choose depends on the desired result.
- Canvas material. The most practical option is steel. This material is reliable and durable.
- Width of the working part. This parameter may vary. An indicator of 10 mm is in demand.
- Handle material. Wood is considered a reliable option. It is very comfortable to work with such material.
These are the main points that you need to pay attention to first. These characteristics are considered the main ones. This may not necessarily be a purchased device. The homemade version is also great.
Before carrying out construction work, it is advisable to simply hold the tool in your hand. You should check whether it is comfortable and does not cause discomfort. Only if the device does not cause inconvenience can it be used for finishing.
Technological process
How to make brickwork for jointing? When is it permissible to start such work?
If you decide to use the technology of laying facing bricks while simultaneously preparing the seam areas for jointing, then the excess mortar mixture is removed with a trowel in such a way as to ensure a common level with the plane of the wall.
As soon as the mortar mass begins to set, it is given the required shape using a jointing template. The mortar located between the brick rows is pressed inward by about three millimeters, compacting the mass well. This helps improve the quality of not only the masonry, but also the entire wall as a whole.
Regarding the time when it is best to start such a procedure, observe the following points, which are the most significant:
- monitor the consistency of the solution and the degree of its plasticity;
- control natural factors - air temperature and the percentage of humidity in it;
- speed mode of work of a master laying brick stone.
Masonry with simultaneous jointing
A similar procedure is started by preparing several rows of masonry, the solution in which begins to gradually harden.
You must act in a certain sequence:
- The brick stone is laid on a sufficient thickness of the mortar layer and lightly pressed. The mixture that is outside the seam is removed flush with the brick surface;
- the solution that has set, but has not had time to harden, is smoothed out with jointing or a piece of a simple hose, compacting and pressing the mass into the seam;
- if the jointing will be done a little later, then it is recommended to leave a little free space in the seams so that there is room for the jointing solution.
Carrying out jointing after masonry
Making bricks for jointing is possible on long-constructed walls. To perform such work, you will have to remove a certain amount of old masonry mortar. The formed cracks are moistened, a new solution is placed in them, which is expanded in a known way.
It is recommended not to prepare the mixture yourself, but to purchase ready-made formulations in dry form, which can only be diluted with water. Such materials retain their shape perfectly after the jointing procedure.
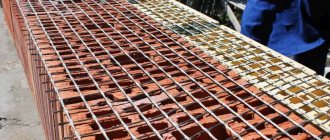
Masonry using rods
This technique is based on the use of a steel rod of round or rectangular cross-section, which is laid along the entire length of the bottom row on both sides. Then all that remains is to fill the free space between the metal elements with a mortar mixture, lay out the brick stone in a row, adjusting it in place with a wooden mallet.
Carrying out such work requires a large supply of metal rods of the same cross-section, since the embedded steel elements should be removed after a certain number of brick rows have been removed from above. Pull out the rods carefully, and then immediately wash them with water to remove traces of the mortar mixture.
The advantage of this method of jointing is that after removing the rod, an attractive and even joint remains, evenly filled with sand-cement mortar. There is no need to further modify it; you won’t even need to clean it with a metal bristle brush.
True, the contractor will need special attention when laying out the first row - it should turn out perfect, laid out strictly in a line. The check is carried out at the building level
By unstitching seams with a metal rod, you get the following advantages:
- masonry joints are characterized by perfect evenness;
- if all work is carried out carefully, then the front surface of the brickwork retains its cleanliness. This is especially true for expensive facing stones, the surface of which is difficult to clean from dried mortar particles;
- There is completely no need to form seam sections - all work is performed by a metal rod.
By the way, many people prefer to use round steel elements, because square shapes do not always make it possible to maintain the general level for brick stone and mortar mixture. This type of seam requires additional filling with jointing compound.
Technique for using grout material
To complete the last stage of laying the facing elements, it is necessary to prepare the following tools and materials:
- putty knife;
- bag;
- gun;
- mixture;
- gloves;
- container with water.
Important Not every job can be done with a syringe, so you may need an ordinary narrow spatula and a bag filled with grout mixture.
Additional tool:
- mixer;
- trowel;
- level;
- container for the solution (if it was in the bag).
- First you need to prepare the surface. It is cleaned of excess glue solution and dust. Wait for it to dry (10–20 minutes) and prepare to grout.
- The composition is carefully laid into the seams and compacted. When applied, excess is removed immediately before it hardens.
It is important to choose a mixture that suits the cladding. Dilute it according to the instructions that manufacturers place on the packaging.
If the composition is purchased in dry form, it is necessary to dilute a small amount. This will make it convenient to work with, but a large volume may begin to dry out. And stale ones (if you cook a lot and leave them the next day) will lose their properties, worsen the waterproofing of the seams and develop cracks.
When all factors of the grouting process are taken into account, and the composition is selected in accordance with the cladding, then it can be grouted in the following ways:
- Inside - compact the mortar under the stone without leaving it outside; if necessary, make additional indentations. The seam becomes concave and the stone appears to protrude outward.
- Flush - done with a semi-dry mixture, you can rub it in with your hands (but wear gloves). After rubbing, wipe the surface with a rag or a hard rag to get rid of excess.
- Convex - the composition is rubbed in with a special spatula, which is used along the seam, then, on the contrary, it protrudes outward. This method is worth practicing, as it requires certain skills.
- Bevel is a method that does not require skill. It is necessary to move the trowel along the seam, and then immediately remove part of the mortar, making indentations up to 4 mm at an angle.
- The triangular method is a complex and beautiful grouting method, used mostly indoors. To grout, you will need to remove a certain amount of mortar between the bricks; the remaining composition is placed in a triangle. This requires dexterity and skill from the master.
Using a syringe gun
The method is used in the following cases:
- outdoor cladding;
- large amount of work;
- when processing porous or sandy surfaces.
Grouting with a gun allows you to apply a precise strip of seam along the entire length of the decorative elements, while eliminating the occurrence of voids, interruptions, and bubbles. The tile or stone remains clean after work, material loss is minimized, and the grouting speed is high.
- The finished composition is placed into the gun with a trowel or spatula.
- Then, using careful direct extrusion from the tool, fill the vertical seams from top to bottom, and the horizontal seams from left to right.
If you don’t have a special gun, you can buy disposable grout. It looks like a syringe tube, there is a seal on it, and the solution inside does not need to be prepared or diluted.
Spatula
Attention A rubber spatula is the most common tool in the job. A thin strip of grouting material is placed on it, and then laid between stones or tiles at the desired angle.
The solution must be applied with force into the gap, then walk along the seam, removing the excess.
The force must be sufficient to rub the tool plate so that it fills the entire joint cavity and ensures tightness of the tile cladding. Using a spatula, you can apply cement and epoxy grouts.
From individual expert publications on our website, you can find out what types of decorative stone exist and are used for wall decoration, and also read how to beautifully and correctly decorate Khrushchev-era buildings, balconies, arches, kitchens and hallways, as well as doorways in various apartments with such materials .
Making the solution
From the purchased raw materials a mixture is created in the following proportions:
- cement – 1 part;
- lime – 1 part;
- sand - 10 parts.
Preparation of the solution
To all this, water is added in small portions. The solution should have the consistency of thick sour cream.
Note! The solution must be mixed before use. Its setting time is from 1.5 to 2 hours. During this time, the entire mixture should be used.
Important! When working with lime, safety precautions must be observed. If they are violated, significant injuries, such as chemical burns, can occur. To prevent this from happening, remember that when combining a dry mixture with water, you must add liquid to the mixture, and not vice versa. It is also recommended to work only with gloves in order to first protect your hands from direct contact with a dangerous chemical element.
Precautionary measures
When performing jointing work, you must follow the safety rules:
- use personal protective equipment: helmet, safety glasses or face shield, gloves, thick clothing, shoes with steel toe caps and thick soles, respirator;
- follow the rules for working at height;
- do not hang on the wall or lean on fresh masonry;
- do not work from random supports, use only scaffolding, stepladders and scaffolding;
- do not leave tools and materials on scaffolding unattended;
- Before using electrical appliances, make sure they are in good working order and that their insulation is intact.
To unstitch the seams, you will need personal protective equipment.
Compliance with these requirements will save your health and life.
Brick laying for jointing - nuances of the process
Before moving on to directly solving the question of how to lay a brick under the jointing, we will first deal with the question of what it even is. According to many people, a stitcher is a special tool that forms a beautiful facial seam. But many people forget that jointing is a kind of template that allows you to maintain equal distances between individual bricks. In most cases, this tool is the length of half or most of the brick, which makes it quite easy to use for leveling masonry.
The joint is either a thick plate with a curved handle, or a tube cut halfway along the length. The latter option was actively used by masons in the past, and today flat jointing has become widespread, which makes the seam more neat.
Brick laying for jointing photo
So, we’ve sorted out the jointing, now it’s time to clarify the situation with the question of how the masonry for the jointing is done? In principle, there is nothing complicated here, especially if you clearly lay out the first, fundamental row in the level. Let's start with it.
There are several ways to lay out the first row while respecting the horizon, but in most cases experts use only one. Beacon bricks are installed at the corners or edges of the wall - their uniform level can be checked using hydraulics or a laser. A thread is stretched between these bricks, relative to which the first row is laid out.
Here you need to pay attention to the tension of the thread, since over long distances it can sag - it may be necessary to install an intermediate beacon brick. If the distances are small, then the first row can be laid using an ordinary slatted level. Now the second row and all subsequent ones
This is where the fun begins - you will have to learn how to apply the solution in a certain amount. This is where you will need the jointing, which can be used as some kind of template. The solution is applied to the previous row in a slide, the height of which is twice as large as the width of the jointing. Then the brick is seated with a hammer, and the seam gap between it and the previous row is controlled by jointing. It is simply inserted into the seam, and the brick is lowered all the way. It should be understood that such control will have to be carried out on all sides of each brick.
Now the second row and all subsequent ones. This is where the fun begins - you will have to learn how to apply the solution in a certain amount. This is where you will need the jointing, which can be used as some kind of template. The solution is applied to the previous row in a slide, the height of which is twice as large as the width of the jointing. Then the brick is seated with a hammer, and the seam gap between it and the previous row is controlled by jointing. It is simply inserted into the seam, and the brick is lowered all the way. It should be understood that such control will have to be carried out on all sides of each brick.
How to lay brick under jointing photo
Each brick of the facing masonry is laid in this way. This, of course, may seem difficult, but believe me, after a maximum of several unsuccessful attempts everything will work out in the best possible way. As the mortar dries, it is additionally necessary to cultivate the seams - the jointing is again driven into the seam, and with its help, the mortar in it is smoothed out with a longitudinal movement. Here it works as a spatula. Do not forget that this tool needs to be wetted with water more often, then the solution will not stick to the metal, and the seam itself will remain smooth. And yet, in this way the seams can be given any color. This process is rather similar to grouting tile joints, only it is done much more carefully. After drying, excess mortar or grout is removed with a special brush with wire bristles.
Brickwork for jointing photo
Homemade device for obtaining even masonry
To improve the quality of masonry work and speed it up, you can make a special template for masonry
To improve the quality of masonry work and speed it up, you can make a special template for masonry. Externally, this product resembles a wide container without a bottom. Using this device, you can easily apply a perfectly even layer of solution. As a result, the masonry process itself will be much easier.
The following characteristics of the masonry depend on the evenness of the mortar application:
- If you lay the stone on a very thin layer of mortar, the adhesion of the bricks will not be strong enough.
- A layer of masonry mortar that is too thick will lead to overuse and unsightly, uneven masonry.
- If the solution is applied in an uneven layer, the outer side of the masonry will look sloppy due to crooked rows.
You can avoid all these disadvantages of incorrectly applying the solution using a template. Externally, this is not just a container without a bottom, but a product with restrictions on the sides that allow it to be firmly held on the wall. The dimensions of the template can be very different and depend on the masonry being performed and the stones used.
You can pour the solution into the elongated hole in the central part of the device.
The template is laid on top of a row of bricks. The solution can be placed into the elongated hole in the central part of the device. As a result, thanks to the restrictive parts of the template, the layer of solution comes out perfectly even in width and height. Moreover, the height of the seam will be strictly as specified by the dimensions of the template. After filling the niche with the solution, the template can be moved to a new location.
The template allows you to replace two tools used when making masonry mortar at once - a building level and a cord. In this case, during the construction of one building, several types of templates can be used:
- When making the main walls of a building, templates with specified basic wall parameters are used.
- To make the facing brick layer, a different template with the parameters of the facing stone is used.
Making a template
This device for quick brick laying is easy to make with your own hands.
This device for quick brick laying is easy to make with your own hands. Of course, you can buy the finished product in the store. Usually on it you can adjust all dimensions (seam height and width). But if you want to save money, you can make the template yourself.
First, you need to decide on the basic geometric dimensions of the masonry joint (width and height). Here a lot depends on the stone used. Depending on the masonry technology and the material used, the dimensions of the template niche are determined.
To work you will need the following materials and tools:
- a plastic box of a suitable size or a sheet of chipboard (plywood) and slats of a suitable thickness;
- pencil, level and ruler;
- drill (manual or electric);
- fastening elements (screws, nuts, screws);
- steel corners;
- screwdriver;
- screwdriver;
- hammer.
If you manage to find a plastic box of a suitable size, then it is much easier to make a template from it
Moreover, the plastic is quite durable and light, which is important when performing masonry work. If you haven’t found a box, you can construct a structure of the required size from sheets of chipboard or plywood and slats
First you need to make a regular box without a bottom, slightly larger than the width of the brickwork.
The entire structure includes the following components:
- Frame with two longitudinal wooden sides. The distance between these wooden planks should be equal to the thickness of the wall. Thanks to the protruding lower parts of the planks, it is convenient to align the stones when laying, since these planks overlap the bottom row. This makes it much easier to keep the wall vertical without a plumb line or level.
- Carrying handles. Handles make the tool easier to use.
- Cross members. They are usually made from strip steel. This element allows you to control the linearity of the masonry.
The second name for such a template is a dispenser, since it can be used to accurately dose the amount of solution applied
The second name for such a template is a dispenser, since it can be used to accurately dose the amount of solution applied. Above we described the device and principle of using a horizontal dispenser. It is suitable for making horizontal seams.
To form a correct and even vertical seam, a vertical dispenser is used. The principle of using an end dispenser is similar to using a horizontal template. The only difference is that due to the small amount of solution, it is applied using a hand trowel.
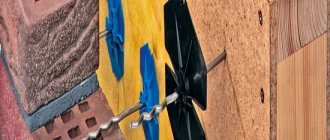
Tools for work
Thanks to the jointing, the brick wall acquires a noble and beautiful appearance.
- Convex or concave jointing - this tool is designed to fill the seams of the brickwork of a house and remove the remaining mortar from them. Depending on the required thickness and shape of the seams, the cross-sectional profile and jointing size are selected. If desired, you can make it yourself by bending a strip of metal and wrapping the intended place for the handle with electrical tape. You can use an old knife, after heating it on a burner and bending it.
- Falcon is an instrument consisting of a 40x40 cm shield with a handle. It can be made of either metal (it is more durable) or wood. Used as a tray for solution.
- A trowel for masonry work is a steel blade, ground on both sides, with a wooden handle. Used for leveling, cutting mortar from house brickwork and for filling vertical joints. This tool can be used to bandage the seams of brickwork.
- A mortar shovel is used to supply mortar, to spread it on the wall of a brick house, to mix the mortar in a mason's box or bucket.
- The mason's box is used to receive and supply mortar to the mason's workplace.
- Mopping is used to form seams when laying ventilation ducts in a house, to clean them from protruding excess, to fill them more completely and smooth the mortar between masonry bricks.
Structural parts
This jointing is the same trowel used in construction and repair. This tool consists of:
- working part;
- necks;
- handles;
- butt.
The working part is made of reliable steel. Most often it has a galvanized or stainless steel coating. The mount (neck) has not only a holding function. It also divides the working part and the handle. The neck determines the level of grip of the hand when working.
The handle is usually made of rubber, plastic, or wood. Combinations of materials may be used. Handles are also made of lead or steel, but they are rarely found on sale. Their main advantage is impact resistance.
The butt is located at the end of the handle and is created from reinforced materials. This piece is pressed onto the masonry mixture to create a neat surface. The butt must be fixed securely, and if there is incorrect play during construction, the handle may crack.
The scope of use of such devices is small. These are specialized devices that are used to perform masonry procedures with mortars. The device will help distribute the mixture between the bricks, ensuring the reliability of the wall and an attractive appearance.
Since such products are considered professional tools, their creation is carried out according to GOST standards. These parameters must be taken into account by craftsmen when choosing a product for a specific operation.
Tools
Jointing seams can be done either with ready-made devices purchased in a store or with homemade ones. Moreover, some master masons make their own hand tools in various configurations to produce joints of non-standard shapes.
But using joints alone is not enough. Depending on the condition of your brick wall, you may need:
- A sharp chisel and a hammer or hammer to remove old mortar from the seam.
- Drill with mixer attachment for preparing grout. If the volume of work is large, it makes sense to use a concrete mixer.
- Triangular trowel and falcon - for carefully applying the mixture and removing excess from the masonry.
- A stiff brush and brush will easily clean the surface of the stones when the grouting and grouting are completed.
- A soft flute brush or roller is needed to wet the surfaces.
- A wooden strip about a meter long - it is convenient to rest the tool on it when sewing horizontal seams.
Also, do not forget that to prepare the grout you will need a special container - deep, but not wide, so that the solution in it does not set so quickly.
A truly working legal way to save money. Everyone needs to know this!
In what cases is it used?
After the construction of a brick structure, vertical or horizontal rows of bricks are connected to each other using prepared mortar. Excess cement-sand mixture that protrudes outward is removed. After this, the seams must be processed. This processing is called seaming. This procedure is used to:
- Give a beautiful design to brickwork.
- Protect from moisture, which increases tightness.
- Ensure the strength of the structure.
- Increase the durability of the structure.
To learn how to lay bricks yourself, read the article Brick Laying.
Based on this, you should not refuse to unstitch the seams and put off this task for the future. Naturally, in some cases, jointing is done on brickwork that was laid several years ago. But during this time, the seams have already absorbed enough moisture to reduce the performance characteristics of the brickwork.