The material for building a country house is often brick. It looks very elegant, but also has a lot of useful properties - for example, it retains heat well in the finished building. And even finishing brick also brings considerable benefits, and also performs an aesthetic function. And to make your home even prettier, you can add additional decorative elements to the walls. For example, grouting the joints of brickwork looks impressive, and, as it turned out, brings considerable benefits.
Grouting brickwork joints
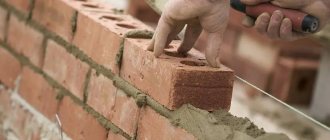
Grouting process
Expert recommendations
To ensure that no defects or errors occur during the work, you need to read the recommendations from the craftsmen.
- When preparing the grout composition yourself, it is necessary to use sifted components so that they do not contain large fractions.
- After preparing the solution, it should be allowed to sit for 10–15 minutes and then mixed again to improve plasticity.
- When grouting, you should avoid applying the mortar to the bricks.
- If the solution gets on the decorative finish, it must be removed immediately, preventing it from drying out.
SNiP indicates that the thickness of the seam should be up to 1 cm, and therefore it is recommended to make small gaps between the bricks themselves, adjusting the size depending on the climatic conditions at the work site. There is no need to start grouting joints on hot days, as the solution will quickly harden, which can lead to disruption of the technological process. You should also avoid carrying out work in wet weather. The solution must be mixed in small portions in order to quickly produce it and not allow it to harden.
As you can see, grouting is a responsible but effective way to improve the appearance of a ceramic or other coating after finishing work, and it will also make it possible to create a complete finish. Professionally applied grout will improve the appearance of the base and protect the wall from damage. In addition, it will increase the thermal insulation properties of the masonry, which will allow it to stand for a long time and not require annual repairs. To do this, you just need to complete all the work according to the recommendations and written rules.
You can see an example of grouting joints in the video below.
Safety precautions
You should not grout in hot weather, because the mortar mixture dries out much faster. Craftsmen recommend waiting out rainy weather so that the solution does not absorb a lot of moisture.
Carrying out such work requires the use of protective equipment - helmet, goggles, gloves, overalls and a respirator. Before working on scaffolding, you should study the safety requirements for high-rise repairs.
It is prohibited to hang yourself on a wall or lean on freshly laid brickwork, work on random supports, or leave tools unattended.
How to erase them?
For high-quality processing of the seam, you need to study the instructions on the packaging of the grouting material and also prepare for work. Tools and materials you will need:
- mixer;
- spatula/gun;
- drill for mixing;
- sponge;
- rags or rag;
- gloves;
- mixing container.
Regardless of the purpose of the grout, it is applied with a gun or a trowel/trowel.
Let's look at how to properly fill and grout joints when laying stone cladding. Work progress when sealing seams:
- Surface preparation: clean the cladding and allow to dry.
- Mix a small amount of grout to prevent excess from hardening.
- Treat the seams in one of the following ways - using a gun or a spatula, apply the mixture, compact it into the seam gap. Excess must be wiped off immediately.
- Let the solution set.
- Treat it with a fixative.
Important Each mixture has its own instructions for use. On average, dry formulations are prepared in proportions of 1 kg per 200 ml of water
The mass is stirred until smooth, the grout has the best characteristics in the first three hours, then it begins to thicken and loses its elasticity. It is recommended not to use a stale solution, as this will lead to loss of waterproofing and if the seam is sealed with such a product, microcracks may appear.
We recommend watching a video on how to grout seams on decorative bricks:
Jointer
Joint jointing is the final stage of surface finishing. It is necessary to secure the facing elements, complete the composition, and additionally treat the gaps between the elements from various influences (temperature, dirt, moisture).
For jointing, you need to prepare the following materials and tools:
- grout for seams;
- foam sponge;
- several containers: for water and breeding fugue;
- grout spatula;
- masking tape;
- latex gloves.
To joint joints, you need to purchase a special grouting gun or rubber spatula. The latter is a small plate with a handle. Tools made from different materials are selected depending on the process in which they are used. To apply and press the grout into the gap between decorative stones, spatulas with a springy rubber surface with a narrow blade are used.
Advice: It is faster to rub with a spatula than with a gun, but this requires skill in execution.
Before work, you can cover the stone with masking tape so as not to stain it and not to wipe it off again. For final cleaning of surfaces from contamination with fugue and its residues, special synthetic cellulose or foam sponges are used. But a soft cloth moistened with warm water may also work if it does not damage the stone (it is better to check first).
After work, it is better not to store the remains of the diluted fugue: after use, it dries out and loses its elasticity.
You can familiarize yourself with the options and principles for decorating a corridor, hall, bedroom, area near the TV, balcony, doorways, arches and columns with decorative stone.
Jointing technology during construction
In this case, the seams are processed immediately after laying several brick lines. The starting point for work is the beginning of hardening of the composition. The composition itself must retain its plasticity.
It is important to follow the following sequence:
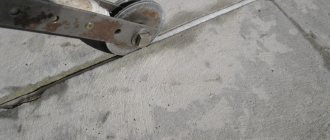
- When laying this material, the entire composition that protrudes outwards is cut off flush with the laid masonry. Such pruning significantly increases the rate of jointing. An example of this is shown in the figure below:
Pruning
- The wall surface is thoroughly cleaned. The working tool is a stiff fleecy brush.
- Sewing vertical seams. The tool moves from top to bottom and is pressed into the masonry. Air is removed from the composition by pressure. The density and strength of the composition develops. First of all, short seams are unstitched vertically.
- To make the seams horizontally even, a wooden strip is attached to their underside. You should lean on it and guide it along the masonry line. Uniform pressure here will create a pleasant aesthetic finish.
- Filling seams vertically. Then - horizontally. Movement on the working surface: from top to bottom.
- When the composition has completely set, the elements of the jointing mixture are removed from the wall. A broom or brush is used here.
Tools
Jointing seams can be done either with ready-made devices purchased in a store or with homemade ones. Moreover, some master masons make their own hand tools in various configurations to produce joints of non-standard shapes.
But using joints alone is not enough. Depending on the condition of your brick wall, you may need:
- A sharp chisel and a hammer or hammer to remove old mortar from the seam.
- Drill with mixer attachment for preparing grout. If the volume of work is large, it makes sense to use a concrete mixer.
- Triangular trowel and falcon - for carefully applying the mixture and removing excess from the masonry.
- A stiff brush and brush will easily clean the surface of the stones when the grouting and grouting are completed.
- A soft flute brush or roller is needed to wet the surfaces.
- A wooden strip about a meter long - it is convenient to rest the tool on it when sewing horizontal seams.
Also, do not forget that to prepare the grout you will need a special container - deep, but not wide, so that the solution in it does not set so quickly.
A truly working legal way to save money. Everyone needs to know this!
Grouting brickwork joints
This procedure may be required if you need to restore the properties of old walls or make jointing of the same color. Indeed, often the mixture in different areas of the masonry differs noticeably in shade. First of all, it is necessary to cut the surface of the dry mortar to a depth of 1-1.5 cm (with a hammer and chisel) and remove its remains. Cleaning is carried out not only at the seams, but throughout the entire masonry - the brick wall must be completely cleaned of dirt and dust before grouting. To simplify the task, you can use a compressor unit to blow out even the smallest crumbled particles from the cracks and ensure the best adhesion of the fresh seam.
Also, for accurate preparation for jointing, you need a reliable and well-sharpened tool. Only with its help can you remove excess mortar so that the brickwork is not damaged. After this, you need to moisten the seams with water and start working. Do not moisten the entire surface at once - limit yourself to a small area that you will be working on in the next hour.
Brick grout is sold ready-made or dry. It can come with the addition of pigments and plasticizing additives. But the main thing in any chosen composition for seams is its base. Today there are two options for embroidering walls:
- cement (Quick-Mix, Mixonite);
- epoxy resin (Litokol Litochrom, Mapei).
But you can prepare an inexpensive mixture yourself. The simplest grouting for masonry consists of two parts of lime and cement, taken equally, and 10 hours of fine sand. This solution has a pot life of about 90-120 minutes, so you shouldn’t mix a large volume for jointing right away.
Another recipe: for one part of cement, take the same amount of ground volcanic trace and 5 hours of sand as a filler. This type of grout should be used if the brick wall “pleases” the eye with efflorescence and whitish streaks from the seams. A purchased or self-prepared jointing solution is stirred to the consistency of liquid sour cream: it should not spread, but stick to an inverted trowel in a lump.
Having prepared the grout according to the instructions on the package, you can begin to make vertical joints. The composition should be soft and plastic to make it easier to work with, but not liquid, otherwise the solution will not hold its shape and will simply flow along the masonry. After all the preparations, the jointing is carried out using the following technology:
1. Apply the finished grout with a trowel - a little more than is needed to fill the seam. In order not to stain the bricks of the bottom row, you can substitute a plaster falcon.
2. Remove excess mixture with an edge and smooth the surface using a suitable hand tool. Each seam is pressed with force so that there are no voids left between the old mortar and the grout.
3. After filling, the seams are actually opened, that is, they are given shape. To work in horizontal rows, it is more convenient to use a straight strip - under it, like under a ruler, you can draw an even line.
When the jointing of the brickwork is completed, its front side is cleaned of traces of mortar with a stiff brush. Then you need to let the mixture finally gain strength, not allowing the seams to dry out or, conversely, get wet in the rain.
List of sources
- GidPoKraske.ru
- plotnikov-pub.ru
- kirpich-sbm.ru
Preparatory activities
Joining can be carried out immediately after laying the brick or after erecting the walls. In the first case, the mason brings the masonry into proper shape after several rows have been completed and the mortar begins to set.
In the second case, when laying, the master leaves the outer part of the seam empty for subsequent filling with jointing mixture, and they begin refining the wall after a certain time has passed, necessary for complete shrinkage of the masonry.
Before restoring old masonry, it is necessary to remove the mortar from the joints to a depth of 15 mm and clean the wall from dust and dirt
Preparing the masonry is carried out in the following sequence:
- If it is necessary to update the cladding of an old wall, parts of the old jointing are removed from the seams to a depth of 10 - 15 mm. To avoid damaging the bricks, it is better to use a narrow wooden wedge and a hammer. If it is not possible to knock off parts of the frozen solution, use a chisel;
- Use improvised means to remove dust and dirt from the walls of the building;
- The seams are cleaned using a stiff brush or a high-pressure apparatus. This work should be carried out very carefully, since dirt and dust particles interfere with the adhesion of the jointing solution;
- After cleaning, the seams are moistened using a roller or soft brush and a bucket of water.
The preparation of the cement-sand mixture begins only after the surface has been completely prepared for the next stage, at which the jointing solution is prepared.
You can make the jointing mixture yourself or use a ready-made factory-made composition, which is sold dry. and in wet form. Since the solution is used for decorative purposes, concrete dyes can be added to it. A concrete mixer will speed up the process of preparing the jointing mixture
We recommend: Cold bitumen production
If you prefer to do everything yourself, then to prepare the optimal mixture, take lime, sand and cement in a ratio of 1:10:1 and mix with water until the consistency of very thick sour cream is obtained. Remember that the composition remains mobile for up to 1.5–2 hours, so mix only the amount that you can use during this time.
If the mixture you receive is too liquid, you can remove excess moisture from it by placing dry red brick in a container with the solution for 1 - 2 minutes.
For large volumes of work and the presence of assistants, a concrete mixer will help speed up the process.
Types of jointing and their main characteristics
Before you begin jointing work, you need to become familiar with the basic methods of sealing seams. You can often find the following types of joints:
- flush. A simple and common type of jointing. The technological process is as follows: it is necessary to cut off excess mortar from the surface of the wall; this can be done using a construction trowel. Next, use a brush to clean the gaps between the bricks. The result of the treatment is clearly defined white seams;
- recessed rectangular. Typically this type is used as a decorative finish. This option is more labor-intensive. If the brickwork is exposed to constant exposure to precipitation, then this method of treatment should not be used. Jointing technology: it is necessary to remove mortar from the joints to a depth of 5 mm. Next, the new mortar should be compacted and smoothed; this can be done using a construction tool called a round dowel;
- concave. An equally popular option that is used for grouting. This method involves using a prepared tool called “jointing”. This grouting implies the following: the excess mortar is cut off and the resulting white seams are treated with a semicircular joint along the entire length;
- beveled. This type of jointing has become widespread in regions with harsh climatic conditions. A prerequisite is a carefully sharpened trowel. Grouting is done in the following way: cut off excess mortar with a sharpened trowel, which must be held at an acute angle. It is recommended to deepen the tool by 3–4 mm.
Sealing stove walls with mortar
If the seams of brick stoves become leaky and begin to gradually collapse, carbon monoxide will begin to leak into the room, which is considered hazardous to health. To determine exactly where the seams have weakened, the furnace is flooded, and the place from which smoke will leak is marked. To solve this problem, the old voids are first thoroughly cleaned to a depth of 20-30 mm. Next, the masonry is washed with soapy water, all rough areas are scrubbed with a wire brush.
For additional strength, salt is added to the solution.
To seal furnace seam voids, you will need a refractory mixture, which is prepared from red clay. To make the solution as durable and heat-resistant as possible, it is recommended to add 350-400 g of salt to a bucket of the finished mortar mixture. If the gaps are very large, they are additionally sealed with a fire-resistant cord before sealing. When the solution dries, the walls are grouted; if necessary, the surface is whitened, painted or covered with greaseproof varnish.
Restoration of brickwork joints
Sealing joints with lime mortar
To stop the seams between the bricks from spilling out, first of all, with a metal brush, we remove all the rotten mortar, reaching its solid state. Then, using an ordinary sweeping brush, we remove all the dust that remains in the seams between the bricks.
Prepare a solution of slaked lime. When quicklime hardens, it will swell and try to crawl out without giving a binding effect. Add sand to lime in the following proportion: 1 part lime + 3 parts sand, mixing with water. It is better to take washed river sand, since gully sand contains particles of clay, which will give the seams a yellow color.
Before the process of filling with lime mortar, problem areas are moistened with water and, using jointing, the solution is pushed into the damaged areas. After the lime mortar has hardened, the seams are cleaned with sandpaper.
Repairing cracks in a brick wall
If cracks up to 5–8 mm in size appear in the brick wall of your house, you need to do the following. Clean the seams in places where the destruction spreads perpendicular to the cracks so that it is possible to insert reinforcing bars with a diameter of 6 - 8 mm into these places of the seams, and in some cases it can be thicker, depending on the width of the seam. Then the places where the reinforcement is laid are sealed with concrete mortar.
Metal screed around the perimeter of the wall
It happens that this method does not give positive results, then they resort to the method of repairing the brickwork, using a wall screed around the perimeter using metal profiles. In other words, depending on the size of the entire wall, using electric welding, a frame is constructed from a large metal corner ranging in size from 63 to 110 mm, which is adjacent to the corners of the house and is pulled together (welded) together in several places along the perimeter of the wall with a metal strip. In “several places” – this is at the top, in the middle and at the bottom. After the screed is installed, you need to repeat eliminating the cracks using reinforcement.
If the size of the cracks reaches more than 10 mm, experienced craftsmen recommend dismantling the old masonry in these places and laying out new ones.
Note: all work to eliminate defects must be carried out after the cracks reach their maximum size and stop growing.
Repairing cracks with clay and sand
The main signs indicating that it is time to start restoring the furnace are its smoke and poor heating of the room. The reasons for this may be through cracks formed between the bricks, which will subsequently need to be rubbed or covered up.
The most reliable method for coating ovens is a solution of clay and sand.
Classic grouting of cracks in a brick kiln consists of the following main steps:
In brick kilns, as a rule, the main cracks most often appear in the places where such elements are attached, such as the firebox doors or the vent. Therefore, before coating a brick stove with a clay heat-resistant mortar, you must first completely remove the firebox door, then just clean the damaged area and finally begin restoration work. In order to cover the problem area with clay, it is also recommended to fasten a wire (asbestos cord) around the perimeter to the door frame until the cracks are eliminated in order to firmly fasten it to the brickwork of the stove.
Benefits of grout
The jointing is both decorative and practical.
Decorative properties include:
- emphasizing the texture of lines;
- highlighting the brick pattern;
- combining all the lines that were laid out both horizontally and vertically;
- giving the façade rigor and clarity.
The practical characteristics are as follows:
- sound insulation increases with jointing;
- it protects from excess moisture;
- heat is retained in the building;
- service life increases;
- tightness appears;
- small cracks close.
The grout covers the previous layer of cement, but in this way it is impossible to completely remove errors in the form of excess cement in the wall, its curvature and uneven masonry.
There are several well-known and common ways to make grout yourself. Let's look at some examples in more detail.
What are grouts made of?
Depending on the connecting element, there are different types of grout for decorative stone: epoxy, cement, latex. The materials also contain polymer additives that improve their properties. Depending on the main component, the grout can be:
- Plaster. The mixture is suitable for sealing joints between decorative stones indoors.
- Epoxy. It has a high level of moisture resistance. Thanks to special additives, it becomes immune to the effects of aggressive substances. This grout polymerizes quickly, so it is not easy to apply.
- Cement. It can be coarse-grained or fine-grained. The first type creates a pronounced textured surface. The composition looks natural. This material is prone to cracking, but the problem can be quickly eliminated. You should not use it to work with marble or glossy cladding.
- Polyurethane. The composition has a high price, but it is resistant to fading, moisture, and stains. Since the material does not dry very quickly, it is not difficult to work with.
- Silicone. It is elastic and provides a high level of tightness. Technical characteristics include resistance to negative temperatures and moisture.
- Latex. It has good adhesion parameters to the base, as it penetrates deep into the seam. Cracks have not yet formed on it.
- Rubber. This type of grout is resistant to moisture and easy to apply. It is expensive, so finishing large areas is impractical. It is more suitable for interior walls of rooms where there is high humidity.
The technology for applying the material depends on the type of composition.
What defects may occur?
In brickwork, defects can occur not only in the condition of the brick itself, but also in the seams between it. For example, if the technology is violated, cracks may appear on the jointing.
A few more major defects that require immediate repair:
- bulging of mortar on jointing;
- corrosion of seams, surface coating with fungus or mold;
- solution detachment;
- lack of waterproofing and vapor barrier;
- freezing of seams;
- destruction of joints.
A layer of mortar between the facing bricks is also too thick or too thin. Poor filling of joints in vertical masonry also has its disadvantages: the wall loses its protective properties, and over time the masonry may collapse and repair work will have to be carried out.
To identify defects, a thorough visual inspection of the wall is carried out before repair. As an auxiliary tool, you can use a chisel or spatula. If you carefully pry the mortar seam with the corner of a spatula, you will notice how it moves away from the jointing on its own. This means it's time for renovation.
Tools
Jointing seams can be done either with ready-made devices purchased in a store or with homemade ones. Moreover, some master masons make their own hand tools in various configurations to produce joints of non-standard shapes.
But using joints alone is not enough. Depending on the condition of your brick wall, you may need:
- A sharp chisel and a hammer or hammer to remove old mortar from the seam.
- Drill with mixer attachment for preparing grout. If the volume of work is large, it makes sense to use a concrete mixer.
- Triangular trowel and falcon - for carefully applying the mixture and removing excess from the masonry.
- A stiff brush and brush will easily clean the surface of the stones when the grouting and grouting are completed.
- A soft flute brush or roller is needed to wet the surfaces.
- A wooden strip about a meter long - it is convenient to rest the tool on it when sewing horizontal seams.
Also, do not forget that to prepare the grout you will need a special container - deep, but not wide, so that the solution in it does not set so quickly.
A truly working legal way to save money. Everyone needs to know this!
Grouting brickwork joints
This procedure may be required if you need to restore the properties of old walls or make jointing of the same color. Indeed, often the mixture in different areas of the masonry differs noticeably in shade. First of all, it is necessary to cut the surface of the dry mortar to a depth of 1-1.5 cm (with a hammer and chisel) and remove its remains. Cleaning is carried out not only at the seams, but throughout the entire masonry - the brick wall must be completely cleaned of dirt and dust before grouting. To simplify the task, you can use a compressor unit to blow out even the smallest crumbled particles from the cracks and ensure the best adhesion of the fresh seam.
Also, for accurate preparation for jointing, you need a reliable and well-sharpened tool. Only with its help can you remove excess mortar so that the brickwork is not damaged. After this, you need to moisten the seams with water and start working. Do not moisten the entire surface at once - limit yourself to a small area that you will be working on in the next hour.
Brick grout is sold ready-made or dry. It can come with the addition of pigments and plasticizing additives. But the main thing in any chosen composition for seams is its base. Today there are two options for embroidering walls:
- cement (Quick-Mix, Mixonite);
- epoxy resin (Litokol Litochrom, Mapei).
But you can prepare an inexpensive mixture yourself. The simplest grouting for masonry consists of two parts of lime and cement, taken equally, and 10 hours of fine sand. This solution has a pot life of about 90-120 minutes, so you shouldn’t mix a large volume for jointing right away.
Another recipe: for one part of cement, take the same amount of ground volcanic trace and 5 hours of sand as a filler. This type of grout should be used if the brick wall “pleases” the eye with efflorescence and whitish streaks from the seams. A purchased or self-prepared jointing solution is stirred to the consistency of liquid sour cream: it should not spread, but stick to an inverted trowel in a lump.
Having prepared the grout according to the instructions on the package, you can begin to make vertical joints. The composition should be soft and plastic to make it easier to work with, but not liquid, otherwise the solution will not hold its shape and will simply flow along the masonry. After all the preparations, the jointing is carried out using the following technology:
1. Apply the finished grout with a trowel - a little more than is needed to fill the seam. In order not to stain the bricks of the bottom row, you can substitute a plaster falcon.
2. Remove excess mixture with an edge and smooth the surface using a suitable hand tool. Each seam is pressed with force so that there are no voids left between the old mortar and the grout.
3. After filling, the seams are actually opened, that is, they are given shape. To work in horizontal rows, it is more convenient to use a straight strip - under it, like under a ruler, you can draw an even line.
When the jointing of the brickwork is completed, its front side is cleaned of traces of mortar with a stiff brush. Then you need to let the mixture finally gain strength, not allowing the seams to dry out or, conversely, get wet in the rain.
Practical advice
Knowledge of the nuances and experience of professionals will help you avoid mistakes and improve quality:
- Be sure to sift the sand. There should be no large fractions in the grout mixture.
- A fresh batch should sit. Let the solution sit for at least 20 minutes.
- When filling the seam, try not to get the solution on the surface of the masonry.
- When laying on the front side, leave gaps to decorate the seam.
- A concave seam can be made by filling the vertical and horizontal at the same time.
- It is better to remove the remaining solution immediately.
- Correct any unevenness/mistakes immediately while the solution is damp; this will not be possible after it has hardened.
- It is better to work on a cloudy, dry day.
- You can make the jointing yourself from an old knife or any metal object.
Start filling the seams from the vertical gaps
Benefits of grouting
- Improving the appearance of the building facade. The grout has a rich color palette. Using contrasting colors, you can emphasize the harmony of the masonry.
- Protection from moisture not only the seams, but also the walls of the house, which increases their service life.
- The sound and heat insulation properties of floors are significantly increased.
It is not always possible to see buildings with similar decoration. If the masonry is subsequently to be plastered or faced, grouting is not required. Advice. When subsequently decorating the seams for masonry, you must use only intact and flawless material, and the seams must be the same in thickness. There are craftsmen who make horizontal seams somewhat thicker than vertical ones. This is a design decision.
Methods of carrying out work
Grouting can be done in two ways, in which the seams will have either a convex or sunken appearance. When performing a processing method called sunken, you will need a small spatula, with which both vertical and horizontal seams are simultaneously filled with the mixture. When the grout is applied, the tool with the arc is turned inward and the excess mortar is removed.
In order to perform convex grouting, an arc-shaped tool is applied to the gap between the bricks with an arc outward and the space is filled with mortar. When one of the seams is filled, the tool is pulled further. Thus, all horizontal seams are filled. When the mixture dries, you can do convex grouting of the vertical joints. All excess mixture is wiped off the surface of the bricks with a damp cloth.
As can be seen from the information presented, grouting the joints of brickwork can be successfully done with your own hands. A properly prepared solution will last a long time and reliably, giving brick walls an aesthetically attractive appearance and preventing moisture from entering the masonry.
Types of syringe guns
The devices are used for filling and rubbing seams. They are different from each other. But essentially there are only two types of them:
- Guns that work with stone.
- For working with ceramic tiles.
They are equipped with a special mechanism that squeezes out a specially prepared mixture, like in a syringe. But different models may differ from each other in the following characteristics:
- The material from which all components of the pistol are made.
- Case color.
- Various volumes of cylinders for solution.
- Availability of additional components.
Models with a large cylinder have a reinforced body that can hold high pressure inside. Usually all elements are galvanized.
That is, the larger the cylinder volume, the more parts wear out. This is also due to the fact that at some sites we have to work in an accelerated mode. This affects the operation of the pistol.
Surface preparation
First of all, the work begins with preparing the surface of the brickwork. It must be taken into account that the vertical seams must be processed first. Work with horizontal ones is carried out secondarily.
Read how to make reinforced brickwork with your own hands here
A hard bristle brush is used to clean and prepare the surface. The cement solution is cleaned of various coarse contaminants. Modern technologies make it possible to use a special apparatus that helps get rid of the smallest particles of debris. Its work is based on the principle of high pressure and helps remove particles that are invisible to the eye.
After cleaning the debris, it is necessary to carry out the procedure of wetting the seams.
The next step will be preparing the solution. It must be mixed immediately before grouting. After all, the solution dries within 2 hours.
Varieties of material and methods
Epoxy-based compounds are used for interior finishing.
Masonry joints must be treated with special compounds. Several different types of grout can be used for these purposes. However, in Russia, with frosty winters, only 2 types are widely used:
- cement-based mixture;
- composition made from epoxy resin.
The first is mainly used for treating external walls, the second - internal, as it is much easier to wash and clean. The color of the composition is determined depending on the wishes of the owner and is achieved by mixing with the color scheme.
In addition, you can use chemical components that will prevent the formation of fungus and mold, as well as increasing resistance to sudden changes in temperature conditions.
The appearance of the wall will depend on the grouting method chosen. The final result will depend on what tool will be used to complete the work. While some of the grout joints can be applied using a spatula, more complex compositions will require a special device.
To a greater extent, seaming is done in the following ways:
- Flush, in this case the composition is placed inside the seam, and the excess is removed with a spatula. After this, the brick is cleaned with a brush.
- A convex seam is applied using a similar method, however, the excess is not removed with a spatula, but, on the contrary, a special arc-shaped device is passed along it, after which a neat mark is formed. Thus, horizontal masonry is processed; vertical seams must be made after the first ones have partially hardened.
There are quite a few ways to lay out the jointing. The most common of them are presented below.
When performing work, you need to press the compound firmly into the seams between the masonry. This will create a high-quality and durable surface.
Possible options
There are several options for how to do the jointing. The visual effect that the wall will receive depends on the chosen method.
When working on the filling, you need to follow the sequence, starting first with the vertical seams, and then with the horizontal ones.
Special attention is not paid to the thickness of the seams. The indicator can vary from ten to fifteen millimeters for horizontal seams, and from eight to twelve for vertical ones. But most often you can find thin seams, four millimeters thick. This decision was driven by the desire to save on cement mixture. Also, the thickness of the seams depends on the worker’s approach to performing the procedure and climatic influence.
The process of finishing the seams is important regardless of the thickness, because a clear pattern will not only decorate the walls, but also increase the performance characteristics of the building. What methods exist to highlight brick seams?
Flush
This option is the easiest to implement. You can do jointing in this way even without a special tool. Filling mortar that protrudes beyond the brick or gets on it is removed with a trowel. After the main process, the seam is processed using a stiff brush.
We recommend: PSUL tape: what it is, technical characteristics, application, GOST
Concave
This method requires a special narrow spatula. This small tool will fill the seams. For ease of working on all lines, the spatula should not be long. The cement mortar is removed from the masonry, as in the previous version, after which they go along the seam with a jointing tool. The grout solution is applied inside in the same way.
Convex
To work on jointing with a convex effect, you need an arched spatula. The tool is applied to the seam with the arc part facing outwards, the resulting space must be filled with mortar. Afterwards, the spatula is moved further to the untreated area and the construction mixture continues to be applied.
Undercut or flush
This method is considered the most accessible and is most often used for making masonry joints.
The main idea is that the mortar protruding from the masonry is trimmed with a trowel, after which the seam areas are additionally treated with a hard-bristled brush. Using this method, the joining areas are given ideal smoothness and aesthetics.
Rectangular
This option is more difficult to work with than the previous ones. First, you need to remove five millimeters of cement from the seam, even if it has already dried. After this, the gaps are filled with grout mixture. This design looks interesting, but experts do not recommend using this method for facade decoration due to poor drainage.
Beveled
This method is suitable for buildings that are being built in harsh climates. In this option, the mortar between the seams is not cut straight, but at an angle. The cutting angle should be sharp, 3-5 millimeters.
What can you make it from with your own hands?
Budget-friendly, but no less high-quality - making a grout (grout mixture) yourself. Initially, you need to know the main types of grouting components:
- Cement mixtures are simple, easy to prepare, cheap, but high-quality material. To make a fugue, you will need to mix cement mixture (you can use white cement), sand and water in equal proportions. Sand is selected to the smallest fraction. A dye or color of the desired decor color is added to the mixture.
- Gypsum fugue - this composition requires skill, as the gypsum sets quickly. The mixture is made in small portions, which do not have time to harden during work. Gypsum is diluted to a semi-liquid state; slaked lime or 2% of any glue of animal origin is added for strength. Such substances will replace the plasticizer, make the fugu less fragile, and increase the hardening time.
- Alabaster mixture is a type of gypsum, only after additional heat treatment. Alabaster powder is diluted with water to a semi-liquid, thick state, you can add dye. In use it is similar to gypsum composition.
- Clay grout - a grout of this material is made from a clay mass with the addition of a small amount of slaked lime and cement. When hardened, the mixture will be very strong.
Advice You can buy a ready-made grout mixture and modify it, for example, add the desired color and even glitter. If the design requires a transparent seam made of liquid glass or epoxy, then adding shiny elements will make it more impressive.
A fugue made independently is inferior to industrial compositions, but the quality can be similar. Before mashing, you should make sure that the self-made fugue has the necessary qualities or is close to these parameters:
- elastic, easy to fit at seams;
- after drying, it does not crack, does not crumble, and does not fall apart when cared for;
- the setting time of the composition should be equal to the treatment of one square meter of cladding surface;
- for wet rooms, the composition of the fugue must be moisture resistant;
- the grout mixture must withstand washing with household chemicals;
- aesthetics of the composition: the grout must correspond to the idea and overall design of the facing surface.
For paving stones
Dry mixtures are not only convenient to use, but also provide the coating with a neat appearance. Typically, their main component is white cement, and pigments and plasticizers are used as additives.
The grout for this material must be resistant to abrasion, temperature changes and at the same time have a long service life. If you sprinkle the paving stones with salt and other components to remove ice, this will not affect the condition and quality of the grout.
How to prepare the solution
The solution is prepared in two stages:
- The entire contents of the bag (at the rate of 25 kg) are poured into a container and filled with water. Using a construction mixer, thoroughly stir the solution for 3 minutes until a homogeneous structure is obtained.
- Let the solution mature for 2-3 minutes and then stir again.
It is important to know that after water has been added to the mixture, it can be used for no more than 15-20 minutes
Application technology
The grout is applied evenly to the seams. It is enough to simply place the solution in the area of the seams, and remove the excess with a sponge or rubber spatula. The main thing is to do the work carefully, minimizing streaks on the paving stones.
Uniform filling can be ensured by a special gun, which has a solution container and a narrow nozzle. The existing piston creates pressure inside the container, allowing the solution to be pushed out through the nozzle.
We talk about grouting joints of gypsum and other types of brick in the next section.
The process of grouting paving stones with mortar is presented in the video below:
Sealing joints in brickwork
Sealing the walls in the house will get rid of the cold and help prevent water from entering the room. Well-sealed walls increase the strength of the structure.
//www.youtube.com/watch?v=YQJbIaohJjY
It is necessary to note that in modern construction a special gun is used to seal seams. This construction gun is intended strictly for grout mixtures.
It fills the seam tightly and thoroughly without excess. When choosing building materials, you need to pay attention to the brick itself.
The first thing you can do when choosing a quality brick is to get a certificate from the manager who sells it. But it also happens that the trade representative does not have documentation, and if there is, it is not a fact that it is genuine. This means that you need to determine with your own eyes and hands the quality of the brick for construction.
Experts recommend first inspecting the appearance of the product. If it is cracked, then you should refuse the purchase. Cracks usually appear when the production technology has been violated. You also need to be wary if there are foreign inclusions in the bricks. When they are gray with a loose structure, the presence of quicklime may be suspected. Accordingly, when it comes into contact with water, the brick will collapse. In order to check the strength of the product, you need to choose a brick of lower quality and try to break it. Good products will not break into many pieces. If there are a large number of them, then this indicates violations during mixing.
//www.youtube.com/watch?v=8csgj-AkEHk
If the brick has a dark middle, it means there were violations during the heat treatment procedure. If you purchase sand-lime brick, its corners must be strictly even. It should be taken into account that silicate products are cheaper, but they are less durable.
Creation of joint compound
After these stages, it is necessary to create a joint compound. It can also be ordered ready-made. You can cook it yourself. It is worth considering that the composition is created for decorative purposes, so special dyes should be introduced into it.
The option of creating this solution yourself involves:
- lime – 1 share.
- sand – 10 shares,
- cement – 1 share.
They are mixed with water. The result should be the consistency of thick sour cream. The time interval for solution mobility is one and a half to two hours. For this reason, create as much mixture at once as you will use during this time.
If the created solution is very liquid, then place a red brick in the container with the composition for a couple of minutes. It will absorb excess moisture.
If you need to prepare a lot of mortar, it is better to use a concrete mixer and also get assistants.
How to care for tiles
In order for the coating to last for a long time, you need to know how to properly care for tiles.
For glossy structures, strong acid-based detergents should not be used. This may damage the gaps and seams between the products.
It is best to purchase special products for tiles, ceramic tiles and porcelain tiles.
Do not use metal brushes or abrasive powders because they will severely scratch the surface of the coating. This is especially noticeable on glossy ceramic tiles.
The Best Tile Cleaners
To ensure that the tiles retain their attractive appearance for a long time and do not fade, it is better to use specialized mild detergents:
- Mister Muscle. Eliminates plaque, rust, removes stains from the surface of tiles and gives it shine. It is necessary to apply the liquid to the dirt, wait 3-5 minutes and walk again with a damp sponge. It copes well with old, stubborn stains and does not run off vertical surfaces. In this case, there is no need to scrape and rub the plaque with a washcloth. The detergent perfectly removes even formed mold from the grout.
- Frosch. Suitable for most types of tiles. Effectively removes dirt, grease, stains and plaque from ceramic tiles. Frosch is harmless to the body. The product neutralizes unpleasant odors and kills germs. To clean the tiles from dirt, dilute 2 caps of detergent in 5 liters of water and clean the surface. Not intended for use in its pure form.
- Cif Anti-plaque. Removes accumulated dirt thanks to a unique water- and dirt-repellent formula. In a matter of seconds it will remove limescale and soap stains from the surface of the tile. SIF should be applied evenly to the dirt, wait 5 minutes and rinse with clean water.
- Domestos. Effectively eliminates fungus, whitens grout joints between tiles and disinfects. Directions for use: Dilute 2 caps of gel in a five-liter bucket of water and remove dirt with a sponge or soft-bristled brush. Then rinse the surface with water and wipe dry.
- San-klin (Santik). Liquid for removing limescale, rust and other contaminants from tiles. It must be applied to the surface for 5-10 minutes and then remove any remaining dirt.
You can also use the following aids to clean tiles:
- Bleaching powder. Dilute the powder with clean water. Pour the solution into a spray bottle and spray it onto the desired surface. Then leave for five minutes and rinse with plenty of clean water. Let the ceramics dry or wipe the surface with a dry cloth. Chlorine solution kills germs and gets rid of mold.
- Melamine sponge. Easily wipes off minor stains, removes limescale and does not spoil the appearance of the cladding. You just need to wet the sponge and rub away the dirt.
- Steam cleaner. A gentle alternative to aggressive cleaning liquids. Steam cleans the tile surface no worse than chemicals. And at the same time it does not have any mechanical effect. Steam supplied under high pressure dilutes grease stains on the tiles and disinfects the surface being cleaned, killing germs. The steam cleaner is excellent at removing mold and limescale in the bathroom. It easily removes even greasy stains in the kitchen.
To prevent ceramics from fading and scratches appearing on it during use, you need to treat it with a special varnish. A durable protective coating is created, the color does not change for many years, and caring for the tile surface is greatly simplified because almost no dirt accumulates on the varnish coating.
With proper cleaning and good timely care, ceramic tiles will last for many years.
Rules for preparing the grout mixture
Grout from cement-sand mortar is prepared as follows:
- Sift 2 buckets of sand through a fine sieve into a container for preparing the mixture. The sifted sand should not contain foreign elements and fractions.
- Dry cement is added to the sand in a ratio of 1:2.
- After mixing the dry mixture, water is added to it. The amount of liquid should be such that the mixture acquires the consistency of a thick, homogeneous mass. As a rule, kneading is performed using a hammer drill and a spinner attachment.
If the seam will be treated with a special mixture of colors purchased in a store, its preparation proceeds as follows:
- About 6 liters of water are poured into the solution container.
- The finished powder is poured in.
- The solution is carefully mixed with a puncher and left for some time. When all the liquid is absorbed and the mixture swells, the grout must be thoroughly mixed again.
The solution is ready for use.
|
| REQUEST PRICE WITH DISCOUNT |