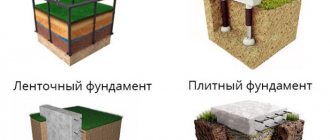
In low-rise construction, there are several outwardly similar structures manufactured using different technologies. For example, the slab can be poured onto a strip foundation at the same time as it or after the strip has hardened onto a permanent deck. Another option is flooring on the ground. In the first case, an inverted bowl-shaped slab is obtained; in the second version, a floating screed is not connected to the foundation and walls. All the nuances of these designs will be discussed below.
Backfill under the slab
For backfilling, a homogeneous material is used, optimally river sand.
It is important to prevent the presence of clay inclusions in it that retain water. Different sources offer their own backfill options - either sand is used entirely, or layer-by-layer backfilling is done with sand and small crushed stone.
The presence of crushed stone allows the bottom layer to be compacted more densely - the sharp edges of small stones compact the sand layer more effectively. A leveling sand layer of 5 cm is again poured on top of the crushed stone.
IMPORTANT!
No general consensus has been reached on this matter. The subsidence of the cushion, noted in practice, occurs in both homogeneous and multilayer backfill options, which is explained by a greater load on the internal load-bearing walls than on the external ones.
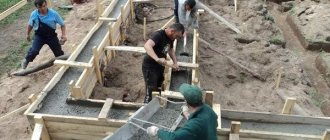
Foundation preparation process
All work on arranging a rough screed begins with careful preparation of the soil base
To begin with, it is important to identify the highest and lowest points, taking into account the level of the soil and the evenness of its surface. A laser level will help you determine their values.
This procedure is necessary in order to evaluate for yourself the entire scope of work, as well as determine how much building materials may be required.
It is also important to pay attention to thoroughly compacting the soil. To do this, you can use special construction equipment - for example, a roller or vibrator. The procedure is necessary so that in the future the soil does not sag significantly and this does not lead to cracking of the rough screed, which will undoubtedly negatively affect the finishing floor covering
The procedure is necessary so that in the future the soil does not sag significantly and this does not lead to cracking of the rough screed, which will undoubtedly negatively affect the finishing floor covering.
Pneumatic rammer for soil compaction
After the soil has been thoroughly compacted, a sand and gravel cushion is laid. It can also be made of clean, washed and river sand. The thickness of this layer should not be more than 60 cm. In the latter case, a layer of gravel or expanded clay is also poured on top, which will make it possible to create a more durable base.
It is also recommended to fill the pillow not all at once, but in layers - for example, 20 cm each. In this case, each layer is well compacted separately. The procedure will make the base as dense as possible. Before compacting, the pillow is moistened with water. The thickness of the expanded clay layer can be at least 10 cm. This layer is also compacted separately.
Expanded clay backfill
The procedure for covering large openings
If the opening is wide enough, floor slabs can only be laid on the foundation using additional elements. In order not to destroy the entire product, two methods are used. In the first case:
- determine the amount of free space that should be filled during installation, divide it by two;
- install the first slab, prudently departing from the edge a distance numerically equal to the obtained value;
- install all slabs in accordance with the requirements of the regulations;
- measure the remaining space, which should be numerically equal to the distance left earlier when installing the first slab;
- fill the gap on both sides of the structure, laying cinder blocks with their ends facing the main surface;
- control the position of the block holes, which should be directed to the side.
Blocks will help block free spaceSource stroyimdom.com
In terms of labor intensity, the second method is significantly superior to the first. In this case, having previously determined the amount of free space, distribute it evenly between the laid slabs. After installation is completed, the resulting gaps are sealed as follows:
- a board is attached from below between the slabs, which can act as formwork;
- reinforcement is placed in the space;
- concrete solution is prepared;
- the free space is filled with concrete mortar.
Dry screed
Unlike traditional and semi-dry screed, this method does not require time for the coating to dry and gain strength. The decorative coating can be laid the very next day.
Preparation is carried out as described above and consists of a cushion, a rough screed and a layer of waterproofing. Then technology changes.
Table 2. Dry screed installation technology
| Illustration | Description |
| Beacons-guides made of metal profiles are fixed on the floor surface. | |
| Expanded clay or a special thermal insulation backfill is poured between the beacons and distributed evenly using a rule. | |
| Gypsum fiber sheets are laid on top in two layers using an adhesive solution. | |
| The sheets are laid with seams staggered and additionally secured with self-tapping screws. |
Flooring options
There are many options for creating a floor on a monolithic slab. The main task is to insulate the slab and ensure a high-quality microclimate inside the house.
Most experts consider the optimal composition of the floor pie to consist of the following layers:
- Layer of sand.
- “Skinny” screed 5 cm.
- A layer of insulation (penoplex 5 cm).
- Concrete screed giving strength (5-7 cm).
- Leveling screed (2-3 cm, ready-made compounds).
- Final (finish) coating.
At the same time, if the slab is sufficiently insulated from below, simpler methods can be used. For example, a “floating” floor consisting of a layer of sand backfill (as an option, you can use fine expanded clay, which provides additional insulation) and sheet materials installed on top (chipboard, plywood, MDF, etc.).
The backfill layer is carefully leveled flat and horizontal, a subfloor made of sheet materials is laid on it, then the finishing coating is installed.
There are other options for arranging the floor, but they all represent different combinations of laying layers of backfill, insulation, and leveling screed. They have no fundamental difference or significant advantage, having approximately equal performance qualities.
Stages of pouring a monolithic slab
The technology for pouring a monolithic foundation slab has several stages:
- First of all, it is necessary to carry out a geological study of the soil and determine the differences in height.
- The unsuitable layer of soil is removed and the construction site is carefully leveled.
- Crushed stone and sand are prepared for the so-called pillow.
- Waterproofing is placed in the blank.
- The formwork is being constructed.
- A double reinforcement frame is assembled and tied with special wire.
- The monolithic foundation slab is poured with concrete mortar. The last layer must be poured very quickly, and it is advisable to use a mixer or concrete pump. The surface is carefully smoothed and leveled.
- Cover the finished work with film and leave for 4 weeks. But for the first 6 days it is necessary to wet the structure with water.
After the foundation has been properly poured, you can proceed to further construction. Do not forget that a properly constructed foundation is a guarantee of the quality of the structure.
Foundation construction according to slab type
Of all the above, the best would be a slab foundation. It is characterized by high reliability and ease of construction. Here it should be taken into account that such a foundation must be created strictly according to technology. Otherwise, reliability will be poor.
During construction, provide for the introduction of communications in advance. After all the work is completed, this will not be possible. In some cases, stiffeners are installed, which allows saving on the thickness of the slab. Insulation must be carried out; if it is not done, problems will arise in the winter. Next, we will consider the option of constructing a tiled base.
Site marking
The arable layer has a high tendency to subsidence; therefore, the construction of any foundations resting on it is prohibited. Any work begins with marking the site, as well as subsequent removal of the surface layer of soil.
The initial marking is done simply; for this, stakes are driven into the corners of the proposed foundation and a rope is pulled between them around the perimeter.
Attention! On each side it is necessary to retreat 1.2-1.5 m from the proposed slab. This will allow you to make a blind area without any difficulty. Also, with this approach it is more convenient to connect some communications
Also, with this approach it is more convenient to connect some communications.
Digging a pit
This is a rather complex and important procedure. Often, various mechanized means are used for this, for example, a bulldozer or excavator. Now there is mini equipment that can be used to perform work in small areas.
After excavating the main part of the soil, the area is leveled. Be sure to ensure exact compliance with the project requirements. The pit is prepared with the expectation of constructing a cushion of sand and crushed stone.
Also at this stage, the laying of communications is prepared. Here it is worth considering their features. Even insulated water and sewer pipes should be buried to protect against freezing to a depth of 1-1.5 meters, depending on the region. Drainage wells are also installed in the corners of the future building.
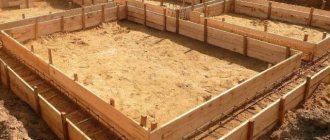
Installation of formwork
This stage is quite important. In addition to the direct work of installing the formwork elements, other equally important actions need to be done.
First prepare the pillow. To do this, a layer of crushed stone is poured onto the bottom of the pit, and a layer of sand is placed on top of it. Each of these layers must be compacted with a vibrating plate. On some soils it makes sense to first lay geotextiles. Extruded polystyrene foam is placed on top of the finished pillow. It serves as insulation, which prevents problems with soil swelling. You can do without insulation, but in this case the thickness of the slab is increased to 40 cm.
Next, you can begin installing the formwork. There are two options for solving the problem:
- Board or plywood panels;
- Polystyrene L-block.
If wooden panels are used as formwork, they should be made 10 cm above the design level of the slab. Polystyrene blocks perform the function of additional insulation of the foundation.
Reinforcement
It is important to carry out the reinforcement correctly. To do this, use reinforcement 10-15 mm in diameter. They are laid in one or two layers, depending on the thickness of the slab
The distance between the rods is 30 cm, but it is recommended to place them more often under load-bearing walls
They are laid in one or two layers, depending on the thickness of the slab. The distance between the rods is 30 cm, but it is recommended to place them more often under load-bearing walls.
Concrete works
To prepare the solution, mixers of different capacities are used. During work, it should be remembered that no more than 2 hours should pass between pouring different batches of concrete.
If it is not possible to fill during this time, then the dividing sides should be prepared in advance, and it is important to make them so that grooves are formed. They will allow you to firmly connect parts of the slab that were poured at different times. After pouring and gaining initial strength, the foundation should be waterproofed
Several methods are currently used
After pouring and gaining initial strength, the foundation should be waterproofed. At the moment, several methods are used.
- Coating with bitumen-based mastic. A significant disadvantage is the limited service life.
- Pasting with fiberglass with a double bitumen layer. This treatment costs more, but can last up to 80 years.
Technology: how to fill correctly?
As mentioned earlier, the uniqueness of this base option is the fact that the slab distributes pressure on the soil, thereby creating additional support for the structure .
To build a monolithic slab on the ground with your own hands, you need to prepare a pit and pour a concrete mixture into it, followed by laying heat-insulating material. How to pour it correctly?
The algorithm of actions for a house without a base is as follows:
- Initially, it is necessary to create a strip foundation measuring 0.4 m wide and 0.4-0.7 m deep. Naturally, it is necessary to take into account not only the type of soil, but also the weather conditions of the region where the building will be located. During the installation stage of the reinforcement cage, it is required to leave vertically protruding ends of the reinforcement with a diameter of 1.2-1.4 cm along the entire perimeter of the foundation, every half meter. This is necessary for the subsequent connection of the slab and foundation. Moreover, do not forget that the external formwork should have a greater height than the subsequently installed monolithic slab by 0.2-0.25 m.
- The concrete mixture is being poured.
- For a pit, 50-60 m is enough. It is important that the bottom is level.
- The bottom is covered with a sand cushion. The layer should be within 15-20 cm, after which it is carefully compacted until the surface can be stepped on with shoes, but no imprint will remain.
- It is necessary to lay a layer of geotextile on top of the sand to prevent mixing of sand and crushed stone. Geotextile tapes are sewn together using special equipment. Along the entire perimeter, the geotextile should protrude about half a meter and extend onto the strip foundation.
- Next comes the stage of filling crushed stone. The thickness should be at least 20 cm. If possible, it should be compacted and leveled as best as possible around the entire perimeter. Next, this layer is poured with cement milk so as to fill all the voids, and the layer is 3-5 cm on top of the crushed stone.
- As soon as the “pie” hardens, it is necessary to lay a waterproofing layer on top. Next, all seams must be carefully sealed with a blowtorch or gas torch. The waterproofing should also extend beyond the ends of the foundation by 30-40 cm.
- Now comes the stage of laying the heat-insulating material. It should be level with the tape base. For these purposes, it is best to use dense grades of penoplex. Mastic is used to seal the joints between sheets.
- Now you need to start arranging the rebar box. To do this, rods with a diameter of 12-14 mm are taken and placed at a distance of up to 20 cm. The mesh must be laid in 2 layers, with a distance of 10-15 cm. The layers must be combined with pieces of reinforcement. The lower part, under the mesh, should contain special supports, which are mounted in such a way that the distance from the insulation to the bottom row of reinforcement is 5-6 cm. These rods must be tied as tightly as possible to the protruding ends of the strip foundation reinforcement, which were left at the first stage.
- It's time to pour the slab. It is important to work with the concrete mixture around the entire perimeter at once so that the concrete can settle in an even layer without bubbles. The level must be leveled along the outside of the formwork so that there is at least 5 cm to the edge of the top row of reinforcement.
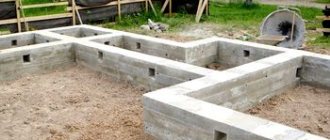
Ribbon
A strip foundation is a buried reinforced concrete structure that is laid under the external and load-bearing walls of a building. The width, height and depth of depth may vary. The strength, stability and reliability of the foundation depend on these indicators.
Advantages and disadvantages
The strip foundation is considered universal. It is suitable for construction on different soils and for various architectural structures.
It has the following advantages:
- high construction speed;
- the ability to build the foundation of a house without the use of special construction equipment;
- efficiency (due to the fact that the foundation is laid only under the walls, and not under the entire building);
- possibility to build a ground floor or basement;
- high strength (a massive tape can become a reliable support for a three-story brick house).
This foundation option also has its disadvantages:
- This option is not suitable for construction on peat and subsidence soils;
- accurate preliminary calculations are required.
Area and conditions of application
This base option is suitable for the construction of buildings made of any materials up to 3 floors high. Moreover, it is possible to build using it under almost any site conditions. Tapes are used on sites with pronounced relief, with a predominance of rocks, with high occurrence of underground flows and increased heaving of the soil.
According to the standards laid down in SNIP, classic strip foundations can be used without restrictions on coarse clastic and rocky soils. When erecting buildings on other, less stable soils, careful calculations are required, and sometimes reinforcement of the structure is required.
On biogenic soils, the construction of a strip foundation is considered irrational. However, even in these cases it applies. But certain preparatory work is needed - strengthening the soil using bulk methods, replacing weak soils with dense bulk materials, installing piles under the belt.
What it is?
A foundation is an underground, much less often underwater, part of any structure that transmits static and dynamic stresses to the soil foundation. Proper design implies such a transmission of impulses in which it is impossible to exceed shrinkage standards and accelerate the destruction of the house.
There are a number of techniques by which this effect is achieved:
- dispersal of operating forces over a large territory;
- removal of soil to a solid mass;
- overcoming the loose layer in some places using piles;
- increasing the strength of the surface mass.
The easiest option is to build on completely rocky soil, there is no shrinkage there, or it is too small. It is much more difficult to create and design foundations where the soil is highly compressible. It’s even worse for architects and developers of areas with changing soil properties.
Formwork
The slab formwork is a box of wooden panels, 10-15 cm above the concrete level. The formwork is assembled as tightly and firmly as possible; there should be no gaps of more than 3 mm. The outer side is fixed with support bars and inclined stops that prevent the panels from being squeezed out under the influence of the mass of liquid concrete.
If formwork is being made for a slab with a plinth, then the deck must first be built. To do this, a system of support beams, crossbars and other elements is installed, forming a reliable supporting structure for the deck to remain stationary. Then the plane is assembled as tightly as possible and without gaps.
A layer of film is laid over the deck to seal the structure and prevent concrete leakage.
Basic procedure
- Before pouring concrete, a waterproofing layer is laid on the prepared “cushion”. This can be either modern construction developments or ordinary, inexpensive film or roofing felt.
- The construction of a monolithic slab is a process of laying two levels of reinforcement cage on prepared layers. Moreover, they are installed perpendicular to each other - one along, the other across. This is due to the fact that the lower one works in tension, the upper one works in tension. The first level is 5 cm from the bedding, the second is 5 cm from the upper surface of the future slab of a monolithic strip foundation. On average, the slab is 20-40 cm thick. Although this largely depends on what kind of building will be erected, from what materials, plus the “behavior” of the soil.
The reinforcement for the frame is taken with a cross-section of 16 mm (a relative value, since the reinforcement is selected based on the weight of the future structure and the condition of the soil), knitted into cells (20x20cm) with ordinary steel wire.
If the plan provides for the presence of pipelines or other main lines in the foundation slab itself, then holes (taking into account the diameter of future pipes) for such mains are made in advance. Upon completion of the installation, the gaps between the foundation walls and communications are sealed.
- At the final stage, concrete mixture is poured into the prepared reinforcement plane. There is no need to save on the foundation of a future building; it is better to use a solution of high strength in terms of its strength. The mixture must be resistant to frost, changes in low and high temperatures, and have a high degree of moisture impermeability. To perform the procedure better, it is better to use a concrete pumping unit and fill the entire solution at once.
- After pouring, the concrete is compacted using an electric vibrating tool (to remove air bubbles). It is smoothed out using a level and left in the formwork until completely hardened into a single monolithic slab.
It should be said that the choice of this base design is very good for independent construction, since it eliminates any oversights and mistakes.
Solid foundation slab - application specifics
A monolithic slab made of reinforced concrete has an increased safety margin and is used in industrial, civil and residential construction for the construction of various types of buildings:
- country houses;
- private houses;
- group and single cottages;
- industrial facilities;
- premises for storing vehicles;
- various low-rise buildings.
Builders have to pour different types of foundations to build buildings.
The strength characteristics of a reinforced concrete foundation allows it to withstand the weight of buildings made of various materials:
- block concrete;
- natural stone;
- baked brick;
- wooden beam;
- rubble stone;
- reinforced concrete.
Slab foundations are also used as the basis for the construction of frame buildings and log houses. The foundation slab for a house made of aerated concrete has proven itself positively in various operating conditions. It prevents cracking of walls built from fragile gas-filled blocks.
A monolithic slab is the best option for solving the following problems:
- construction of buildings on marshy soils;
- construction of houses on soils with nearby groundwater;
- construction of buildings on problematic soils prone to heaving;
- construction of the facility on bulk soils containing fine sand.
Before pouring a monolithic slab, you should calculate the strength of the structure and calculate the reinforcement. When determining the possibility of using a solid slab to construct a foundation for a specific structure, you should determine the thickness of the base and select the depth of the slab base.
The weight of buildings made of various materials allows them to withstand the strength characteristics of a reinforced concrete foundation
The following factors must be taken into account:
- soil properties at a construction site;
- groundwater level;
- load characteristics of the foundation;
- the mass of the future building;
- features of climatic conditions;
- altitude fluctuations at the work site;
- performance characteristics of the building material used.
The expanded range of application of the monolithic slab is due to the increased area of the supporting sole, which provides:
- proportional distribution of the mass of the structure onto the soil;
- preventing settlement of individual parts of the building frame;
- damping soil reaction associated with frost heaving;
- impossibility of cracks forming on the walls of the building.
Options for load-bearing floating structures
Without going into too much technical detail, this is a reinforced concrete slab of various thicknesses, which is installed (poured) on a dense bed of bulk materials. This type of base is used for:
- Construction of massive large buildings, the supporting structures of which are made of concrete, brick or stone;
- When creating poured foundations of all types, where fillers are not used. It is enough to use gravel or crushed stone of a small fraction for this;
- When constructing buildings on sandy, clayey soils of all types, as well as on soils prone to seasonal movement (swelling) through freezing.
The figure shows a diagram of a slab foundation. To construct such load-bearing structures, it is necessary to use wooden formwork. A classic vibrator is well suited for compacting the cushion material, which improves the quality of concrete. The thickness of the concrete slab rarely exceeds 40 cm and this is the key advantage of this type of foundation, because there is no need to use a large amount of ready-made concrete mortar. It is also worth remembering that the dimensions of the slab must correspond to the strictly specified design parameters of the building, and may be slightly larger, but not smaller.
Recommendations for strip bases
It is optimal to form the tape base using horizontal or vertical filling methods.
The strength characteristics of the base after stage-by-stage filling and acquisition of the required hardness will be ensured only if the reinforcement is correctly oriented. It must be located strictly perpendicular to the joining planes. If horizontal filling of the foundation base is carried out in portions, then vertically located reinforcement is a necessary condition.
Longitudinal, horizontal, arrangement of reinforcement is necessary for the vertical method of laying mortar
Pay attention to the connections of the reinforcement frame at the corners of the building, in the areas of branches characteristic of this foundation
Pay attention to the features associated with portioned filling of the strip base. When erecting formwork above the ground level of the foundation and locating the underground part in a trench, the layers should be joined at soil level
Before pouring the base part, wait until the concrete solidifies below the zero level. This will prevent the appearance of cracks and subsequent destruction of the base.
Features of pouring in several stages
It often happens that the work team, for some reason, does not have time to finish pouring the foundation slab and leaves some of the work “for tomorrow.” SNiPs and pouring technology provide for such a separation, but with the only caveat that the break period should not exceed 12 hours from the end of pouring. The area to be concreted must be evenly poured and covered with waterproofing or oilcloth on top; this creates a kind of membrane to protect the structure. This is necessary to prevent moisture from entering from the outside. The next morning, you need to sweep away the concrete milk that has come out and begin to apply a new layer of concrete mixture. This method is called “hot” when the bottom layer does not yet have time to harden at the time of applying the top one.
It is necessary to distinguish such a concept as a concreting working seam. This is when the bottom layer has hardened so much that the top layer cannot fully set for connection.
If the time period exceeds 12 hours, then it is necessary to wait until the bottom layer has completely hardened. Only then should you begin laying a new one, as the technological map and SNiPs say. The order is called "cold". It is strictly prohibited to apply new concrete onto uncured concrete. There will be immediate destruction of both structures.
Calculation of slab foundation
Unlike a strip foundation, to calculate a slab foundation you will need to specify much fewer parameters. We will need to know the bearing capacity of the soil and the concrete itself. It is also worth making sure that the slab foundation will be able to withstand the weight of the future building. To do this, divide the total weight of the structures (concrete base and building) by the total area of the foundation.
Let's look at an example. Dry soil has a bearing capacity of 2 kg/cm2; we use concrete grade M 150 with a bearing capacity of 163 kg/cm2. Based on these data, it turns out that the foundation and the building should not exert a pressure on the ground of more than 2 kg/cm2.
Calculation of the thickness of the slab foundation will also depend on these indicators. Let's say you plan to build a bathhouse on 2 floors 10 x 10 m, respectively, the base area will be 100 m2. If the thickness of the foundation is 20 cm, then its approximate weight (taking into account the armored belt) will be about 100 tons. With a building wall thickness of 25 cm, the total weight of the entire structure will increase by another 30 tons. But, there will still be furniture, equipment and people in the house. We add another 70 tons and get 300 tons. If we divide this value by 100 m2, then we get approximately 0.1 kg/cm2 - this will be the pressure exerted by the building on the ground.
Healthy! If you are planning to build a small building, for example, a slab monolithic foundation for a garage, then the minimum height of the base can be 10 cm. If we are talking about residential buildings, then the minimum permissible thickness is 20 cm.
However, it is worth considering that this is only an approximate calculation. Regardless of whether you plan to build a slab monolith or strip foundation yourself, it is better to carefully study:
- GOST 25100 - to understand the classification of soils;
- SP - which talks about enclosing and load-bearing structures;
- SP – anti-corrosion coatings for structural frames of buildings;
- VSN 29-85 and 37-96 – manufacturing and design of MZF.
It must be taken into account that a slab foundation is very different from a “ribbon”, so the support area and other parameters will vary.
How to prepare for work?
Laying a foundation is a responsible process, since the reliability and durability of the design structure depends on the choice of material and quality of installation.
Where to begin?
But to save money, you can use reference information and independently conduct a study of the soil and the depth of underground sources on the site.
What do you need to know before designing?
To calculate a reinforced concrete pile-strip foundation, you need to know:
- soil type;
- degree of soil heaving;
- freezing point;
- occurrence of ground sources;
- bearing capacity of the soil;
- elevation changes on the site;
- climatic conditions for the region (amount of precipitation).
Before calculating the foundation, it is necessary to select the number of piles. As a rule, supports are installed at the corners of the building and in places where the partitions in the house according to the project will intersect.
The approximate distance between the supports is 1.5–3 m. The cross-sectional area of the piles is selected experimentally, based on the bearing capacity of the soil.
To select parameters, it is recommended to use the reference data:
| Diameter of bored piles, cm | 100 | 150 | 200 | 250 | 300 |
| Base area, cm2 | 79 | 177 | 314 | 490 | 707 |
| Soil type | Load bearing capacity | ||||
| Coarse sand | 325 | 701 | 1350 | 2050 | 2350 |
| Medium sand | 235 | 530 | 942 | 1472 | 2120 |
| Fine sand, supersaturated with moisture | 197 | 530 | 748 | 1226 | 1775 |
| Hard clay | 353 | 795 | 1413 | 2208 | 3180 |
| Plastic clay | 197 | 353 | 628 | 980 | 1413 |
| Coarse rocks | 432 | 1315 | 2168 | 3238 | 5650 |
Calculation of supports and grillage
To lay a reliable foundation, it is necessary to carry out a number of mandatory preliminary calculations:
- Determine the total loads taking into account the weight of walls, ceilings, roofing, snow flooring, etc.
- Find the required support area, knowing the weight of the structure and the safety factor. Formula for calculation: S support = (M * 1.4)/N, where:
- M – total mass of the structure (from paragraph 1),
- N – bearing capacity of the soil (reference information),
- 1.4 – reliability factor.
- Calculate the total cross-sectional area of the piles, taking into account their number.
- Compare the results of calculations in steps 2 and 3.
If the cross-sectional area of the piles is larger than the supporting area, then the selected parameters are suitable; if it is smaller, it is necessary to increase the area of the supports. Sometimes it is advisable to increase the number of pillars (the calculation algorithm will not change).
The length of the supports is selected taking into account the depth of soil freezing. As a rule, a reinforced concrete structure must rest against a solid load-bearing layer. For most Russian regions, the freezing point is at a depth of 1.5 m. To this value, you must remember to add the height of the base.
The width of the grillage is selected so that this value exceeds or is equal to the thickness of the plinth or load-bearing walls.
Required tools and materials
To build a pile-grillage foundation, you will need the following tools and materials:
- hand drill or electric installation for making pits;
- mixture for concrete mortar: sand, crushed stone, cement, water;
- medium-fraction crushed stone for installing a drainage cushion under the grillage;
- bentonite solution for coating the walls of the well;
- roofing felt sheets for waterproofing piles;
- sheet waterproofing material for grillage;
- polyurethane foam insulation;
- metal reinforcement for reinforcing the upper and lower parts of the foundation;
- boards, beams, nails and screws for the manufacture of formwork;
- pegs, fishing lines for marking the area.
Compaction and tamping
The bottom of the pit must be leveled and compacted. Since the excavator cannot provide the same depth over the entire surface of the pit, all uneven places must be leveled by adding earth and compacting the surface with a vibrating plate. This is necessary so that the foundation can withstand the load at any point, otherwise, due to uneven soil support, cracks may appear on it.
To quickly and efficiently level the bottom of the pit, you can sprinkle it with sand, moisten it and compact it with a vibrating plate. It is able to compact sand to a depth of 14-20 cm; this is the layer that can be poured and compacted in one go.
If the project requires a sand-crushed stone cushion, then crushed stone with a fraction of 25-55 mm is poured on top of the compacted sand.
It is compacted in the same way. Thus, the soil is not only leveled, but also compacted. The plate drives stones into the soil to a depth of 0.5 m.
How to build a sauna on a “floating” slab?
The standard design of a floating slab foundation is quite simple - it is a monolithic reinforced concrete foundation, which is located immediately under the entire area of the building. It is made buried on normal soil and shallow where there is solid sand underfoot.
So, here you can build a floating foundation with your own hands for your bathhouse:
Stage I. The entire layer of vegetation is removed - where the bathhouse will be built, plus one meter for the blind area. We transfer the removed layer to the garden. A pit is being dug to the design mark. For this it is better to hire an excavator. The main thing is not to dig up, otherwise the foundation may simply burst at the place of digging. This is a very serious mistake. To prevent the edges of the pit from crumbling, it is better to dig them with a slight slope.
Stage II. We fill in a layer of crushed stone - 10 cm, laying it in several stages and tamping it well (for example, with a log with a handle). Then - a layer of sand, which will fix the crushed stone and prevent it from “walking”. And its resistance to frost will help the new foundation withstand the cold.
Stage III. A waterproofing layer is laid - usually a dense, expensive polyethylene film. It is needed so that moisture does not then seep into the foundation and, on the other hand, the valuable concrete “milk” does not leak during the pouring of the solution. Now we pour a thin layer of footing - M-100.
Stage IV. We are building formwork. If the foundation was immersed in the ground, then the walls of the pit can also fulfill this role, but they also need to be waterproofed. And for formwork, boards 25 mm thick and 50-100 mm higher than the height of the foundation are well suited. We lay a control cord along the upper edge of the formwork, in which we fix only one side of it, and lower the second with an attached load on the other side. When the solution is poured, the cord can be removed.
Stage V. Laying the reinforcement - this is the most critical stage. Metal rods will stick out from the foundation in places where the walls are erected - this is necessary to achieve an inextricable connection between them and the foundation. But such reinforcement cannot be welded - only tied with soft wire. We close the rods in a semicircle in the corners, and insert the ends into the side walls of the foundation - we get a flexible one-piece structure.
Stage VI. At this stage, the base is concreted: the solution is laid in layers up to 15 cm, carefully leveled and compacted by bayonet.
Concrete must be poured in one step, for which it is better to use a concrete mixer. The best recipe to use is this: for one part of cement – one part of water and sand. The concrete must be compacted until a wet layer appears on the surface. After that, we take a wooden lath and align everything.
On the first day, we wet the foundation every 4-5 hours and cover it with film to prevent cracks from appearing. The next day we wet it only three times, and then only in the morning and evening. When it dries, we remove the formwork, and in a month you can continue building the bathhouse, or even better - in a year.
Soil moisture indicators established by GOST.
It is necessary to compact the soil in conditions of high humidity. That is, if the soil is dry, then it must first be moistened. The aspect that should be taken into account is that soil moisture must correspond to certain parameters established by GOST:
- for sand – from 8% to 12%;
- for light sandy loams – from 9% to 12%;
- for loamy and light soils – from 12% to 17%;
- for heavy soils – from 16% to 23%.
How to fill the foundation inside a house?
Slight waterlogging is allowed, equal to the coefficient established by the standards depending on the type of soil - from 1 to 1.35. A more accurate indicator can be established in the laboratory by conducting a series of special studies. Soil that is too dry must be moistened. Soil with high humidity must be dried.
A feature of soil moisture is the fact that water is not suitable for such activities. It is necessary to make special clay or cement milk. To do this, several handfuls of cement or clay are dissolved in water. The resulting solution should resemble a primer in structure: have the density of water, but have a white color. The foundation is backfilled after the soil has absorbed a sufficient amount of the composition.
Detailed step-by-step instructions
Few people know that before assembling the lower flooring, you need to take care of the ventilation of the subfloor. To do this, experts recommend drilling several large holes in the corners of the building. They can then be covered with a grill. Then the entire subfloor is treated with an antiseptic.
Stage No. 1 – preparing the logs
What are lags? These are bars that are used to assemble the finished floor in a wooden house. Wood of the second and even third grade can be used as them. Since such logs often do not have a very smooth surface, it is worth modifying them a little. To do this, the side on which the floor covering will be attached is leveled with an ax.
You don’t need to try too hard, but you will have to try to make the log even in this area. The horizontality of the future floor will depend on this. After engraving, the logs are completely covered with an antiseptic. They can be installed in two ways - on the ceiling and on the base.
By overlap
Long logs must be properly installed and secured. To do this on the ceiling, you must first make grooves in the lower frame of the walls, the depth of which is equal to the width of the bars. Planed logs should lie flat in them. But first, it is advisable to put a rubber gasket on the ends. It will dampen unnecessary noise.
A heavy beam will not be supported on some grooves, so it needs to be supported with reliable support. Brick pillars will serve as it. They are assembled as follows. At the same distance from each other along the line of the logs, holes are dug (20x20x40). A layer of gravel is poured onto their bottom and compacted. The next layer is made of sand, which also needs to be compacted well. A square of reinforcing mesh is laid out on the bottom.
The pit is filled with cement-sand mortar. To prepare it you will need cement, sand and water (proportions 1x3x0.5 liters). After the concrete has dried, a layer of roofing material is laid on top, and only then a brick pillar is built on it.
The distance between the joists depends on what boards are used for the finishing flooring. The principle of arrangement is this: the thinner the board, the more often the logs are installed. It is impossible to lay the timber directly on the erected supports; waterproofing material must be laid again between them.
Based on
Construction of rough floors
It is also possible to construct a subfloor on joists along the base. To do this, the top loose layer of soil is cut off, leveled and covered with crushed stone. The fine-grained material is carefully compacted. And only then the location of the logs is marked. You can’t put them on crushed stone; you need reliable supports. They most often use a grillage wrapped in roofing material or bottom trim beams.
In this case, the support pillars are also installed on the foundation. It is built using the same technology as for brick supports. A layer of waterproofing is laid on top of it, and only then the logs are installed. It is attached to the post with dowels, corners and self-tapping screws. You can lay logs in this way in a brick house.
Stage No. 3 – fasten the timber
After installing the logs, installation of the lower flooring begins. To do this, the support is first assembled. It uses timber with a section of 50×40. It is attached to the bottom of the joists on both sides. For these purposes, experts recommend purchasing not ready-made bars, but a board (150×40), which can then be cut into three parts. This will save you a lot of money when assembling subfloors. Three shards will be obtained from one such board.
Next, you need to decide what to make the floors of the house from, what to use as a subfloor. It is much easier for a beginner to work with ready-made sheet materials - plywood, OSB sheets or chipboard. It is better to choose 12 mm thick sheets for these purposes and lay them in two layers.
To securely fasten them, a sheathing is assembled, which is formed from additional transverse bars and attached to the lower base of the support beam. The joints of the sheets in this case should lie on the central axis of the transverse jumpers.
Experienced craftsmen recommend using low-quality material to assemble a rough foundation in a private home. A waste board, slab or picket fence is best suited for these purposes. Why? The lower base actively reacts to changes in temperature and humidity. The listed material easily changes its shape, so it performs very well in such aggressive environments.
Having completed the described work, you can begin laying the insulation. But first, a layer of waterproofing is laid on the lower base. This can be an ordinary polyethylene film, which covers the entire base, forming niches for laying the heat-insulating layer.
Land works
Before starting earthworks, the soil is examined and the levels of freezing and location of fertile soil, the depth of groundwater, soil heaving, etc. are measured.
Important! If the soil allows and the house is planned to be one-story, then you can limit yourself to the construction of a shallow strip foundation with a monolithic slab. The amount of excavation work depends on whether there will be a basement in the house or not
If not, then the soil will need to be excavated only to the depth of the tape, and in width - with a margin for the thickness of the formwork. Wooden planks need spacers to support them and prevent them from falling
The amount of excavation work depends on whether there will be a basement in the house or not. If not, then the soil will need to be excavated only to the depth of the tape, and in width - with a margin for the thickness of the formwork. Wooden planks need spacers to support them and prevent them from falling.
If you plan to build a basement, then all the soil should be removed. The size of the pit is usually 2-5 m larger than the dimensions of the foundation, since a reserve is needed for the formwork panels.
To organize a large pit, it is better to hire special equipment, since this solution will be optimal in terms of cost and speed of work.
The fertile layer is laid out separately in the garden or vegetable garden. The rest of the soil needs to be piled up, since some of it will later be useful for backfilling, and the excess will need to be removed.
What is the structure?
This base is a monolithic slab of reinforced concrete, commensurate with the building itself, lying on bulk soil. Along its perimeter there are stiffening ribs. Reinforcement ribs are installed over the area in increments of 1–1.2 m. By and large, a floating slab foundation is a type of strip structure. Its only difference is rigid spatial reinforcement along the load-bearing plane.
Slab foundation diagram.
The task of constructing such a foundation is to achieve stability and lack of deformation of a building standing on heaving soils. This becomes relevant during off-season periods, with uneven soil movements.
Sandy soils that are flooded by groundwater, that settle unevenly, and those that are mobile are considered unreliable. This mobility occurs due to the freezing and subsequent thawing of water, as a result of which entire layers of soil rise and fall, which can lead to warping or destruction of the building.
Strip and column foundations are not able to prevent deformations. Therefore, a rigid monolithic slab is equipped that rises and falls along with the soil layers. Equipping a floating foundation makes sense when constructing small buildings.
Advantages and disadvantages
This design has a number of advantages. The following are distinguished:
- does not require large financial costs;
- withstands significant mechanical loads;
- does not increase the load on wall structures;
- can be easily repaired and lasts a long time;
- suitable as a base for any finished floor option;
- allows you to install a “warm floor”.
A fairly simple solution to construct can answer a number of basic tasks during the construction of a building. However, you need to take into account some nuances:
- requires high-quality insulation;
- not suitable for large backfill layer thicknesses (it cannot exceed 60 cm);
- the floor is dependent on the groundwater level - not recommended for use in areas where it is high.
The depth of the aquifer can affect the condition of the finished floor, so the area must be surveyed first.
Pros and cons of a slab base
A slab foundation is a shallow foundation that ensures the reliability of the building during ground movement. The base has a “floating” ability, which minimizes the risk of the structure skewing during seasonal freezing or thawing of the soil. Thus, the foundation and the building installed on it seem to “float” on the upper layers of the soil. This is optimal for heaving, clayey areas, but such structures are practical on any other type of soil.
The construction of a slab foundation is simple, but ensures its stability
The foundation slab has a simple design that is effective in operation. This is due to the following advantages of this foundation compared to other options:
- the minimum amount of excavation work contributes to savings during the construction process;
- ideal for complex, heaving soils, as it ensures the stability of the structure;
- the service life of a high-quality tile foundation is more than 150 years;
- the possibility of using any material for building a house;
- a simple device does not require much time to build.
In the process of creating a slab foundation, a large amount of concrete, reinforcement and other materials are required. This leads to significant financial costs, which is the disadvantage of such a foundation for a house. To arrange the slab, you need as smooth a starting surface as possible. Otherwise, laying the foundation layers will be impossible or of poor quality. At the same time, all communications calculations must be planned at the early stages. The disadvantages of slab construction are clearly expressed, but when building on heaving soils, the foundation is the only option.
Slab base suitable for level areas
The stability of the slab base allows you to build houses with a height of 2 floors. At the same time, it ensures protection of the structure from distortions as a result of soil freezing, as well as the durability of structures.
Features of a floating foundation
A floating foundation is a type of slab construction. Often floating is synonymous with slab foundation, but they have some differences. The floating option is presented in several types, with the following features:
floating grid - a base with cross-shaped stiffening ribs in increments of 1 to 3 m. The method has a lower cost, and during operation, distortions of the building are excluded. The key to the reliability of the design is the accurate calculation of all parameters depending on the characteristics of the future structure;
the columnar floating option cannot be created on clay soil, but it is optimal for rocky and gravelly sands when building log houses, frame or panel houses. The foundation pad consists of sand and waterproofing, which replace the fertile soil layer. The pitch between the pillars is 1.5–2.5 m;
the floating slab is a solid, shallow base
At the same time, it is important to stabilize the condition of heaving soil by organizing drainage, replacing the layer of inert soil, and protecting it from freezing. This allows you to avoid compromising the integrity of the building when the slab moves as a result of soil swelling.
A floating foundation differs from a slab foundation in that it can be created in several versions. The choice depends on the building material, soil characteristics, and weight of the structure. In any case, an accurate calculation of all parameters is necessary, otherwise the structure may tilt as a result of soil movement.
Finnish foundation
A foundation in which the slab is not connected to the plinth/foundation part bears only operational loads. Communications in the form of heated floors do not pass along the base, because they are installed at the stage of finishing the structure. The Finnish version is designed for subsequent installation of heated floors. The base is suitable for buildings without an underground floor.
For a Finnish stove, the inner part is filled separately
Finnish foundation involves insulation using penoplex or other materials for arranging the foundation. This process is carried out from the inside of the structure. In this case, the bottom plate does not have thermal insulation, and for waterproofing they use welded or glued films.
DIY pouring
The process of pouring concrete is a responsible operation that requires accuracy and an understanding of some subtleties. First of all, you need to consider the weight of the material. If you pour from a height, there is a risk of destroying the formwork or reinforcement cage.
To create an optimal filling mode, you should make a tray along which the mixture will be directed into the trench. This will create a uniform supply of concrete and eliminate sudden changes in load as much as possible.
Self-manufacturing and pouring is not a desirable option, since productivity is very low and the process is slow. This creates a layered structure of the tape, reducing its strength and load-bearing capacity.
It is strongly recommended to use ready-made material and pour it from several points. You should not count on the mixture spreading over the entire length of the formwork. It is necessary to prepare in advance several access points for the mixer to the trench, provide for the possibility of installing a tray and pour in even portions from different points.
This is the only way to create a monolithic casting with the same strength characteristics at each point.
Schemes for installing a floor on the ground in a house, basement, garage or bathhouse
In houses without basements, the floor of the first floor can be made according to two schemes:
- supported on the ground - with a screed on the ground or on joists;
- supported on walls - like a ceiling over a ventilated underground.
Which of the two options will be better and easier?
In houses without a basement, floors on the ground are a popular solution for all rooms on the first floor.
Floors on the ground are cheap, simple and easy to implement; they are also beneficial to install in the basement, garage, bathhouse and other utility rooms.
A simple design, the use of modern materials, and the placement of a heating circuit in the floor (warm floor) make such floors comfortable and attractive in cost.
In winter, the backfill under the floor always has a positive temperature. For this reason, the soil at the base of the foundation freezes less - the risk of frost heaving of the soil is reduced. In addition, the thickness of the thermal insulation of a floor on the ground may be less than that of a floor above a ventilated underground.
It is better to abandon the floor on the ground if backfilling with soil is required to a too high height, more than 0.6-1 m. The costs of backfilling and compacting the soil in this case may be too high.
A ground floor is not suitable for buildings on a pile or columnar foundation with a grillage located above the ground surface.
Three basic diagrams for installing floors on the ground
In the first version
a concrete monolithic reinforced floor slab rests on load-bearing walls,
Fig. 1
.
| Fig.1. Monolithic flooring on the ground (suspended floor) |
After the concrete hardens, the entire load is transferred to the walls. In this option, a monolithic reinforced concrete floor slab plays the role of a floor slab and must be designed for the standard load of the floors, have the appropriate strength and reinforcement.
The soil is actually used here only as temporary formwork when constructing a reinforced concrete floor slab. This type of floor is often called a “suspended floor on the ground”.
A suspended floor on the ground has to be made if there is a high risk of shrinkage of the soil under the floor. For example, when building a house on peat bogs or when the height of bulk soil is more than 600 mm. The thicker the backfill layer, the higher the risk of significant subsidence of the fill soil over time.
Second option
- this is a floor on a foundation - a slab, when a reinforced concrete monolithic slab, poured onto the ground over the entire area of the building, serves as a support for the walls and a base for the floor,
Fig. 2.
| Fig.2. Floor on a slab foundation |
Third option
involves the installation of a monolithic concrete slab or the laying of wooden logs in the spaces between load-bearing walls supported on bulk soil.
| Fig.3. Floors on the ground |
Here the slab or floor joists are not connected to the walls.
The load of the floor is completely transferred to the bulk soil,
Fig. 3.
It is the latter option that is correctly called a floor on the ground, which is what our story will be about.
Ground floors must provide:
- thermal insulation of premises in order to save energy;
- comfortable hygienic conditions for people;
- protection against penetration of ground moisture and gases - radioactive radon - into premises;
- prevent the accumulation of water vapor condensation inside the floor structure;
- reduce the transmission of impact noise to adjacent rooms along the building structures.
This is interesting: Is it possible to lay new linoleum on the old one: we study it in detail
Foundation on stilts
Pile foundations are suitable for any soil, except those made of rock. Their second advantage, besides versatility, is low installation costs. If there is a high groundwater level at the construction site, what kind of foundation to make, spending a minimum of time and labor on it, is also not controversial - of course, a pile foundation.
Structurally, it consists of reinforced concrete or metal pillars installed along the perimeter of load-bearing walls with a certain pitch and buried in the ground to a solid layer below its freezing level. At the top, all the pillars protruding above the ground are connected with a grillage. This is a monolithic reinforced concrete strip, a powerful steel profile (channel or I-beam) or, if the weight of the house is small, a large section beam.
Aboveground part of the pile foundationSource 1pokirpichy.ru
Types of pile foundations
Piles can be driven, bored or screwed. Each type has its advantages and disadvantages.
- Driven reinforced concrete piles are reliable, durable, and can withstand heavy loads. Special equipment is required for their installation.
- Screw piles can be installed either mechanically or manually. Their main advantage over other types is the ability not to loosen, but to compact the soil around them when screwed in, which increases their stability and stable position.
- Bored piles are the most cost-effective of all, especially if you do them yourself: drill holes with a hand drill, reinforce them and fill them with concrete.
Types of piles: driven, driven and screwSource kursremonta.ru
Advantages and disadvantages
A pile foundation of any type is not subject to the forces of frost heaving if the piles rest on a non-freezing, not saturated with water, hard and immovable layer of soil. Sometimes such a layer is located at a very great depth - more than 2.5-3 meters. Pouring a concrete strip of this height will be very expensive. And piles in this situation are beyond competition.
But if the soil on the site does not contain hard layers at all, which also happens, the piles, without a solid foundation, will not hold the house in a stable position. This is one of their shortcomings. There are others:
- insufficient load-bearing capacity: a pile foundation is suitable only for relatively light buildings - frame, wooden, light cellular blocks;
- impossibility of building a basement or basement floor;
- the need for high-quality insulation of the lower floors and their protection from dampness.
A big plus when installing pile foundations is a minimum of excavation work, a clean construction site free of dumps. Source kakoydom.ru
When is it advisable to install a floating base?
Before engaging in preliminary calculations and preparatory work, it would not hurt to understand what a floating foundation is and in what cases its use is advisable.
Floating foundation
This type of foundation is advisable to use on problematic and heaving soils. The foundation received its special name due to the fact that its design is a monolithic reinforced concrete slab that moves together with soil that is prone to heaving. Of course, this process cannot be seen with ordinary eyes.
But if your site has very problematic soil, then building a strip foundation is simply not practical. A floating base is also expensive, but compared to the construction of a classic concrete strip, it is a more profitable option, providing high structural strength and savings in labor costs and monetary savings.
The floating base can be divided into several types:
- monolithic;
- columnar;
- tape
Some tips from the professionals
Creating a floor screed on the ground is a task that even home craftsmen can do. Modern process technology has made the process as easy as possible; the main thing is to follow the stages of work, do everything efficiently and listen to the advice of specialists:
- The screed level is set taking into account existing or planned doorways. Level markings must be carried out along the entire perimeter of the base. Stretched cords will help make orientation easier;
- if a clay layer is involved in the preparatory work, then it should be moistened and then compacted - such an obstacle will become almost insurmountable for groundwater;
- concrete screed on an earthen base - a multi-layer “pie”, each of the layers in which must be carefully aligned horizontally;
- the thermal insulation characteristics of a concrete floor can be improved using an expanded clay, cork or plywood layer;
- the thickness of the rough screed should be about 8 cm, and the thermal insulation layer should be at least 10 cm;
- when creating a reinforcement frame for a concrete floor that will have to withstand severe operational loads, it is best to use rods with a diameter of 8 mm;
- The concrete surface is prone to cracks; to avoid this problem, expansion joints are created on the surface. After cutting, they must be sealed;
- To prevent the appearance of dust on the screed, special impregnations are used, which are applied no later than 7 hours after compaction of the concrete layer.
It is very important to use high-quality materials when arranging a concrete screed, especially for the “filling”, that is, insulation and waterproofing. If they fail, the entire structure will lose its strength and will not last long.
You should not save on screed materials, otherwise you will subsequently have to spend significantly more money on repairs.
The result of competent work with high-quality materials will be the appearance of a reliable and durable concrete floor. It will not only withstand high operating loads, but will also serve as an ideal base for applying any of the topcoats on the market today.
Floors with a properly installed concrete screed will last for many years, or even decades.
By following the technological sequence and paying due attention to all its stages, even an amateur who has very modest knowledge of the repair process and has minimal skills can cope with the creation of the screed
Floor pie on the ground
The cheapest option for the lower level after the earth floor, which is currently not used anywhere, is the floor on the ground. The building code SP 31-105 specifies the installation of floors on the ground with three minimum layers:
- crushed stone backfill with a minimum thickness of 10 cm;
- polyethylene film 0.15 mm;
- concrete slab minimum 10 cm thick.
To ensure the mobility of the structure, the connection to the wall is organized through a damper layer, which solves several problems:
- damping of vibrations and structural noise;
- absence of a rigid connection with the elements of the foundation or plinth to avoid destruction;
- providing an air gap to compensate for linear expansion of the material.
Damper tape.
During possible subsidence and swelling of the foundation soil, the floor slab moves freely on the ground in a vertical level without destroying the base, grillage or MZLF.
The need for the remaining layers of the floor pie on the ground is due to the improvement of the operational characteristics of the structure:
- footing – a screed made of lean (B7.5) concrete to provide a flat surface when laying roll waterproofing and sealing joints, protecting the material from multiple punctures by the sharp edges of crushed stone;
- thermal insulation - a carpet made of extruded high-density polystyrene foam allows you to retain the heat of the subsoil under the building, thereby completely eliminating frost heaving, increasing the service life of the foundation and reducing heat loss in the floors;
- reinforcing belt - perceives tensile loads in the lower level of the screed;
- heated floor contours – increase living comfort and reduce heating costs.
Floor pie on the ground.
Recommendations for concreting
Before installing the screed, the area of the room must be divided into strips 80-100 cm wide using a steel U-shaped profile or wooden beacon boards placed on edge. The damper tape is attached to the walls before pouring begins so that it protrudes 1.5-2 cm above the design mark of the finishing surface.
Pouring concrete begins at the far end of the room and moves towards the front door.
Laying is done in strips, filling the cells slightly above their level. For leveling, use a vibrating screed or a metal rule, moving it along the beacons.
After allowing the mixture to dry, the beacons are removed from it, filling the resulting seams with fresh concrete. After this, the concrete is covered with film and given 4 weeks to gain strength, periodically moistening it with water.
Which type is built faster?
When pouring a concrete strip or slab, you have to let the concrete sit for a certain amount of time. This greatly slows down construction, but in this case it is impossible to speed it up. When creating a prefabricated strip or laying ready-made reinforced concrete slabs, construction time is significantly reduced.
In addition, pouring concrete is possible only in the warm season, which significantly limits the possibilities of creating monolithic slabs or strips, while prefabricated structures, with some restrictions, can be built at any time of the year.
Therefore, the speed does not depend on the type of base, but on its design.