Sand-cement mortar is used for laying piece building materials. However, it cannot be used for the installation of aerated concrete blocks for various reasons.
The performance properties of aerated concrete require a special approach to installation technology. In particular, ordinary cement mortar is not used for laying gas blocks; a special adhesive composition is needed.
Many home craftsmen have some experience in construction work, which they then use to solve any issues related to the construction of houses; they do not consider building materials as a complex and multifaceted technique. However, this approach is incorrect and even dangerous, especially if you plan to work with modern materials. The consequence of such frivolity is serious mistakes. For example, not everyone knows what kind of solution is needed for aerated concrete blocks, laying them out of habit on a regular sand-cement mixture. The result can be cold in the house, and in difficult cases, the destruction of walls.
Tools used
- A trowel is the main tool of a mason, used for applying mortar to blocks.
- Remove excess glue with a notched trowel The width of the canvas should correspond to the width of the block, so as not to make unnecessary movements. The teeth are selected depending on the quality of the blocks: 4 mm - for even blocks, 8 mm - for products with large deviations in geometry.
- Trowel for aerated concrete (carriage) - this specialized tool has a capacious bucket with a tooth. The device allows you to pour the solution onto the blocks and immediately remove the excess. The carriage is an alternative to the trowel and comb.
- A hacksaw for aerated concrete differs from a regular one in having large, sparse teeth; the tool is used for sawing blocks with the least amount of damage.
- The corner template is not a required fixture. It allows you to make an even cut at a right angle.
- Brush or broom. Mechanical processing of aerated concrete leads to the appearance of large amounts of dust. Small particles impair adhesion between the glue and the blocks, so before applying the solution you need to clean the surface of the stones.
- A grater is a plane for aerated concrete, on the working side of which there are multidirectional teeth. This tool is used to remove irregularities on blocks.
- A rubber mallet helps to adjust and shrink the blocks onto the mortar without damage.
For aerated concrete blocks, you can only use a mallet with a rubber tip. Wooden and steel strikers will leave dents.
- Bubble level is a measuring device for checking horizontal and vertical planes between adjacent blocks.
- Hydraulic or laser level (level). A group of measuring instruments that allow objects to be placed at the same level at a great distance from each other.
- A wall chaser is a device for creating recesses in blocks for laying reinforcing bars.
- Lace - rope for creating cast-offs around the perimeter of the house. It is pulled between the outer blocks so as not to disturb the overall geometry of the walls.
- A hammer drill with an attachment for mixing construction mixtures.
Selection options
Cellular concrete has special properties that make it impossible to obtain high-quality masonry using conventional cement mortar. This is because the seams will be thick and will cause serious heat loss. Adhesive for aerated concrete blocks in terms of physical properties is very close to the parameters of the building material, therefore it is ideally suited. Ordinary cement mortar does not have such characteristics.
When constructing buildings in the northern regions, it is advisable to use gray glue. Its characteristics do not deteriorate at temperatures from +5˚ C - the composition does not spread and has excellent adhesion. Temperature limits for use are in the range of up to -10˚ C.
Advice! The adhesive composition used during construction in winter must always have a temperature above 0˚ C. This will ensure adhesion and protect against damage during work.
Professionals recommend not to save money when buying aerated concrete adhesive; to choose only brands with an excellent reputation, time-tested, and which consumers speak well of.
Which glue is better can be decided by testing. Buy several different adhesive compositions and try to glue 2 aerated concrete blocks with each of them. After 24 hours, break the connection and carefully examine the joint. The best option is when the block breaks, but the integrity of the seam is preserved, this is the glue that needs to be purchased.
If the connection splits along the seam, the glue is of low quality, do not buy it. In the case where both the gas block and the seam are partially broken, the adhesive mixture is not very good.
Necessary materials
The choice of materials is determined by the project and may differ depending on the chosen technical solution.
Blocks
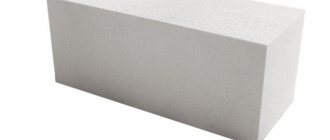
- Ordinary aerated concrete blocks. They are purchased in accordance with the design documentation of the building according to the thickness of the walls. A regular block can have straight ends or with a tongue-and-groove, tongue-and-groove or groove-to-plane joining system.
- U-shaped (tray) blocks are purchased if provided for by the project. Such products are used as lintels for door and window openings, as well as for filling armored belts when forming the last row.
Armopoyas is the colloquial name for a reinforced concrete strapping element, which is introduced into the structure of a house to compensate for strong tensile and compressive loads. A monolithic row is usually poured under floors or roofing.
- beam lintels , like U-blocks, can be used in window and door openings, if provided for by the project.
Glue solution
Masonry adhesive is the most common type of binder for working with aerated concrete blocks. It is made on the basis of mineral components and is supplied in dry form. The thickness of the seam when laying with glue should be 1 - 3 mm.
There is also an alternative way of laying blocks on adhesive foam. Polyurethane cylinders do not take up much space and are easy to use even for people without special masonry skills.
Cement-sand mixture
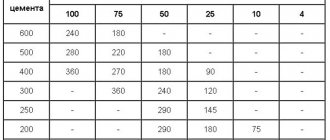
When laying aerated concrete blocks, DSP is usually used only for the first row. The solution is made from a ready-made mixture or you can independently select the desired ratio of sand and cement. The thickness of the seam must be at least 10 mm.
Laying all rows on the DSP is allowed, but this method is not popular due to the thickening of the seams, which leads to increased costs for the solution. In addition, masonry with thicker seams has less strength. The technology of laying on cement mortar is justified if the curvature of the blocks does not allow the use of glue.
The best manufacturers of adhesives
So, you have decided to use adhesive for the masonry of your future home or other building and it is time to choose a composition on which you will entrust one of the most important missions, namely the strength and integrity of the structure.
Today, the building materials market is filled with various companies and brands, and the category of mixtures is no exception, providing quite a wide choice. So for a more optimal solution, it’s worth considering the three best and most popular options, from world leaders and simply proven brands.
Ceresit
One of the most popular brands of building materials, mixtures and other things is the Ceresit and it deservedly occupies a high position, thanks to numerous recommendations and its exceptional quality.
Made on the basis of cement with mineral fillers and an organic modifier, the Ceresit adhesive mixture is perfect for thin-layer masonry of external and internal walls made of gas or foam blocks.
This adhesive composition is produced in bags weighing 25 kg.
Knauf
Also quite a popular solution among many construction companies and professional builders themselves are compounds from Knauf , which, thanks to their gypsum base, provide high and durable adhesion quality.
The environmentally friendly composition of Knauf Perlfix does not have any adverse effects on humans, and its plasticity allows you to quickly level the blocks.
This adhesive composition is produced in bags weighing 30 kg.
Preparatory work
Before starting masonry, you should prepare all tools and materials. It is also necessary to remove construction debris and thoroughly sweep the surface of the foundation.
Mixing the mixture
The glue remains in working condition for 20 - 30 minutes, so the solution is prepared in small portions. Also, the first row does not require a cement-sand mixture (1 to 4 or 1 to 3); it is mixed in a separate container or concrete mixer, depending on the volume.
- Pour a small amount of water into the concrete mixer, add plasticizer and start mixing.
- Fill in 2 parts of sand.
- Add 1 part of cement, wait for mixing.
- Add the remaining 2 parts of sand. At this stage the solution should be dry.
- Bring the mixture to the desired consistency using water.
If you use a ready-made mixture, then we skip these steps - add the solution to water and mix until it has the consistency of thick sour cream. If the solution is too dry, add more water.
It is recommended to add dry mixtures to water, and not vice versa, so that lumps do not appear.
You should start preparing the glue only after installing the corner blocks so that the solution does not have time to harden. To do this, pour the dry composition into a container with water and stir it using a construction mixer.
Marking
At this stage, it is necessary to check the compliance of the geometric parameters of the foundation with the design provisions. The horizontalness of the base should also be assessed.
- A deviation of less than 20 mm is considered normal; it is leveled with a layer of cement-sand mortar (10 - 30 mm).
- A difference of 20 - 40 mm - in this case, a layer of mortar of 30 - 50 mm and reinforcement with masonry mesh will be required.
- Violations of more than 40 mm are formally already a defect, so to eliminate the defects, you can contact those who performed the work on the foundation. Concrete pouring is required for leveling.
To check the levelness of the foundation, use a laser plotter, level or hydraulic level.
At the marking stage, you need to scrape the foundation in order to clarify the dimensions of the building and check their compliance with the design. To do this, use pegs to secure the string at the corners and check the diagonal of the future building.
Waterproofing
According to the standard SP 15.13330.2011 “Stone and reinforced stone structures”, a cut-off waterproofing must be located under the first row of masonry. This layer prevents moisture from the foundation from rising up the walls due to capillary suction. The following materials can be used as waterproofing.
- Self-adhesive bitumen-based sheet. This material is specially made for cut-off waterproofing, so it is supplied in rolls of small width.
- Fused bitumen waterproofing for roofs requires heating with a torch.
- Cement waterproofing is spread on the concrete base.
Proportions for preparing the solution
Basically, professional builders always know what proportions of the components are needed for a certain amount of mixture, but if suddenly you are just starting to be interested in this topic, you can always find a “recipe” for preparing a solution using a bag with the composition.
The rules for preparing the mixture will also be located there. But if for some reason they were not there, then it is worth noting that they are quite simple and will be accessible to absolutely everyone:
- pour the contents of the bag (approximately 25 kg) into a clean container;
- pour in about seven to eight liters of water;
- using a drill mixer, mix the mixture at low rotation speed, bringing the solution to a homogeneous state;
- After five minutes of “ripening” the solution, it can be used.
This is what the standard preparation instructions look like, and checking the plasticity of the mixture will be quite simple; you just need to apply it with a spatula to the surface of the block and see if it spreads. When the glue thickens, you can always stir it with a mixer, but you still shouldn’t leave the mixture unused for more than 2 hours.
It will also be important to note, as already written above, that the technology for preparing glue from the winter composition differs quite a bit from the main one as follows:
- the water must be hot (at least 60 degrees Celsius);
- the temperature of the finished working mixture should not fall below +10 degrees;
- the “life” of such a solution at sub-zero temperatures is no more than half an hour;
- Never apply glue to blocks covered with frost, hoarfrost or snow.
Step-by-step masonry instructions
We lay out the blocks at the corners of the foundation. Work should begin from the highest part of the base. For this we need a cement-sand mixture; it is better to mix the glue later. First you need to clarify the location of the doorways.
First row
Before laying, the blocks must be cleaned from fine dust with a brush to improve adhesion. Also, debris could get on the waterproofing, so it needs to be swept up.
- We start laying from the highest point. To do this, remove the block and apply the solution to the surface in an even layer with a trowel. We seat the stone and level it with light blows of a mallet. At this stage, it is important to pay attention to the location of the block relative to the vertical line of the foundation. We check ourselves with a bubble level.
Depending on the design solution, the vertical of the wall may coincide with the foundation, but this is not always the case. In some cases, it is hung or pushed back to form a shelf for trim or insulation.
- We move to the next corner and do the same thing there. After this, we stretch the mooring between the blocks. To do this, the rope can be secured to the top of the blocks with a self-tapping screw or nail. Using a level, we align the blocks relative to each other and adjust the position with a mallet.
- When the mooring is stretched between all the corners, you can dilute the mineral glue and begin laying the first row. A solution of CPS is laid out on the base.
- Mineral glue is applied to the ends of the block with a trowel, and the excess is removed with a comb.
- The blocks are seated using a mallet; the horizontal and vertical positions relative to adjacent blocks are checked using a bubble level.
- If necessary, stones are cut with a hacksaw; for this it is convenient to use a corner template, which allows you to obtain an even vertical cut.
At this stage, partitions are laid. Non-load-bearing walls are connected to the frame of the house with flexible connections, load-bearing walls are tied with masonry.
Subsequent rows
- The first row needs to be prepared for further work. To do this, the surface of the blocks is leveled with a grater. Particular attention should be paid to the joints, as a “tooth” or elevation may form there, which will transfer stress to the top row.
- We perform reinforcement of the first row.
- Laying the second and all subsequent rows also begins from the corners, only a different direction is chosen for the first block. Thanks to this, the top block ties the vertical seam of the bottom row.
- Cement-sand mortar is no longer used; mineral glue is applied to the bed and bond planes. At the same time, we remove the excess mortar with a spatula-comb so that the seam is no thicker than 3 mm.
- In each subsequent row, the blocks must be offset by at least 20 cm relative to the previous one.
- From the fourth row, window openings usually begin to form. This level is also reinforced.
Door and window openings
The main difficulty in forming windows and doors lies in the construction of the lintel. The calculation must be carried out at the design stage. If the lintel is subject to loads from floors or roofing, then it is considered load-bearing. A structure on which only the masonry rests is calculated as non-load-bearing. Let's look at the main solutions that can be used in an aerated concrete wall.
Monolithic reinforced concrete beam. Fixed or removable formwork is placed on wooden supports above the openings. A reinforcement frame is assembled in it and filled with concrete. U-blocks are used as permanent formwork.
A finished beam made of aerated concrete or reinforced concrete is a solid element that is laid in the opening. Aerated concrete blocks are lighter and can be installed without auxiliary equipment.
Masonry lintels are made in the absence of serious loads. The masonry is assembled on wooden supports, which are removed after the mortar has dried. Additionally, such jumpers can be reinforced at the top or bottom. There is also an option when the blocks are attached to the top row with steel dowels.
The area of support on the masonry for a load-bearing lintel must be at least 200 mm, for a non-load-bearing lintel - at least 100 mm.
Reinforcement
Let us examine the reinforcement procedure in more detail.
- A wall chaser is used to cut longitudinal grooves in the blocks. Their number depends on the width of the wall: less than 200 mm - one, more than 200 mm - two. The distance to the edges of the block from the recess must be at least 50 mm.
- The grooves are cleaned of fine suspension with a brush and filled with mineral glue.
- Reinforcement of a periodic section profile (diameter from 8 mm) is placed in the recesses.
- The reinforcement must bend at the corners; joints in these places are not allowed. The connection of two rods should fall on the central part of the block, the two ends are connected together with wire.
- The reinforcement is recessed into the groove, and excess mortar is removed so that the surface of the row is even.
The following rows are subject to reinforcement: the first, under the window openings, above the lintels, every fourth in the blind walls, at the level of the mauerlat and the edge of the roof.
The last row
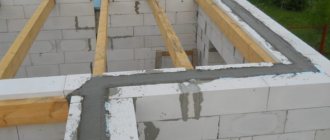
The last levels of masonry usually serve as support for the roof or ceilings, so a monolithic strapping belt is placed there. It must distribute the loads so that local stresses do not arise in individual sections of the wall.
The strapping belt is poured into removable or permanent formwork. The latter can be a row of tray blocks. They have a recess where the reinforcement cage is laid and concrete is poured.
Features of aerated concrete
Aerated concrete is a building material from the cellular concrete family. The development of aerated concrete first began about 100 years ago, and since then there has been debate about the advantages and disadvantages of the material. It differs from conventional types of concrete in its porous structure, low weight and density. Proponents of aerated concrete argue that these properties are advantages, while opponents consider them disadvantages. At the same time, the material was deliberately developed precisely for such a structure, which was the goal of all research. As a result, it was possible to reduce the load on the foundation and conserve thermal energy.
Most opponents of the material are captured by their stereotypes. They see only part of the word “concrete”, missing the important prefix “gas-”. All the supposed disadvantages of the material are its features, thanks to which new opportunities and advantages are obtained. The inability to accept a technology different from the generally accepted one makes opponents of aerated concrete criticize it for not being the same as dense and traditional brands. Attempts to challenge the installation technology themselves look ridiculous, but debate about the benefits of mortar or glue has not subsided for many years. Meanwhile, aerated concrete has a lot of positive qualities that need special mention.
Advantages and disadvantages
The advantages of the material include:
- light weight, reducing the load on the foundation and allowing to reduce the cost of its construction (the cost of the foundation is 30-40% of the total construction costs);
- the ability to save thermal energy, which allows you to reduce heating costs (for our country this point is very important, since the cold season can last at least six months);
- The even and precise shape of the blocks and their increased size (compared to brick) make it possible to obtain neat masonry done without the involvement of expensive specialists. Construction proceeds much faster than when using traditional piece building materials;
- the relatively soft structure allows the material to be processed with hand tools, adjusting the size to the ideal level. At the same time, you can lay aerated blocks manually, without the use of lifting equipment;
- under normal operating conditions, the service life of the material significantly exceeds the 25-50 years declared by the manufacturers.
Common Mistakes
- The absence of cut-off waterproofing under the first row of masonry leads to capillary suction of moisture from the foundation.
Often, instead of waterproofing, a brick belt is made under the first row. Ceramics raise moisture better than aerated concrete, so this makes no sense.
- Poor cleaning of blocks from dust and debris before laying impairs adhesion between rows.
- Do not sand the joints with a block float before laying the next row. Unevenness of the seam can lead to local stresses and cracks.
- Installation of a lintel without calculation leads to the appearance of structures with excessive or insufficient strength.
- The junction of two pieces of reinforcement on a corner block.
- Bandaging violations - the appearance of through vertical seams when joining partitions, corners or rows of masonry.
- The absence of a reinforced concrete belt under the floors or roof can lead to the appearance of cracks.
Mixture composition
Naturally, glue for laying cellular blocks comes in the form of a dry mixture from which it is subsequently made. The basis of such a mixture is always Portland cement, which is essentially very fine quartz sand, thanks to which the strength of the already hardened composition is achieved.
In addition to it, there are also various modifiers that retain moisture, allowing the glue to harden correctly, and also prevent the appearance of cracks, which is also completely undesirable. The plasticity of the mass, which allows the composition to fill all cavities, is increased by various polymer additives, which in turn increases the adhesion between the block and the solution, ensuring the strength of the structure.
Foundation preparation
A feature of aerated concrete is not only maximum lightness, but also high hygroscopicity. Any noticeable increase in the level of humidity provokes the loss of the building material’s heat-insulating properties, so houses made of aerated concrete are necessarily built on a plinth , usually made of concrete or brick.
The height of the base for a house made of aerated concrete is determined based on the depth of groundwater, the average amount and nature of precipitation. It should be above the average snow cover for the area.
So for the Moscow region, the average snow depth reaches its maximum in February and averages 25-35 cm in open areas and 40-45 cm in protected areas. Protection can include fences, neighboring structures and vegetation. Based on this, a 40 cm base will be enough.
also
influenced by the aesthetic appearance of the building, the number and height of steps, and the design of the vents .
As well as the presence or absence of basements and semi-basements, the location of communications underground. A guarantee of high-quality masonry will be the use of cut-off waterproofing, which will complement the standard waterproofing of the foundation base.