- Preparation of adhesive solution
- Actions that violate the integrity of structures
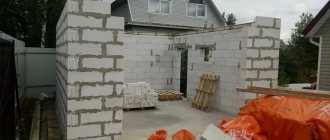
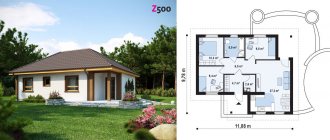
Having decided to build a house from aerated blocks or use this material for planning premises, many decide to carry out the work themselves. The reason is quite clear - by refusing the services of hired workers, the owner is trying to reduce the cost of building walls. In this case, instructions on how to correctly lay aerated concrete blocks with glue will be very helpful.
Tools used
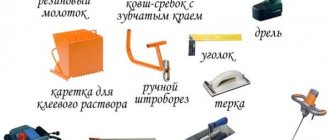
- A trowel is the main tool of a mason, used for applying mortar to blocks.
- Remove excess glue with a notched trowel The width of the canvas should correspond to the width of the block, so as not to make unnecessary movements. The teeth are selected depending on the quality of the blocks: 4 mm - for even blocks, 8 mm - for products with large deviations in geometry.
- Trowel for aerated concrete (carriage) - this specialized tool has a capacious bucket with a tooth. The device allows you to pour the solution onto the blocks and immediately remove the excess. The carriage is an alternative to the trowel and comb.
- A hacksaw for aerated concrete differs from a regular one in having large, sparse teeth; the tool is used for sawing blocks with the least amount of damage.
- The corner template is not a required fixture. It allows you to make an even cut at a right angle.
- Brush or broom. Mechanical processing of aerated concrete leads to the appearance of large amounts of dust. Small particles impair adhesion between the glue and the blocks, so before applying the solution you need to clean the surface of the stones.
- A grater is a plane for aerated concrete, on the working side of which there are multidirectional teeth. This tool is used to remove irregularities on blocks.
- A rubber mallet helps to adjust and shrink the blocks onto the mortar without damage.
For aerated concrete blocks, you can only use a mallet with a rubber tip. Wooden and steel strikers will leave dents.
- Bubble level is a measuring device for checking horizontal and vertical planes between adjacent blocks.
- Hydraulic or laser level (level). A group of measuring instruments that allow objects to be placed at the same level at a great distance from each other.
- A wall chaser is a device for creating recesses in blocks for laying reinforcing bars.
- Lace - rope for creating cast-offs around the perimeter of the house. It is pulled between the outer blocks so as not to disturb the overall geometry of the walls.
- A hammer drill with an attachment for mixing construction mixtures.
Selection of glue, famous brands, approximate prices
The basic principle of choosing any building material remains unchanged - cheap is not of high quality. Therefore, when buying glue for gas silicate blocks, do not be tempted by the low price. It is better to focus on popular brands and well-known manufacturers that have earned the trust of customers.
The leading positions in the informal quality rating are occupied by adhesive mixtures of the brands Ceresit, Quick-Mix, Bonolit, YTONG, AEROC and AeroStone. Estimated prices for these goods range from 190 to 300 rubles for a standard bag weighing 25 kg.
When choosing glue, take into account not only the reputation of the manufacturer, but also the temperature at which the work will be carried out. Standard formulations are designed for the positive range (from +5 and above)
Necessary materials
The choice of materials is determined by the project and may differ depending on the chosen technical solution.
Blocks
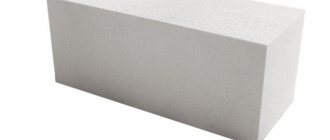
- Ordinary aerated concrete blocks. They are purchased in accordance with the design documentation of the building according to the thickness of the walls. A regular block can have straight ends or with a tongue-and-groove, tongue-and-groove or groove-to-plane joining system.
- U-shaped (tray) blocks are purchased if provided for by the project. Such products are used as lintels for door and window openings, as well as for filling armored belts when forming the last row.
Armopoyas is the colloquial name for a reinforced concrete strapping element, which is introduced into the structure of a house to compensate for strong tensile and compressive loads. A monolithic row is usually poured under floors or roofing.
- beam lintels , like U-blocks, can be used in window and door openings, if provided for by the project.
Glue solution
Masonry adhesive is the most common type of binder for working with aerated concrete blocks. It is made on the basis of mineral components and is supplied in dry form. The thickness of the seam when laying with glue should be 1 - 3 mm.
There is also an alternative way of laying blocks on adhesive foam. Polyurethane cylinders do not take up much space and are easy to use even for people without special masonry skills.
Cement-sand mixture
When laying aerated concrete blocks, DSP is usually used only for the first row. The solution is made from a ready-made mixture or you can independently select the desired ratio of sand and cement. The thickness of the seam must be at least 10 mm.
Laying all rows on the DSP is allowed, but this method is not popular due to the thickening of the seams, which leads to increased costs for the solution. In addition, masonry with thicker seams has less strength. The technology of laying on cement mortar is justified if the curvature of the blocks does not allow the use of glue.
Ingredient proportions
The correct composition of the proportion of the masonry mixture is a very important stage, on which the reliability of the entire structure of the house will directly depend. The type of masonry mortar and its composition depends on the brand of blocks and the purpose of the walls and is indicated in the design documentation.
Most often, developers use a cement to sand ratio of three to one. It can vary for different types of walls:
- external walls: 3/1;
- room partitions: 4/1.
How to cook?
To build aerated block walls, a decent volume of mortar will be required, so it is obtained mechanically using a concrete mixer or construction mixer. When preparing CPR manually, the mixture is not completely mixed, and the chemical reaction in it does not proceed to the desired result, and therefore the seams are loose and fragile.
CPR mixing technology:
- After the developer has decided on the required volume, he first adds water in the required volume to the running mixer; 1 hour is taken to be equal to 10 liters.
- Add 1 hour - ten-liter bucket of cement and mix.
- Add sand 1 bucket at a time, a little at a time. Make sure that it is completely mixed and the composition is homogeneous. Otherwise, the mixture will become unusable for installation.
- Stir the solution for 5 minutes until it becomes paste-like.
With this technology, the cement mortar is impregnated with air microbubbles, which prevent it from settling. In addition, these bubbles function as microscopic spheres that perfectly distribute loads.
The cement mortar used for aerated concrete must be applied within a period of up to 2.5 hours from the moment of preparation. The embedded blocks will not absorb water from the masonry mortar, and therefore their surface is wetted, especially if installation work is resumed after a forced break.
Preparatory work
Before starting masonry, you should prepare all tools and materials. It is also necessary to remove construction debris and thoroughly sweep the surface of the foundation.
Mixing the mixture
The glue remains in working condition for 20 - 30 minutes, so the solution is prepared in small portions. Also, the first row does not require a cement-sand mixture (1 to 4 or 1 to 3); it is mixed in a separate container or concrete mixer, depending on the volume.
- Pour a small amount of water into the concrete mixer, add plasticizer and start mixing.
- Fill in 2 parts of sand.
- Add 1 part of cement, wait for mixing.
- Add the remaining 2 parts of sand. At this stage the solution should be dry.
- Bring the mixture to the desired consistency using water.
If you use a ready-made mixture, then we skip these steps - add the solution to water and mix until it has the consistency of thick sour cream. If the solution is too dry, add more water.
It is recommended to add dry mixtures to water, and not vice versa, so that lumps do not appear.
You should start preparing the glue only after installing the corner blocks so that the solution does not have time to harden. To do this, pour the dry composition into a container with water and stir it using a construction mixer.
Marking
At this stage, it is necessary to check the compliance of the geometric parameters of the foundation with the design provisions. The horizontalness of the base should also be assessed.
- A deviation of less than 20 mm is considered normal; it is leveled with a layer of cement-sand mortar (10 - 30 mm).
- A difference of 20 - 40 mm - in this case, a layer of mortar of 30 - 50 mm and reinforcement with masonry mesh will be required.
- Violations of more than 40 mm are formally already a defect, so to eliminate the defects, you can contact those who performed the work on the foundation. Concrete pouring is required for leveling.
To check the levelness of the foundation, use a laser plotter, level or hydraulic level.
At the marking stage, you need to scrape the foundation in order to clarify the dimensions of the building and check their compliance with the design. To do this, use pegs to secure the string at the corners and check the diagonal of the future building.
Waterproofing
According to the standard SP 15.13330.2011 “Stone and reinforced stone structures”, a cut-off waterproofing must be located under the first row of masonry. This layer prevents moisture from the foundation from rising up the walls due to capillary suction. The following materials can be used as waterproofing.
- Self-adhesive bitumen-based sheet. This material is specially made for cut-off waterproofing, so it is supplied in rolls of small width.
- Fused bitumen waterproofing for roofs requires heating with a torch.
- Cement waterproofing is spread on the concrete base.
Features of aerated concrete
To build a house, it is necessary to use suitable materials. About 100 years ago, one of the representatives of the cellular concrete family, aerated concrete, was developed. It was conceived as the optimal type of building materials for private housing construction and in this regard had the most successful set of qualities. However, initially builders treated aerated concrete with great doubt, since it was radically different from conventional building materials and did not meet generally accepted standards. The reason for this attitude was the porous structure of aerated concrete, due to which it received a lot of positive and negative qualities. The advantages of aerated concrete are:
- light weight, reducing the load on the foundation;
- low thermal conductivity, allowing you to save on heating your home;
- smooth geometric shape, allowing for thin-seam installation of aerated concrete blocks;
- the material is easy to cut and process, which is constantly used when laying gas blocks.
Disadvantages of the material:
- low load-bearing capacity, limiting the height of buildings (for private houses - up to 3 floors);
- hygroscopicity, requiring reliable protection from contact with moisture;
- low strength, requiring reinforcement of the masonry and installation of armored belts under all floors.
In addition, the disadvantages include the presence of shrinkage, poor ability to hold fasteners, high demands on the strength and immobility of the base.
Pores in aerated concrete arise during the manufacturing process when a chemical reaction of aluminum powder with lime occurs in the presence of water. A large amount of gas is released, and the mass of material rises like yeast dough. The result is a mass of aerated concrete, which is cut into aerated blocks with an even and precise shape using special equipment.
Step-by-step masonry instructions
We lay out the blocks at the corners of the foundation. Work should begin from the highest part of the base. For this we need a cement-sand mixture; it is better to mix the glue later. First you need to clarify the location of the doorways.
First row
Before laying, the blocks must be cleaned from fine dust with a brush to improve adhesion. Also, debris could get on the waterproofing, so it needs to be swept up.
- We start laying from the highest point. To do this, remove the block and apply the solution to the surface in an even layer with a trowel. We seat the stone and level it with light blows of a mallet. At this stage, it is important to pay attention to the location of the block relative to the vertical line of the foundation. We check ourselves with a bubble level.
Depending on the design solution, the vertical of the wall may coincide with the foundation, but this is not always the case. In some cases, it is hung or pushed back to form a shelf for trim or insulation.
- We move to the next corner and do the same thing there. After this, we stretch the mooring between the blocks. To do this, the rope can be secured to the top of the blocks with a self-tapping screw or nail. Using a level, we align the blocks relative to each other and adjust the position with a mallet.
- When the mooring is stretched between all the corners, you can dilute the mineral glue and begin laying the first row. A solution of CPS is laid out on the base.
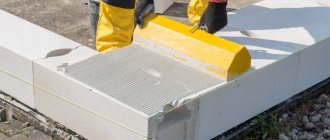
- Mineral glue is applied to the ends of the block with a trowel, and the excess is removed with a comb.
- The blocks are seated using a mallet; the horizontal and vertical positions relative to adjacent blocks are checked using a bubble level.
- If necessary, stones are cut with a hacksaw; for this it is convenient to use a corner template, which allows you to obtain an even vertical cut.
At this stage, partitions are laid. Non-load-bearing walls are connected to the frame of the house with flexible connections, load-bearing walls are tied with masonry.
Subsequent rows
- The first row needs to be prepared for further work. To do this, the surface of the blocks is leveled with a grater. Particular attention should be paid to the joints, as a “tooth” or elevation may form there, which will transfer stress to the top row.
- We perform reinforcement of the first row.
- Laying the second and all subsequent rows also begins from the corners, only a different direction is chosen for the first block. Thanks to this, the top block ties the vertical seam of the bottom row.
- Cement-sand mortar is no longer used; mineral glue is applied to the bed and bond planes. At the same time, we remove the excess mortar with a spatula-comb so that the seam is no thicker than 3 mm.
- In each subsequent row, the blocks must be offset by at least 20 cm relative to the previous one.
- From the fourth row, window openings usually begin to form. This level is also reinforced.
Door and window openings
The main difficulty in forming windows and doors lies in the construction of the lintel. The calculation must be carried out at the design stage. If the lintel is subject to loads from floors or roofing, then it is considered load-bearing. A structure on which only the masonry rests is calculated as non-load-bearing. Let's look at the main solutions that can be used in an aerated concrete wall.
Monolithic reinforced concrete beam. Fixed or removable formwork is placed on wooden supports above the openings. A reinforcement frame is assembled in it and filled with concrete. U-blocks are used as permanent formwork.
A finished beam made of aerated concrete or reinforced concrete is a solid element that is laid in the opening. Aerated concrete blocks are lighter and can be installed without auxiliary equipment.
Masonry lintels are made in the absence of serious loads. The masonry is assembled on wooden supports, which are removed after the mortar has dried. Additionally, such jumpers can be reinforced at the top or bottom. There is also an option when the blocks are attached to the top row with steel dowels.
The area of support on the masonry for a load-bearing lintel must be at least 200 mm, for a non-load-bearing lintel - at least 100 mm.
Reinforcement
Let us examine the reinforcement procedure in more detail.
- A wall chaser is used to cut longitudinal grooves in the blocks. Their number depends on the width of the wall: less than 200 mm - one, more than 200 mm - two. The distance to the edges of the block from the recess must be at least 50 mm.
- The grooves are cleaned of fine suspension with a brush and filled with mineral glue.
- Reinforcement of a periodic section profile (diameter from 8 mm) is placed in the recesses.
- The reinforcement must bend at the corners; joints in these places are not allowed. The connection of two rods should fall on the central part of the block, the two ends are connected together with wire.
- The reinforcement is recessed into the groove, and excess mortar is removed so that the surface of the row is even.
The following rows are subject to reinforcement: the first, under the window openings, above the lintels, every fourth in the blind walls, at the level of the mauerlat and the edge of the roof.
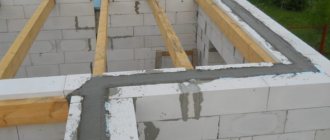
The last row
The last levels of masonry usually serve as support for the roof or ceilings, so a monolithic strapping belt is placed there. It must distribute the loads so that local stresses do not arise in individual sections of the wall.
The strapping belt is poured into removable or permanent formwork. The latter can be a row of tray blocks. They have a recess where the reinforcement cage is laid and concrete is poured.
Construction conditions
The design is the end wall of the attic floor, protecting the attic from natural phenomena (wind, rain, frost). The most common form of pediments is considered to be triangular, but there are also trapezoidal, pentagonal and polysyllabic types, depending on the design of the house.
The pediment can be a continuation of the aerated concrete wall or be built on frame sheathing, which is the rafter part of the roof (aluminum, board).
The wall pediment is more durable, so it is used much more often as the main option.
The gable structure is installed on both sides of the house. It must have geometrically correct dimensions on each side, identical to each other, so that there is no distortion of the roof slope.
The construction of pediments begins from a reinforced monolithic belt (mauerlat), and is always secured with anchors during construction, in the last row of the upper wall. The basic rules for the construction of all aerated concrete structures are contained in SP 339.1325800.2017.
The main features of pediments are that they depend on:
- size and configuration of the future roof;
- wall strength (continuation of the structural external load-bearing part);
- load distribution from the roof and attic;
- presence of windows in the attic and attic entrance.
Suitable blocks
Requirements for all blocks made of cellular aerated concrete are determined by a number of standards (GOSTs):
- R 57334-2016/EN 771-4:2011;
- 25485-89;
- 31360-2007;
- 12852.5-77;
- 21520-89;
- 12852.6-77;
- 27005-86;
- 31357-2007;
- 31359-2007;
- SN 277-80.
Of the existing types, the most preferable for the pediment would be a material with density markings D500-D700 (and higher), a structural series that is considered to be the best for the construction of load-bearing walls.
Different shapes of cellular concrete divide it into rectangular, with grooves, U-shaped, and with handles. For gables, blocks with standard dimensions according to GOST can be used - 600 x 400 (300) x 200 (300) mm or 400 x 400 (300) x 300 mm.
To make the pediment structure strong, it is reinforced with spacers and lintels. At the same time, the roof frame is made as strong and reliable as possible. The required thickness of the aerated concrete block is standard (for all external load-bearing walls) - 375 mm.
Correct calculation
In order not to make mistakes in construction, in a pre-drafted project, the necessary parameters are calculated, according to which the ratios of the parallel sides must be identical. When carrying out independent calculations, the following parameters are taken into account:
- Height. Represented by the distance from the base of the structure to its top point. This indicator is always included in the design documentation.
- Width. Shows the distance along the base of the structure - in the widest part.
- Roof slope angle. To determine it, you can use the photograph table below, created according to regulatory requirements. To find out its value, you need to measure 1 m from the edge of the pediment and the height of the slope - this will be the angle of inclination:
- Area of a triangle.
It is determined by the standard formula: the height is multiplied by the width and divided by 2. If there is asymmetry of the slopes, then the area of each half is calculated separately and then summed up. The basic formula for calculating the pediment: S= L /2 x H, where: L is the base of the triangle (width of the building), H is the height. The use of the formula is shown in the picture below: - Area of the pediment-trapezoid. Here the height is multiplied with the middle line (half the sum of the lengths along the upper and lower bases). Additionally, the area of the triangular area of the top is calculated using the formula described in the previous paragraph. The resulting amounts are added together to obtain the exact area of the structure.
Common Mistakes
- The absence of cut-off waterproofing under the first row of masonry leads to capillary suction of moisture from the foundation.
Often, instead of waterproofing, a brick belt is made under the first row. Ceramics raise moisture better than aerated concrete, so this makes no sense.
- Poor cleaning of blocks from dust and debris before laying impairs adhesion between rows.
- Do not sand the joints with a block float before laying the next row. Unevenness of the seam can lead to local stresses and cracks.
- Installation of a lintel without calculation leads to the appearance of structures with excessive or insufficient strength.
- The junction of two pieces of reinforcement on a corner block.
- Bandaging violations - the appearance of through vertical seams when joining partitions, corners or rows of masonry.
- The absence of a reinforced concrete belt under the floors or roof can lead to the appearance of cracks.
Can I put it on glue?
It is very important in the summer to carry out the arrangement of the foundation, which must completely harden before the onset of the first stable frosts. Only in this case can winter masonry technologies be successfully applied
Important!
You can carry out masonry in the frosty season, following certain rules.
Low-temperature conditions can complicate construction work that involves the hardening of cement mortars, so in the cold winter period it is necessary to warm up the aerated concrete and also use special anti-frost additives. Experienced specialists in the construction industry recommend combining the use of chemical and physical methods of protection with work on heating the stacked blocks and mortar.
Wall finishing made of gas silicate
Cladding gas silicate brick
For exterior finishing, special ventilated systems or materials characterized by high vapor permeability are used.
A gap is left between the façade brickwork and the gas silicate wall. They connect two masonry layers with flexible connections. If you prefer to use paint, putties or plaster mixtures for facade work, you need to make sure that they are designed for working with gas silicate.
Interior decoration involves the use of breathable materials.
Walls made of gas silicate blocks can be covered with wallpaper or painted with water-based paint. For a bathroom, toilet, or kitchen, you must first install a vapor barrier or soak the walls with a special solution. When ceramic tiles are used to decorate a bathroom, a vapor barrier is not needed.
Please note! Internal walls can be puttied no earlier than two months after completion of construction.
Work on the facade of the building can begin only when all internal finishing processes have been completed. The only exception is ventilated systems. They can be installed immediately after construction is completed.
Calculation of the required number of blocks
House made of gas silicate
You can calculate the total number of gas silicate blocks by calculating the volume of all walls of the house according to the project.
A more accurate calculation is carried out for each wall separately. To do this, you need to take the dimensions of the wall from the project, and the dimensions of the gas silicate block will become known when purchasing it. Knowing the width of the block and the length of the wall, it is possible to calculate the number of blocks per row of masonry. If half a block is needed, it is counted as a whole block. The number of rows of masonry is calculated in the same way. The number of rows is multiplied by the resulting number of blocks in one row. The final number is the number of blocks per wall.
If there are openings for doors and windows in the wall, an approximate calculation is also made. Then, after counting the blocks for each wall, all the numbers are summed up.
Composition and advantages
The adhesive consists of high quality cement, polymer additives, specially sifted sand and modifiers. Polymer additives improve the thermal conductivity of the mixture and its adhesive properties. Modifiers provide protection against cracking if the ambient temperature rises.
Advantages:
- the possibility of obtaining seams with a thickness of 2-3 mm, which provides a significant reduction in heat loss through the joints and reduces the cost of building construction;
- resistance to low temperatures, with the winter version of the glue you can perform work in the cold season;
- increased moisture resistance;
- no shrinkage during hardening.
It is necessary to store adhesive for aerated concrete blocks only in heated rooms. The solution must also be made in a warm place, the water must be hot (+60˚ C), the finished composition must have a temperature not lower than +10˚ C. In the cold season, the prepared solution must be used up as soon as possible, since after 30 minutes it will lose its qualities.
Composition and characteristics of the mixture
The composition of aerated concrete adhesive includes:
- high quality cement;
- fractionated (sifted in a special way) sand;
- polymer additives that serve to improve the adhesive qualities of mixtures and their thermal conductivity;
- modifiers, thanks to which the seams do not crack when temperatures rise.
The advantages of compositions for working with aerated concrete include the following characteristics:
- the ability to make thin seams (only two to three millimeters thick), which reduces heat loss through the joints and reduces construction costs;
- frost and moisture resistance;
- the ability to carry out work in cold weather (with winter glue);
- hardening without shrinkage.