In low-rise construction, laying aerated concrete blocks with grooves solves several problems at once: it saves the time required for the construction of external walls, reduces the thickness of the horizontal masonry joint to a minimum, and almost completely eliminates vertical “through” joints. The last two factors are especially important when building an energy efficient home. This advantage over conventional blocks is achieved thanks to the special geometry of the tongue-and-groove block and the use of a special adhesive masonry mixture.
Preparatory stage
Delivery and unloading of aerated blocks occurs on pallets in packaged form. Storage at the site is carried out on a flat and dry area, excluding contact of the bottom row blocks with water.
The inherent humidity of autoclaved aerated concrete shipped by the manufacturer is quite high, and after unloading, the pallet must be unpacked so that the blocks begin to “dry out.” Leave only a protective film on top in case of rain. The top part of the package (“cap”) is removed before laying.
The first row of the wall is the most critical. It is especially important to set the ideal horizontal level when using a large-format gas block with grooves laid on an adhesive mortar - there is no way to correct small errors due to the thickness of a conventional masonry joint made of a cement-sand mixture.
Preparing the base and laying the first row
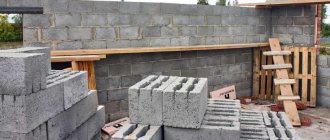
Any type of foundation is suitable as a base for walls made of aerated concrete blocks: strip, slab or pile. For small, lightweight buildings, you can also use a columnar foundation if the grillage is made of a steel profile or reinforced concrete beam. The main condition is that the base must be strong and level.
Before starting work, make sure that the surface of the foundation or plinth does not have sagging or chips. The sagging is knocked down, the chips are repaired. Check the horizontal level of the base. If the height differences exceed 5 mm, then additional leveling is carried out with cement-sand mortar. Then the base is waterproofed - usually roll bitumen materials are used.
The first row is laid in the following sequence:
- Find the “highest” corner and place the first block in it. It is laid on a layer of pre-prepared cement-sand mortar. The layer thickness is standard for a horizontal masonry joint - about 10 mm. The block is leveled and relative to the plane of the wall by lightly tapping it with a rubber mallet.
- Focusing on the first block, install the remaining corner blocks. Check and adjust their position to the level and relative to the plane of the wall.
- A cord is attached to the corners of the mooring, and “ordinary” blocks are laid out on the mortar, leveling them relative to the fixed level.
- To fill a gap in a row smaller than the length of the block, an additional element is cut out in “place”.
Which is better, a regular or grooved aerated concrete block?
Sometimes there are statements about the significant advantages of grooved blocks and their superiority over conventional elements. However, apart from geometric features, there is no difference between them. Both types are made from the same raw materials, using the same technology, on the same equipment. There is also no fundamental difference in masonry technology; the only nuance is the design of the corners (sealing grooves or trimming ridges). Therefore, statements about the advantages of grooved blocks have no practical confirmation and should not be taken into account when choosing a material.
Features of laying aerated concrete blocks with grooves
Unlike blocks with smooth end surfaces, gas blocks with grooves and ridges have their own laying technology. There are several differences:
- Corners and openings. If the first block is placed in the corner with the grooves facing outward or the block fits exactly into the opening with the grooves, then they are sealed with mortar. If the first block is placed in the corner with a comb or the block goes into the opening with a comb, then it is first cut off or smoothed with a trowel using aerated concrete.
- Adjunctions. From the side of the adjacent wall, the block is oriented towards the corner with ridges. The most common way to join two corner blocks is to cut off the ridges at the adjacent one and fill the vertical seam with glue. The difficulty of such a connection is that it is difficult to make a perfect cut under construction site conditions. Therefore, the thickness of the seam may be greater than the recommended 2-3 mm. A more complex, but technologically correct method is to cut grooves in the side surface of the first block for the ridges of the adjacent element.
- Vertical seams. If the project calls for finishing on both sides of the wall with plaster, putty or mortar tiles, then the vertical seam is not sealed with glue. The sealing does not affect the strength of the masonry, but only ensures the airtightness of the walls. With the “dry” finishing method on at least one side of the wall, only 50 mm wide strips are coated with glue along the outer edges of the ends of the block.
- Additional element. There are two ways to make an additional element from an aerated block with grooves. The first is to cut the block to size from the ridge side, coat both end sides with glue and install it in place. The second is to saw the gas block with the tongue-and-groove at an angle, cut off the “extra” part parallel to the cut line so that the two remaining profiled parts fit into the masonry of the row. The “oblique” vertical seam is completely coated with glue. This option is considered more reliable and protected from blowing.
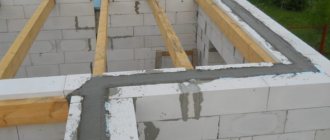
Reinforcement of the first row
Reinforcement of the first row is a mandatory procedure, regardless of the length of the wall. This is necessary to reduce the risk of cracks forming during the drying process of the aerated block and shrinkage of the house. The reinforcement of the first row does not affect the load-bearing capacity of the wall.
The most common method is to create an armored belt from two bars of periodic reinforcement with a diameter of 8 mm, laid in grooves parallel to each other along the entire perimeter of the walls. The grooves are cut manually or using a power tool. The distance from the reinforcement to the edge of the block should be about 60 mm. The depth and width of the groove must be sufficient to accommodate the rod and a layer of glue (or mortar), which should completely cover the reinforcement on all sides.
As a “lightweight” method of reinforcement, you can use laying two parallel strips of perforated steel tape 15 mm wide. The thickness of the tape should be at least 1 mm, but not more than 2 mm, so that it does not increase the size of the horizontal seam. After laying out the tape, it is completely covered with glue, on which the second row of the block is laid out.
After cutting the grooves, their bottom and the surface of the first row must be thoroughly cleaned of dust and crumbs.
A clean block surface is a prerequisite for good adhesion to the glue.
The grooves are completely filled with glue, the reinforcement is pressed into it, and excess solution is removed from the surface. After this, they begin laying the second row.
Aerated concrete blocks: sizes and prices per piece, characteristics and applications
As the density of the aerated block increases, the safety margin increases
Basic dimensions. Aerated concrete blocks have different sizes, this allows you to more accurately calculate the required number. The most popular are: 600×300×200, 600×300×250, 400×300×200, 600×300×300, 400×300×300, 600×400×300, 400×400×300 and 500×400×300 mm . Knowing the dimensions, you can calculate how many pieces of gas blocks are in a cube and, accordingly, how many of them are needed to construct a building with the given technical parameters.
Density. Density grade is measured in kg/m³. In accordance with the requirements of GOST 25485-89 (Cellular concrete), aerated concrete is divided by density into thermal insulation (D300-D500), structural-thermal insulation (D500 - D900) and structural (D1000 - B1200). The greater the density of the aerated concrete block, the higher its load-bearing capacity.
Strength class. This indicator determines how much axial pressure a given block can withstand. For example, strength class B2.5 allows the use of such a block in the construction of load-bearing walls up to 20 m high. The indicator values are as follows: B1.5, B2.0, B2.5 and B3.5.
Comparative table of characteristics of aerated block and other materials:
| Specifications | Brick wall | Wall made of porous large-sized ceramic blocks | Aerated concrete wall made from industrial blocks | |
| Ceramic brick | Silicate brick | |||
| Compressive strength, kg/m² | 125 | 150 | 128 | 15-30 |
| Average density, kg/m³ | 1350 | 1750 | 830 | 400 |
| Thermal conductivity, W/(m*°K) | 0,40 | 0,95 | 0,21 | 0,1 |
| Water absorption,% | 13 | 13 | 12 | >30 |
| Frost resistance, cycles | 35 | 35 | 50 | 25 |
| Standard wall thickness, m | 0,52 | 0,52 | 0,38 | 0,40 |
| Speed of construction of a wall of standard thickness, hour/m² | >3 | >3 | ∼1,3 | ∼0,88 |
Coefficient of thermal conductivity. This indicator has the following values: 0.096, 0.12, 0.14 and 0.17, and means the ability of a warmer room to “share” its heat with a cold one. The higher the coefficient, the greater the heat transfer. When determining the most suitable coefficient for you, it is necessary to take into account humidity.
Frost resistance. The frost resistance index is measured in cycles, and for aerated concrete blocks it ranges from 25 to 100. For comparison, brick has up to 50 frost resistance cycles.
Drying shrinkage. This indicator is measured in mm/m and should be no more than 0.5, otherwise you risk seeing more shrinkage cracks on the walls of your house than those provided for by GOSTs.
Second row and ligation of vertical seams
The second row starts from the corners, placing the blocks in a dressing relative to the first row. Before laying, the surface of the bottom row must be treated with an aerated concrete float, removing the slightest differences in height between adjacent blocks.
No matter how ideal the surface of the row may seem, this procedure cannot be neglected. Even a 1 mm difference in height in the form of a “tooth” with a thin layer of seam serves as a source of constant stress for the top row of blocks. And in this place a crack may appear in the wall over time.
After treating the surface with a grater, dust and crumbs must be swept away.
Laying is carried out using an adhesive solution laid out in a continuous layer for one block (with a small “margin” along the length of the strip). The glue is prepared immediately before laying the row, and each block must be fixed no later than 15 minutes after applying the solution to the surface of the aerated concrete. Spread the finished mixture using a special bucket with a serrated edge with a width equal to the size of the gas silicate tongue-and-groove block. You can also use a regular trowel and a notched trowel.
The correct placement of each block is checked by level and cord, adjusting the position by lightly tapping with a rubber mallet. Using the same mallet, the groove of the gas block is driven into the ridge until it stops.
If there are slight deviations of the additional elements from the standard size of the block, the displacement of the vertical seams of each next top row relative to the bottom will occur “automatically” due to the ligation of the corner to the width of the block itself. And this displacement is enough for the masonry to comply with the standards for bandaging rows - at least 80-120 mm. In other cases, as well as when passing through openings, it is necessary to ensure that this condition is met.
If the thickness of the walls is laid in two blocks, then the displacement of the vertical joints of the outer and inner parts should be at least 100 mm.
Subsequent rows of tongue-and-groove gas blocks are laid using the same technology as the second row.
Grooved or non-grooved aerated concrete block. Which one should I buy?
Basically, aerated concrete blocks are presented in the following sizes on the construction market:
- length – 590 mm or 600 mm;
- height – 200 mm or 250 mm;
- width: 80 mm; 100 mm; 120 mm; 180 mm; 240 mm; 300 mm; 360 mm; 400 mm; 500 mm.
These blocks can have a rectangular shape with a smooth surface, as well as with a tongue-and-groove system. Rectangular aerated concrete blocks with a tongue-and-groove system have a thickness of at least 200 mm and a density of 400 kg/m3 or more.
In this publication we will briefly look at two types of aerated concrete blocks: grooved and non-grooved.
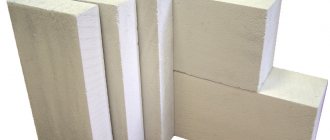
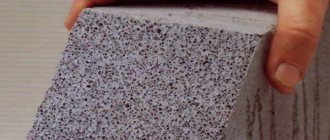
Aerated concrete blocks with a tongue-and-groove system
Aerated concrete blocks with a tongue-and-groove system are an improved type of conventional aerated concrete block, designed for the construction of load-bearing walls of a building up to three floors high. Such aerated concrete blocks have tongue-and-groove joints at the side ends, photo 1. Grooved aerated concrete blocks are obtained by turning “tenons” and “grooves” along the ends at the production stage using a special cutter. This form of blocks has a number of advantages, namely:
- Significant savings in glue are achieved, since when constructing masonry from grooved blocks, its vertical seams do not need to be filled with glue if these walls are to be plastered or puttied. Otherwise, it is recommended to apply a thin layer of glue to the outer strips of tenons along the ends of the block, photo 1;
- the thermal insulation properties of the wall are increased compared to a wall made of smooth aerated concrete blocks;
- labor productivity increases due to the speed of installation and ease of carrying blocks;
- grooved aerated concrete blocks eliminate additional heat loss along the vertical joints of the masonry;
- The tongue-and-groove system allows precise masonry of walls even by a non-professional mason (very valuable when masonry is carried out by the developer).
The disadvantage of grooved aerated concrete blocks: at the corners of a building or in door and window openings, you have to additionally align the ends of the blocks - cover the grooves or grind off the tenons with a grater. To remove the tenons, it is recommended to use a plaster float with sandpaper with a grain size of 24 mm.
Photo 1. Grooved aerated concrete blocks and their laying
Below, in Table 1, are the main dimensions of aerated concrete grooved blocks (with a tongue-and-groove system) produced by Stonelight.
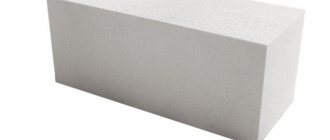
Ungrooved aerated concrete blocks (smooth)
Non-grooved aerated concrete blocks (smooth) have almost the same geometric parameters, with the exception of the “groove-ridge” system; at the ends there is a smooth and even surface, photo 2. The scope of application for smooth aerated concrete blocks is the same as for non-grooved ones. Smooth aerated concrete blocks with a thickness of 75...150 mm are used for the construction of partitions (partition blocks). The remaining aerated concrete blocks with a thickness of more than 150 mm are used for the construction of walls (wall blocks).
Unlike grooved ones, smooth aerated concrete blocks should be thoroughly coated with glue on all sides (in places adjacent to each other), including the vertical side surfaces.
In table 2 shows the main dimensions of non-grooved aerated concrete blocks (without a tongue-and-groove system) produced by Stonelight.
Thus, grooved aerated concrete blocks are more convenient for construction and have some advantages. Although in terms of the load-bearing capacity of these two types of blocks, they are completely identical.
Table 1 - Main dimensions of aerated concrete grooved blocks (with a tongue-and-groove system) produced by Stonelight
| Tongue/groove system | Width, mm | Height and length, mm | Volume on pallet, m3 | Qty. blocks per pallet | Number of blocks in 1 m3 | Number of m2 from 1m3 blocks | D500, kg | D400, kg | ||
| Weight 1m2+25% for humidity | Weight 1 piece +25% for humidity | Weight 1m2+25% for humidity | Weight 1 piece +25% for humidity | |||||||
| Yes | 250 | 200x600 | 2,1 | 70 | 33.33 | 4,0 | 156,25 | 18,75 | 125 | 15,0 |
| to order | 280 | 200x600 | 2,016 | 60 | 29.76 | 3,57 | 175,0 | 21,0 | 140 | 16,8 |
| Yes | 300 | 200x600 | 2,16 | 60 | 27.77 | 3,33 | 187,5 | 22,5 | 150 | 18,0 |
| Yes | 360 | 200x600 | 2,16 | 50 | 23.16 | 2,78 | 225,0 | 27,0 | 180 | 21,6 |
| Yes | 375 | 200x600 | 1,8 | 40 | 22.22 | 2,67 | 234,38 | 28,125 | 187,5 | 22,5 |
| Yes | 400 | 200x600 | 1,92 | 40 | 20.83 | 2,5 | 250,0 | 30,0 | 200,0 | 24,0 |
| Yes | 500 | 200x600 | 2,4 | 40 | 16.66 | 2,0 | 312,5 | 37,65 | 250,0 | 30,12 |
Photo 2. Smooth aerated concrete blocks
Table 2 - Main dimensions of aerated concrete smooth blocks (without tongue-and-groove system) produced by Stonelight
| Width, mm | Height and length, mm | Volume on pallet, m3 | Qty. blocks on a pallet | Number of blocks in 1 m3 | Number of m2 from 1 m3 blocks | D500, kg | D400, kg | ||
| Weight 1m2+25% for humidity | Weight 1 piece +25% for humidity | Weight 1m2+25% for humidity | Weight 1 piece +25% for humidity | ||||||
| 75 | 200x600 | 1,62 | 180 | 111,11 | 13,33 | 46,88 | 5,625 | 37,5 | 4,5 |
| 100 | 200x600 | 2,16 | 180 | 83,33 | 10,0 | 62,5 | 7,5 | 50 | 6,0 |
| 120 | 200x600 | 2,16 | 150 | 69,44 | 8,33 | 75,0 | 9,0 | 60 | 7,2 |
| 150 | 200x600 | 2,16 | 120 | 55,55 | 6,67 | 93,75 | 11,25 | 75 | 9,0 |
| 200 | 200x600 | 2,16 | 90 | 41,66 | 5,0 | 125,0 | 15,0 | 100 | 12,0 |
| 250 | 200x600 | 2,1 | 70 | 33,33 | 4,0 | 156,25 | 18,75 | 125 | 15,0 |
| 280 | 200x600 | 2,016 | 60 | 29,76 | 3,57 | 175,0 | 21,0 | 140 | 16,8 |
| 300 | 200x600 | 2,16 | 60 | 27,77 | 3,33 | 187,5 | 22,5 | 150 | 18,0 |
| 360 | 200x600 | 2,16 | 50 | 23,16 | 2,78 | 225,0 | 27,0 | 180 | 21,60 |
| 375 | 200x600 | 1,8 | 40 | 22,22 | 2,67 | 234,38 | 28,125 | 187,5 | 22,50 |
| 400 | 200x600 | 1,92 | 40 | 20,83 | 2,5 | 250,0 | 30,0 | 200,0 | 24,0 |
| 500 | 200x600 | 2,4 | 40 | 16,66 | 2,0 | 312,5 | 37,65 | 250,0 | 30,12 |
On the Ukrainian construction market, aerated concrete blocks of decent quality are produced by the following enterprises:
- Stonelight;
- AEROC (Aerok);
- YuDC;
- HSM (Hatten).
I would also like to note that when choosing aerated concrete blocks, you should also be guided by their density and concrete strength class, since how warm and durable your house will be depends on this indicator.
The author of the publication is an expert from GIDproekt
Konev Alexander Anatolievich
General principles of reinforcement of walls made of aerated concrete blocks
On “blind” walls longer than 6 m, reinforcement is carried out every fourth row. To do this, either install reinforced belts embedded in the grooves from a rod with a diameter of 8 mm, or place “flat” reinforcing elements in a horizontal seam.
Sections of walls under window openings are reinforced in the same way. In this case, the reinforcement (or tape) must be extended beyond the boundaries of the opening in both directions by at least 500 mm.
The upper part of the openings in the load-bearing walls is made of a steel profile, which is then lined on both sides with aerated concrete blocks. Another option is to make a reinforced concrete lintel using a U-shaped aerated concrete block as permanent formwork.
In self-supporting walls and partitions, with an opening width of less than 1200 mm and a short distance to the ceiling, there is no need for steel or reinforced concrete lintels.
Wall decoration from grooved gas blocks
Some developers believe that masonry made from grooved gas blocks does not need to be finished. They claim that the masonry surface is so smooth and flat that finishing is simply not needed.
This statement looks very strange - if the masonry was done in one row (usually), then the presence of gaps in the vertical (and some horizontal) seams can be considered guaranteed. If they are not repaired, cold bridges and areas with active condensation will appear. Here the aerated concrete will get wet and mold will appear. If the surface is not plastered or, at a minimum, not puttied, it is impossible to get rid of these problems.
Finishing is needed not only from the inside, but also from the outside. In this case, if you plan to install thermal insulation, you must first putty the surface or apply a thin layer of plaster. Otherwise, water vapor from the internal air passing through the cracks will saturate the heat insulator and damage it.
Recommendations for carrying out work
When working with mortars, the optimal air temperature is considered to be in the range of 5-25 °C. At higher temperatures, it is recommended to moisten the surface of the aerated block with water to ensure the normal humidity conditions necessary for adhesion to the glue.
Is it possible to lay tongue-and-groove gas blocks in the cold season? You can carry out work at temperatures down to -15 °C if you use glue with anti-frost additives.