A considerable number of people still do not understand the special need for the construction of a basement floor, while others, in turn, simply cannot imagine how this reliable and functional home can do without this room. Despite the fact that the basement cannot be classified as either a basement or a full first floor, it is increasingly taking its place in housing design. So what is the reason for his popularity?
This is what the finished basement of the house looks like
By building a basement floor, you get the following benefits:
- A noticeable saving of space on your plot of land, which is essential when the area is not too large;
- Possibility to equip a boiler room or a number of other services (sauna, billiard room, etc.) in this room;
- Ideal for terrain with complex multi-level terrain;
- Possibility of using the roof as a terrace;
- Increasing the architecture of the whole house.
The disadvantages of the ground floor include high financial costs and the complexity of construction work.
When building a basement, as a rule, materials with a porous structure are used to get rid of excess moisture. Otherwise, once inside the structure, the water quickly freezes with the onset of frost, which will eventually destroy the base surface, and, accordingly, the structure in general.
Existing types of base
To cope with this danger, the base is covered with paints and varnishes. This not only prevents the destruction of the base from atmospheric influences, but also makes it attractive in appearance. When choosing the appropriate paint and varnish coating, it is important to consider the degree of vapor permeability.
The paint used to cover the base should serve as a reliable moisture-proof film: this will prevent water from getting into the substrate. At the same time, it will allow water vapor to pass through, which serves to additionally eliminate excess humidity. Also, when purchasing a paint coating, it is important that it is light and weather resistant, and also meets fire safety requirements. The coating must remain visually attractive for at least three years.
Before painting the base, you need to apply a strengthening primer to its surface.
This will provide good adhesion and increase the strength of the surface. When painting, it is advisable to use only water-soluble alkali-based paints with an acrylic resin base that fully meet all the requirements regarding the processing of bases.
If the structure of the surface to be coated is porous, you will also need to apply a special water-based acrylic impregnation.
As a result, the mineral base will effectively repel water.
The ground floor is not only a beautiful appearance of the building, but also an expansion of its functionality. The basement can become a space for utility purposes; a sauna and bathhouse can be located here, or it can be turned into a garage. Light pits provided for basement windows are a kind of additional rooms that serve for good heat retention.
Pit installation diagram
Experts recommend planning rooms if the upper part of the basement floor reaches a height of two meters above the ground.
Typically, the ground floor of a private house does not involve the arrangement of living quarters. However, if the ceilings are high enough, a gym, billiard room, swimming pool and sauna can be installed here. If the level of the room in the basement is at the lowest point of the relief, it would be advisable to arrange a garage here. Thanks to this, you will get maximum free space and save on work on arranging the entrance to the garage.
When rooms are designed, their lighting options are carefully thought out. In addition, proper design will save energy. If rooms for non-technical purposes will be located in the basement, it should be taken into account that windows that let in sunlight will be an excellent addition to electric lighting.
The relevant standards stipulate that the ceiling height in such rooms should be no less than 2.5 meters. Due to this, the building will acquire a more pleasant appearance, and thermal insulation will improve several times.
Construction of the basement
There are several ways to build a basement under a house:
- The recessed plinth is one of the most commonly used. The main advantage of this structure is that it is highly resistant to moisture. The water drains very quickly, and since it does not stagnate, it does not harm either the house itself or its foundation.
- The basement floor is located at the level with the foundation, and this will require certain monetary costs for the waterproofing work necessary in this case. This measure will prevent the accumulation of excess moisture, and, therefore, the foundation will not collapse because of this.
construction of a basement floor from blocks - A protruding plinth is built if the building has thin walls. Usually it is needed in order to improve the quality of thermal insulation of the basement, for example, if it is not intended to serve auxiliary purposes.
Recessed foundation
The basement, buried below the zero level, follows the contour of the building and is constructed as a strip foundation.
The main conditions for the construction of a recessed basement foundation:
- the soil has normal moisture;
- aquifers are located at sufficient depth.
The possibility of constructing a recessed plinth is determined based on the results of geodetic surveys.
Due to this, you can effectively increase the living area of the entire building
How to prepare a construction site for work
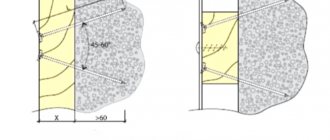
Laying a foundation with the simultaneous construction of a basement floor requires a thorough soil analysis at the construction site, as well as determining the location of groundwater. If they are found at a depth of one and a half meters, then the base should be built no higher than one meter.
When properly leveling a construction site, it may be necessary to apply an additional layer of primer. If groundwater is located near the surface of the earth, preliminary drainage of the land will be required. Drainage systems designed for this purpose will help you easily cope with this task. Their use will allow us to lay the foundation more deeply.
Diagram of the drainage system during the construction of the basement floor
General information
Norms
According to the standards, the ceiling height of the ground floor must be no less than 250 cm. The deepening of the ground floor is limited by the level of groundwater - with a high occurrence of perched water, as well as in wet places, its underground part is usually small. In an area with deeply located groundwater, the base is deepened almost completely, and this will reduce heating costs. So, we should consider the features of the construction of the basement floor.
Arrangement of the ground floor
The base is a continuation of the base, and therefore it can be made of the same material as the foundation itself, or using the material of the wall surfaces. Typically, monolithic concrete, brick or ready-made blocks are used to build the ground floor. The thickness of the basement walls is determined by a special calculation.
The role of the floor on the ground floor is played by a concrete slab, and it is produced by pouring or even ready-made reinforced concrete slabs are laid. Floors of the ground floor can be made of slabs, concrete, or even wood. Given the huge above-ground height of the plinth, windows and doors can be made in it, and it is important to place them on the east, south or even west side. The location of the window frames on the northern wall of the basement can lead to excess snow accumulating and possibly even pushing through the window frames. Basement walls require mandatory waterproofing, and the deep part of the base is recommended to be treated with waterproofing materials both outside and inside in order to increase reliability. It is permissible to waterproof the above-ground part only from the outside.
How to prepare a pit on a construction site
All work begins with the appropriate marking of the construction site, after which, guided by the house design, the foundation pit is dug using an excavator. If construction work is carried out in the spring, then there is a possibility of water accumulating in the pit, which will later have to be disposed of using a pump. Another way is to wait until it is absorbed into the soil naturally.
Once the required depth is reached, the bottom of the pit is carefully leveled, and the alignment of the corners requires special attention. When the pit is dug, it is marked based on the house design. Trenches for load-bearing walls must be dug to a depth of no less than 30 centimeters. When the trench is ready, crushed stone is poured into the bottom, then reinforcement is laid, and only then concrete is poured. It takes approximately three weeks for the concrete solution to dry completely.
Marking the underground floor of the house
The marking of the basement floor must be done. Work in this case involves performing the following actions:
- Drawing up a plan of the basement premises, which will indicate the specifications of all rooms on the floor. It is especially important at this stage to arrange the boiler room and fulfill all the prescribed requirements for its placement inside the house (the pros and cons of this are discussed in the corresponding article).
- In addition, calculations are required that will demonstrate the bearing capacity of the foundation and walls of the underground floor. It is these structures that will bear the main load from the ceilings and walls located above. Experts often recommend adding up to 30% of the required strength into the design at this stage in order to gain full confidence in the reliability of the structure.
- Then markings are made on the ground (in the building area or on the constructed foundation). Only professionals can do this job correctly, so don’t hesitate to contact them. In total, before making a basement, it is recommended to consult with several specialists.
- Finally, the contours of load-bearing walls and partitions are drawn. After this, you can consider this stage of work completed. Correctly made calculations will be the key to successful construction.
Marking the site for building a house.
When discussing the pros and cons of the basement, professional builders recommend developing several project options in accordance with which the construction of the basement can be carried out. In addition, unlike construction work that can be done with your own hands, the design must be completely carried out by specialists.
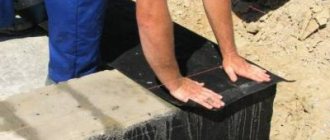
How to waterproof
The waterproofing device provides reliable protection of the foundation from moisture. It consists of pouring a concrete blind area around the perimeter of the proposed building, while the foundation itself is protected from the outside with rolled waterproofing material. In most cases, waterproofing is used for this - a fairly effective material that has a very reasonable price.
The efficiency of this system can be increased, for which experts propose an additional drainage system with external waterproofing. To do this, you need to step back half a meter from the base and dig a hole into which clay, crushed stone and concrete mortar are then placed. This must be done with the utmost care, because reliable waterproofing is the key to the durability and reliability of the entire house as a whole.
This is how the basement waterproofing is installed
How to make a basement from foam blocks
Foam block is one of the most common materials chosen for the construction of a “residential basement”. It allows for high-quality installation of utility networks and makes it possible to leave space for windows. It is better to use special equipment to work with it: doing the work manually will require considerable time. When using foam blocks, a choice is most often made in favor of a prefabricated foundation or a strip foundation.
If the house is supposed to have a basement floor, then the foundation is poured half a meter thick or more. To increase the strength of the walls, masonry is done with bandaged seams. A cement-sand composition is used for bonding. The blocks need to be laid as evenly as possible, otherwise, over time, difficulties will arise with finishing work.
It is also worth noting the size of the windows and making them as large as possible: more street light will penetrate into the basement.
It is necessary to leave ventilation holes, for which holes are left between the blocks at level with the ground surface.
Ventilation holes are left between the blocks at the same level with the ground surface. They should be properly covered with nets, and then garbage will not get inside the room.
The foundation of the basement should be about a meter above ground level. The blocks are connected to each other using a so-called leveling belt. And now, finally, the floors of the first floor can be laid.
Most often, reinforced concrete is used when arranging the belt, but brickwork can also be used. The first option, when reinforcement is laid on board formwork and poured with concrete, is considered more reliable.
Example of formwork installation
This results in a strong semi-underground structure. It serves as a reliable basis for the subsequent construction of the floor.
Types of socles
To make a plinth, it is necessary to take into account the thickness and material of the wall panels, as well as the strength characteristics of the soil.
The design of the plinth of a house varies according to the following types:
- Protruding. It is used in case of too thin wall panels and for arranging rooms below ground level.
- Recessed. It is considered the most popular and has a practical application: drainage from the facade prevents the formation of increased moisture in the house.
- Aligned with wall panels. Experts sometimes do not consider it possible to use this option, since the very effect of the presence of the basement floor is lost, however, if the option of thoroughly waterproofing the walls is not scary, a basement constructed in this way will fully meet all the requirements of comfort and practicality.
To make a plinth, it is necessary to take into account the thickness and material of the wall panels, as well as the strength characteristics of the soil, which are influenced not only by aquifers, but also by the climatic features of the region.
How to build a monolithic basement
The basement, which is built from monolithic concrete, has several advantages: it has good moisture resistance, high strength, and short construction times. In addition, it is possible to arrange a room for almost any purpose, including a garage or a swimming pool.
Properly installed waterproofing allows you to build a basement and install a basement, even if the soil environment is damp. However, for this, the foundation walls must have the most rigid adhesion to the floor slabs of the basement.
Construction technology:
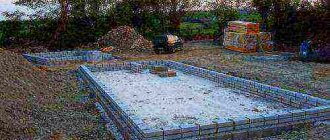
- First, the site is marked for upcoming construction work, after which a pit is dug for future construction. The pit is dug to a depth that is approximately half a meter below where the underground part of the foundation will be located.
This will make it possible to lay a waterproofing sand and gravel cushion in the future. When selecting soil using an excavator, you should minimize the uneven depth of the foundation, for which it is recommended to manually remove the last soil layer. Areas that are too deep should not be backfilled, as this may lead to further deformation of the floor slabs. - Then comes the turn of arranging the drainage system. If there is quicksand, a drainage device must be provided to avoid stagnation of water. For this, a 10-centimeter bedding is made: gravel and sand. These layers must be rolled carefully. To compact the sand as much as possible, it is also filled with water several times.
- Concrete grade M50-M100 is poured onto the leveled pad. The concrete layer should be five centimeters: the base is leveled in order to lay the floor slab, while waterproofing functions are performed.
Example of a waterproofing pad for a basement floor
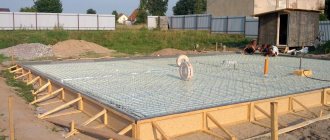
Rolled waterproofing (for example, roofing felt) is laid immediately after the concrete has hardened. Waterproofing must be laid in two layers and fastened using a floating method or using bitumen mastic. - After preparing the base, the external formwork is built. First, the floor slab is poured, it will serve as a support, and the foundation walls will “grow” from it. Wooden panels or boards are used to make formwork. Self-tapping screws and bars are used to connect them together. To increase the strength of the base, the slabs are reinforced. This is done in two directions - longitudinal and transverse - the reinforcing rod must be embossed, with a diameter of 10 centimeters (the exact dimensions are determined during preliminary calculations). Special guides are used for laying the reinforcement; they are fastened with wire.
In order for the walls to be rigidly and reliably connected to the floor slab, reinforcement bars are used (attached vertically). - After installing the formwork and when the reinforcement is fixed, the foundation slab is poured with M250-M300 concrete (its thickness is at least 20 centimeters). Moreover, it is recommended to do this immediately. If desired, concrete can be poured in small parts, but the slab will become less durable and seams with increased tensile stress may appear. It is advisable that concrete joints in such cases be located along the wall that is longer. After pouring the concrete, the surface must be leveled and left for about a month until completely cured. At this time, the formwork for the plinth and foundation walls is being built.
- Wall formwork is built in the same way. Non-removable polypropylene panels are used during its construction, and this will simultaneously solve the issue of insulation. The reinforcement is laid in the longitudinal direction relative to the walls.
Scheme for laying reinforcement for pouring.
Reliability is ensured by tying together horizontal rods and vertical ones that are already fixed. With a foundation depth of three meters, strength is imparted by two strapping belts, which are made both in the upper part and in the lower part. - During the process of arranging the formwork, door and window openings are laid where this was previously provided for by the house design. Special metal pipes – sleeves – are being laid.
- Concrete is poured either immediately or in separate layers. The rule is this: a new layer must be poured before the previous layer begins to set. Otherwise, you will have to wait another three days: if the concrete does not gain the required strength, it may collapse under the pressure of the layers covering it. Then you can lay the floors.
- From the outside, waterproofing of the basement floor is carried out using the pasting or coating method. On the inside, it is best to use penetrating waterproofing: the concrete becomes noticeably stronger and vapor exchange is not disrupted.
Scheme of penetrating waterproofing of the basement.
Insulation of the basement floor from the outside is carried out with polystyrene foam boards, which are attached with the glue intended for this purpose. To secure parts that protrude above the ground (optional), dowels specially designed for foam plastic are used. - To fill the underground part, the soil that was formed when the pit was dug is used. The presence of solid particles in the soil is unacceptable, since they can damage thermal and waterproofing, and are covered with coarse sand.
- The materials used to decorate the walls of the building are suitable for finishing the basement floor.
Technology for making a plinth made of blocks or bricks
When making a base from these materials, its underground part, which plays the role of a foundation, can be made using the technology of pouring a strip foundation or also from blocks. In this case, the floor of the basement usually does not have a rigid connection with the walls and is poured separately, after the foundation has been erected. Since its waterproofing properties are somewhat lower, such a base is usually erected in areas with a groundwater depth of more than one and a half meters.
The foundation is poured to the ground level using conventional technology, the concrete is allowed to reach the design hardness, and then the above-ground part of the base is laid out from blocks or bricks. The masonry is laid using cement mortar and dressing, and every two to four layers are additionally reinforced with reinforcing mesh. The technology for waterproofing and insulating the base does not differ from that given above.
The process of constructing a plinth from blocks and bricks
The base of the blocks can also be made using pile technology: concrete piles are driven into the bottom of the pit, which will serve as a support for the floor slabs, and the space between them is filled with concrete blocks. Such a foundation has increased resistance to loads, but requires the use of a large amount of heavy equipment, so it is rarely used in private construction.
How to properly waterproof a basement and choose the right material
Why is it necessary to waterproof the basement?
During the construction process, many people for some reason give waterproofing work almost the very last place, believing that reliable protection against moisture can be done after the house with a basement floor is completely built. Of course, waterproofing can be done from the inside, but the best option is to protect the walls from the outside.
External waterproofing will allow:
- Increase the durability of housing, because moisture that gets into concrete structures significantly affects their service life;
- Arrange a living room in a dry and warm basement;
- Get rid of mold and fungi, which are eternal companions of damp and dark rooms.
The most commonly used types of waterproofing are penetrating, pasting, roll and coating.
Penetrating waterproofing
Penetrating waterproofing allows you to most thoroughly protect “underground housing” from high humidity. It is laid to a depth of approximately 90 centimeters in the thickness of the concrete, filling small cracks, so that moisture has nowhere to seep. Once in the concrete, the insulating material that has penetrated there immediately forms a chemical reaction with its constituent elements, resulting in the formation of solid crystals. They fill the pores in the concrete, and there is nowhere for moisture to penetrate.
Pros of penetrating waterproofing
- It interacts well with the concrete mass, thereby reliably blocking the path for moisture penetration.
- It covers even the most minor flaws in the design, due to which the strength of the material becomes approximately 20% higher.
Foundation waterproofing installation diagram - Highly resistant to aggressive materials such as alkali, acids and various petroleum products.
- Has high resistance to mechanical stress.
- Frost resistance indicators increase.
- In fact, concrete slabs become stronger and have a longer service life.
How to make penetrating waterproofing of a basement
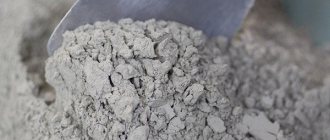
The working surface is thoroughly cleaned of dust and debris beforehand. Then the dry powder is mixed in water until smooth. Before laying the first layer of waterproofing, the surface of concrete structures is moistened. The next layer is poured after the first one is absorbed. After this treatment, the structures should be moistened for several more days.
Insulation should only be applied to the slab after it has been dampened, otherwise the material will not be able to penetrate to the required depth.
When it comes to waterproofing old buildings, it is necessary to clean and moisten the slabs as thoroughly as possible. In this case, the penetration of waterproofing into concrete will be extremely deep. To apply the penetrating insulating layer, use a brush with synthetic bristles or a mortar pump designed for this purpose. Moisture insulation work is carried out when it is warm outside.
Pasted waterproofing
Polymers, bitumen and synthetic materials are what roll lining materials are made from for waterproofing the basement.
Absolutely all plinth structures must be carefully covered with roll insulation, while several layers of material are used for external walls. If the groundwater level is too high, up to five layers of waterproofing can be laid.
Example of installation of adhesive waterproofing
The process of installing a waterproofing structure:
- The walls of the basement are covered with layers of waterproofing from the outside, and the sheets of material should overlap.
- To prevent the waterproofing material from being damaged, this is done using an installed reinforced concrete block or a half-brick wall (located somewhere a centimeter from the surface).
- The resulting space is filled with bitumen mastic.
- The waterproofing structure is protected by an iron mesh; it is plastered on the outside.
Disadvantages of this type of basement waterproofing: complex installation, the need for auxiliary protection of the material from defects, the possibility of pasting at an outdoor temperature of at least +10 degrees.
Coating waterproofing
This kind of waterproofing requires not only external, but also internal walls of the basement.
It carefully seals the slightest imperfections in the working surface, which significantly increases the resistance of the walls to moisture.
External protection of the wall with mastic will prevent moisture from seeping into the room. Coating waterproofing is represented by the following materials:
- Bitumen mastics;
- Polymer-bitumen mastics;
- Cement-polymer waterproofing.
The most economical option would be to use bitumen-based mastic as insulation. True, it will last no more than five years, after which it becomes unusable, and moisture can penetrate into the base. Therefore, periodically you will have to resort to re-waterproofing the room. Cement-polymer and polymer-bitumen mastics are distinguished by their significant resistance, including to sudden temperature changes. But these materials are afraid of mechanical damage: careful protection is required.
Construction calculations
First you need to complete the design of the plinth, taking into account the determination of the purpose of the room
When deciding on the construction of the ground floor, it is necessary to perform the following actions:
- Complete the design of the plinth, taking into account the determination of the purpose of the room;
- Calculate the load on the foundation and walls of the ground floor.
Advice! To be sure of the strength of the supporting base, it is recommended to add another 30% strength plus. In this case, the building will definitely withstand all the loads.
- Mark out the construction site taking into account the ground floor.
- Draw out the contours of wall panels and load-bearing partitions.
The last stages are difficult for an untrained master to work on independently, so it is best to seek help from a professional. The specialist will tell you exactly what size and format to arrange the proposed basement floor so that it meets all the developer’s requests.
Basement finishing technology and materials
How the “underground housing” will ultimately look will affect both the overall appearance of the house and its completeness. That is why you need to carefully and carefully select finishing materials. When choosing materials, it is important to pay attention not only to the fact that they are beautiful. They must also be durable and have minimal moisture absorption.
The easiest way to finish is by painting.
A wide range of modern paints with a long service life are produced for finishing the basement floor. They are characterized by both resistance to moisture and frost.
Extruded polystyrene foam is also used for basement finishing. The slabs that are made from it are attached using adhesive mastic, and then plastered over a mesh, and a finishing coating is applied to them.
Finishing the basement floor with decorative stone
Any owner of a private house strives to build a beautiful and respectable house or renovate an existing one. But few people pay attention to the condition of the base, and in vain - the foundation of the house plays a significant role in the appearance of the house. The most popular is finishing the base with artificial stone. But before purchasing material and starting work, you should learn about the advantages and disadvantages of a particular material, and how to carry out the installation yourself.
Of course, natural stone has better characteristics, but there is also a minus - it is a high price, which can cancel out all the advantages. Artificial stone is not much inferior to natural stone and is several times cheaper. The correct choice of material and high-quality installation will allow it to serve for decades.
Also, decorative stone is much lighter than natural stone, and its smooth surface makes it possible to place the material on glue without “sinking” it into the wall.
Finishing the base with decorative stone is similar to the method of laying ceramic tiles. The main thing you need to remember is that the base for finishing must be strong and level. It is better to take care of the evenness of the base during the construction of the house, otherwise a considerable amount of adhesive will be required to level it.
There are 2 installation options: a method with jointing and without a seam.
- The jointing method involves fastening the stones at a distance of 2 cm from each other. This method may be more preferable, as it makes it possible to save on the amount of material. However, considerable attention must be paid to the quality of the seams.
- There are stone models that are installed exclusively using a seamless method, when glue is applied only to the back surface of the product, and excess adhesive is removed with a spatula.
Example of corner finishing of a plinth
Stone for a plinth must be purchased 10% more than the area of the plinth required, since waste or mechanical damage to the tiles is possible.
If necessary, decorative stone can be easily cut with a grinder to the desired shape. Preparation of different types of surfaces for finishing with artificial stone.
Artificial stone can be laid on a base made of metal, wood, concrete, plasterboard, etc.
Any facing surface requires preliminary leveling and drying. Before starting work, you need to make sure that the base will not shrink in the future. The surface of the base must be cleaned of plaster or paint, and also degreased.
Plaster
If the finishing of the base was previously carried out using plastering, then the base must be checked for possible voids and a new mixture must be applied. After drying, the surface must be sanded with a dry brush. After making sure that the base is completely dry, you can begin finishing the base.
Brick
If the base is made of ceramic brick, it is necessary to putty the seams to eliminate possible unevenness between the brick and the grooves.
Concrete
At least six months must pass from the moment the concrete base is erected until it is finished with decorative stone. Before facing, the concrete surface must be cleaned of possible mold.
Drywall
Drywall sheets must have high load-bearing capacity. The HA sheets need to be treated with a primer; after complete drying, you can begin laying the decorative stone.
Chipboard
This base must have excellent moisture resistance. To avoid various twists, the plates themselves must be mounted as rigidly as possible. When attaching, it is advisable to use a highly elastic adhesive; it would not hurt to also use a reinforcing mesh.
Polystyrene foam, mineral wool and other insulation materials
An artificial stone for a plinth should not be attached to such a base, since the insulation materials have a loose structure.
A reinforcing mesh needs to be installed on the surface using several dowels, a layer of plaster is placed on top, and after waiting for complete drying, a deep primer should be applied.
Joining seams
The surface of the plinth must be sealed, preventing the adhesive mixture from getting under the cladding, otherwise in winter the masonry of the plinth itself may be destroyed or cracked. The jointing is done using a special syringe - a pistol. If you don’t have such a tool, you can make a special bag from a plastic bag with a hole for squeezing out the solution; the hole should be narrower than the seam itself.
You need to wait a while until the mortar begins to harden, then use a spatula to smooth out the seams and remove excess mortar. Fresh solution should not be removed; dirty marks will remain. This can be done in about an hour using a coarse brush.