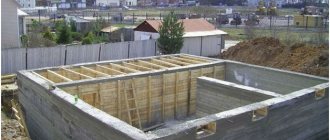
Monolithic foundation is a reliable, durable, affordable type of foundation. The exact cost will depend on the quality, composition of the soil, and the volume of work to be done. In some cases, designing a structure is cheap, in others it will be quite expensive. According to the current classification, monolithic foundations belong to non-buried floating foundations; they can be shallow. Filling is done over the entire area of the house, forming a large slab.
Monolithic foundation and ground floor Source ownhouse.pro
Base design features
The monolithic reinforced concrete strip foundation has a simple and reliable design. A prerequisite for its durability is the presence of a sand and gravel cushion equipped in accordance with all the rules. This pillow will redistribute the loads from the building onto the ground and act as a damper during frost heaving. Often, a monolithic foundation is the only possible option for arranging the foundation. It is constructed on loose, unstable, clayey soils, soils with a significant freezing depth.
A monolithic foundation slab is made using significant volumes of concrete and reinforcement. The grade of concrete must be high - at least B30, since the entire area of the building is reinforced and then concreted. In most cases, the finished structure, due to its scale, costs a lot, but you definitely need to count - a lot depends on the characteristics of a particular site and the materials used. In some cases, a monolithic foundation will be even cheaper than a deep strip foundation (due to the reduced volume of excavation work and savings on concrete pouring).
This is what the foundation reinforcing mesh looks like5375414102316428 Source logosvaya.rf
The depth of the monolithic foundation depends on the weight of the building and the type of soil. When the degree of deepening is insignificant and the soil is heaving, the house along with the foundation will sink and rise. It is important to correctly calculate the optimal slab thickness and reinforcing layer so that the current parameters do not affect the integrity of the finished building. The slab compensates for possible changes due to the action of elastic force. In the spring, when the ground begins to melt, the house will sit in place.
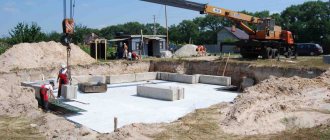
Pouring the foundation slab
For concreting the foundation, it is necessary to use concrete of the highest quality. As stated at the beginning: you should not save here. It might come out sideways. Usually they use either B15 concrete, also known as M200, but it is better to use high-strength concrete class B 22.5, known as M300 and higher. It is guaranteed to ensure the reliability and durability of the entire structure.
The foundation is poured in several ways. It all depends on the availability of the site for a construction mixer, or “concrete mixer” in common parlance.
The easiest way to supply concrete is to pour it directly from a concrete mixer through a tray or through a special sleeve directly into the formwork.
This is the case if it is possible to get close to the construction site. If this is not possible, then the concrete is fed through a long chute made of boards, pushing it with a shovel every meter until the mixture reaches the formwork.
After unloading, the concrete must be compacted so that it evenly fills all cavities. To do this, use a vibrator, immersing it in concrete every meter. In principle, in the absence of a vibrator, concrete can be compacted with a shovel.
Next, the slab is leveled. The level is set with special beacons even at the stage of laying the reinforcement. If the top edge is the edge of the formwork, then the process is simplified. Otherwise, you can use stretched rope or pieces of reinforcement. For alignment, use a long piece of board or an aluminum ruler, starting from one edge and smoothly leading to the opposite end along the beacons.
After pouring, compacting and leveling, the concrete needs to mature. In this case, it is necessary to follow some rules:
- the concrete should not dry out. In the first days it must be moistened with water. This also needs to be done in the summer heat;
- the concrete should not freeze. If work takes place in winter, the slab must be heated either from a heat gun or with electric heating elements immersed in concrete. At temperatures above +5° it will be enough to cover it with film or roofing felt;
- concrete should not be exposed to precipitation during the setting period.
After just a few days, the formwork can be removed. Construction can begin after the concrete has acquired at least 70% of its properties. This occurs after three weeks of ripening. When purchasing concrete, you need to take the choice of supplier seriously. There is a risk that instead of the brand of concrete you ordered and paid for, they will deliver you a lower, and therefore cheaper, brand. It is almost impossible for a non-professional to distinguish this.
It is not recommended to contact intermediaries. It is best to order concrete from large reinforced concrete factories that supply concrete for the construction of monolithic high-rise buildings. In this case, the risk of running into an unscrupulous supplier is much lower or absent altogether. Prices there may be slightly higher than average, but you will have some guarantees of quality.
Types of bases
Monolithic reinforced concrete foundations are of the following types:
- Classic - in it the slab is placed on a bed of a mixture of sand and gravel; insulation is desirable, but not necessary. The thickness of the concrete coating is 20-50 cm, taking into account the weight of the building and the type of soil. The dimensions of the cushion are determined taking into account the total depth of the fertile soil layer (it is removed). The pit obtained after removing the top layer is filled two-thirds with gravel and sand.
This is what the classic type of monolith looks like Source ownhouse.pro
- USHP is a Swedish foundation slab with insulation; it comes with a built-in heated floor. The formwork is not removable - it consists of blocks of expanded polystyrene of an L-shaped design. This structure reduces the cost of heating rooms, since heat leaks will be minimal. Heated floor pipes need to be laid on top, reinforcement can be installed on them or under them, everything can be filled with concrete up to 10 cm. Communications are designed at the stage of preparation for the foundation, not earlier. When the foundation is ready, you can install heating and install utilities. This approach speeds up construction, but increases its cost.
- Russian - slab structures with stiffeners. To strengthen the foundation structures for the construction of heavy houses, ribs of different rigidities and massive dimensions were created. The arrangement of such structures is carried out under load-bearing wall ceilings. The degree of complexity of the work being carried out increases - it is necessary to make the stiffening ribs and the slabs separately. In this case, the bearing capacity of the foundation will reach its maximum; it will be possible to make the slab thinner up to 15 cm.
The choice of a monolithic slab device should be made taking into account the specifics of the project, the available budget, technical capabilities, and desired results.
Monolithic foundations are divided into classical, Russian, USHP Source misterbuilder.ru
Installation of a monolithic foundation: step-by-step instructions
The technology for building any foundation includes a preparatory stage:
- survey work is being carried out, a project is being developed;
- For the construction of a monolithic foundation, it is necessary to prepare the site.
When the nature of the soil has been determined, the levels of freezing and groundwater levels have been established, you can begin clearing the area. It is necessary to prepare passage for special equipment; when creating a monolithic foundation with your own hands, it is better to mechanize the preparation of the pit.
Marking
The perimeter of the future foundation is marked using pegs and strings (the rope chosen is elastic and does not absorb water). The outline is drawn at the corners. Perpendicularity is checked with a construction square.
It is necessary to correctly mark the future foundation
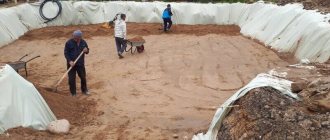
Construction of the pit
Before digging a pit, the fertile layer is completely removed; there should be no plant residues in the soil. The depth of excavation is determined taking into account the thickness of the sand cushion and the monolithic layer of concrete; it must be at least 10 cm above ground level. The foundation for a private house with a basement is made below ground level, the depth of the pit corresponds to the design one.
The bottom and walls are compacted, leveled, and then covered with geotextiles. The sheets are laid overlapping to ensure the sand cushion is isolated from the soil. It is recommended to seal the joints with moisture-resistant tape so that the material does not spread under the weight of the sand-gravel mixture.
Geotextiles are necessary to waterproof the cushion from the soil.
Formation of a sand cushion
Sand or sand-gravel mixture is poured in several stages, each layer fills the entire pit, is moistened, and compacted to reduce the number of voids. To prevent the concrete from getting wet, a layer of polymer is laid on top of the sand. A moisture-resistant membrane reduces the risk of cracking, and the concrete monolith will retain its strength. The membrane film is laid overlapping so that the water flows out through the pores. The membrane is covered with an overlap on the formwork structure.
Construction technologies: with and without insulation
The issue of energy savings is acute today, so most foundations are made immediately with insulation. You can do without additional thermal insulation - in this case, the corresponding stage of work is simply skipped.
How to make a base
The construction of a foundation slab begins with designing the base. The dimensions of the working pit for the slab must be at least 1 m larger than the area of the lower part of the building.
Work order:
- On the site selected for construction, remove the entire fertile layer of soil - usually 20-30 cm, sometimes more. You need to remove everything.
- Drainage pipes are laid along the edge of the pit below the bottom level, which are responsible for draining surface water into drainage wells. The measure protects the walls and foundation.
Level the bottom, fill up humps and holes and remove them, carefully level the horizon level and compact it. Roll out the geotextile onto a flat bottom so that it covers both the bottom and the walls. Spread the canvases overlapping; reinforced tape is used to glue the edges. Geotextiles will prevent planting roots from actively growing and will prevent the sand embankment from being washed away (sand masses act as a cushion-damper).
Proper preparation of the foundation is the key to the durability of the future foundation Source rabotai-sam.ru
- Pour clean sand with medium grain sizes onto the laid geotextile layer - a layer of up to 30 cm will be sufficient. You need to distribute the mixture as evenly as possible, then compact it.
- The thickness of the embankment is regulated using stretched cords, which are tied to stakes driven into the ground to specially prepared supports. The cords must be positioned horizontally.
- Pour crushed stone onto the compacted layer of sand - immediately fill the full volume, distribute the material over the area as evenly as possible. Compact the leveled crushed stone to achieve maximum density.
- Lay pipes for water supply and sewerage systems. Dig ditches of a given depth in pre-compacted crushed stone so that there is spare space around the backfill elements. Lay pipes in the ditches, pour sand, level everything thoroughly, compact the sand with a board or shovel. More severe compaction work may lead to cracks.
At this point, the work on arranging the foundation is considered completed.
If everything is done correctly, the base will be reliable and durable Source bouw.ru
See also: Catalog of projects of reinforced concrete houses for permanent residence in a modern style with 2 rooms.
Works with concrete
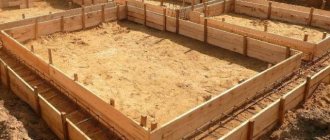
Formwork is placed along the perimeter of the prepared pit area. To assemble it, use 40 mm thick boards or 20 mm plywood. The height of the formwork for the foundation slab should be equal to the total thickness of the remaining layers.
Along the edge of the structure it will be convenient to monitor the level of the concrete mass during pouring work, so the board is edged. If it is necessary to save material, the formwork is placed only for preparation. When the concrete has set, the structure is dismantled and placed higher, using base slabs for re-filling. With such a scheme, additional temporary losses cannot be avoided.
This is what removable foundation formwork looks like Source i.ytimg.com
In any case, the formwork for a monolithic foundation slab will need to be supported from the outside with jibs and stops. The structure must be rigid enough to withstand the pressure of the concrete mass.
About 100 mm of concrete is poured onto the compacted layer of gravel. You can use low grades - like B7.5-B10. High-quality concrete preparation is mandatory - it will provide a reliable base for laying insulation and waterproofing in the future, and will ensure uniform distribution of the loads created by the building.
Waterproofing
Since the monolithic foundation slab will be located entirely in the ground, it must be properly waterproofed. To solve the problem, coating and roll materials are used. First, the base will need to be dusted off, then soaked in diluted kerosene or more modern options - a primer. The sides of the concrete blank also need to be coated.
This is what coating waterproofing looks like Source izoler.ru
The rolled material is released beyond the foundation by about 15 cm, the sheets themselves are rolled out with an overlap, the edges of the joint are coated with bitumen-based mastic, and carefully pressed. Be sure to ensure there are no waves or creases while laying out.
If the groundwater is high, it is optimal to use a couple of layers of rolled waterproofing. The material is rolled out crosswise, fixed with a primer (bitumen-based waterproofing), it is not necessary to dilute the substance. The most popular roll waterproofing materials are TechnoNIKOL and Gidroizol. The former has maximum tensile strength, so would be the preferred choice. Ruberoid is the worst option, despite its cheapness, it is better not to use it. Modern roofing felt is brittle, thin, quickly loses its original characteristics and is not suitable for building foundations.
This is what roll waterproofing materials look like Source www.ivd.ru
Capillary suction of liquid through slabs can be reduced by using liquid impregnations (for example, Betonite). They significantly reduce the degree of moisture absorption, penetrating up to 60 cm in depth. Impregnations are expensive, but their properties are excellent.
See also: Catalog of companies that specialize in foundation equipment.
Insulation works
To construct a foundation, monolithic slabs are usually insulated. The work is carried out using extruded dense polystyrene foam. The average thickness of the insulation is 15 cm, it can be less or more, taking into account the climatic conditions of a particular region. Expanded polystyrene is laid in a minimum of a couple of layers - the second covers the first and all seams (the main cause of cold bridges).
Insulation increases the duration of work and improves the quality, durability, and performance characteristics of the finished structure. L-lock slabs are usually laid in a single layer. Since polystyrene foam is not friendly with petroleum products, a dense polyethylene-based film is laid on it, and thermal insulation material is laid on top.
It is very desirable to carry out insulation of monolithic foundations Source readmehouse.ru
Reinforcement
Pouring a monolithic foundation slab requires mandatory reinforcement. AIII reinforcement, ribbed type, with a diameter of about 12-14 mm, is usually used as a reinforcing frame. The mesh is laid in the transverse and longitudinal directions, the step is from 15 to 30 cm, layers - 1 or 2, taking into account the weight and mass of the building. All reinforcement parameters must be calculated separately.
The reinforcement from the edge of the slab should be at a distance of at least 5 cm. It should be placed on specially equipped supports that provide the necessary clearance. As a result, a cage should come out; the rods at the intersection points are tied using soft steel wire. Other joining techniques are welding or plastic clamps. The second option is easier to implement, but not as reliable as the first. The welding is also not ideal - the resulting seams are vulnerable to rust, and the connection itself is too rigid. When using clamps and wire, the structure plays without destroying the ligaments; during welding, such movements lead to rupture of the seams. The result is questionable reliability of the finished reinforcement.
Reinforcing mesh Source gid-str.ru
Filling order
Pouring a concrete slab is done using a mixture prepared using grades B30 and higher. Thickness - from 20 to 50 cm. The perimeter is processed within one day, it is important to prevent the formation of vertical seams. It is best to bring ready-to-use concrete to the site, having previously calculated the volumes of mixture required for construction.
The arrival schedule of trucks with concrete is calculated so that the craftsmen have time to distribute the first portion of the mixture and thoroughly compact it. For compaction, deep-type vibrators are used, creating high-frequency vibrations. As a result, the air is removed, the concrete is thoroughly mixed, and acquires plasticity and fluidity. The results of this treatment are a smooth surface and a high hygroscopicity class.
In some situations, it is permissible to pour the slab onto a strip foundation in horizontal layers. Here, vertical divisions are not made so that cracks do not appear in the joint areas.
Construction of a slab foundation for a private house from A to Z
Work begins with soil analysis (ground level, bearing capacity and uniformity of layers, evenness of the area) and calculation of foundation parameters (slab and cushion thickness, cross-section and frequency of reinforcement, laying depth). The main stages of laying, if possible, are carried out in the spring or in the first months of autumn, in fairly dry, but not hot weather and warm soil.
In order to make a slab foundation with your own hands, you must follow these steps:
The site is prepared, the foundation is marked, communication pipes are laid and excavation work is carried out.- Layers of sand and crushed stone are poured and compacted at the bottom of the pit, serving as a drainage cushion.
- Formwork with supports on the sides is installed along the perimeter of the foundation.
- Work is underway to insulate and waterproof the base and foundation walls.
- A reinforced frame is tied inside the formwork.
- The previously laid communication pipes are closed to prevent the solution from entering.
- The formwork is filled with concrete with mandatory air removal and compaction.
- The poured slab is leveled and covered with film, the structure is left alone until it reaches full strength.
- After removing the formwork and checking the condition, the slab is backfilled, if necessary, adding drainage around the perimeter or changing the soil.
Soil analysis and slab calculation
The initial data for the calculation are:
- Climatic data of the region (used to determine the level of soil freezing and snow loads)
- The results of the analysis of soil samples taken at least 5 points (corners and center of the house) at a depth of 1.5-2 m, allowing to determine its groundwater level, water saturation and bearing capacity.
- General weight loads and area of the house.
The soil samples taken allow us to determine the optimal value of the building load, in kgf/cm2:
- for loams, fine dense and dusty sands this value is 0.35 kgf/cm;
- for medium-density sands and plastic clays – 0.25;
- sandy loam and hard clay – 0.5.
When carrying out construction on the latter, additional attention is paid to water saturation indicators - when the “overflow” is close to the surface or seasonal flooding, the bearing capacity of hard clays rarely decreases. Due to the high risks of distortion, laying slabs in such areas is abandoned in favor of pile types of foundations resting on stable layers.
The thickness of the slab is calculated manually or using online calculators according to the following scheme:
- The total weight load is divided by the area of the house and compared with the optimal value of the bearing capacity of the soil.
- The resulting difference is used to determine the optimal mass and thickness of the slab foundation.
If the calculator displays a thickness of less than 15 cm, the mass of the building is considered too large; if it is more than 35, laying a slab is not economically feasible. Once you have obtained the optimal thickness for private houses of 20-30 cm, you can begin to calculate the reinforcement and concrete.
Sometimes the calculation is simplified - the owners choose the minimum recommended by the standards based on the wall material (20-25 cm - aerated concrete and timber, 30-35 - brick and cinder block), add it to the total weight of the building and compare it with the soil parameters.
The total weight of the building from the foundations should always be less than the product of the area of the house in cm2 and the bearing capacity of the soil. If this condition is violated, adjustments are made to the calculation.
Excavation
At this stage the site:
- cleared of roots of large plants;
- leveled and excavated manually or with an excavator to the calculated depth (pad + recessed part of the slab).
The pit is marked before digging, after preliminary leveling.
Pegs and a cord mark both the boundaries of the foundation itself and the corners of the pit - with a 50-100 cm indentation on the sides for the formwork and future blind area. After excavating the fertile layer and excess soil, the bottom of the pit is compacted with a vibrating plate or log and covered with geotextile.
If the laying of communications is planned under the future slab, at the same stage of the zero cycle, pipes and ducts of the main lines are laid, and, if necessary, drainage pipes are laid around the perimeter.
The layout and depth of placement of utility networks are selected in advance ; the end terminals are necessarily protected from the ingress of bulk materials or concrete. Making changes to the wiring after excavation work is difficult and dangerous; any little details are taken into account in advance.
Areas with differences require special attention. If the level deviates by more than 50% of the base thickness, simply removing the soil and leveling the bottom is not enough. In such cases, two options are possible: filling low areas with the infertile soil selected above or filling them with a sand-gravel mixture followed by compaction.
Making a pillow
Saving on this layer is unacceptable; mistakes in arranging the cushion can lead to frequent contact of the sole with ground moisture, flooding of the basement parts and distortions of the openings.
According to the standards, the pillow is placed outside the perimeter of the slab by 20-50 cm with a difference along the plane of no more than 2 mm/l.m . Sand that is permeable and removes moisture from the sole is poured first, and durable crushed stone with a fraction of 20-40 mm is poured second. All layers are carefully compacted and, if possible, separated by geotextile fabric.
The thickness of the layers depends on the soil parameters; the recommended minimum for a sand layer is 20 cm, for a gravel layer – 10. However, adjustments are possible: when constructing on dry and dense soils, sand can be abandoned in favor of ASG and the thickness of this layer can be reduced to 10 cm.
When working on heaving and heterogeneous areas, part of the soil in the pit is replaced with sand, the thickness of this layer increases to 30-40 cm. The crushed stone cushion is always backfilled, in especially severe cases - from crushed stone impregnated with bitumen or crushed granite.
If there is an increased risk of foundation heaving, a reinforced mesh is laid under the base of the slab on top of the crushed stone and a 5-7 cm layer of rough concrete with a strength grade of M50 is poured.
Find out more about the design of the pillow in our article at the link.
Collection and installation of formwork
Removable formwork for the foundation slab is laid from boards with a thickness of 30 mm or plywood from 18 mm. Side supports for a structure with a standard height are installed every 70 cm; on soft soils, pieces of boards are placed under the supports.
Boards made of boards are assembled as tightly as possible, with cross beams placed on the outside every 1-1.5 m. Ideally, the edge of the formwork coincides in level with the slab; if this is not possible, the level of future concrete pouring is marked on the inner surface. Immediately before the concreting stage, the internal surfaces of the formwork are coated with drying oil or machine oil.
After assembling the formwork, inlet and outlet openings for communication systems are formed in its walls , which will pass directly into the slab monolith.
Full article on formwork installation at the link.
How to make waterproofing?
Waterproofing of a slab foundation is always carried out, regardless of the reliability and thickness of the bedding.
In the absence of a rough concrete or insulating layer, a horizontal moisture barrier is laid from at least two layers of waterproofing membranes or other modern waterproofing roll materials.
The canvases are laid with an overlap over the entire formwork, a mandatory 15 cm overlap , soldering or caulking of the seams and displacement of the joints. Work is carried out in soft shoes and in dry weather.
Find even more information about waterproofing here.
In what cases and how is insulation carried out correctly?
The need to lay an additional insulating layer arises when there is a high risk of seasonal heaving or freezing of the foundation, planning to install underfloor heating elements in the slab, or excessive soil moisture.
The practice of filling expanded clay under a slab is now being abandoned in favor of slabs of extruded polystyrene foam. Penoplex is laid in 2 layers or has interlocking connection systems; the final thickness of the thermal insulation layer depends on the climatic conditions of the region and varies between 10-25 cm.
What else you need to know about the need to insulate a slab base, read here.
Monolith reinforcement
According to the standards, the minimum total cross-section of the horizontal bars of the reinforced frame is 0.3% of the total cross-section of the slab.
A standard monolith 20-30 cm thick is reinforced with two rows of mesh, in compliance with a number of rules:
- A uniform cell pitch of no more than 30 cm (ideally 15-20).
- The minimum cross-section of horizontal rods is 12 mm, vertical – 6.
- The distance from the edges of the concrete is 50 mm.
- Laying vertical lintels in increments of no more than 20 cm on problematic soils, 40 cm on normal soils.
- Laying the top row of mesh on pre-curved elements.
- Strengthening the frame with additional rods under load-bearing walls (including internal ones), foundations of furnaces and heavy boilers.
- Laying clamps at the corners, overlapping the rods at the joints.
- Tying joints with wire.
To simplify the work, it is worth calculating and preparing the corner and reinforcing elements in advance, tying the meshes separately and completing their knitting in the formwork. The indentation from the bottom edge established by the standards is ensured by plastic cups-retainers.
A detailed article about which reinforcement to choose is here, and about reinforcement technology here.
Rules for concreting and pouring
To pour a slab foundation for a house, you need high-quality concrete with a strength grade of at least M200 (ideally M300) and water resistance from W6.
Taking into account the large volume of the structure and the need to carry out concrete work without breaks for more than 2 hours, it is easier to order the solution externally.
Concrete is poured into small squares in layers of 20 cm (from a mobile hose, and not by spreading the solution with a shovel!), carefully expelling air bubbles from each.
The top layer can be leveled manually, but better results are achieved by compacting and leveling the poured slab with a vibrating screed. Compaction is carried out until the cement laitance protrudes, the coarse filler is completely hidden in the concrete and bubbles disappear on the surface.
Care and removal of formwork
Work is carried out at air and soil temperatures not lower than +5 ° C ; in case of sudden changes, measures are taken to warm up or protect the concrete from cracking. The surface of the slab must be covered with film or burlap, and in hot weather the concrete is sprayed with water. Under normal conditions, it is allowed to remove the formwork after 5-7 days, after a crack appears between it and the concrete.
The panels are removed without sudden movements or tearing off; after dismantling the formwork, the side walls are inspected and, if necessary, re-covered with waterproofing materials.
Video description
The process of pouring the foundation in the video:
8 hours after pouring, provided that the air temperature is at least 5 degrees, the coating is watered. Irrigation should be strictly drip - a stream of liquid will wash away the not completely hardened mass. In order not to damage the surface, burlap is placed on it or a layer of sawdust is poured, and a film is laid on top. The covering material must be watered to maintain optimal moisture levels in the concrete mixture.
When there is a threat of frost, the formwork and slab are insulated. Any heat insulators are suitable - building materials, straw, sawdust, etc. The formwork is removed from the monolith when the concrete reaches 70% of the total design strength.
Concrete after pouring needs to be properly cared for Source stroidom-shop.ru
Digging a pit and installing formwork
In principle, there is nothing complicated about digging a pit. It is necessary to remove the soil to a certain depth. The main thing is to prevent deepening in any part of the pit.
If this suddenly happens, then there is no need to add soil or sand under any circumstances. Then you need to deepen the pit by this amount. The bottom is leveling out.
Next, the axles are divided along the cords. At the places where they intersect there will be the corners of the house. Sometimes pipes are laid under the foundation to drain runoff or rainwater.
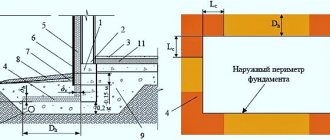
Installation of mortgages for communications and installation of ring drainage around the perimeter of the foundation
The drainage pipe is laid in crushed stone, which is wrapped in high-density geotextile
Inspection wells of the drainage system are installed according to the level
After installing the embeds and drainage, we make a cushion of coarse sand with pouring and layer-by-layer compaction
Related:
How to make a foundation from 20x20x40 blocks
How to pour a strip foundation yourself: without special equipment and...
Technology of tying screw piles with timber, channel
The top layer of the cushion is made of crushed gravel Installation of the waterproofing membrane
All seams are taped with bitumen tape
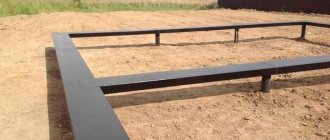
Formwork is made from durable construction boards. A frame is knocked out of it. The corners are strengthened. The inside is covered with film or roofing felt and is often insulated with polystyrene foam.
The sides are reinforced with spacers every 50-70 cm. On one side they are rested against the formwork, on the other - against the bottom or wall of the pit. It is also necessary to leave a working gap between the pit wall and the formwork. The formwork must be assembled evenly, without gaps. There should be no changes in it. Otherwise, there may be an overuse of concrete when pouring the foundation. This was discussed above.
Advantages and disadvantages of slab foundations
A strip foundation with a slab on the ground has its strengths and weaknesses, which you need to know about before construction. Advantages:
- Relatively small force of pressure on the ground. This is possible due to spatial reinforcement, a large area of the supporting structure, and simple transfer of soil movements to different seasons. The base should fall and rise evenly - together with the house being built. All this will prevent the appearance of gaps and cracks in the walls.
- Simple installation - pouring the slab takes relatively little time and requires the use of a standard set of equipment and tools. We remind you that in any case it is better to trust professionals to perform such work.
- High performance characteristics - the slab has a significant area and can withstand high loads, especially if it stands on non-heaving, stable soils.
- Flexibility - in a good sense, that is, the slab on soils actually floats during periods of seasonal heaving, rising along with the structure evenly over the area.
- The possibility of using slabs as subfloors - and, as a result, reducing the cost of installing joists. It is necessary to insulate the slab floor and protect it from the negative effects of groundwater.
There are more advantages to a monolithic foundation than disadvantages Source domsdelat.ru
Types of monolithic foundations
There are different types of monoliths, they are classified by design:
- Tape is formed only under load-bearing walls. The advantages of such foundations are the possibility of arranging a basement, cellar, basement room. Construction costs are minimal. Strip foundations behave unstably on moving, heaving soils; there is a high risk of concrete deformation and destruction of buildings during seasonal soil movements.
- The slab is a continuous monolith over the entire area of the lower floor. This is an unsinkable floating foundation that is stable on loose soils and moving layers. Not suitable for very wet areas only. The construction of a monolithic foundation requires large financial costs, but the structure will be based on a solid support, the slab is capable of leveling unstable soil.
- The pile-grillage type is formed on screw piles or concrete pillars installed below the freezing level. The supports take on the excess load and save the concrete from destruction.
Types of monolithic foundations
According to the degree of deepening into the ground:
- Recessed ones are made for houses with basements, ground floors, and multi-story stone buildings. When concrete rests on a dense layer of soil that does not freeze in winter, a stable building structure is obtained.
- Shallow-depth is chosen for light one-story or one-and-a-half-story structures made of timber or foam concrete. Such a foundation is not designed for heavy loads and does not require large financial expenses.
In the geological conditions of temperate latitudes, slab foundations are more often chosen; they are erected independently or with the involvement of construction organizations.
Price issue
A monolithic slab on a strip foundation is reliable, wear-resistant, durable, but in the review we have not yet considered the issue of price. Dependence on the volume and complexity of the work is a relative concept, but in this case they most clearly reflect the price of the finished solution.
When calculating, the following parameters are taken into account:
- concrete screed thickness;
- thickness of the sand and gravel cushion;
- number of insulating materials;
- reinforcement diameter or quantity of reinforcing mesh;
- height of the poured foundation;
- volumes of lumber used for formwork.
The number of materials used depends on the area of the monolithic slab. With a thickness of 20 cm, the price will be around 4,000 rubles, with a thickness of 40 cm – 6,500 rubles.
The cost of a ready-made solution is determined by the climatic and geological conditions of the region. These include the proximity of groundwater and the complexity of the terrain. When contacting specialists, you need to take into account the price of construction services - it is calculated per shift or per result.
The price of the foundation depends on the thickness of the slabs and the amount of materials used Source propodval.ru
Concluding contracts with construction companies for the implementation of a turnkey project is much more profitable than contacting one or more private teams. In the first case, the quality of the work will be guaranteed to be high, it provides a guarantee. Be sure to carefully read the terms of the contract with all the specified details of cooperation. The price is calculated in advance before the contract is concluded.
Creation and installation of a reinforcing frame
It is necessary to reinforce monolithic and monolithic-prefabricated strip foundations to increase resistance to deformation forces and loads that act on the foundation during operation.
The reinforced frame consists of the following types of rods:
- Working reinforcement is longitudinal rods that absorb bending loads.
- Clamps are transverse horizontal rods connecting the reinforced frame.
- Vertical clamps connecting rods located in different planes.
When creating reinforcement for LMF, you must be guided by SP 63.13330.2012. The standards establish the following reinforcement cross-sectional dimensions for various types of structures:
- light houses, outbuildings - 8-10 mm;
- houses made of piece materials, timber - 10-14 mm;
- heavy buildings made of bricks, blocks - 14-18 mm.
The maximum permissible cross-section of reinforcement for low-rise construction is 22 mm.
To create reinforcing units of the foundation, rods of class A3 (A400) or A240 are used, the difference between them is insignificant. The number of working rods in the reinforced frame is 4 or 6. The transverse reinforcement pitch is 20-60 cm. The reinforced frame must be knitted using knitting wire with a diameter of 0.6-1 mm. It is best to use a special gun or hook for knitting. Compared to welding, knitting provides higher reliability. You can use welding instead of knitting only on longitudinal straight sections of the frame (for more details, see GOST 14098-91).
Corner connections of reinforcement are made in the following ways:
- Rigid overlap or “foot”. The ends of the rods are bent at an angle of 90 degrees and connected to each other with wire.
- L-shaped clamps. The clamp is overlapped, the internal rods are connected to the external ones.
- U-shaped clamps. Additional U-shaped rods are installed overlapping, creating an additional frame for vertical and horizontal rods.
When reinforcing obtuse angles, the rod is bent at the top and overlapped at the bottom. An additional clamp is mounted at the bend point.
Knowing the reinforcement plan and the parameters of the reinforcement used, you can calculate the required number and cost of rods. For a reinforced frame with 4 rods, the calculation is made as follows:
- multiply the length of the monolithic tape by 4 and obtain the length of the longitudinal reinforcement;
- divide the length of the monolithic tape by the step between the vertical rods and multiply by 4 - we get the length of the vertical rods;
- we add both values and get the total length of the reinforcement for the frame
- Considering that the length of one rod is 6 m, we divide the resulting amount by 6 and get the number of rods.
Sergey Yurievich
Construction of houses, extensions, terraces and verandas.
Ask a Question
When purchasing, it is recommended to take a reserve number of rods - 5-10% more than the calculated quantity. The finished reinforced frame is laid in the formwork so that the reinforcement does not touch its walls and the bottom of the trench.
Which monolithic slab is considered universal?
Here it is worth remembering the degree of stability and strength of the supporting structure. Therefore, it is difficult to clearly answer the question of which monolithic foundation slab will be universal. Although the optimal design would be one in which main and intermediate stiffeners are provided, connected by reinforcement. It is also worth remembering that the foundation slab must be fixed with additional fasteners to ensure a greater degree of contact with the external environment.
The cantilever slab (restrained) is popular in the construction of high-rise buildings, but it is structurally complex because here the main edge is used with a tail made of steel reinforcement at an angle of 45 degrees. There is also a special scheme for the construction of a monolithic beam foundation using multi-span beams of multidirectional types.
Advantages of a solid base
The name monolith speaks for itself. A solid base reinforced with iron reinforcement is the most popular on the market and in some respects it surpasses the rest:
- Strength, endurance, wear resistance. Withstands the weight of a 3-story building without modification;
- Warranty for a service life of 20 years depending on local natural conditions;
- It is used on sandy and moving soils, bulk and clay soils;
- It has a strengthening effect, dampens tremors, movement on heaving soils is not felt;
- Uniform distribution of the load of the entire structure on the base, which avoids cracking, deformation, and curvature;
- Constructing a monolithic foundation can be less expensive than other types of pouring;
- The reinforced concrete from which the base is made is resistant to moisture;
- Speed and ease of construction work;
- The laid foundation serves as a basement floor with a ready surface for laying parquet or laminate flooring. No additional screed or floor leveling is required;
- It is used for buildings of any complexity, height, perimeter, from rectangular to bay windows, figured with walls made of bricks, blocks, panels, glass.