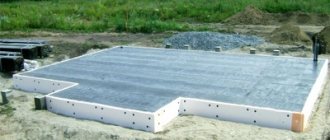
Installation of prefabricated elements
Reinforced concrete wells are used to ensure stable operation of utility networks and are constructed in places where flange connections are installed and connected to pipeline fittings. Elements of reinforced concrete wells are widely used when laying external water supply networks during the construction of residential and industrial buildings.
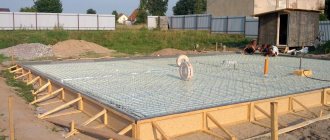
What is a monolithic frame of a private house?
The technology for constructing monolithic frame type buildings was initially used for the construction of commercial and industrial facilities. However, due to the increased load capacity of construction projects and the durability of the structures being constructed, it has become widespread in the field of housing and summer cottage construction.
Monolithic construction technology is widely known throughout the world
Constructed using progressive technology, the concrete frame of the house is a durable structure consisting of:
- reinforcement frame made of steel rods. The installation of the frame is carried out before pouring concrete and allows you to form a solid power circuit that increases the load capacity of construction instructions;
- branded concrete mortar. The concrete mixture being poured includes Portland cement with a marking of at least M400. The solution is filled into the pre-installed formwork, which is dismantled after the column has hardened.
Load-bearing reinforced concrete columns, thanks to which frame houses acquire increased strength, are constructed in various ways:
- the first method involves assembling the formwork structure, installing the reinforcing grid of future columns and pouring the concrete mixture;
- the technology allows, after hardening the concrete and dismantling the formwork, to easily create an outer wall inside a concrete frame using bricks or various types of building blocks;
- according to the second method, it is possible to construct the walls of the building in accordance with the design requirements.
In this case, the walls are reinforced with a reinforcement grid placed inside the double-sided formwork structure. After assembly, the formwork is filled with concrete mixture. The function of the end parts is performed by the walls, which facilitates the work process.
Filling the inter-plate wall space can be made of any durable material
Professional builders recommend building a monolithic frame of a private house with your own hands only after a detailed study of the technology requirements. You should prepare a wall kit in advance, consisting of aerated concrete blocks or other building materials, steel reinforcement and working mortar.
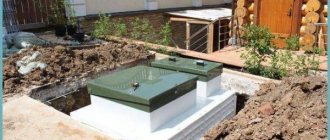
Calculations before installing a well
Almost every private or summer cottage has a well. This is due to the inability to connect to the general main sewer system. The size is calculated based on the number of people living in the house.
Drain wells are usually built more than 2 meters deep, which is enough for an ordinary family of several people. If you make the depth shallower, you will have to pump out the liquid too often, which will lead not only to loss of time and effort, but also finances.
What calculations should you focus on:
- the volume of a well for an average family of 4 people is 700 liters;
- one adult uses about 150 liters of water per day;
- every three days the family will need a waste water tank of 2.4 m3.
The calculation is approximate, in each individual case the data will differ. You can observe your family members and calculate the required well volume for your site.
The installation location is not determined randomly; the following standards are taken into account:
- if the well performs a storage role, then you need to think in advance about mechanical pumping of the liquid; specialized transport should be able to approach the site without any problems;
- the distance to the nearest inspection well should be more than 15 meters;
- the inspection well should be located at a distance of 3-12 meters from the living space;
- The drinking well should be located 30 meters from the sewer well.
Bottom filter device
In some cases, to obtain clean drinking water, it is necessary to install a bottom filter from bulk materials.
In this article we will look at the bottom filter, since such a filter is most relevant when using an incomplete shaft well design, when water enters through the bottom. If you plan for water to flow into your well through the side walls, then you need to build a wall filter, and it is not discussed in this article.
Cases when a bottom filter is needed:
- If the soil at the bottom of the well is loose and mobile or is generally quicksand. Quicksand is soil saturated to the limit with water, usually sand or sandy loam, which liquefies when mechanically applied to it.
- If the depth of the well is not great, but it is planned to use an electric pump, which can create water turbulence and raise turbidity from the bottom.
- If water flows into a drinking well from an aquifer in a powerful stream
Structure of bottom filters:
Typically, bottom filters are made from several fractions of stone materials and coarse sand.
You can use a three-layer structure, where the fraction of each layer differs from the previous one in size by about 5 times. Moreover, the sequence of laying layers can be direct (the largest fraction is at the bottom, and the higher the size, the smaller the size) or reverse (the smallest fraction is at the bottom).
A direct filter protects well the bottom of the well from erosion when constructing a well on a floating surface or in clayey soil.
A reverse filter is recommended for use in sandy soils.
The thickness of each layer of the bottom filter is approximately 150-200 mm, that is, the entire three-layer filter will be about half a meter thick. On quicksand, in addition to bulk materials, it is also necessary to use a wooden shield or metal mesh to prevent the filtration material from being sucked into the flowing soil.
Scheme of a direct bottom filter with a wooden shield
The wooden shield must match the shape and size of the well shaft. It is made of durable and moisture-resistant wood: oak, larch, aspen. To allow water to enter, holes with a diameter of about 10 mm are drilled in it or gaps are left between the boards. The number of holes is determined experimentally depending on the filling of the well, the diameter of the shaft and the water flow.
Materials for bottom filter
It is important to know that not all stone materials can be used to construct a bottom filter; some may simply be ineffective, while others may even be harmful to health. It is strictly forbidden to use granite crushed stone, because
it has an increased background radiation
It is strictly forbidden to use crushed granite stone, as it has an increased background radiation
The best materials for installing a bottom filter in a drinking well are: coarse-grained quartz sand, river pebbles, shungite, jadeite.
The best materials for a filter in a drinking well
River pebbles are the most affordable material from the above list, which you can acquire yourself; the remaining materials will most likely have to be purchased. On one of the sites, the cost of a 200 mm jadeite filter for a well with a diameter of 1.0 m is about 20 thousand rubles. Shungite is also very popular on sale; some suppliers even sell it in three different fractions at once.
Caring for the bottom filter
It is recommended to clean the stone materials of the bottom filter every 5 years. The material is removed, washed and re-laid, with new material being partially added if necessary. The wooden shield must be replaced with a new one.
Water supply system for a country house
When building a country house, the question of installing a well arises even at the beginning of construction work, when laying external water supply networks. This is a mandatory structure that must be installed at the point where the home water supply line joins the main pipelines.
Water supply unit
As mentioned above, such structures can be made from prefabricated elements or cast with your own hands from monolithic concrete.
Prefabricated
Reinforced concrete products for wells, manufactured in factories, look preferable for many factors. This includes delivery to the construction site, speed of installation of the structure and guarantees from the manufacturer.
Installation of a water supply unit
The procedure for performing work on installing an inspection chamber for servicing the connection point of the water supply system:
- excavation;
- compaction of the soil base with a sand-crushed stone mixture;
- installation of reinforced concrete bottom;
- assembly of working chamber rings;
- installation of a covering slab (with a hole);
- neck installation;
- sealing pipes and installing valves or valves;
- installing a hatch and installing running brackets;
- waterproofing of external walls (for wet soil).
If, for some reason, the use of standard prefabricated elements is unprofitable, then the structural parts can be made at home.
For example, let’s analyze the process of making a reinforced concrete well from monolithic reinforced concrete on a construction site with our own hands, and if at the time of consideration questions suddenly arise on this topic, watch the video in this article.
Spacer beam
Sometimes it happens that it is impossible to use a ladder or stationary brackets to descend into a well. As a rule, this is due to the emergency condition of the hydraulic structure. There may also be other reasons. The “Well” spacer beam was developed especially for such cases. We are talking about a mobile anchor module for servicing various types of wells with a diameter of up to 180 cm. The material of manufacture is a steel tubular profile. The device is designed for a weight of 500 kg.
Spacer beam for descending into a well shaft
The structure contains the following elements:
- Winch for lowering and ascent. A cargo-passenger steel cable (diameter - 4.1 mm) is wound on it. There is a special attachment at the end of the cable.
- Stationary twin block roller type.
- Anchor ear. A safety knot that prevents the worker from accidentally falling down.
- Movable stops. They are positioned depending on the diameter of the well being served. Threaded pins and wing nuts are provided to secure the selected position.
Distinctive features of pouring cellar walls
The technology of the process for arranging a cellar (a depression in the ground for storing crops) depends on the chosen option (ground, underground, inside-basement, located separately from the house). A cellar made from a concrete monolith is a reliable structure, characterized by strength, protection from hot weather, frost and humidity.
Nuances of the structure (features that distinguish it from the arrangement of a conventional monolith):
- Most often, a basement for storing food is made in the form of a partially recessed structure in the house itself (1/2 the height of the base), with a flat roof and an earthen floor (sometimes it is made of concrete and waterproofed - there must be water drainage).
- The owner of the house must choose the technology for arranging the cellar - it is made from ready-made reinforced blocks or poured into formwork. Monolith is more suitable for heaving soils with a lot of loam.
- The floor is poured with concrete 20 cm above the waterproofing.
- A pit for a cellar outside the house is made in the same way as a house. In a private house, it is equipped after pouring the floor, according to the plan (allocating space for it), assembled from foundation blocks, along the grooves.
- For a cellar, waterproofing additives (Dehydrol Lux 3) are added to the masonry mortar. These additives are also used to treat the entire surface of the blocks after the construction of monolithic walls.
- The depth level of the basement depends on the level of groundwater and the location on the ground (you cannot build a basement on a hill and a high position of water near the ground).
- For the cellar, ducts with air ventilation must be installed.
Features of arranging a monolithic basement for products also include the application of floor waterproofing in several layers, with good compaction of the purified soil, the addition of fatty clay and loose clay.
How and when to dig
When is the best time to dig a well? This issue is no less important, so you need to give it due attention:
In the spring, when the snow is melting, it is not advisable to dig a well, because you can make a mistake with the depth. This is explained by the fact that at this time the groundwater level is high, for example, a well dug in April may turn out to be dry in winter - the level of water fluctuation is in the range of 1-2 m; the most optimal time is the end of winter (no later than March) or the end of summer, since then the water horizon level is lowest
Undoubtedly, it is difficult to dig a well in winter, but there are cases when it is impossible to dig it at other times of the year: we are talking about mines passing through floating vessels; digging a well with your own hands is the right decision, but you also need to pay attention to the availability of free time, because you need to dig continuously so that the column does not stick. It is advisable to take a vacation during this time, because weekends are not the best option, you may have to remove the rings, and this is a labor-intensive task. The next aspect is how to properly dig a well
Basically, three people dig a well: one works with a crowbar/shovel at the face, filling a bucket with soil, the second lifts the bucket with the help of a gate, carrying the mined rock to the dump, and the third rests. The work is intensive, workers often replace each other
The next aspect is how to properly dig a well. Basically, three people dig a well: one works with a crowbar/shovel at the face, filling a bucket with soil, the second lifts the bucket with the help of a gate, carrying the mined rock to the dump, and the third rests. The work is intensive and workers often replace each other.
Visual process of digging a well
If stones are encountered, they are turned out with a short crowbar, then tied with ropes, and removed from the well using the same gate on wooden trestles.
We build a well ourselves: stages of a long journey
If you have decided that it is necessary to build a well on your site, before you begin directly laying it, you need to do a number of fundamentally important actions, in military terms, to carry out reconnaissance on the ground.
Reconnaissance and survey of the local population
The art of finding a water vein using a grapevine slingshot has been well known since ancient times.
At this stage, you will have to become district inspector Aniskin for some time and carry out a number of urgent operational measures:
- Carefully survey local residents about the availability of water and its quality in the immediate vicinity of your site.
- Visit your local geological exploration office and review geological maps for the depth, abundance and quality of local waters, again as applied to your site.
- Independently inspect the area for the presence of plants on it that indicate the proximity of groundwater. These are Norway willow, black alder, large burdock, common plantain and others.
- You can also localize a good place to lay a well if you systematically place a cast-iron frying pan upside down overnight in the area during the summer. Abundant condensation inside early in the morning can serve as a positive signal.
- For additional research, you can contact dowsing specialists or frame framers, who certainly have a positive reputation.
Willow is a time-tested, reliable neighbor to an underground water source.
And a young guy went to the mine: shaft sinking
The work of a digger can be entirely manual
At this stage, you will have to experience all the delights of the hard work of a Stakhanovite shock worker in the domestic mine construction industry.
And almost completely mechanized
The process itself consists of several stages:
- Estuary marking. Do not forget that the mouth should have a diameter of +50% of the cross-section of the main body of the trunk. At the finishing stage, this volume will be filled with clay for waterproofing and covered with reinforced concrete screed.
- Preparing the site for transshipment of supplied soil. Take into account the required loosening coefficient; for clay it is 1.5. That is, when excavating a pillar with a volume of 20 cubic meters. at the transshipment site for loading and removal you will have 30 cubic meters. do not place the dumping area directly next to the trunk of the future well. In order to minimize the pressure of the excavated soil on the walls, place it at a distance of at least 5-7 meters from the work area.
- Take care to ensure ventilation and drainage as work deepens. This is especially true at depths below the horizon of the maximum occurrence of perched water, which is 12-15 meters. Local ventilation can be provided by an axial high-speed fan with an impeller diameter of about 400 mm, and drainage by a low-capacity drainage pump.
- The provision of tools is as follows. To loosen the soil, you need a bayonet shovel, a short hoe, and a cleaver, which is a wide ax mounted vertically on a long handle. To excavate a stone, you need a pair of crowbars of sufficient length to handle the work. For loading, a shovel with a straight and conical edge and a scoop are required. As a universal tool, an American-style shovel.
- Lifting and transferring soil. To facilitate lifting, it is necessary to arrange a simple or double block on a metal or wooden frame. The use of such a system simplifies and facilitates lifting compared to direct manual lifting. Constantly monitor the integrity of the rope and the reliability of fastening the lifting vessel in order to prevent its accidental fall into the face of the shaft.
- Carrying out surveying work related to constant quality control of the vertical axis and diameter. These requirements can be met by using a plumb line and a diameter template, which can be used to carry out constant measurements of the quality of the work performed.
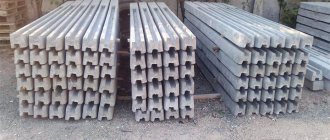
We prepare rings, but not wedding rings
Since the casing of the body of the trunk of the future well in our case will be done using concrete rings, their selection should be taken care of in advance.
With a fairly wide range of concrete rings on the market, finding a quality product in all respects is not at all easy
Important! Recently, plastic rings for lining the walls of wells have appeared on the market. Since there is no experience in the long-term operation of such products in the country, it seems premature to talk about such materials as a full-fledged alternative to traditional ones.
Making well rings from concrete is, if not complicated, then in any case a very responsible procedure. Therefore, take the choice of manufacturer and product quality very seriously.
- The basic, or rather generally accepted, diameter of a concrete ring of this type is 900 mm. It is this diameter that determines the normal operation and subsequent repair of a well made of concrete rings. In addition, the cost of such a product meets the optimal ratio for such an important criterion as price.
- It is worth paying attention to the quality of the ring body, the presence of locking elements, the tightness of the fit, the diameter of the mounting loops and other things.
- It would be useful to make sure of the positive reputation of the ring manufacturer, based on the systematic quality of products and a reasonable pricing policy.
Installation with a manipulator greatly simplifies work in all respects
- Calculate the possibilities of transporting and unloading products at the most reasonable price, and this can be provided by an on-board vehicle with sufficient carrying capacity, equipped with a crane-manipulator unit. Among other things, if such a CMU, in addition to a hydraulic boom drive, is equipped with a winch, then in addition to unloading, you can organize the installation of casing rings directly from the side.
Although manual labor flourishes wildly in the vastness of the country
Montage, how much is in this word
The actual installation of casing elements, when a do-it-yourself well made of concrete rings is at stake, can be done using two technologies. These are direct casing and blast casing. Let's look at them in more detail.
Direct casing is carried out along the finished trunk, starting from bottom to top. In this option, it is possible to greatly facilitate and reduce the cost of installing a well made of reinforced concrete rings by using a manipulative installation and combine delivery, unloading and installation into one complete operation.
However, this technology is possible if the well is driven through stable rocks that do not require fastening, or you can get by with a simple temporary structure supporting the support.
When mounting according to the bottom-up scheme, it is necessary to securely and without distortions place the main ring on the sole, since it ensures the reliability and alignment of the entire barrel set
If the excavation is carried out on unstable, sandy soils, prone to crumbling, quicksand, then casing the walls of the shaft is possible only by casing with blasting. What is it?
As the face advances, the rings are simultaneously lowered, or as experts say, rings move towards it. The rock removed from under the edge of the ring causes its independent movement from top to bottom following the face under its own weight at the initial stage, and under the weight of other rings at subsequent stages of work.
In this case, for the convenience and safety of work, a frame with a block is needed, which will ensure the forward and correct movement of the ring to fit onto the previous one.
The use of stationary block structures greatly simplifies installation and increases work safety
A word from Experienced. When installing rings with undermining, rings with a lock are required. Since the side rocks are unstable, closing the rings will prevent displacement and rotation of the rings, and will preserve the integrity and alignment of the structure, and a well made of reinforced concrete rings will serve faithfully for many years. If there is no locking element, the locking effect can be achieved by welding the mounting hinges and additional embedded plates using electric arc welding. It would be useful to recall the provision of local ventilation and other safety rules when carrying out hot work at depth.
When you are constructing a well from concrete rings, a kind of folk instruction written with sweat and blood categorically recommends cutting the seams where the rings meet each other.
There are several ways:
- This is a clay castle for a well made of concrete rings. It is ensured by laying a clay mortar of enriched fatty high-quality clay along the entire perimeter of the joint.
- Laying a polymer or rubber gasket along the diameter of the ring.
- Using a special waterproofing sealant.
Important! When using polymer, rubber tapes, or sealant for a well made of concrete rings, be sure to ensure that they are chemically inert and safe when in contact with water.
Decorative plaster for concrete in the interior
Art concrete The treatment that imitates a rough texture is called art concrete. This is a decorative plaster for concrete in the interior, sold in powder form. Once the paste is created, it is easily applied, creating the effect of a concrete coating. This type of finishing is preferable for use in restaurants, hotel complexes and executive class buildings, having the effect of prestige and creating an unsurpassed ornament. The surface with convex images elegantly combines with a variety of building materials, as well as home interior items:
- Office and living room furniture;
- wooden flooring;
- window structures and stained glass windows;
- strong chandeliers;
- brick partitions.
Having a “rough” appearance, concrete plaster looks great in interior design and is considered a fashionable design element. As part of the newest trends in decorating design, many people are opting for “clean” walls designed in a minimalist manner.
External waterproofing
A so-called clay castle is used as protection against water. It is used to cut off the perched water and prevent rainfall and melt water from entering the well. A clay castle cannot be called the best solution to the problem. The fact is that it changes in volume and thereby contributes to the deformation of the structure.
To ensure high-quality external waterproofing, roll materials are often used. First, the surfaces are treated with liquid glass and then a clay castle is created. The result is double protection against moisture. This leads to higher construction costs, but helps maintain water quality. For the castle, clay with a small sand content of up to 15% is used.
First, it is frozen, for which it is left outside all winter, and then mixed with lime in a 4:1 ratio, stirring until a homogeneous plastic mass is obtained. Provided that everything is done correctly, the clay lump will hold its shape perfectly and will not crack.
The clay is placed in a trench made around the well. Its width should be at least 50 centimeters and its depth 100 centimeters. To strengthen the walls of the trench, formwork is assembled. The clay castle must be laid in layers of 15–20 centimeters and compacted thoroughly. When it is ready, it is covered with geotextiles and topped with paving slabs or concrete. This external finish will protect the clay from deteriorating during precipitation so that it does not turn into mush.
Well installation
Installing concrete rings is physically impossible for one person to handle. And it’s not just the heavy weight of the material. Two people must hold the rings from different sides so that they fall evenly into the hole. This condition is not relevant if special equipment is used.
- At the first stage, a hole is dug.
- The first concrete ring is lowered. Depending on how smoothly the first ring is installed, the entire further design will depend. It will be impossible to correct any distortions that arise at the end of construction.
- Subsequent rings are installed. It is recommended to control the vertical using a plumb line.
- There should be no joints; for this they are covered with cement mortar.
- After the cement mortar has dried, the bottom is installed. To make cleaning the well easier in the future, the bottom is sloped towards the hatch.
- The rings are sealed.
- A concrete cover is installed. The cover must have a chamfer and a hole.
- The hatch is installed.
To prevent the liquid entering the well from freezing during frosts, a small layer of earth is poured on top of the lid.
Most doubts arise regarding whether to leave a cavity for drainage or to completely seal the well.
The well must be completely sealed, provided that the water flow exceeds 1 m3. Alternatively, a cleaning device can be constructed. Otherwise, dirty water will penetrate into groundwater, and natural soil cleansing will not be enough.
All activities must be carried out in a certain order. The well is sealed after concreting the bottom.
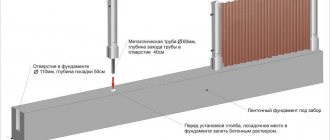
Particular attention should be paid to the process of installing the well cover. At the same time, a ventilation pipe is installed. It should protrude 60 cm above the ground. The ventilation pipe protects the concrete well from the accumulation and explosion of gases as a result of the decomposition of organic substances.
Required tools and materials
To install a concrete septic tank with your own hands, you will need the following materials:
- ASG (2.5 t).
- Cement (18 bags of 50 kg).
- Liquid bitumen (20 kg).
- Iron corner 40 x 40 (25 m).
- Iron sheet 2 mm thick 1.250 x 2.0 m (1 piece).
- Sheets of plywood 1.5 X 1.5 m (8 sheets).
- Flat slate 1500x1000x6 (6 l).
- Polyethylene film (two to three cuts with a total area of 13 x 9).
- Boards 40 x 100 mm.
- Plasticizer (depending on type per 5.9 cubic meters of concrete).
- Wire rod with a cross-section of 0.6 mm (meterage depends on the density of the mesh).
- Bars 50 x 50 mm.
- Bricks (120 pcs.).
- Pipes for external sewerage (individually, depending on the distance).
- Pipes for internal sewerage (individually, depends on the design).
- Branch pipes (individually, depends on the design).
- Fittings (according to the number of pipe connection points).
- Sealant (1 pc.).
- Screws (300 pcs.).
- Cutting disc for metal (1 pc.).
- Grinding attachment for angle grinders (1 pc.).
To install a concrete septic tank, you will need the following tools and equipment:
All calculations of materials were performed for a monolithic concrete septic tank with dimensions: width - 2 m, length - 3 m, depth - 2.30 m.
Construction of round water supply wells made of prefabricated and monolithic concrete.
When constructing a water supply network in seismic areas (relating to territorial areas with soils with average seismicity of 7...9 points), it is preferable in all cases to construct wells from prefabricated reinforced concrete rings
.
In places where there are no construction bases or the possibility of supplying reinforced concrete products, it is ALLOWED to use wells made of monolithic concrete
subject to confirmation of the feasibility study of the feasibility of their construction.
Water supply networks and structures
on them (in seismic areas) must be carried out in compliance with the following requirements:
- For wells made of prefabricated reinforced concrete rings -
- steel connecting elements are placed in the seams between the prefabricated rings;
- At the junction of the lower ring and the bottom, a cage made of monolithic concrete of class B12.5 (GOST 26633-85) is installed.
- For wells made of monolithic concrete and brick:
- the walls of the working part and the neck of the well are reinforced with meshes in accordance with GOST 8478-81;
- reinforcement of the walls ensures the operation of the structure against dynamic influences, in accordance with clause 3.46 of SNiP II-2.03.01-84 “Concrete and reinforced concrete structures”.
underground communications and electrical cables in the work area
workers must be warned in advance about their location and instructed on safety measures during work.
The development of pits with vertical walls during large development is carried out with slopes or with fastenings of vertical soil walls. The excavation site should be protected from surface water runoff with a soil roller.
Work on deepening pits
without a device for temporary fastening of the walls, the pit should not exceed the depth:
1.5 m
- in loams and clays;
1.25 m
- in sandy loam;
2 m
- in particularly dense non-rocky soils.
During breaks in work, a hole for the well
must be fenced.
On the fence
It is necessary to install warning notices and signs, and at night, provide warning lighting.
Manufacturing of reinforcing frame
The use of reinforcement makes it possible to reduce the thickness of the ring, and therefore its weight. At the same time, the strength characteristics of the product and its service life increase.
For the reinforcing frame you will need:
- steel rods with a diameter of 8-10 mm (10 pieces);
- steel wire with a diameter of 8-10 mm (about 5 m);
- thin wire.
Calculate the length of the frame. To do this, recall the formula for calculating the circumference: the number Pi (equal to 3.14, rounded to 3) must be multiplied by the diameter. We take the diameter of the circle to be 104 cm so that the frame runs in the middle of the concrete ring.
We multiply this number by 3, we get 312 cm. Divide this number by 10, we get 31.2 cm. Round up to 31 cm. So, we lay out the steel rods on a flat surface at a distance of 31 cm from each other.
Next, we weld pieces of wire 315-318 cm long to them at intervals of 160 mm. We take the wire a little longer than the calculated length of the frame, so that when rolling the workpiece into a ring, you can weld its ends or twist it.
We manually bend the mounting loops from thick steel wire and weld them to the frame (you can screw them with thin wire). That's it, the frame is ready. If you don’t have a welding machine, then all the frame elements can be twisted with thin wire.
Wire frame for reinforcing the reinforced concrete ring in Fig. B consists of steel rods, rings and four loops welded to wire. In Fig. A concrete ring without a frame with holes instead of lugs for lifting. For reinforcement, only one wire ring is laid on top of the holes (+)Typical sizes of reinforced concrete rings
If for some reason you cannot use ready-made products, then the owner of a country or summer cottage should think about options for making them yourself.
To do this, you need to make a mold from available materials, install a reinforcing mesh into it, and then pour in a concrete solution mixed in strictly defined proportions.
Factories producing reinforced concrete products and structures use special product markings. Typical sizes of well rings:
- the height is standard and is 900 mm;
- thickness - 70-140 mm;
- diameter - 100-200 mm.
The thickness of the cylinder wall and its diameter may vary.
The main dimensional parameters of a reinforced concrete ring for a well: Dв - internal diameter, Dн - external diameter, H - height (+)
With an increase in the diameter of the ring and the thickness of its walls, the consumption of concrete increases. The weight of the product also depends on these dimensions. To reduce the mass of the finished product, they try to reduce only the height of the reinforced concrete ring, and make the walls as thick as possible.
On sale you can see products with a height of 350, 450 or 500 mm. They are also called additional rings and are installed upon completion of work, when a product of standard sizes no longer fits entirely into the dug well.
Another way to “legally” reduce the weight of a well ring is through the mandatory use of reinforcing mesh. In this case, the wall thickness can be 6-8 cm, which does not impair the strength characteristics of the product. Therefore, it is better to make reinforced concrete rings with your own hands for building a well on the site.
It is necessary to reduce the weight of the well ring in order to avoid the use of lifting equipment during installation work. This is important for summer residents and gardeners who decide not only to make products with their own hands, but also to move them around the site without the use of special equipment.
Homemade rings are a practical and affordable solution not only for arranging a well, but also for solving other problems. For example: creating a drainage well or drainage hole.
Image gallery
Photo from
Concrete rings for well construction
Rotary sewer well made of reinforced concrete ring
Construction of a septic tank made of concrete rings
Concrete rings in site arrangement
What is the bottom
Regardless of the type of structure, it is mandatory to install the bottoms of the wells. The bottom must be concreted to prevent groundwater from entering the structure. This is especially true where water is collected. Wells must also be protected from liquid penetration.
Not only the quality of the water, but also the durability of the object, how reliable the operation will be, and the importance of preserving communications and equipment located inside depend on how well the material is installed. The bottoms of the wells must be strong, since they will constantly be subject to heavy loads
In some cases, they must withstand the entire mass of all reinforced concrete rings that press on the bottom of the well. To support all this mass, heavy concrete and very strong steel are laid
The bottoms of the wells must be strong, since they will constantly be subject to heavy loads. In some cases, they must withstand the entire mass of all reinforced concrete rings that press on the bottom of the well. To support all this mass, heavy concrete and very strong steel are laid.
In order to extend the service life of the well bottoms, during the work process, vibration pressing is used to connect the components using an innovative method. Using this method, very smooth concrete with high strength can be obtained. Thus, a dense reinforced concrete structure emerges. There are no gaps between the bottom ring and the bottom.
Today, factories have mastered and successfully used the technology for producing high-quality products of several types of rings, as well as well bottoms.
Due to various circumstances, builders cannot always place monolithic products at the bottom of a well.
Before laying materials on the bottom of the well, you need to pay attention to the parameters of the bottom. This is necessary in order to calculate the largest load
Moreover, they must be combined with the standard parameters of the rings.
Properly laid well bottoms should be in the form of a monolithic slab of reinforced concrete materials. The shape should be round, and for installation there should be three loops. The diameter of the slabs may vary, but the thickness is standard and is 14 cm.
Such parameters are not random; they are prescribed in state standards and are strictly regulated. Studies were carried out, during which it was established that this particular thickness has a sufficient margin of safety and can withstand high pressure of reinforced concrete products, as well as incoming water, resist soil mobility and the influence of groundwater. The design must be selected together with other details.
Necessary equipment
What types of concrete wells are there? Regardless of the purpose, there are solid/monolithic structures and those consisting of several rings.
To make a well from rings, they are simply stacked on top of each other until the required height is reached. There are standard sizes of rings, and some companies produce non-standard sizes and shapes. In particular, you can find rings with sides, which are not mandatory, but make the installation of the upper elements much easier.
Before purchasing concrete rings at a hardware store or placing an order at a factory, there must be a technical plan for the future system. Preliminary accurate measurements must be made and the joining system of the well rings must be determined.
High concrete rings can be made to order. With them, construction takes less time and there are fewer joints. Installation of large concrete rings will not be possible without special equipment and experienced specialists. To work with materials of non-standard sizes, it is advisable to have experience in this field. Therefore, it is better to invite professionals to do the work.
When choosing between brick wells and concrete ones, it is recommended to give preference to the second. The strength of the materials is identical, and installing concrete is easier and faster.
In addition to the walls, the well has other necessary components.
- Bottom. Performs the task of waterproofing. Its presence prevents liquid from flowing out of the well into the ground and, vice versa, groundwater from entering the system.
- Lid. It also performs a protective function, protecting the well from the entry of polluting particles from the outside. It also eliminates the risk of a person or animal falling into the well, which could cause injury. If a standard size well is selected, then the lid for it is selected immediately in the store. If the system is made to order, then the cover will also be made based on measurements.
Good waterproofing provides protection for pipes and other communications running inside the well.
The hatch is available in a choice of two materials: concrete and metal. Concrete hatches are cheaper and do not weigh more than metal hatches. One of the main advantages is the impossibility of stealing the concrete element.
Requirements according to GOSTs and SNiPs
Concreting of monolithic wall structures is strictly regulated by state urban planning standards. The basic one is SNiP 3.03.01-87.
The requirements for monolithic structures are detailed in each building construction project, on the basis of which a project for the production of monolithic works is developed.
It provides:
- stages of work preparation;
- installation of formwork;
- filling;
- control and care until the solution hardens and compliance with safety regulations at each production stage.
The standard establishes the following violations that should not be present on the surfaces of a monolithic structure:
- Areas with uncompacted concrete are prohibited;
- structures with exposed reinforcement are prohibited, except for its technological outlets;
- on concrete of classes: A/B/C there should be no oil stains or rusty stains;
- On the walls, only shrinkage cracks of no more than 0.1 mm for grades A, and 0.2 mm for grades B/V/G are allowed.
Do-it-yourself concreting of a mine
The easiest way for a beginner to work is with concrete rings. Apart from physical fitness, no other specialized knowledge or skills are required. It is much more difficult to install a monolithic structure. If it is not possible to use special equipment, you can concrete the well using formwork.
Monolithic walls have a number of advantages over rings. They are more hygienic and durable. The walls are smoother and, due to the lack of joints, more airtight. Cleaning is easier and disinfection is more effective.
To install a monolithic concrete well, additional materials will be required. They are easy to find in any hardware store and the price is quite affordable.
In order for the well structure to last as long as possible, it is important to choose the right materials.
- The material must be purchased before construction; improper storage conditions can lead to a deterioration in the quality of the material.
- Portland cement grade 400 has proven itself well.
- Cement is mixed with sand (quartz is preferred), gravel and crushed stone, all of which is mixed in water.
- River and sea sand shows the best adhesion to cement. Mountain sand contains more clay.
- Gravel is also chosen from river or sea gravel, since it contains rough stones.
- It is strictly not recommended to use crushed brick.
Well construction
To work, you will need a set of simple tools.
For those who want to build a well themselves, we have compiled step-by-step instructions:
- At the selected location, dig a round hole 1.5 meters deep and 1.3 - 1.5 meters in diameter. The bottom of the pit is leveled and cleared of soil;
We dig a one and a half meter hole.
- A tripod with a lifting hoist or winch is installed above the pit, to the end of which cleats with four hooks are attached;
We install a tripod with a lifting mechanism over the pit.
- The ring is rolled to the edge of the pit and hooked to the hooks by the mounting rings, lifted and lowered to the bottom. It is advisable to level it horizontally. A second ring is immediately placed on it, the end being coated with cement mortar;
We place the rings horizontally and evenly.
- One worker goes down to the bottom and begins to dig up soil under the lower end of the lower ring, collecting it in a bucket. The assistant lifts the buckets and pours out the soil, gives tools for digging the soil - a crowbar, a pick, a pick, etc.;
We begin to dig up the ground under the column.
- When the rings have dropped below ground level, the next part is rolled up and installed on the column;
We continue to build up the column as it descends.
- When the column has sank so much that water has begun to actively flow, a hose is lowered to the bottom and the water is pumped out with a surface pump, while continuing to dig. It is necessary to go deeper into the aquifer at least a meter to one and a half;
If water comes out, pump it out with a pump and continue digging.
- Then a layer of waterproof clay is poured onto the bottom, compacted, and the joints begin to be coated with cement mortar with the addition of liquid glass or other sealant for concrete surfaces. The rings are connected with steel brackets or plates coated with anti-corrosion paint;
We seal the seams and connect the parts with plates.
- After the joints have hardened, the clay is dug out, and a wooden shield with many slits is placed at the bottom, on which washed sand and gravel are poured in a layer of 30–40 cm;
Pour a layer of sand and crushed stone onto the bottom.
- When the water reaches a constant static level, it is pumped out until it becomes clear and clean;
Pump out the cloudy water until a consistently clear liquid appears.
- At the end, the canopy is built, the head is finished, and a lifting mechanism is constructed. A clay castle is made around the above-ground part. The blind area can be built only after complete shrinkage of the soil - after 2 - 3 years.
We complete the work by improving the head.
Brief educational program: the well and its structure
A well is a depression in the ground sufficient to reach an aquifer and of an acceptable diameter for its construction and maintenance, designed to accumulate water for the purpose of organizing a water supply with drinking or industrial water.
Schematic diagram of a classic well, assembled on concrete rings with a diameter of 1100 mm
Very often, it was not possible to organize water supply from open sources, such as rivers, lakes, streams and springs for objective reasons, for example, sufficient distance from a populated area, or unsatisfactory water quality.
In this case, the issue of sustainable all-season water supply with water of acceptable quality was resolved by constructing a well. At an early stage, the well served as a social element and provided water to the community of people, since its construction and arrangement was quite an expensive process in all respects.
Later, as productive forces grew and technology improved, wells began to appear in individual estate or courtyard designs.
Ancient capital wells were also made of stone, with the exception of the Russian North, where wood was the main construction and finishing material
Basic elements: simple, like everything ingenious
A classic well consists of:
- Trunk - rectangular, square or round cross-section extending from the surface of the earth to a dead end. It has a wide variety of depths, from 2.5 meters, in low-lying wet areas with closely located groundwater, the so-called high water, to 60 meters or more. Such wells reach the level of artesian waters. A classic example of such structures is the famous Arkansas wells, which provided drinking water to mail carriage horses in the United States during the era of mass development of the Midwest.
In today's America, legends about untold Indian wealth securely hidden in deep wells throughout the Great Plains are very tenacious.
In turn, the trunk has:
- Head or mouth, a section from the surface of the earth to a depth of approximately 1 meter and up to 1 meter away from the boundary of the trunk. In this area, work is being carried out to strengthen and waterproof the junction area in order to prevent subsidence of the lyadka and leakage of contaminated surface water into the shaft.
- The base, pit or sump, the lowest point in the well trunk, is slightly below the level of the main aquifer, the main function of which is to cut off large mechanical elements and mineral suspensions that fall into the trunk and further into the reservoir. Very often, such an area is covered with a mesh plate, and the pit acts as a kind of settling filter.
- A water reservoir is a section of a water column that is provided by the debit of a well, or in other words, by the constant influx of an aquifer. The working altitude of this area is not constant and may have significant fluctuations, primarily of a seasonal nature.
- Lyada, a closed structure in the form of a small house above the mouth of the trunk, which housed a lifting gate with a tub or bucket and which cut off the open mouth from elementary pollution from the surface, atmospheric precipitation and protected it from freezing in the cold season.