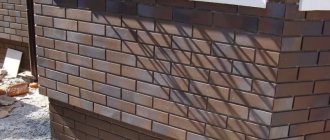
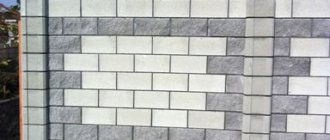
A house lined with brick.
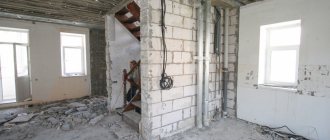
The facade not only protects the house from the harmful effects of external factors, but is also its calling card. Having decided to clad the facade with brick, you can be sure that the house will have an aesthetic appearance and will easily last for several decades without major repairs. Brick can be easily combined with other materials, such as wood, glass, aluminum. A brick wall “breathes”, has frost resistance and resistance to chemical corrosion. The house, lined with brick, has a rich appearance. It would seem that the choice of finishing material is obvious, but it often happens that the existing foundation for facing bricks is not suitable due to its small width.
Expansion of the foundation for brick cladding
The facade not only protects the house from the harmful effects of external factors, but is also its calling card. Having decided to clad the facade with brick, you can be sure that the house will have an aesthetic appearance and will easily last for several decades without major repairs. Brick can be easily combined with other materials, such as wood, glass, aluminum. A brick wall “breathes”, has frost resistance and resistance to chemical corrosion. The house, lined with brick, has a rich appearance. It would seem that the choice of finishing material is obvious, but it often happens that the existing foundation for facing bricks is not suitable due to its small width.
Why is it important to finish the base?
It is wrong to think that finishing of this kind is only a design decision. It performs some other functions:
- Despite the fact that the foundation is the strongest part of the house, it also needs protection from external factors. Finishing minimizes the influence of precipitation, sudden temperature changes and high humidity, direct rays of the sun;
- Since the foundation is located closest to ground level, it is most susceptible to contamination, not only by dust and soil residues, which are harmless, but also by various aggressive substances that cause destruction of concrete joints. The plinth finish not only prevents this process, but also cleans well;
- This material also protects the base from biological life forms: mosses, fungus, mold;
- The basement finishing should also include insulation under the outer layer of material;
Insulating the foundation is an important point. On the one hand, the entire internal space of the building is located higher, and there is no need to insulate it. But that's not true. The foundation is a kind of cold accumulator. Even a well-insulated floor will not save you from penetration of low temperatures from the foundation. A significant part of the heating is wasted just like that. But that's not the worst thing. In winter, due to severe freezing, the foundation collapses regardless of the material, be it stone, concrete or brick.
Foundation and expansion of existing foundations
So how can you line a house with facing bricks if there is no space on the foundation? If it is advisable to entrust the facing work to highly qualified masons, then the work to expand the foundation can be carried out independently. Of course, before starting work, it would be useful to clarify what the foundation itself is, how to expand the foundation and outline the main stages of the work. The foundation can be:
- columnar/pile with reinforced concrete grillage;
- tape monolithic.
It is assumed that the existing foundation is not wide enough and needs to be expanded; for this, an additional foundation is “attached” to the existing foundation of the building.
Making a columnar foundation as an additional foundation is rarely practiced, since carrying out the work is associated with certain difficulties. If you plan to use a reinforced concrete beam as a grillage, you will need to use a crane. When pouring a monolithic grillage, a significant amount of work will be required to produce formwork.
The work on making a strip foundation is much simpler, therefore, as a rule, it is used. In addition, a monolithic strip foundation (made according to the rules) will subsequently become an additional foundation for the entire building.
The additional width is calculated based on the consideration that there should be enough space for facing brick laid with a spoon (15 cm), an air gap (3 - 5 cm) and insulation (10 cm), a total of 30 cm. This is the optimal width for comfortable manufacturing work foundation, and for subsequent brick lining of the house.
Work order
In order for the work to be completed in the shortest possible time, you should count and prepare consumables, prepare access roads, clear the work site and prepare tools.
Materials and tools
The set of tools and materials needed to expand the foundation are practically no different from those needed when carrying out standard concrete work to pour the main foundation. You should prepare:
- shovels (bayonet and pick-up), trowel;
- measuring instruments (tape tape, level, water level) and marking devices (pegs, construction cord);
- electric tools (grinder and hammer drill);
- axe, hammer, wood saw;
- cement, sand, crushed stone, reinforcement, formwork boards, binding wire.
The bricks for facing the house should be counted. It is advisable to deliver it to the construction site after the additional foundation is ready. This will allow you to move around the area more freely.
Making the foundation
The place for the additional foundation is thoroughly cleaned, the formwork, if any, is dismantled, only cleaned soil is left, and markings are carried out. Add 20 cm to the width of the future additional foundation - this will provide space for formwork and simplify work in the trench. Using pegs and a cord, the building is demolished, focusing on the width.
A trench is dug to a depth of up to 0.5 m; this should be done carefully, trying not to “injure” the soil at a given depth, since loosened soil, even carefully compacted, subsequently gives sediment.
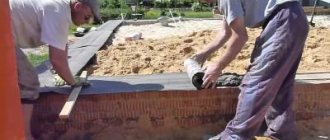
In the old foundation, at a distance of 10 - 15 cm from the upper boundary, holes for reinforcement are drilled with a hammer drill. The pitch between the holes is 50 cm, the depth is 15 - 20 cm, the diameter corresponds to the reinforcement (10 -12 mm). The reinforcement is cut into segments of 30 - 35 cm and hammered into the holes, leaving 15 cm outside. This reinforcement will serve as a kind of anchor fastening, ensuring rigid adhesion of the old and new foundations. After this, the trench is cleared of crumbled earth, a sand cushion is poured onto the bottom, which is spilled and compacted.
Preparing the reinforcement frame
The formwork is made from planed boards and installed at a given distance (30 cm), secured with struts. Then they begin to reinforce the future foundation. You can tie the reinforcement directly into the trench, but given its small width, it is wiser to prepare sections of the reinforcement cage at the top and then secure them in the trench.
After this, you can begin pouring concrete, which is best ordered from a specialized enterprise.
If the volume of work is too large and interruptions are inevitable, then concrete should be poured in sections to the full height, creating working joints perpendicular to the axis of the foundation. The working seam is placed at a distance of 1/3 from the corner. It is unacceptable to pour concrete in layers.
After 2 - 4 weeks, when the concrete has completely set, the formwork is dismantled. Then the foundation is protected with waterproofing, the remaining ditch is filled with earth, after which you can begin to clad the house.
How to do it yourself?
The procedure for self-construction of brick foundation columns involves performing several successive procedures. They start with calculations and end with collection. Let's take a closer look at each stage of work.
Calculations
When starting to calculate the cross-section of brick supports, they are guided by empirical formulas to obtain the area of the sole suitable for holding the load from the structure.
The support area is affected by the dimensions of the design surface of the foundation base. It is usually customary to construct pillars with a square or rectangular cross-section.
When constructing a one-story building, it is more practical to build a square with sides of 0.38 m, or a rectangle whose dimensions are 0.38 * 0.25 m.
If a two-story building is planned, the cross-section of the pillars cannot be less than 0.5 * 0.5 m.
Marking
After preliminary cleaning of the building site, it is necessary to begin scrupulous cleaning of vegetation from the entire area. To prevent uneven terrain, it is necessary to immediately backfill all existing depressions with soil.
When the construction area is cleared and planned, marking begins. It is provided with metal pins installed at the points where the support posts are placed. Next, they begin excavation work, starting to dig along the pit marks.
Excavation
The work starts with the construction of recesses in which cushions will be placed for laying bricks on them. The excavation is carried out taking into account the dimensions of the calculated supports, and also provides an area for easy laying in a recess reaching 0.7 m.
Preparing the base
When the recesses are dug, a ten-centimeter layer of sand and crushed stone is poured onto their bottom. They definitely need to be compacted. After this, waterproofing is laid on such a cushion to protect the brick from ground moisture.
The base can be strengthened by pouring a 15 cm layer of concrete on top of the roofing material and placing reinforcement inside it. After a couple of days, it will be possible to begin laying bricks using the maximum strength cement mortar.
Masonry
In order for the bricks to reliably adhere into a strong support, it is necessary to use good cement (M-400 or M-500).
When laying, be sure to cover every three rows with reinforcing mesh. When carrying out masonry, we must not forget to check the rows for horizontal and verticality, using a building level.
The height of the supports must rise above the ground level by at least 20 cm. If the horizon has a slope, then this value refers to its highest point.
The masonry technology involves placing 4 bricks in each row, then the column will be square and have a void inside. It is filled with reinforcement, after which it is poured with concrete to significantly strengthen the structure being built.
Waterproofing of pillars
After completing the masonry process, it is necessary to additionally protect the columns from moisture. This activity is carried out using bitumen mastic vertically, as well as membranes to stop the rise of water upward.
Filling free space
To ensure that the mortar between the bricks dries slowly, so that it gains maximum strength, you need to wait 7 days.
Then all the space remaining inside the recesses must be filled with gravel or crushed stone. This technology makes it possible to neutralize the effect of seasonal ground movements on the support.
Waterproofing the top of the supports and backing
It is necessary to lay a layer of roofing felt on top of the brick supports, and then mount the Mauerlat on it. It is advisable to erect a fence between the pillars - filling the space with soil that can prevent cold air from penetrating under the lower surface of the building.
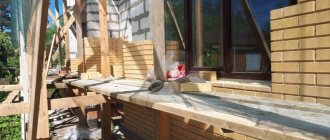
Cladding works
Having certain skills in working with bricks, you can cladding the house yourself. Moreover, facing bricks are made with more careful adherence to dimensions than ordinary building bricks.
Since it is desirable for a house lined with brick to be not only aesthetically pleasing, but also warm, various insulation materials are used for this purpose. The best option is sheet mineral insulation. It is produced in various thicknesses and is easy to install. The insulation sheets are attached to anchors appropriately located in the wall, which are driven into the wall every meter and every sixth row of brick. This could be wire cut into pieces. Its length should be enough for reliable fastening in the wall (5 - 8 cm), a layer of insulation (10 cm) and laying in the facing masonry, that is, about 30 cm. Also, the insulation sheets should be pressed with mounting dowels and umbrellas (5 pieces per 1 m. sq.). The anchors provide additional strength and stability to the façade wall.
It is also necessary to ensure ventilation of the insulation. For this purpose, holes (vents) are left in the façade wall along the upper and lower cornices. They are protected with a mesh or special plugs are placed on them for ventilation. You should also worry about the eaves overhang - it should overlap the new wall by at least 25 cm, so you may have to cover the roof.
There are some subtleties when cladding a house made of wood, which relate to the structure itself. Before covering a wooden house, you should make sure that all its elements are in good condition - there is no fungus, signs of rotting, or serious damage. All these places need to be removed/repaired and, if necessary, replaced.
Cladding a wooden house with bricks
The wood of the walls must be treated with fire-resistant impregnation and an antiseptic (maybe twice). Before you cover a wooden house with bricks, you should ensure its ventilation. Slats are placed along the walls in increments of 1 m, and a vapor barrier is placed directly on them. Holes are left in the façade wall. These actions will ensure air circulation between the façade wall and the wooden elements, which will protect the latter from moisture.
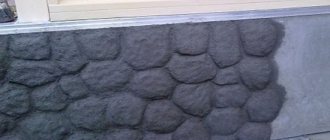
Finishing the base with panels
Finishing with siding has a number of advantages that must be used during construction. As a rule, the panels are mounted on a steel or wooden frame, which creates additional volume. It is advisable to fill the empty space between the panels and concrete with insulation. For this purpose, polystyrene foam or basalt wool is used.
Decorative siding is made from metal, polyvinyl chloride, cement-based mixtures and composite materials. The front layer of the panels can be imitation stone, natural wood or colored fabric. The resulting surface is sufficiently durable and presentable in appearance. A brick building takes on a completely new style with siding trim.
Scheme of finishing the base with panels.
The sequence of panel cladding is as follows:
- Carrying out markings. For this, a tape measure, level and marker are used. The size of the frame mesh should be adapted to the parameters of the insulation material.
- Drilling holes in concrete. Installing plastic dowels in them. A puncher and a hammer are used.
- Frame assembly. To do this you will need a screwdriver, a hammer, a level and a steel profile. It is not advisable to use wood as it has a limited service life.
- Installation of insulation. The best option is to glue it to concrete. To increase the reliability of fastening the insulation, anchor bolts with wide heads are used.
- Fastening the panels. This is quite simple to do, since all siding models have a system for fixing parts together.
You can cover the base with panels in just 1 working day. This design is lightweight and does not weigh down the foundation at all.
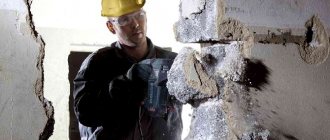
Preparing the foundation for brick cladding
Carrying out construction and installation work when facing a building with brick requires certain knowledge and skills. The task of correctly covering the walls of an old house using finishing bricks is no exception. If brick laying is in most cases trusted to professionals, then the owner of the building can prepare the foundation for facing bricks.
The width of the foundation for facing bricks must be 25-30 cm, and its laying must be no less than the depth of the soil at which it begins to freeze.
To avoid mistakes that could cause premature destruction of the cladding, knowledge of the general procedure and some of the subtleties of carrying out work on the correct installation of the foundation will help. Proper laying of the foundation for the cladding, taking into account all the loads, is the key to high-quality execution of the cladding itself.
Requirements for the foundation and choice of its type
When measurements have been taken of the walls of the house that require cladding, the amount of brick has been calculated, and the brick itself has been selected and brought to the work site, you can calculate the total load that will affect the additional foundation.
It should be borne in mind that we are talking about a ready-made building, during the construction of which brick finishing was not planned, therefore there is no room for brick on the existing foundation of an already built house. In addition, when calculating the main foundation of the house, the additional load that the brick would give was not taken into account. The values of this load are large.
Scheme of the wall of a house made of ceramic blocks: 1 – facing brick; 2 – ventilation slot; 3 – thermal insulation 100 mm thick; 4 – ceramic blocks; 5 – plaster.
This is explained simply: with an increase in the area of the wall intended for lining, the total weight of the brick used increases, that is, the load on the foundation of the house. For example, for 1 sq. m of masonry requires a little more than 50 pieces of finishing bricks weighing from 1.7 kg to 6 kg (depending on the type and modification), then the total load of one wall is only 15 sq. m. m will range from 1250 kg to 4580 kg per foundation. And this does not take into account the mortar on which the brick is laid.
The best option for a foundation for brick cladding is considered to be a monolithic strip foundation. It holds the load well and is quite simple to implement.
Schematically, the work comes down to expanding the foundation, so the newly cast part should form a single whole with the existing one.
Sometimes a columnar foundation with a reinforced concrete monolithic grillage is installed, which is something like a pile structure. Its use is justified when the soil is loose or marshy. Unlike a strip monolithic foundation, when constructing such a foundation it is almost impossible to do without the use of construction equipment, since a reinforced concrete grillage or sometimes metal beams used as it have enormous weight.
Scheme of the device of a strip monolithic foundation.
Taking into account the above, in the vast majority of cases of brick cladding of private buildings, a monolithic strip foundation is installed. Another advantage of this choice: it is easy to “connect” with the main foundation of the house, regardless of its type. In rare cases, when the house stands on a rubble, brick or sand and gravel foundation, the installation of a monolithic concrete belt will strengthen the entire foundation of the building.
The simplest option is when the cladding is planned during the construction of the house. In this case, the foundation is laid immediately of the required width. The calculation is made as follows: the width of the load-bearing wall plus the gap for the insulation (if there is a need for it, then 10-15 cm) plus the air gap (3-5 cm), plus the size of the facing brick (12 cm), that is, there should remain directly under the cladding minimum 15 cm.
In some cases, building codes allow the cladding to protrude beyond the foundation by a third of the width of the brick, that is, 4 cm, but this will have to be taken into account when laying the brick - more attention will need to be paid to the connection of the cladding with the old wall.
In private construction, foundation loads are calculated in isolated cases. Usually the consideration that it is better to give a margin of safety prevails. Therefore, you can omit the exact calculation of the additional width of the foundation for the brick and take it equal to 30 cm. In a narrower space, it is also more difficult to arrange high-quality reinforcement.
Preparing the necessary tools and materials
Tools used in laying foundations and walls: 1 – trowel; 2 and 3 – jointing; 4 – shovel; 5 – tamping; 6 – hammer-pick; 7 – plumb line; 8 – roulette; 9 – meter; 10 – square; 11 – level.
Before you begin work on the foundation, you need to deliver tools, equipment and prepared materials to the construction site. It is understood that the brick itself has already been purchased and delivered.
The following tools should be at hand:
- bayonet and shovel shovels;
- tamping;
- building level;
- Master OK;
- grinder or hacksaw;
- container for mixing the solution;
- sledgehammer;
- construction hammer;
- pegs and twine;
- roulette.
Materials that must be delivered to the construction site in sufficient quantities:
- fittings with a diameter of at least 12 mm;
- cement;
- sand;
- gravel or other foundation filler;
- boards for formwork;
- wire for tying reinforcement;
- polyethylene film;
- roofing felt
Marking
Brickworking skills are quite simple. The more thoroughly you prepare for the process, the better the result will be. You will have to do several stages of marking and checking.
The first stage includes checking the perimeter and levels. You will need a simple tool:
- Hydro level, a tube with flasks, 10-20 meters long, filled with water. Before use in the work area, it must be filled for at least 12 hours.
- The rule is 2.5 meters in length, measure individual sections of the bed (places of masonry).
- Tape measure, marker, pencil.
- Construction cord, fishing line. Take into account line sagging in hot weather.
- A hammer drill with a drill and dowels are useful when tensioning ordinary cords.
If the horizontal level deviates by more than 5 mm, make a leveling pad from cement mortar.
The second stage, we check the right angles. You can check the angle using a construction square or the “Egyptian triangle” method. On one cord we mark 3 meters with a marker, on the perpendicular cord 4 meters, the distance from point to point should be exactly 5 m. We make adjustments before starting the first and main row.
Preparing the site for the foundation
Marking is being done. Using a tape measure, string and pegs, the width of the trench is marked, taking into account the fact that formwork will have to be placed in it, that is, 15-20 cm should be added to the width of the future foundation. The distance from the wall of the house to the outer edge of the trench should be at least 50 cm. According Pegs are installed in the corners, and a string is stretched between them.
If there are blind areas, paths or other finishing coverings under the walls of the house, they will have to be dismantled before marking the trench.
A trench is dug to the depth of the foundation, to its base. It is allowed not to open the entire foundation, limiting it to a depth of at least 50 cm. If the entire structure is being prepared for facing bricks, and not a separate wall of the house, work is carried out simultaneously along the entire perimeter.
Scheme of the design of a shallow foundation of a house.
Having descended into the prepared trench, it is necessary to mark the anchors on the old foundation, approximately 10 cm from its top. The distance between them is about 50 cm. It should be noted that the larger the wall area for cladding and the smaller the diameter of the reinforcement used, the more frequent the location of the holes.
Reinforcement or dressing
The standard method of strengthening masonry involves laying a mesh between the rows in the solution at the run stage. The thickness of the soldered version of the mesh should be no thinner than 1 mm, with a cell of 25-40 mm, no more.
When finishing, corners are laid through a row, and purlins (straight sections) of brick are laid through 3 rows by 4. This way, maximum strength of the entire masonry is achieved.
When starting to pour the foundation, one more issue must be taken into account, the connection of the base with the wall. Laying strips of mesh 10 cm wide into the foundation so that they protrude up to the proposed brick wall is not a problem.
And already during the finishing process, insert them between the seams.
The distance from one dressing to another should be at least 80 cm.
Sometimes for such purposes, wire with a diameter of 3-4 mm is used, it is laid more often.
Pouring the foundation
Detailed foundation pouring diagram.
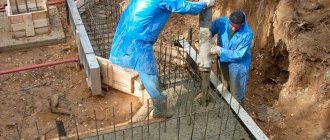
Formwork is installed (only on the outside of the foundation) from boards planed from the pouring side. It should protrude about 30 cm above the level of the future foundation. The formwork is checked using a level for verticality and secured with spacers. The boards are generously moistened with water. Instead of wetting, you can line the prepared bed with plastic film, the edge of which is removed and secured on the back side of the formwork.
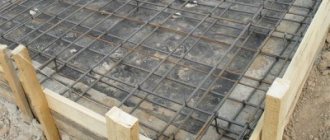
Reinforcement is being prepared for laying in the foundation. As a rule, these are two rows of vertically installed (driven into the ground) sections of reinforcement. The distances that must be maintained both from the formwork and from the old foundation are at least 3, but not more than 5 cm. It is enough to install reinforcement in a row in increments of 50-60 cm. Each rod is tied with adjacent wires to create a metal frame.
Scheme of a columnar foundation with a grillage made of prefabricated standard elements: 1 - strip foundation blocks FL 8-12-3 (1180*800*300 mm); 2 — concrete blocks FBS 9-5-6 (880*500*580 mm); 3 - grillage made of reinforced concrete lintels 5 PB-25-37 P (2460*250*200 mm); 4 - twisted wire; 5 - reinforced monolithic belt.
After the metal frame is formed, concrete is prepared for pouring the formwork. It should be remembered that it is not recommended to fill the foundation to its entire depth at once. This is done in two or three passes. Each time a layer of 20 centimeters is made and left to set for at least 2 days. In hot weather, the layer is covered with a waterproofing pad so that the moisture from the concrete does not evaporate before setting occurs.
When pouring concrete, do not forget to compact it so that there are no voids left inside. The last layer of concrete after pouring must be checked for horizontalness using a building level. If necessary, correct it by making a cement screed.
After the concrete has completely hardened, the formwork is removed. From the outside, the concrete is protected with two layers of roofing felt. The groove remaining after pouring the foundation is filled to its entire depth with sand or soil, compacted and compacted.
Moisture protection
Waterproofing of the brick seat must be done in any case. To do this, use roofing felt or bitumen-based mastic. The mastic is applied in two layers, with a time interval of 24 hours. Before application, the surface is primed with hydrophobic primers once.
It will be a little easier with a solution. There are several points to consider:
- Hardness of water. It is better to soften the water with the help of additives.
- The temperature of use matters here. At a temperature of +8 Celsius, the necessary reactions in the solution stop. True, there are special mixtures and antifreeze additives on sale that allow work to be carried out even at minus 7.
- In hot weather +35, veneering is also not carried out. The strength of the solutions suffers due to the rapid evaporation of moisture. Lime-based solutions are covered with film and watered during work.
- The addition of coloring elements, graphite, carbon, affects the strength of the masonry. Losses are approximately 15%. Use certified additives and colors.
Non-standard situations
The complexity can be presented by communications leading through the foundation of the house, for example, water or sewer pipes. It is not recommended to embed them into a concrete foundation. For them, you can build belts from tin or, to protect them from damage while working on the foundation, wrap the sections of pipes exposed during the preparation of the trench with polyethylene film in several layers.
Any house lined with brick will be protected from atmospheric influences, and its temperature and humidity conditions will be normalized.
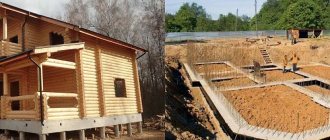
Sometimes old buildings that are planned to be improved using facing bricks turn out to be standing with virtually no foundation. In this case, the foundation for the cladding is still laid, but it is connected to the basement of the house using reinforcement, the slope of which (15-20 degrees) is made downwards. With such unfavorable initial data, it is recommended to install formwork on both sides.
It is necessary to remember that the foundation of an old house almost always has to be expanded before facing it with brick. Simply casting a new brick foundation parallel to the old one is unacceptable, since subsequently cracks may appear along the brick lining due to subsidence or displacement of the constructed foundation. To avoid this, both foundations must merge into one, strong and durable. This requirement is achieved by a reliable mechanical connection.
When the foundation for brick cladding is completed according to all the rules, after it has completely hardened, you can proceed directly to the cladding. The place for the brick is ready!
Rules for cladding the walls of a house made of aerated concrete with bricks
Aerated concrete is a building material that is becoming increasingly relevant in the construction of residential premises. It became so popular due to its increased heat capacity, low weight and the absence of the need to pour a powerful foundation. However, the material is porous and afraid of moisture, so to protect against the negative effects of the environment, facing materials should be used. Cladding a house made of aerated concrete with brick is a more suitable method for those who have not yet chosen the type of finishing for the facade.
Pros and cons of aerated concrete walls lined with bricks
The most advantageous material that can be used to line aerated concrete is brick. The advantages of choosing it? Let's consider the advantages:
- Reliable protection from aggressive influences: snow, rain.
- Guarantee of high-quality sound insulation indoors.
- Presentable facade.
- The ability to withstand absolutely any natural phenomena due to the high strength of the structure.
- Aerated concrete walls are endowed with vapor permeability, which means the finishing should have exactly the same property, which brick perfectly matches.
- Brick increases the service life of a living space.
- Excellent frost resistance and mechanical strength.
Like other materials, aerated concrete walls have some disadvantages that are quite significant:
- If the gas blocks are laid with an air gap, then condensation will form in the wall cavity, which will cause the block to lose its properties much earlier.
- The need to generate additional money for the purchase of facing materials.
What is needed for construction?
To carry out excavation work you will need the appropriate tools. To install the brick strip:
- sand,
- brick,
- masonry mortar,
- reinforcing mesh or rods,
- waterproofing,
- insulation.
You also need removable formwork and concrete mortar for the cushion. A solution of high strength cement and sand is suitable for masonry, but for the above-ground part you can make a mixture of cement and lime in a ratio of 1:3.
What kind of brick are used?
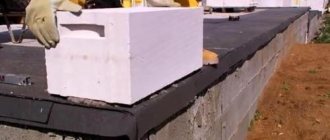
Only solid red brick of grades M-150 - M-300 is suitable for laying the base . Frost resistance index - from F 35-100, water absorption - no higher than 20%.
The best option would be clinker brick - due to the higher firing temperature, it has greater strength, frost and moisture resistance. But clinker has a significant drawback - its high price.
It is prohibited to use silicate, fire-resistant or hollow red bricks, brands with low frost resistance and strength index.
Methods of facing walls with bricks
As it turned out, three options have been developed for cladding aerated block walls where brick is used: tightly to the walls, with an air gap, like a three-layer wall. They all differ in design and method of laying bricks. Let's take a closer look at each.
Close to the wall
This method is rarely in demand, because... relevant only for unheated rooms. If this method is implemented in buildings with heating, then the warm air, trying to escape to the street, will form condensation, which will serve as an impetus for the destruction of the wall from the outside.
It is impossible to rigidly connect brick and gas blocks, because they have completely different heat transfer coefficients, i.e. in heat or extreme cold they are subject to unequal expansion, and this will soon cause damage to the wall masonry.
With air gap without ventilation
This cladding method is considered durable because it increases the thermal insulation of walls. Please note that the method is relevant for structures without heating, because this type of masonry does not provide ventilation, as a result, the accumulated condensate will accumulate in the lowest part of the wall above the foundation. Builders recommend laying a layer of thermal insulation in the area between the brick and the gas block.
Insulation of gas blocks with facing brick lining
A house made of aerated concrete with brick cladding must be insulated. This is necessary not only for ideal heat retention in the building, but also to improve operating performance. So, there are several options for insulation and each should be considered separately:
- Expanded clay is a bulk insulation material that contains burnt clay granules.
- Mineral wool - includes mineral fibers. Builders recommend giving preference to the option that is produced in slabs. Important: mineral wool quickly becomes saturated with moisture, which means it needs waterproofing.
- Basalt wool - its base includes rock fibers. The insulation is highly resistant to fire and moisture, allowing air to pass through it perfectly. This type of wool is a convenient option for filling the open space between two walls.
- Penofol is a synthetic foil material. It has a small thickness, which is very important when the passage between the sheathing and the wall is too small.
- Expanded polystyrene is a budget option, but at the same time it is not saturated with moisture. The release form is slabs, making it easy to attach to the wall. Interestingly, this is the most popular material for insulating aerated blocks.
There is a certain procedure for installing insulation, depending on the type of materials. All types, with the exception of expanded clay, are installed before cladding. The cotton wool and polystyrene are fixed using special plastic umbrella dowels. When thermally insulated with expanded clay, it can be added, if necessary, during the process of creating the cladding.
To avoid seams between the constituent parts of the thermal insulation, they are sealed using sealant or polyurethane foam.
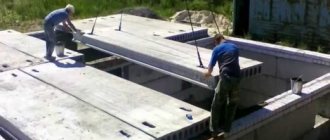
Features of foundation blocks
Each plinth block is a rectangle made of concrete mixture. Moreover, for the production of products, not ordinary concrete is used, but heavy concrete - M200 or M100. In the labeling, these materials are marked with the letter “T”. The material for the manufacture of block structures can also be silicate concrete or expanded clay concrete, which are designated by the letters “S” and “P”, respectively. For the construction of particularly large objects, blocks are reinforced using mounting reinforcement.
To connect individual elements into a continuous structure, each product has connecting grooves at the end. The upper surface is provided with two mounting loops - they are needed to move products for transportation or installation.
According to GOST requirements, several types of similar products are manufactured:
- UDB. This is the name for universal products whose ends are open or closed.
- FBP is an open, hollow base block at the bottom.
- FSB. This abbreviation means that the product is a foundation block for walls. It has no holes or voids. The products are intended for installation during the construction of basements, basements and walls.
Cladding technology
The technology for forming the cladding is slightly different and depends on the building in which it is created - a new one or an existing one. It is worth considering each of them in more detail.
During the construction of a new building
The foundation is laid across the entire thickness of the wall being built, i.e. for brick and gas block. Waterproofing the base is also done for the entire wall. Next you can start laying the walls. Decide for yourself what to put first: brick, gas block or all at the same time. But brickwork has a large number of seams in height, but you need to understand that they are noticeably thicker, but the blocks can generally be laid with glue. This creates a difference in shrinkage, but it is not significant unless we are talking about buildings with many floors.
Fastening aerated concrete and brick when cladding a new building
Fastening facing bricks to aerated concrete is done using conventional reinforcement. You can make it yourself from a rod or wire of the required diameter. In addition, steel tape is suitable for these purposes. But in any case, you need to pay attention to the following points:
- The sum of the cross-sectional areas of the reinforcement is no more than half a square centimeter per square meter of new masonry.
- The number of reinforcement products per square meter is 3-5 pieces.
- Near corners or openings at a distance of 20-25 cm, you need to make another row, the step of which is 25-30 cm.
Instead of connections, you can also use factory-made products, which at the same time provide for fastening the insulation.
When installing ties, it is necessary to ensure high-quality anchoring - that is, they should be immersed in the solution, alternating it at approximately a distance of 10 diameters.
Cladding the external walls of an existing building
In such a situation, it is necessary to build another foundation for the masonry. It doesn’t matter which type is chosen, the main thing is that it can cope with the additional load, i.e. withstood the walls, ceilings, roofing, etc., which are already supported by the foundation.
When forming such a cladding, the connections are secured with dowels. It is better to make through holes in the wall and mount the rods with washers from the inside. The rods can be attached to blind holes. Try not to use a standard solution; epoxy resin-based glue is suitable for this case.
Self-anchoring bolts are suitable for fastening, because they are almost instantly and quite efficiently attached to aerated concrete blocks and the seams located between them.
Recommendations for cladding
Brick lining of aerated concrete blocks is a complex job consisting of three stages, which are worth considering in more detail:
- Pouring the foundation.
- Selection of bricks.
- Formation of brickwork.
Laying the foundation
This is the main point that needs to be thought through initially, i.e. even before construction starts. Here it is necessary to take into account three nuances: the width of the gas block, insulation and brick for cladding. A prerequisite is that the cladding should not hang over the edges, i.e. the width of the foundation should be the sum of the three above components.
Brick selection
The aerated block must be lined with brick, mounted to its width, in other words, to half a brick. The manufacturing material can be hollow, clinker, solid and silicate. Most often in practice, clinker or hollow bricks are used. The first method is much more expensive, but it also has many positive qualities:
- high compressive strength;
- Clinker frost resistance is much better than ordinary facing brick;
- attractive appearance;
- low water absorption (5%) compared to conventional bricks (about 13%).
Brick laying
The final stage of cladding, which includes several stages with many important points. To reliably protect the foundation from condensation, you should lay it on a layer of rolled waterproofing. The remaining rows are placed on a pre-prepared mortar so that the seams in the previous row are densely filled. For masonry you will need a metal rod with a diameter of 0.8-1 cm. Place it outside. A similar rod is used to create a vertical seam.
The mortar is laid out on the formed row and the next brick is laid. When moving the row, do not forget to move the rod along it.
Remember that reinforcement is required for several rows. For shaping, a synthetic mesh is suitable, which can be cut into strips 8 cm wide. As the solution hardens, it may be necessary to undo the seams. First, they are filled with a solution, and after its formation, jointing is done using a special tool.