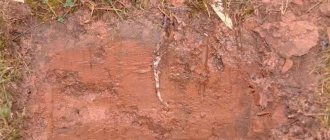
If there is sandy soil in the area where you plan to build a house, then you can consider yourself lucky. This soil is better than peat or clay soil. Its load-bearing capacity is high, which is especially true for coarse sand. It allows water to pass through well, so it is not susceptible to frost heaving, and the finest sand is an exception. But even in this case, the design must be supplemented with a drainage system, the design features of which are discussed below.
Types of sandy soils
If you think that when building a house on sandy soil there should be no problems at all, then you should know that this is not entirely true. In order to avoid mistakes, at the first stage of the work it is necessary to carry out geodetic studies that will determine the type of soil. He can be:
- dusty;
- medium-grained;
- fine-grained;
- gravelly.
Dusty soil has a large number of sand grains with sizes that do not exceed 0.1 mm. This sand looks like dust, and the specific gravity of fine sand grains is 75%. Such soil is considered quite complex, because it is prone to being saturated with groundwater and forming quicksand. But even in this case there is a panacea.
Fine-grained dusty sand consists almost entirely of sand particles (more than 75%). But their size already reaches 0.25 mm. When abundantly moistened, such soil loses its bearing capacity, so structures require additional waterproofing.
Self-arrangement of the foundation on the sand
When arranging the foundation of a house on sandy soil, you should follow a certain sequence and follow the recommendations of specialists.
Preparation and marking of the site
The area allocated for construction is cleared of excess vegetation and the top fertile layer is removed. When marking, use wooden pegs and nylon cord. First, mark the outer perimeter of the house, and then the internal load-bearing partitions. Pegs are driven in the corners of the building, and, if necessary, along the perimeter of the walls.
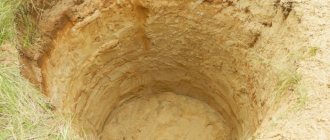
Carrying out excavation work
To arrange the foundation, it is necessary to make a recess, which depends on the type of foundation chosen. To lay a monolithic slab, you need to dig a pit, for a strip foundation, a trench is dug, and round or square holes are prepared for a columnar foundation. Before starting work, it is imperative to organize the drainage of surface water, which contributes to soil liquefaction and a decrease in its load-bearing characteristics. To solve the problem, it is enough to make grooves.
The depth of the foundation depends on the type of soil:
- No more than 1 meter - for coarse sandy and gravelly soils.
- No more than 1.25 meters - for sandy loam soils.
When removing excess soil, you cannot top up the excavated soil. This can lead to uneven shrinkage of the building and subsequent destruction. You can replace the missing soil with sand, crushed stone or gravel. They require careful compaction. You can compensate for soil overflow with concrete mortar.
If construction is delayed for a certain time, it is better not to dig a trench or foundation pit to the required depth. This will help protect the recesses from erosion during precipitation. The remaining soil must be removed immediately before construction begins.
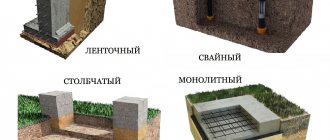
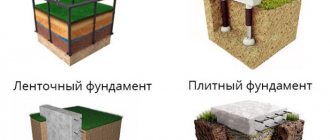
Which foundation to choose for sandy soil?
Before you build a sand foundation for your home, you must choose a type of sand. For example, any base is suitable for large sandy soils. However, strip or columnar structures are more often used, which may be based on foundation blocks or ceramic bricks, which, however, reduce the load-bearing capacity of the structure.
When you plan to build a house without a basement, it is better to build a shallow strip foundation. You can also choose a columnar base; it is suitable for houses made of lightweight materials, such as panels or wood. When choosing a foundation on sandy soil, you must determine how fine the grains of sand are at the base of the soil. If the sand is quite fine and dusty, then the best option would be a monolithic strip shallow foundation.
To reduce the effect of frost heaving, it is better to make the base trapezoidal, expanding downward. Among the advantages of a strip foundation is a less strong effect on soil erosion. Before filling, the trench must be waterproofed by laying the bottom with a special film.
If construction on sand involves the construction of a heavy building, it is better to install a pile or pile-strip option. When the soil is weak, it is better to make a foundation on a sand bed made of coarse sand. For weak soil, a pile-strip foundation is suitable. It fits well on soil prone to the formation of quicksand.
To construct such structures, markings are made and a pit is dug. Formwork is installed in it, and then wells are drilled at the intersections of the tape. Their depth should be such that reliable soil can be reached.
When choosing the type of foundation on quicksand, it is better to give preference to a pile-tape structure, which at the base of the supports will have asbestos-cement pipes fixed with spacers. The solution is poured inside to a third of the depth, and the pipe is then raised so that a thickening forms at the bottom.
On shallow sandy soil you can build a pile foundation. It is stable and durable, because the piles will be located below the frost line. This design is more reliable than a columnar one, which can warp or move apart under the influence of heaving.
A pile-screw foundation is also installed on quicksand, since the supports will reach solid ground. A slab foundation on sand is also called a floating foundation. This is due to its movement along with the soil. Therefore, the structure is almost not subject to destruction. It is reliable and durable, but is expensive due to the consumption of material. A slab base is suitable for moving soil, such as on a hillside. Under such conditions, the house will float along with the slab without being damaged.
Coarse sand
If a study of the soil under the foundation shows that there is coarse sand on the site, then you can choose from a strip or columnar foundation option. The depth of the first will be determined by how the space under the house will be used. If you are planning a basement, then it is better to make it deeply buried. Otherwise, a shallow one will be sufficient, which will save money. The option of a foundation on supports is relevant for frame or light buildings of another type.
Features of strip foundation
A strip foundation on sand is not buried too deep, a maximum of 70 cm. A frame, wooden, panel or small brick house can be placed on such a structure. A building made of foam blocks will also be supported perfectly on a strip foundation.
The strip structure can be prefabricated or monolithic. For massive houses with a basement or residential basement, a deeply buried foundation is made. The depth of the foundation on sand for a brick house is 20 cm below the soil freezing level. When constructing a buried foundation, it should be waterproofed on all sides, ensuring proper drainage. This will allow you to build a house with a basement even with high groundwater.
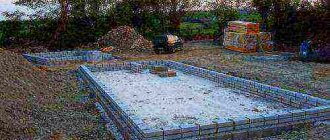
Stage 1. Marking for the foundation pit
Before starting excavation work, it is necessary to mark the site, that is, transfer the foundation drawing from the project “to the area.” To do this we use pegs and cord. First, we set one corner and “pull” two sides of the rectangle from it. We set two more corners and complete the rectangle. Please note that it should be two meters wider and longer than the future foundation (a meter of space on each side is needed to make it convenient to install the formwork).
Advice. It is extremely important here that all corners of the foundation are strictly straight. To check the resulting rectangle, stretch the cords along its diagonals: they should be equal. It is also advisable to double-check the result with a theodolite.
Stage 2. Digging a pit
When the marking is completed, we begin excavation work. The pit can also be dug manually, using ordinary shovels. But if the foundation area is quite large, then it will be more convenient, faster and cheaper to hire special equipment. The depth of the pit for a slab foundation, as a rule, is 1–1.5 m. It is torn off in width and length according to the markings (that is, the excavation will initially be larger than the foundation itself).
Advice. The most important thing at this stage is to make a perfectly flat bottom of the pit. Holes, bumps, slopes and other changes in height are not allowed here. Any unevenness will create an uneven load on the foundation slab and quickly deform it. As a result, the foundation will simply crack.
Leveling the bottom of the pit must be approached very carefully. Remember that the soil layer under the pit must remain intact. That is, when leveling manually after digging with an excavator, you should cut off excess bulges rather than fill in the recesses. After all, even well-compacted backfilled soil will still sag, and this will sharply reduce the strength of the slab.
At the same stage, channels are made for the drainage system. They are covered with geotextiles, on which the main pipes are laid. The laid system is again covered and covered with small crushed stone.
Stage 3. Installation of a cushion and waterproofing under the foundation
We line the prepared pit with geotextiles, which will allow water to pass through, but retain the sand-crushed stone layer laid under the slab. Next, fill the pit with a layer of clean coarse sand (15–30 cm) and compact it. 20–30 cm of crushed stone is laid on the sand in the same way. Sometimes ordinary gravel is used instead of sand and crushed stone, but when constructing serious objects it is better not to do this.
Why do you need a pillow under the foundation? It will play the role of drainage and shock absorber. Firstly, due to its high filtration properties, the sand-crushed stone mixture will conduct moisture into the lower layers of the soil, and the base under the foundation will not “float”. Secondly, by allowing moisture to pass through, the pillow will not swell during severe frosts, and the load on the foundation slab from the base will be less.
Adviсe:
- On wet soils and low-lying areas, the backfill thickness should be increased.
- The pillow should be carefully compacted, otherwise over time it will sag unevenly. Then, instead of absorbing pressure from the soil, the sand-crushed stone cushion will itself create additional pressure on the foundation slab. Sand is considered well compacted if an adult can walk on it and no shoe marks remain.
Next, we install sewer pipes, mark the entry points for sewerage, electrical wiring, and gas pipes, and install waterproofing. There are two options here. The simplest is to lay a rolled waterproofing material, for example, roofing felt, directly on the compacted sand. The second option is more complicated: after backfilling and compaction, the cushion is filled with a thin layer of concrete preparation (5–10 cm of M100 sand-cement mortar). Rolled waterproofing is also laid on the frozen fill.
Sheets of roofing felt are connected using a blowtorch or propane torch. If you place them on a concrete base, then it is worth lubricating the concrete with a bitumen primer (bitumen and diesel fuel in a ratio of 2: 3). The waterproofing should extend beyond the perimeter of the future foundation slab by 30–50 cm on each side. Foam boards can also be laid on the waterproofing layer, which will provide thermal insulation for the foundation.
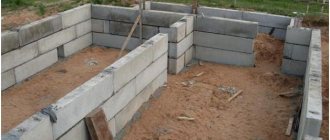
Stage 4. Installation of formwork
For formwork, you can use ready-made panels, boards (at least 40 mm) or available materials. The perimeter of the structure must clearly correspond to the design perimeter of the foundation slab. After installation, carefully check all corners and sides (they must be straight). Make the walls of the formwork strictly vertical. Rigidly fix the entire structure with stakes and spacers so that the walls do not move or bend when pouring concrete.
Advice. When installing the formwork, be careful not to damage the waterproofing layer. The finished structure should be lined from the inside with plastic film. This will make it easier to dismantle the formwork and prevent concrete milk from leaking out through the cracks between the boards.
Stage 5. Installation of reinforcement cage
Reinforcement is as important a component of a reinforced concrete slab as the concrete mixture. Reinforcement gives concrete strength and resistance to deformation. Therefore, knitting the frame should be approached very responsibly.
In a slab foundation, the frame has the form of a two-layer reinforcing mesh with a cell of 20×20 cm. Here are the basic rules for creating a reliable frame:
- Take reinforcement 12–16 mm, twisted and of maximum length. The fewer connected rods you use, the better.
- Lay the frame evenly (with the same mesh) over the entire area of the pit. Otherwise, some sections of the reinforced concrete slab will be weaker than others, and the foundation will easily deform.
- Tie the reinforcing bars with wire rather than weld them. This will provide the structure with greater resistance to deformation.
- Knit the frame directly in the pit, because moving the finished mesh will not be easy.
- Install the fittings carefully so as not to damage the waterproofing. Do not place the frame directly on roofing felt - there are special rubber gaskets for this.
- Install the lower mesh at a height of 5 cm from the waterproofing layer, the upper one – 5 cm below the upper surface of the future foundation. To connect the grids to each other, use small jumpers.
Stage 6. Pouring concrete
To make the slab truly monolithic, the entire foundation should be poured at one time. To do this, it is advisable to order ready-made concrete mix in an industrial concrete mixer. If the foundation area is large, it is more convenient to fill it with a concrete pump, but you can also use ordinary gutters. The mixture is suitable for grade M350 and higher (depending on the design load on the slab). It is also worth paying attention to the water resistance class of concrete - it should be no lower than sixth.
Advice. Thoroughly compact the poured concrete mixture with an in-depth construction vibrator. Thus, the hardened concrete will be solid, without bubbles and voids. And this guarantees high strength of the finished monolith.
Stage 7. Completion of work
After pouring, the concrete must be protected from erosion and drying out. If the weather is rainy, the stove should be covered with film. In case of heat, the set monolith should be watered from time to time to prevent cracking. During frosts, the slab is protected from freezing. When the concrete reaches 50% of its design strength, the formwork can be removed. This should be done carefully, without damaging the waterproofing protruding from under the slab.
The finished slab is protected with a layer of waterproofing on vertical surfaces. If you have left a wide supply of waterproofing material around the perimeter of the slab, this allowance can simply be raised and glued to its vertical walls. Otherwise, the surfaces are simply treated with bitumen mastic. It is also worth waterproofing the basement side of the foundation - this will protect the walls of the building from capillary moisture. In the future, insulation and floor coverings can be laid directly on this layer.
After dismantling the formwork and waterproofing work, fill the pit cavities around the finished foundation. Then all that remains is to wait until the concrete reaches its design strength, and you can begin building the walls.
Thus, you can easily arrange a slab foundation yourself (or with a team of assistants). But if the work ahead is large-scale, it is better to immediately turn to professionals who build turnkey foundation structures. Then you will not have to waste time looking for workers, equipment, materials and independently understand the intricacies of this technology.
In St. Petersburg, specialists from the Samoswalov company will prepare a slab foundation for any house. Call us or contact us through the website. We will do everything from geodetic and excavation work to waterproofing the finished slab. And you can start building your house on the strongest and most reliable monolithic foundation without any unnecessary worries.
Useful information on pouring a foundation
Construction of a strip foundation
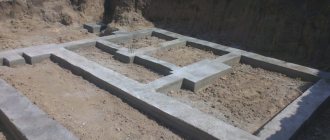
The strip foundation on sand is built according to a certain algorithm. At the first stage, it is necessary to remove the fertile layer of soil from the site, level the surface and mark it. For this, a plan or project is used.
Then an 80 cm trench is dug, the width of which is 20 cm larger than the future walls. The next step is the construction of formwork:
- from plywood;
- profiled sheet;
- edged board.
The inside of the structure is covered with polyethylene. For shallow tape, reinforcement plays an important role. At the final stage, the formwork is filled with concrete.
Monolithic slab foundation
Despite the high cost, labor intensity and complexity of manufacturing, a base made of a monolithic slab is quite often found in private residential construction. This is due to both technical necessity (type of soil, height of groundwater, depth of freezing), and general economic feasibility - significant savings in the further operation of the structure. This article will describe the technology of constructing a monolithic foundation slab, its varieties, calculations and step-by-step manufacturing instructions.
Adding drainage to the foundation
The foundation on sand must be supplemented with drainage, which is especially important for buildings on fine-grained soil. The most effective are closed systems where pipes play the main role. To make one of them, you need to take a plastic sewer pipe in which holes are drilled. The products are wrapped in geotextiles and placed in a trench dug around the house. It is necessary to make bends on the surface, which are filled with gravel, and on top everything is covered with geotextiles and soil.
Soil bearing capacity
For construction, one of the main characteristics is the bearing capacity of the soil. This is especially true for sandstones. Resistance to shrinkage depends on their moisture and compaction. The greater its density, the higher the load-bearing capacity. This means that the soil will be easier to withstand the load and resist shrinkage. It is also worth considering that humidity negatively affects the properties of the soil. The exceptions are gravelly soil and coarse sand.
For construction, the best option is sand with larger particles than silty and fine sand. Here it is worth considering that rocks increase in size with depth, which increases the soil’s ability to resist loads. This means that the deeper the base is placed, the less shrinkage there will be. It is also important to protect the base of the building from moisture. When building a house on sand, it is necessary to waterproof the foundation.
Construction of a pile-strip foundation
The foundation on sand can be pile-tape. To install it, markings are made on the territory and a pit is dug. Formwork is installed in it, and then wells are drilled at the intersections of the tape. Asbestos-cement pipes go down there. The solution is poured inside.
The fittings are placed in the pipe, and then the solution is poured to the end. The reinforcement must protrude above the surface so that it can be connected to the reinforcement of the foundation strip. If the soil is not very wet and water does not flow into the well, then the piles can be poured without the use of pipes.
After preparing the wells, their lower part is expanded with a plow, and then reinforcement is placed there and concrete is poured. After the piles have hardened, you can begin to form the foundation strip. In order to obtain a stronger structure, it is necessary to fill it at a time so that there are no seams between the layers that reduce strength. It is not recommended to weld parts of the reinforcement, as corrosion will form at the seams. Before continuing work, after pouring the base on fine sand, it should be left for 6 months.
Construction of a slab foundation
A monolithic slab foundation is strong and reliable, but by no means a cheap option.
The cost of its arrangement can reach up to a third of the total cost of the building under construction. In order to save some money at this stage of construction, many decide to equip the foundation slab for a house or cottage on their own. This is not easy to do, but it is possible. The main thing is to work strictly according to the project and fulfill all technological requirements for preparing the pit and pouring the slab. Before starting work, you need to prepare the site and make foundation calculations. Preparation includes clearing the work site of old buildings, unnecessary trees and debris. If the area has an overly complex terrain, it should be covered and leveled in advance.
It is best to entrust foundation calculations to specialists. After all, due to a minor mistake, the slab may turn out to be too weak, and the building built on it will not last long. As a last resort, if you are planning to build a small object (garage, bathhouse, shed), you can use approximate calculations or ready-made solutions from the network.
Construction of a pile foundation
A pile foundation on sand can be built if the soil is fine-grained. The structure is durable, and the supports are located below the freezing level. Piles can be:
- printed;
- screw;
- bored.
Once the wells are ready, pipes can be made from roofing felt. The upper part of the pipes is made of several layers, and then the material is pulled together with soft steel wire, which will become part of the formwork. After installing the pipe in the well, it is important to make sure that the hole is not filled with water to more than a quarter of its volume.
When pouring concrete, roofing felt is necessary so that the cement laitance does not go into the soil, and the frost heaving forces will affect the rough wall of the piles, and not the smooth one obtained thanks to the roofing felt. For a well with roofing felt, a reinforcement cage should be made. For this, 6 mm rods are used. They are fastened together by crossbars.
Summary
As you can see, each type of soil requires a special approach when constructing a foundation for a house or other structure. The similarity of the foundation design does not eliminate the presence of certain nuances that completely depend on specific conditions. Without the necessary experience, it is better not to start building a foundation yourself when it comes to complex types of soil. In most cases, when constructing a foundation in difficult conditions, it is impossible to do without the use of special equipment. This nuance must be taken into account when drawing up estimates and allocating a budget for construction. You should not skimp on building materials, as this could result in a disaster in the future. It is worth understanding that the total cost of the foundation can be a third of the total budget
Recommended Posts
Bituminous mastic for waterproofing the foundation.
What kind of foundation is needed for a house made of aerated concrete?
How to choose roofing felt for foundation waterproofing
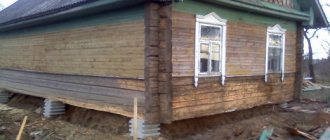
Screw foundation
Pile foundation with grillage
Shallow foundations
Pile-screw foundation
The screw pile is screwed into the soil by the efforts of several people. One of them constantly monitors the level of the support, while the others try to screw it in to the desired level. After the product is below the freezing level of the soil, it is cut to one level and filled with concrete. The cement solution must get inside the pile pipe, as this will strengthen the support and save the metal from corrosion.
After the concrete has hardened, a metal cap is welded to the screw piles. In order to ensure a uniform load from the weight of the building, it is necessary to tie the piles. For additional strength when constructing heavy houses, the strapping is made of channel bars.
The upper part of the foundation is a grillage. It will distribute the load of the load-bearing elements. On an uneven area, the supports will have different lengths, but their upper part should be at the same level. It will take approximately 45 minutes to install one pile.
Pros and cons of slab foundations
A slab foundation has many advantages, including:
- The foundation has little pressure on the ground. This is achieved thanks to spatial reinforcement, as well as its large area, which makes it quite easy to tolerate soil movements in different seasons of the year, while the base evenly rises and falls along with the structure. This makes it possible to prevent the formation of cracks and gaps in the walls.
- The foundation can be easily erected independently, without the use of special equipment and qualified workers, but the entire process of pouring concrete must be strictly followed.
- Due to its large area, the foundation slab can withstand heavy loads from the house, especially if it is located on stable, non-heaving soil.
- The slab seems to “float” on the soil during seasonal heaving, and rises evenly over its entire area along with the structure.
- The slab base can be used as a subfloor, which makes it possible to reduce the cost of installing joists, but the slab floor must be insulated and protected from groundwater.
- A slab foundation is an ideal option if you need to build a house on soils where groundwater is located very close to the surface, on mixed and highly frozen soils.
- The foundation has great strength and seismic resistance, which allows it to be used in seismically active zones.
Among the disadvantages of the foundation, one can note the high cost of funds for its construction, and in some cases the use of special equipment. Also, when using it, you cannot build a building with a basement.
Hydro- and thermal insulation of the base on sandy soil
Thermal and waterproofing helps protect the foundation from destruction by frost heaving and moisture. To create a waterproofing layer, you can use water-based mastic or bitumen. In this case, you should avoid mastics based on organic solvents, since their components can react to the insulation and destroy it.
For thermal insulation of the base, extruded polystyrene foam, also called penoplex, would be an excellent material. Its slabs are conveniently connected to each other and fixed to the foundation using special glue.
Step-by-step algorithm for determining soil type
Before planning the foundation, it is imperative to carry out an engineering-geological analysis of the soil, because certain types of foundation are suitable for each type of soil. You can determine what type of soil is on your summer cottage by examining the percentage of clay, sand and silt, also through the tactile-visual method. You can conduct such a study yourself or with the involvement of specialists. During geological surveys, it is necessary to drill several wells at great depths, up to 15 meters, and extract soil samples from there, as well as groundwater for further laboratory analysis.
Research by surveyors makes it possible to avoid serious mistakes in which the cost of correction may exceed the entire cost of building the foundation (and this is the most expensive part of construction). In order to determine which type of base is preferable, specialist advice is required.
Properties and features of sandy soil:
Bearing capacity is one of the main qualities of sandy soil. It will characterize the possible load that the soil can withstand without negative consequences. The high characteristics of the load-bearing type of earth do not allow subsidence of the base, and the earth will remain intact and prevent displacement of layers. So, the first indicator is the compaction of the layers. Logically, the greatest pressure is to withstand soils with high density. The second is moisture. Soils with low water content are less susceptible to displacement and changes.- Soil compressibility is a characteristic that shows how much the earth can compress under load pressure. The depth of the foundation will directly affect the resistance to compression, and greater depth can even lead to a greater degree of resistance. Due to this, the degree of subsidence of the house is reduced. Earth with a predominance of sandy fractions has a low degree of compressibility, which means that subsidence will not last long.
- The degree of frost heaving - this parameter directly depends on the degree of soil moisture. Under the influence of the low temperature of the earth, which is surrounded by water, it expands and pushes soil particles to the surface. Depending on how saturated the soil is with water, heaving can be very strong (provided that there is a lot of moisture in the soil) and weak (if there is almost no water). To reduce frost heaving and prevent it from negatively affecting the foundation, it is recommended to use non-heaving soil. On moist soil, it is better to build the foundation lower than the freezing line. The heaving index for sandy soil is much lower than for other varieties. The water level in the soil can also affect the heaving index. If they are close together, the degree of frost heaving will increase, and the level of soil water can change at different times of the year, eroding the soil and containing aggressive additives - destroying the foundation. The rise in groundwater levels in sandy soil can reach up to 5 meters.
Sandy soil is a loose rock that contains loam and sand in a ratio of 1 to 3. Sand is a fairly loose material, consisting of grains of sand, the size of which ranges from a couple of mm to the smallest particles, more like dust. It is best to build the foundation on coarse sand.
Additional recommendations for foundation insulation
Before you begin work on thermal insulation of the base, you should carry out coating waterproofing. For this, polymer mastic is usually used. To glue the boards, you should prepare glue, applied to the sheets pointwise or over the entire surface.
After the glue has set, you can begin attaching the next plate, aligning the mounting grooves. To improve the quality of thermal insulation, it is permissible to install a second layer, the elements of which will be arranged in a checkerboard pattern.
Sand cushion device
A sand cushion is placed during excavation work when digging a pit or is placed on top of continental soil if a non-buried slab is provided. In any case, before adding sand, it is necessary to level the bottom of the foundation by making an additional deepening below the design mark.
To differentiate between the soil and the sand layer, it is useful to line the bottom of the pit with insulating fabric (geotextile is excellent).
To install a sand cushion under the slab, you need to use only coarse sand; it is better to immediately discard fine sand.
The minimum thickness of the sand layer should be from 25-30 cm. The material is carefully leveled, making sure that the surface remains perfectly flat.
Compacting a sand cushion
When constructing a cushion, it is very important to ensure the same thickness and uniform density over the entire area of the sand bedding layer, for which compaction of the sand layer is used.
The best result is achieved when using a vibrating plate; manual tampers are not able to provide high quality, it is better to abandon them immediately. To increase the density of the sand layer, it is necessary to regularly moisten the material with water.
When compacting sand, it is important to achieve maximum density; this can be checked in a simple way - you need to walk on the surface. If no shoe marks remain, sufficient density has been achieved.
The sand cushion can be used in the construction of buildings up to 1 floor high.
How to calculate the need for sand for installing a cushion under a monolithic slab
The issue of purchasing the required amount of sand is easily resolved, you just need to carry out simple calculations. To do this, multiply three indicators: the length and width of the sand cushion by the height of the sand layer (up to 30 cm). The result obtained is exactly the volume of sand required. Considering that sand becomes compacted when compacted, it is best to purchase it with a reserve.