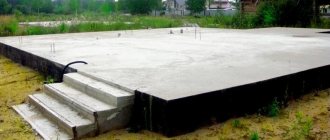
As you understand, this is a simple design that you can save money on. Only its use is limited for light buildings. When you need to make a foundation for a house, this option will not work. How can you make such a foundation if you want to build a gazebo or utility block?
Preparing the site for construction
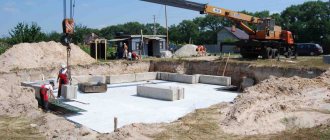
If you are familiar with the construction of strip foundations, then the work will seem easy to you. First you need to remove the top fertile layer of soil. This can be done either manually or using special equipment.
Next, level the area, making sure everything is level. At this point, you should already have a plan for the future structure, where all the data is indicated: depth, width, shape. According to the plan, you must complete the markings. As usual, the work will require rope and stakes. These can be reinforcing bars or wooden boards. The markings should follow the shape of the foundation.
As for the trench, it can be dug manually or with specialized equipment. But since the building will probably not be too large, the amount of work will be small. To save money, you can do everything yourself. By the way, if you work manually, you can achieve better geometric accuracy. And we really need it for a foundation without formwork.
It was previously said that to maintain the required shape, the base needs a sand cushion. It needs to be poured into the bottom of the trench, moistened with water and compacted. It performs very important functions:
- removes water from the concrete base;
- increases the damping properties of the foundation tape.
promotes the best uniform distribution of the load from the building;
When the sand cushion is ready, you need to make sure that the liquid from the concrete mixture does not disappear or go into the ground before it reacts. To do this, you will need to waterproof the foundation trench. A waterproof film is laid on the walls and bottom. It is important to overlap and connect the seams with double-sided tape.
General requirements
The main requirements for direct-on-ground pouring technology are as follows:
- the room must be constantly heated, since the base cannot be used at sub-zero temperatures;
- soil water should not lie higher than 4 m from the surface of the earth, otherwise a sand-crushed stone cushion will have to be made;
- It is forbidden to pour a concrete floor on the ground if it is not properly compacted;
- the bedding layer must be compacted thoroughly;
- when the base is located in the area of capillary water seepage, waterproofing is absolutely required;
- when installing a warm base, you need to know how to pour the mixture in a private house with your own hands (there must be a gap of 15 mm near the walls);
- the floor is poured when the walls are erected and the roofing work is completed.
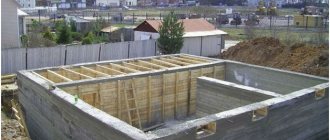
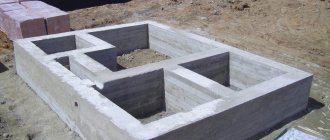
We reinforce the trench
The penultimate step that you need to take before finally pouring a strip foundation without formwork is reinforcement with reinforcement. And here is the main feature of the entire structure of a strip foundation without formwork: reinforcement is done not only horizontally, but also vertically.
Reinforcement with a cross-section of 10 mm is suitable as a frame.
Pouring the foundation
It's time for the finishing stage. You will need a lot of concrete for this job. There is an important point that determines the reliability of the future foundation. The whole point is that the filling must be done at one time, evenly. For example, you finished knitting the reinforcement and installed it late in the evening. This means you shouldn’t bother with pouring, as you may not be able to finish it before the start of the night. You will have to do one part today and the other tomorrow. This way a seam is formed and the tape will not be so monolithic.
That's why you need to wait until morning and pour everything at once so that the concrete doesn't have time to dry out. It is mandatory to compact the concrete. Filling is carried out to the desired level. After which the surface is leveled. Finally, cover the foundation to protect it from rain.
Pouring the foundation into the ground without formwork
Any construction, from a barn to a mansion, has one thing in common - there is always not enough money for the planned volume of construction work, and you have to save. If everything goes well, you can save an extra ten to twenty thousand rubles, but is it possible to fill the foundation without formwork? Refusing to arrange formwork for pouring a foundation into the ground is the same as trying to paint an unprimed wall surface; on the one hand, there is savings, on the other hand, there is a risk of getting a bunch of problems instead of the expected result. What is the right thing to do?
Preliminary activities
Pouring the foundation into the soil requires special preparation. If you decide to make a foundation in the ground without formwork, do not forget to initially determine the type of soil. On sandy soils it is difficult to do without formwork, although with certain skills it is possible. Loams and clay soils are more favorable for the construction of a formless foundation.
It is also necessary to conduct research on the height of groundwater, which affects the method of constructing the foundation.
Refuse the visual determination, it is better to drill a hole to avoid unforeseen consequences. The fertile layer should also be completely removed - it is completely unsuitable for such construction.
The next step is to mark the perimeter of the trench using rope and pegs. Use construction tools and devices to maintain correct geometric proportions and prevent vertical deviations.
Upon completion of the preparatory work, proceed directly to the construction of the foundation.
Pouring the foundation without formwork allows you to reduce the cost of work and facilitate construction
Do you need formwork for the foundation?
Experience and common sense suggest that if formwork is widely used in construction and a lot of money is spent on its manufacture and installation, then the presence of a formwork frame in the ground is necessary and important for obtaining the design characteristics of the foundation strip.
Formwork is necessary for pouring the foundation into the ground, not because of the whim of the architect or the developers of SNiPs; the wooden frame of the formwork in the ground allows you to achieve additional advantages:
- Form a correct and geometrically accurate foundation body of the calculated thickness and width, this will ensure uniform distribution of the load on the foundation strip, without the formation of “weak” sections of the structure;
- The formwork box allows you to fix and ensure the correct location of the reinforcement inside the concrete body of the foundation;
- Formwork allows you to ensure high quality and accuracy of laying the waterproofing layer and thermal insulation.
If you manage to fulfill all of the above requirements, then you can cast the foundation into the ground without formwork. In practice, in many cases, small and light buildings can be installed with your own hands on a foundation strip poured into the ground or into a trench without the use of formwork. Only a specialized specialist involved in the construction of foundations can say how justified such a decision will be for heavy brick buildings.
Concrete hardening time
The hardening period of concrete is quite long.
In practice, exposure is carried out in stages:
- The first three days are watered 6 times a day (every 4 hours).
- Then water for 7 days three times a day.
- After 10 days of exposure, the formwork is dismantled.
- After 28 days, the tape is ready for further work.
Watering allows you to balance the loads that arise due to the difference in humidity inside the tape array and outside.
NOTE!
A 28-day curing period does not mean that the concrete hardening process is complete. The material has only gained sufficient strength to continue construction, but the hardening of concrete continues for a long time.
How to pour a foundation without formwork in practice
Making a foundation by direct casting into the ground may seem simpler and cheaper than when you have to build a wooden formwork frame, knock down dozens of boards into panels, level and drive dozens of posts and spacers. In the absence of formwork, the role of the form that ensures that the concrete mass is given the required profile is played by the walls of the trench, well or pit.
Sequence of operations for pouring a foundation without formwork
The most difficult and time-consuming will be to build a strip foundation without formwork in conditions of weak and moving soils. Even in the absence of groundwater, the huge mass of uncured foundation concrete without formwork can cause settlement and distortion of the tape profile in the trench.
Thus, the strength of a foundation in the ground without formwork depends 90% on the quality of preparation of the trench or pit for pouring concrete. You will need to perform the following operations:
- Study the nature of the soil as accurately and in detail as possible, determine the groundwater level and the presence of springs, springs and other sources. If it is determined that there is a high water level, wet sand, or oily clay, then in parallel with the planning and digging of a trench for the foundation, it is necessary to drain the area;
- The width of the foundation strip, cast into the ground without formwork, is increased by 20-30% of the calculated value, thus, increasing the trench compensates for the deterioration in the load-bearing properties of the strip due to a possible violation of the geometry;
- If possible, the main part of the earth is removed from the trench with an excavator, the last 30-40 cm is torn off manually with an entrenching tool. This is the most difficult and time-consuming stage of work, since it is necessary to level the walls of the trench and trim the bottom horizontally using a building level and a hydraulic level gauge;
- After finishing and compacting the cushion, the walls of the trench are lined with plastic film, the bottom is lined with isospan or glass roofing material;
- At the final stage, the trench is filled with ready-mixed concrete to give the upper part of the foundation the shaped appearance of a strip; the edges of the trench are laid out with a decking board and a row of bricks. After the concrete has set, the bricks and boards are removed. A protruding part of the foundation 5-7 cm high is formed above the ground surface.
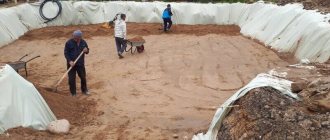
Preparing the soil and trench
Before starting work, experts recommend trimming the soil and fertile layer of soil along the edges of the future foundation. Any available material can be laid on the layer of earth freed from turf: pieces of plywood, boards, planks - anything that will help protect the edges of the trench from shedding of earth and collapse. Before you start backfilling the cushion, you need to carefully trim the walls of the trench, remove traces of the excavator bucket, protrusions, irregularities, stones, tree roots, and clean the trench as much as possible from crumbled earth.
The soil at the bottom of the trench is subject to maximum leveling and compaction. To do this, the surface is covered with a thin layer of crushed stone and wet sand and driven into the base of the foundation in four or five passes with maximum force. The last layer is filled with clean sand or screenings and is also compacted in several passes.
The most suitable tool for packing crushed stone into the ground of a trench would be an industrial motor vibrator, but often the limited construction budget does not allow the use of such equipment. In this case, the preparation of the pillow is carried out in two stages. First, large crushed stone is driven into the ground with a three-kilogram hand hammer, then the mixture of screenings and sand is compacted with a two-handed thirty-kilogram tamper.
Next, you need to waterproof the base and walls of the trench. Most often, the pillow and walls are laid out with thick plastic film, the edges of which are glued together at the joints with construction tape. Waterproofing can be laid on the bottom of the trench in one solid sheet and simply fold the edges 15-20 cm onto the walls, if the geometry of the trench allows. Otherwise, the canvas has to be cut into several parts and laid out on a pillow, folding the edges onto the walls. The joints between pieces of roofing felt must be glued with mastic or a mixture of resin and bitumen.
Pouring concrete
After completion of the preparatory work, reinforcement is carried out, laying reinforcement cages, pre-connected on the surface of the earth. Most often, the frame is made of three layers of reinforcing rod tied with soft wire. Since the most loaded part of the foundation is the bottom and surface part of the concrete casting, one layer of reinforcement is laid on brackets at a distance of 4 cm from the bottom waterproofing. The second and third rows are installed on top of the first on the same supports. The distance from the walls to the reinforcement should be no more than 4-5 cm.
Concreting a foundation without formwork can be done in two ways. The simplest option would be to purchase the required volume of concrete solution and carefully pour it into the trench, evenly dispersing it along the contour of the foundation with shovels. If the concrete is prepared using a homemade method at home, then you can pour the reinforced volume of the tape with your own hands in several layers, and the thickness of each layer should be at least 25 cm. After pouring, the surface of the concrete foundation tape is covered with film for at least 20 days. After the concrete has hardened, the turned-up edges of the waterproofing are wrapped and fused onto the foundation strip.
The role of formwork in the foundation
In our case, what role does formwork play? Naturally, you need to spend a lot of money, effort and time on it, so it is integral to the design, and one cannot but agree with this. It makes it possible to obtain calculation characteristics for the base tape. Formwork is the above-ground part of the structure, which is made of panels, boards, sheets of metal and other materials. It also forms the base of the building.
There are some undeniable advantages of formwork:
- When using it, you can form a correct and perfectly even geometric body of any size. Thanks to this, the entire load of the building will be distributed evenly over the foundation, and there will be no weak areas.
- Thanks to the presence of the formwork box, you can easily position and fix the reinforcement bars correctly.
- With formwork, you will ensure that your foundation is accurately laid with a waterproofing and thermal insulation layer, as well as their high quality.
Please note that the main purpose of the formwork is to support the concrete mortar and the ground portion so that the foundation strip is not altered until it is completely hardened and sound. Also, a ribbon of ideal configuration is formed above ground level.
But is it really impossible to do without formwork ? Not really. If you can fulfill all the requirements (proper laying of reinforcement, creating a level trench and laying a layer of waterproofing), then you do not need this. But in this case there will be no base, but for small and light-weight buildings, pouring the foundation into the ground without formwork will be a good solution for saving money. In this case, formwork is not needed, you just need to dig a trench and pour concrete into the ground, and the walls of the pit will be used as formwork.
Video description
To see all the work involved in preparing the site and pouring the foundation, watch the video:
Formwork
Before pouring the foundation for the house, it is necessary to form a strong, reliable formwork. To form removable formwork you can use:
- wood;
- metal;
- plywood;
- plastic.
Permanent formwork becomes part of the structure and avoids the dismantling stage. To form it use:
- expanded polystyrene;
- wood boards;
- fiberboard
Permanent formwork block for strip foundationSource ofacade.ru
Reinforcement
To form a reinforcing frame, reinforcing rods are installed in the corners. Longitudinal reinforcement is laid at the bottom of the trench and vertical rods are installed every 30 cm, the height of which exceeds the depth of the trench by the height of the foundation above ground level. This distance should be at least 25 cm.
Horizontal reinforcing rods are attached at equal distances from each other in several levels to the very top of the formwork. The frame fragments can be tied together using soft wire.
Drainage
A necessary stage of work when building a house is drainage. It allows you to remove excess moisture from the building during the rainy season or spring snow melting.
Corrugated pipes are used to form a drainage system. They are laid to a depth of up to 50 cm in pre-equipped trenches along the entire perimeter of the house at a distance of no more than one meter from its walls.
So that water and moisture can move by gravity through the pipes, they are laid with a slight slope and a geotextile winding is made.
Advantages of a foundation without formwork
Even though there are many risk factors, if you do it right, it will be profitable and rewarding. Let us immediately note that such a foundation should not be considered for creating a ground part, which is also called a plinth. Sometimes it is even irrational if construction is carried out in a region with severe winters.
But there are also some advantages:
- The price for arranging the foundation will be significantly lower.
- Less labor costs.
- Construction time has been reduced.
- You can dismantle the structure without it affecting the base. You can use the foundation for other purposes. This is a good solution if the design is used for a while.
It is possible and even necessary to abandon formwork if the construction is carried out on loamy soil. In order to eliminate negative phenomena and cold pushing, partial or complete freezing of the soil will help you.
On the territory of Russia, you can make a foundation in the ground without formwork with your own hands like this:
- Dig a foundation trench according to the planned size of the building.
- Cover the outside sides with film.
- Make a sand cushion at the bottom of the trench; its layer should be from 50 to 100 mm.
- The structure needs to be strengthened when using reinforcement in two layers (top and bottom). This is called reinforcement.
- All that remains is to pour the concrete solution into the finished trench.
But keep in mind that there is one caveat: to fill the foundation with or without formwork, you must choose the right brand of cement. For such work it should be at least M300, but the best option would be M400. This is exactly what experienced professionals do to ensure that the foundation does not collapse and lasts for many years.
Pouring the foundation
Recommendations for pouring the foundation
If in your region the soil is considered mobile and weak, then creating a strip base will be difficult and time-consuming. Needless to say, if in places without groundwater, a finished foundation can cause a distortion of the profile in the trench when there is no formwork.
So, it turns out that 90% of the foundation poured into the ground in terms of strength depends on preparatory work, which includes making a trench, reinforcement and carrying out waterproofing work.
It all looks like this:
- First you need to study the characteristics of the land in the region, and also find out what the freezing point of the soil and the occurrence of groundwater are. If springs, wet sand, underwater water and clay are found near the surface, you should create a drainage system throughout the construction area, otherwise the water will simply destroy the foundation.
- The width of the foundation base should be increased by 20-25% of the selected area. By enlarging the trench, it will be possible to compensate for the deterioration in the load-bearing properties of the tape. They will become worse due to a possible violation of the geometry of the shape.
- The best option would be to dig out most of the soil with an excavator and the remaining 40 cm by hand. This is justified by the fact that this way you will not spend a lot of effort and reduce wasted time, and the pit will also be better in shape. The main task is to make a perfectly level trench, as well as to use a plumb line and level.
- If you decide to pour the foundation into the ground without formwork, then creating a sand cushion is simply necessary. This will prevent heaving of the soil, and in addition, moisture will not be retained in the sand. The sandy base will equalize the stress at the contact of the soil with the foundation. The layer should be thoroughly compacted, and the walls should be covered with polyethylene film. Cover the bottom with Izospan material.
As you can see, the preparation is not that difficult. But it is by following all these rules that you will end up with an ideal base in all respects for pouring the foundation without the use of formwork. But there are still some subtleties that should be considered before starting work.
Making a trench
Work with the ground is considered labor-intensive, and for this reason you are advised to carry it out with assistants, or use the services of an excavator.
The sequence for digging a trench is as follows:
- Select the desired area, clear it of debris and anything else that might get in the way. It is better to remove fertile soil, which has a small layer on top, along the entire perimeter, and not selectively.
- Plywood, boards and boards should be laid on top of the layer of earth - any suitable material that can protect the edge of the trench from collapse and shedding of earth.
- After this, mark the strip foundation. Pegs and rope are useful for this. In the photo you can see the detailed implementation plan.
- When everything is ready, you can begin to dig a trench to the required depth. If you work manually, we advise you to immediately check the surface and its evenness using a plumb line and level, and then your trench will be level.
- If an excavator will dig a trench for the foundation, you should carefully check the evenness of the walls, and if there are any discrepancies, they should be trimmed and the marks from the bucket should be removed. In this case, we are talking about uneven surfaces, ledges, tree roots and stones. The trench should be cleared of soil and anything else that will get in the way.
- The bottom and walls must be smooth and compacted to the maximum, and only after this can the formation of a sand cushion begin.
- Pour sand onto the bottom, water it a little with the reins and tamp it down. Depending on the depth, the layer can be from 50 to 150 mm.
- You need to pour a similar thickness of crushed stone on top and compact it well. Although the best option would be tamping using a motor vibrator, if it is not available, the process can be done with your own hands.
- And the last thing is waterproofing the walls of the foundation and foundations. To do this, take plastic film and tape it at the joint with construction tape.
When everything is prepared and awaiting the next stage, another question arises - how to properly reinforce a foundation in the ground without formwork?
Reinforcement and filling
Before you start reinforcing, you will need to buy reinforcement rods and the wire with which you will tie the rods. The task is as follows - you need to form a reinforced frame on the surface of the earth, and it must consist of 3 layers of rods, which are tied together with wire. The greatest load on the foundation will be on the bottom and surface of the foundation strip.
It is in such parts that the reinforcement frame will be placed. At the same time, do not forget that under no circumstances should you lay it on the ground. It must be at a distance of 50 mm from the walls and bottom of the trench. This will allow the concrete solution to completely absorb the frame. As a result, you will receive a foundation for the foundation.
And the last stage - all that remains is to pour the foundation without formwork, and you have 2 options for events:
- Make your own concrete.
- Order a ready-made solution from a construction company.
Everyone will decide for themselves what is best and more profitable for them, but it is recommended to order the mixture from trusted companies, and although you will spend more money, you will have more effort and time.
Helpful advice! In order to calculate the required volume of concrete, you should calculate the entire length of the foundation strip, height and width, and then multiply these indicators by each other.
For example, if the length is 35 m, the width is 0.5 meters, and the height is 1 meter, then the volume of the tape will be 17.5 m 3. If you are all for saving, then doing everything yourself is more profitable. It will be rational to do the preparation if you use a concrete mixer.
Preparation of the solution
For the concrete solution you will need:
As for the proportions, the following is true: for 10 kg of cement you need 30 kg of sand and 45 kg of gravel/crushed stone. To get a mixture of M400 brand, use exactly half as much water as dry ingredients. For example, 10 kg of cement, 30 kg of sand and 45 kg of gravel = 85 kg, and then it turns out that the required amount of water is 42.5 liters.
When the solution is ready, it can be poured into the finished trench. The mixture should be distributed evenly; to do this, use a shovel and compact everything well. It is also important to expel air bubbles and make the concrete as dense as possible. The work is carried out in several layers, with a thickness of 26 cm. When the tape is completely filled, the surface should be smoothed and leveled. To prevent debris from getting inside, cover everything with plastic wrap.
Hurray, the foundation is ready! Now we just have to wait about a week for it to harden. Final drying and strength will occur only after 31 days. If such work was carried out in the summer, the concrete will need to be moistened from time to time so that it does not crack. Before starting construction on a finished foundation in the ground without formwork, it should be covered with waterproofing material, and the simplest one can be called roofing felt.
Grasping
The period lasts several hours after preparing the solution. At this stage, you need to have time to complete the following processes:
- Transportation of the solution to the work site. This is especially true when ordering pre-fabricated concrete, since the production site may be located at a sufficient distance from the area where the foundation needs to be poured. The issue is solved by using special equipment - concrete mixers. Constant stirring increases the life of the solution.
- Laying the concrete mixture into the mold.
- Compaction (vibrating or pinning) and leveling.
The setting time depends on the ambient temperature, which is why it is so important to decide when it is best to pour the foundation for a house. To choose the right time, it is recommended to familiarize yourself with the following table
| Ambient air temperature (average daily value indicated), ᵒС | The period during which setting occurs (on average), the beginning and end of the process are indicated in hours |
| 30 | 1-2 |
| 20 | 2-3 |
| 6-20 |
Hardening
Immediately after setting is completed, hardening begins. This is the name given to the process of crystallization of concrete mortar and its transformation into artificial stone. Knowing the hardening time is necessary in order to understand when it is better to start removing the formwork from the foundation of the house and engage in further construction processes. An important task for builders is to reduce the duration of work without compromising quality. This can only be done by studying the regulatory documentation.
The most important characteristic of a concrete mixture is its grade strength. Due to the introduction of a new designation for this value, confusion in the labeling is possible. It all depends on what GOST the plant operates on. If the marking is carried out in accordance with GOST 26633-2012, then we are talking about concrete strength classes, which are designated by the letter B, for example B20. The number is the grade strength in MPa. When using markings in accordance with GOST 26633-91 * (an outdated document that is still used by some specialists), strength is indicated by a brand, for example M300, where 300 is the value in kgf/m².
You can remove the formwork from the foundation of the house and start building walls only when the concrete has gained strength of at least 70% of the original grade. This requirement is given in the joint venture “Load-bearing and enclosing structures”. It is better to comply with these conditions, but if there are justifications, you can remove the formwork when the strength gain is more than 50%.
Most often, when it is necessary to pour a foundation for a private house, concrete of classes B15-B22.5 is used (which corresponds to grades M200-M300) mixed with normally hardening Portland cement grades TsEM32.5 or TsEM 42.5 (according to the old markings PTs400 or PTs500). It is for such a solution that the table below is given, which shows the dependence of the speed of hardening on ambient temperature conditions.
| Time interval from the beginning of hardening, days. | Percentage of brand strength at average daily air temperature | ||
| 5ᵒС | 10ᵒС | 20ᵒС | |
| 1 | 12% | 21% | 34% |
| 3 | 23% | 38% | 60% |
| 7 | 31% | 51% | 78% |
| 14 | 37% | 60% | 90% |
| 28 | 43% | 70% | 100% |
For a fast-hardening and slow-hardening mixture, the values will differ greatly during the first week, and after that they will become approximately equal to the percentage for a normally hardening binder.
Foundation without formwork - DIY construction
There are two options for pouring the foundation with concrete mortar - with and without formwork. In the second case, resource savings are achieved. If the quality of work remains at the required level, this method is quite acceptable. To choose it, you must take into account that a foundation without formwork requires a carefully prepared trench. Its further integrity will depend on this. This means the stability of the entire structure or house. In addition, it is necessary to take into account the specifics of preparing the concrete mixture, installing reinforcement and many other nuances. Let's look at this in more detail.
Concrete mortar - details of preparation
Considering the fact that the foundation (it is poured with or without formwork) bears the main part of the loads, cement M300 and higher should be used for its manufacture.
If you want to achieve maximum strength of the base, adhere to exact proportions when preparing the mixture. The optimal ratio when using sand, cement and gravel is 3:1:5. After mixing the dry ingredients, gradually add water until a thick, homogeneous mixture is formed.
To obtain a high-quality mass, we recommend using construction mixers or small concrete mixers. They will help you mix the required amount of solution more efficiently and quickly. By observing the technological requirements for preparing concrete mortar, it is easy to achieve high levels of water resistance and frost resistance of hardened concrete.
When is a foundation allowed without the use of traditional formwork?
In order for the formation of a concrete foundation strip to occur as efficiently as possible, the walls and bottom of the trench must meet several requirements:
- the walls must be smooth, strong, strictly vertical;
- the bottom must be level and have no differences in height; it must be compacted;
- the soil should have a wet, but not too wet, consistency; it should not crumble or erode.
The same criteria apply to a foundation pit without formwork in the ground. It will not be possible to dig a trench or pit if the soil is not suitable for it. Sandy soil is prone to crumbling; clay, especially oily clay, is washed away too much. If the soil on the site is predominantly loamy, this option is best suited.
Refusal of formwork is undesirable if there are underground springs or proximity to groundwater on the site. The characteristics of the soil are determined through drilling a pit or a well. If groundwater is close to the surface, you will need to pour the foundation deeper into the ground without formwork. In this case, the trench will need to be made from 1.2 to 1.5 meters deep. This option is called a deep foundation.
A foundation with a depth of 50 to 120 cm is considered to be shallowly buried. Its use is permissible only on soils that are easy to compact, not friable or mobile, and without nearby groundwater.
The width of the trench is calculated based on the width of the walls of the structure or building under which this foundation is laid. The tape is made about 30 cm wider than the wall.
What should be the width
Tape width
It depends on several factors:
- Thickness and height of load-bearing walls.
- Weight of the building.
- Bearing capacity of the soil.
The width of the tape must be at least 100 mm greater than the thickness of the walls. Calculating the weight of a house is a rather complex task, requiring the use of a lot of tabular data and SNiP standards. In addition, it is possible to understand the bearing capacity of the soil in a given area with sufficient accuracy only with the involvement of specialist geologists.
Therefore, calculations should be entrusted to professionals. The question is complex and has no solution for an unprepared person. You can do it simpler - take a deliberately increased thickness of the tape in order to guarantee the load-bearing capacity of the base.
But this option means excessive consumption of materials and labor, which is irrational.
Alternatively, you can use an online calculator, which will provide the required data and values. You should use several resources to get the most accurate readings.
Advantages and disadvantages
Due to the absence of formwork, the described type of foundation has both advantages and disadvantages. The first include:
- saving time on constructing formwork from boards (no need to knock them into panels and install them in a trench);
- saving money (no costs for boards);
- reducing costs by not hiring assistants;
- ease of dismantling of a built-on building or structure.
- the likelihood of changes in the geometry of the foundation due to the compliance of the walls and bottom of the trench;
- decreased accuracy of reinforcement placement when pouring concrete;
- the danger of plant roots and stones getting in, their shedding and damage to the shape and integrity of the foundation;
- the likelihood of the foundation being pushed out by frozen soil.
This means that if thickening or narrowing occurs in the foundation, its strength will be reduced and cracks will subsequently appear in it. They will pose a threat to the integrity of the building. The presence of roots and stones leads to the formation of cavities and voids in the foundation body. Moisture and soil will get into them. When exposed to negative temperatures, concrete will deteriorate and its load-bearing capacity will decrease. The insufficient smoothness of the trench walls, their crumbling and violation of the ideal shape allow the heaving-prone soil to push the foundation out of the ground in winter, sometimes along with the building.
If the soils are subject to heaving, groundwater is high, winters are harsh with low temperatures, and the building has more than one floor, it is not recommended to build a strip foundation without formwork.
Drainage ditches allow groundwater to be drained from the site.
Casting concrete into a trench or foundation pit without formwork is widely used. To take advantage of the advantages of the method and circumvent its disadvantages, a number of solutions are proposed. Such filling, subject to technology, can still ensure the reliability and durability of the foundation. The main thing is to accurately fulfill the requirements of the technological process.
Site preparation
The main indicator of preparatory ethane is a correct assessment of the condition of the soil base. If you ignore soil testing, you can build an unreliable foundation structure. Sometimes it is not possible to professionally determine the category of soil and do a soil analysis; in this case, it is recommended to independently conduct geological surveys on the site. To do this, it is enough to dig a small pit or using improvised means, drill a test well and make a conclusion about the presence of groundwater, the thickness of fertile soil, and the density of the soil.
After determining the type of soil and checking the condition of the load-bearing soils, you can begin clearing the site and vertically leveling the area. The final stage of the preparatory work will be marking the linear dimensions of the planned strip foundation.
Construction stages
Let's consider the construction stages that must be carried out when building a foundation without formwork.
Preparing and digging a trench
You should start digging a foundation trench only after clearing the area of:
- green spaces and their roots;
- fertile soil layer.
The area freed from the top layer of soil is marked and trenches are dug. At the initial stage, it is advisable to use an excavator to perform the labor-intensive work of removing the bulk of the soil from the pit. The final depth, walls and bottom of the trench are adjusted to the required parameters manually using a shovel. All surfaces should be as smooth as possible.
The verticality of the walls and the absence of a slope at the bottom are checked with plumb lines and building levels. The horizontal is determined by the stretched ropes. The first peg is driven into the ground at the lowest point of the entire foundation pit. Next, the entire bottom of the foundation strip is brought to it, removing excess layers of soil.
The edges of the prepared trench need to be strengthened. They are covered with shields, boards, wooden panels and other available materials. The bottom also requires special preparation. It is covered with wet sand and compacted, creating a sand cushion.
Why is a sand cushion a necessary element of a foundation trench? The answer is simple - it performs important functions that ensure the reliability of the structure. The quality of the foundation and the integrity of the building depend on it.
Sand cushion functions:
- evenly distribute the load from the concrete mass;
- smooth out the uneven surface of the bottom of the pit, make it even;
- allow groundwater to seep through the ground and thus be drained away;
- absorb soil vibrations and other vibrations.
The wet sand at the bottom of the prepared pit must be compacted so that no trace of a shoe or a person standing on it remains. Additionally, crushed stone can be poured on top of the sand, which is also carefully distributed, compacted, and leveled. The crushed stone is covered with wet sand on top and the final state is given to a perfectly smooth and hard form for pouring concrete. The height of the sand layer that will lie under the foundation reaches 30 cm. This value must be taken into account when digging a trench. In some situations, the height of the pillow can be increased to 50-100 mm.
When construction is carried out on sandy or flooded soils, a sand cushion is not used for the foundation, since there is no need for it.
Strengthening and protecting the surface of walls and bottom
Not only the bottom bears the weight of the concrete mass. The surface of the walls also needs additional protection. Therefore, the trench, including the walls, is lined with plastic film, which does not allow moisture to evaporate from the soil. As a result, the walls are less susceptible to crumbling. After pouring concrete into the ground without formwork, a film laid in the trench and protecting it prevents the liquid from being absorbed into the soil and disrupting the setting conditions of the concrete mass. Film protection helps make foundation walls without formwork with your own hands as smooth as with formwork. With smooth walls, the likelihood of the foundation being pushed to the surface during soil heaving from frost is reduced. The film reduces the likelihood of plant roots growing into concrete and its subsequent destruction.
Covering material is selected based on a thickness of 100 to 200 microns. To connect the edges of the cut film, they are glued with tape, always on both sides. This will prevent the concrete liquid from seeping into the ground. Polyethylene can be replaced with geotextiles.
To improve the performance characteristics of the foundation, roofing material or Izospan is laid at the bottom of the trench. With their help, the foundation is waterproofed. If there is a need for additional strengthening of the strip foundation walls and thermal insulation, sheets of insulating material are placed along them. As a rule, extruded polystyrene is chosen. It is durable and affordable. The trench walls lined with such sheets provide excellent stability of the foundation, as they do not allow it to be pushed out when the soil heaves. Sheet thickness -50mm. Polystyrene is nailed to the wall of the pit with nails, placing washers under the heads.
Reinforcement
It is necessary to install reinforcement in the prepared trench. The number of its layers is three. The upper and lower layers should consist of three longitudinal rods - along the edges of the pit and in the center. The middle layer can only have rods along the edges, along the walls of the trench. Reinforcement is performed not only along the length, but also across the trench.
The rod for reinforcement is selected from 10 to 12-16 mm in diameter. Its surface should be corrugated. All rods must be connected to each other with binding wire. Transverse reinforcement is performed with a rod or wire of smaller diameter than the base material - up to 6 mm.
Not only ready-made reinforcement elements can be placed in a trench. If necessary, the reinforcement is installed and secured sequentially bar by bar directly in the pit.
The connection of reinforcing elements in two trenches adjacent at right angles is performed using the anchoring technique. To do this, you need corner elements bent into an L shape.
If the walls of the foundation strip are finished with polystyrene sheets, the installation of reinforcing structures will further secure them. But there should be a gap of 5 cm between the reinforcement and the surface of the trench. This applies to both the walls and the bottom, as well as the upper surface of the foundation. As a result, the reinforcing structures will be completely recessed in the concrete and will become a reliable bond for the entire foundation.
Concreting
You can prepare a small volume of concrete mixture yourself. If it is difficult to prepare the required amount of concrete yourself, it is better to order delivery. This, as a rule, should be the M400 brand. Its use guarantees a strong and frost-resistant foundation.
It is better to prepare the mixture yourself in a concrete mixer.
Proportions of components of self-prepared concrete:
- sand 3 parts;
- cement 1 part;
- gravel or crushed stone - 5 parts.
Plasticizers and additives can be added to the composition of concrete for formless molding to increase frost resistance.
The volume of water is calculated based on the ratio to dry mass. The total weight of the mixture without water should be 2 times the weight of the water itself.
It is advisable to pour the mixture prepared independently or ordered into a trench within one day. Otherwise, the concrete will delaminate and the foundation will crack. The custom-made concrete delivered in special vehicles must be poured so that the height of its fall does not exceed 1.5 m. With artisanal pouring, you can form the foundation layer by layer. It's easier, but longer. The time for complete setting and maturation of concrete is from 28 days.
Important points
Let us analyze in more detail the main stages of construction work. Let's look at how a strip foundation is constructed.
A very important point in the construction of a strip base is the installation of a sand cushion. It is necessary for:
- ensuring the horizontal level of the lower level;
- removal of moisture from the future structure;
- leveling the loads acting on the ground;
- vibration compensation.
In order for the sand cushion to fully perform its intended functions, it must be thoroughly compacted. If work is carried out over a large area, you can use specialized equipment (rollers, area vibrators). If compaction is carried out manually, compaction should be carried out layer by layer to achieve maximum density and flatness.
The reinforcement of the base should be taken with full responsibility. This stage of work cannot be ignored, since the strength and durability of the entire structure being constructed as a whole depends on correctly carried out strengthening. Therefore, consider some nuances:
- Use metal rods for reinforcement as separate elements or, if necessary, tie them together using binding wire.
When marking the construction site, drive stakes in the right places, stretching ropes between them
- Place the reinforcement in the ground (prepared trench) both longitudinally and transversely.
- When strengthening the corner fragments of the base, use L-shaped rods connected to each other with wire.
When preparing holes for laying water supply and sewer lines, remember:
- pipes for draining water from a sanitary block or kitchen are laid with a slope of 1–3 cm for each meter of pipe;
- the sewer outlet is laid maintaining a slope of 1–2 cm per meter;
- at the junctions of the elements, plumbing angles of 45⁰ or 30⁰ are used, so when carrying out work, take these points into account and increase the passage hole for their free installation.
Nuances of performing work
To ensure that a foundation in the ground without formwork becomes a reliable support, take into account the following features of its construction technology:
- A freshly poured foundation must be covered. If the trench walls are protected with film, use the free ends of this material. Otherwise, the concrete is covered with burlap or other fabric.
- In hot weather, concrete requires watering to ensure proper setting and curing.
- In cold weather, it is advisable to increase the grade of concrete in order to obtain a reliable foundation.
- Before pouring the mixture, it is permissible to strengthen the edges of the trench with a collapsible strip of boards or bricks. The poured concrete will protrude slightly above the soil level. After the mixture has set, the brick and boards are removed.
- The minimum layer height for layer-by-layer pouring of a self-prepared mixture is 25 cm.
- After the foundation has hardened, waterproofing sheets of roofing material are wrapped on tape and fused onto it.
- To prepare the mixture, only clean ingredients are required - sand, gravel, water. Otherwise, the concrete will lose its performance characteristics.
The question that sometimes arises about whether it is possible to pour a foundation into the ground without formwork should have a definitely positive answer. This is confirmed by numerous reviews that describe examples and calculations. It is possible to build a foundation in the ground without formwork, the main thing is to take into account the features of the technology and the initial parameters of the construction site.
Calculation of the amount of concrete
The amount of concrete is calculated using purely mathematical methods. First of all, you need to calculate the length of the tape .
To do this, you need to measure or calculate the outer perimeter and add to it the length of all internal sections. The cross-sectional area of the tape is then calculated by multiplying the width by the height. The last step is to determine the volume - the product of the length and the cross-sectional area. This will become the required amount of concrete mixture.
It is recommended to increase it by 5-10%, especially if you plan to order a ready-made solution in a mixer. Manufacturers are not always meticulous in their calculations and may deliver slightly less material, which can create a serious problem.
If excess is formed, it can always be used to fill the area in front of the entrance or other structural elements.
IMPORTANT!
When calculating the volume of the tape, all measurements must be made in the same units - if the length is in meters, then the cross-section should be in square meters. This will help you avoid mistakes and order the correct amount of material.