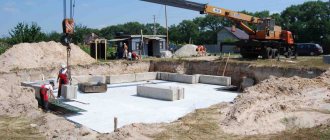
A monolithic slab foundation is one of the most reliable foundations, suitable for the construction of low-rise buildings of any configuration. The slab, due to its large supporting area, is capable of supporting heavy buildings on low-density soils.
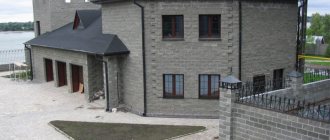
Monolithic slab
This article presents the technology for constructing a monolithic reinforced concrete slab with your own hands. We will consider the pros and cons of this foundation, the features of its calculation, and provide foundation reinforcement schemes.
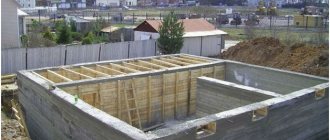
Slab foundation pros and cons
Advantages of a monolithic foundation slab:
- The plate is reliable and durable. The area of support on the ground is larger, the load of the walls and roof is distributed evenly on such a foundation. This is what professional builders and architects primarily value. On the Internet they write about the service life of 150 years. In general, we don’t need that much.
- Simple construction process. A slab foundation requires less excavation work compared to others. The construction of formwork is also much simpler than in other options.
- Possibility to use the base of the slab as a subfloor. We liked the idea of saving money on this. If we made a pile-strip foundation, we would have to overpay for the subfloor and think about how to protect it from rodents.
- Simplicity of waterproofing and ventilation. Protecting your home from excess humidity is especially important in our climate. If we made a strip foundation, we would have to build a large number of vents, but no matter how many there were, there would be no confidence that our floor would be saved from dampness. We completely covered the slab with bitumen mastic and fused roofing material on top, which promises 100% protection from unwanted moisture. We will talk about this stage in detail in another article.
Disadvantages of a slab foundation:
- Inability to make a basement or cellar. This is a significant disadvantage of a monolithic foundation slab, but we decided that we would survive it.
It seems that's it.
- Usually, the disadvantage of a monolithic foundation slab is its high cost. Let's be honest, we haven't thought through other types of foundations inside and out. But based on rough estimates, we realized that in our case the slab would be no more expensive than another foundation. We paid more for concrete, for example, but saved on shallow excavation and fill, formwork, the absence of metal mouse mesh, and the construction of a subfloor.
Preparing a site for the construction of a private house
The advantages of such a foundation
Experienced builders often recommend such a foundation for large houses in areas with unstable soil. There are the following reasons for this:
- a monolithic slab has the ability to apply even pressure on the ground, which reduces the load on it;
- due to less pressure on the soil, shrinkage is reduced, which is especially important when designing a massive building with several floors;
- slab foundations can be poured in swampy areas and other places with unstable soil where other types of foundation may be destroyed;
- carrying out the work does not require a large amount of heavy equipment, so such a foundation can be poured with your own hands;
- if a recessed foundation is used, the construction of the basement will be easier.
All these advantages make a monolithic foundation suitable for most types of complex soils. Such a foundation is the key to strength and long years of service for the future structure.
Strip foundation or monolithic slab, which is better?
Let's find out!
Firstly, the area of the foundation support. A strip foundation will have a much smaller area of support on the ground. Accordingly, it is necessary to carefully conduct the geology of the soil in order to find out its bearing capacity. Otherwise, there is a risk that the house will simply begin to sink or sag in places, then the foundation will crack and the walls will crack too, and this is a major and expensive repair. With a slab, it is much simpler; the load of the mass of the house is transferred to the entire slab, and the foundation, in turn, transfers the load to the ground evenly over the entire area under the house.
Why does a person wearing shoes fall through in the snow, but not or not significantly when wearing skis, because the person’s weight does not change? Correct, because the foot support area is small, but the ski has a large one, which allows you to distribute the load over a larger area. This means that when loading the foundation with the weight of the house, a strip foundation is more likely to crack or sink than a slab.
Secondly, the bearing capacity of soils. If we take weak soils, then we will need more serious preparation for the strip foundation. For a slab foundation, ground movements and vibrations are not terrible; it is not for nothing that it is also called a “floating slab”.
Thirdly, drainage. The drainage system for a slab foundation is much easier to arrange than for a strip foundation. Let’s assume there is a high groundwater level in the area, and besides, the soil throughput capacity is low, as in our case. You will do the drainage, and where will you discharge the water? Or will the foundation be constantly standing in water? In this case, after 10-30 years, corrosion will eat the metal, crumble the concrete around it, reinforced concrete will become just concrete and will no longer take tensile loads. Under favorable conditions, if the soil does not subside and there is no frost impact on the foundation, then, of course, it will continue to stand without disturbing the owners.
Fourthly, the installation of floors. A slab foundation is, one might say, just rough floors. You can lay wooden floors on the slab, pour screed and make warm floors, lay tiles. With a strip foundation it is more difficult. Vents should be left in the tape so that the underground space is ventilated and the floors do not rot.
Fifthly, frost heaving. The forces of frost heave affect different types of foundations differently. Frost begins to grab the ground from above and moves down. Under a slab foundation, if frost gets in, it will probably lift it from below, but when everything thaws, it will fall into place. The frost will initially affect the strip foundation from the side, and then from below. These are already two types of load, the strength of this pressure will be higher. Of course, it is necessary to insulate any foundation so that frost does not destroy it.
As you can see, we are in favor of a monolithic slab; we came to this opinion based on the totality of all the criteria indicated above. Accordingly, what is better is a slab or strip foundation, it’s up to you to decide. If you have weak load-bearing soils, then it is better to make a slab foundation. If you dream of a cellar under the house or a basement, then pour the tape. Each type of foundation performs specific functions under appropriate conditions. Each type of foundation has its pros and cons.
Slab or strip foundation, which is cheaper?
It is generally accepted that a monolithic reinforced concrete slab is much more expensive than a strip foundation. We think differently. The issue of price is more ambiguous than it seems.
It all depends on the source data. It is necessary to take into account not only the cubic capacity of reinforced concrete, but also much more: lumber for formwork, drainage arrangement, preparation of sand and crushed stone, earthworks. According to rough estimates, in our conditions the slab was no more expensive than a strip foundation. Although the question was not about price, but about the expediency and reasonableness of the choice, price still matters. You need to consider which foundation is cheaper, strip or monolithic slab in your particular case.
But remember: the foundation is not something you need to skimp on, it is the foundation of the house.
Thickness of a slab foundation: Example of how to calculate the thickness of a slab
In what cases are slab foundations used?
- Moisture-saturated soils
- Unstable soils
- Heaving soils
- In deep dense soil layers
- Frozen soils
Do you need a blind area for a slab foundation?
Yes, a blind area is needed for a slab foundation. It protects against precipitation and melt water getting under the foundation, as well as from the foundation itself getting wet. When the soil gets wet, its load-bearing capacity decreases. The worst thing is if heavily soaked soils are caught by frost. Frost heaving puts stress on any type of foundation, although the slab can withstand this phenomenon.
To prevent frost heaving of the soil under the house, the blind area is insulated; in this case, the temperature under the slab always remains above zero. In conjunction with the blind area and its insulation, drainage work is carried out to minimize soil moisture, because soils heave due to the moisture contained in them.
DIY foundation installation steps
The construction of a slab foundation is a complex of works, which includes digging and cleaning a pit, installing formwork and frames, concreting and a number of other technological operations. Labor costs are distributed differently, depending on the specific slab design. In the classic version, 100% of the labor intensity can be distributed approximately as follows: 25% construction and completion of the foundation pit, 20% construction of the sub-concrete slab, 15% installation of formwork and 40% concreting of the main slab.
Preparatory work
Preparatory work includes work that must be completed before starting to form the slab. Their list and main production milestones are presented below.
Geodetic reference (axes layout)
Layout is the process of transferring the house plan from the drawing to the site, securing the axes. To do this, you need to first plan the land: clear it of debris and vegetation. Using geodetic instruments, the axes of the base are mapped out into nature, the accuracy of which is checked by comparing the lengths of the diagonals. Then the dimensional axes are drawn to indicate the configuration of the building. Usually they are tied to the longest object on the site: a fence, a wall of another building, or a street red line.
The axles are secured using a cast-off - this is the name given to two wooden pegs connected by a crossbar to which a marking cord is attached. The cast-offs are installed in pairs, at some distance from the contours of the future foundation. Its corners will be located where the cords of the perpendicularly installed cast-offs intersect.
Expert opinion Vitaly Kudryashov builder, aspiring author
Ask a Question
Note: The cutting is first carried out on the soil surface when laying out the contours of the pit, and then these marks are transferred to the bottom of the excavation.
Excavation and modification of the pit
If there are exploitable utilities on the site, work on constructing a pit will have to begin by moving them. Then the soil in the building area is loosened, and when humidity is high, drainage and drainage work is carried out. A small pit can also be dug manually; this method is most often used in already built-up areas that do not have access roads.
In other cases, excavation is carried out mechanically, using excavators or bucket loaders. The use of technology makes it possible to reduce the labor intensity of work and greatly reduce the time required to complete zero-cycle work.
Upon completion of the digging, measures should be taken to strengthen the walls of the pit, which is especially important if it is deep and intended for a house with a basement.
Pit with reinforced walls
You can strengthen the walls in the following ways:
- By injection. Used for porous soils with high filtration capacity. In this case, parkers are installed into the pit slopes, through which liquid cement mortar or heated bitumen is injected.
- Silication. It is used to strengthen loess or sandy soils by injecting a chemical solution into them, followed by thermal fixation.
- Using the effect of electroosmosis. Used on clays with high humidity. As a result of current penetration through it, it loses moisture, becomes denser and loses its ability to swell.
- Mechanical. Several methods fall into this category: installing soil piles and cushions, ramming a pit. In the first case, the leader pile is driven in, and after it is removed, the well is filled with soil, compacting it layer by layer. In the second case, layers of heaving soil are replaced with layers of non-heaving soil - this method is most often used in low-rise construction.
Expert opinion Vitaly Kudryashov builder, aspiring author
Ask a Question
Note: Tamping is carried out on dry soils that are not subject to heaving. For this purpose, both vibratory rollers and rammers suspended on a crane boom can be used. This method is the most economical, since there is no need to import bulk soil. However, where it is not possible to drive equipment, it is necessary to use the method of constructing sand and crushed stone cushions.
There are several other ways to strengthen the soil at the bottom and walls of a pit, but they are not used in private construction.
Nuances of constructing bulk pillows
If the construction of a house is carried out according to a project, then the technology for constructing bulk layers will also be installed. It determines not only the thickness of the bedding, but also the number of layers and the degree of their compaction. All this depends on the quality and degree of soil moisture at the construction site, which is why it is so important to conduct a preliminary study.
When installing a surface floating slab, the soil is most often removed only to the thickness of the bedding, plus half the thickness of the slab. The layout can be as follows: a cushion of 30 cm, a footing of 5 cm, and half a slab of 20 cm. Thus, the depth of the pit is 55 cm. The second half of the slab rises 20 cm above the planning ground level. The same amount must be added to the thickness of the finished floor and you will get zero. The difference between the zero mark and the ground mark is 40 cm.
Pit with concrete preparation under the foundation slab
To replace the base soil, quartz sand, natural gravel, and crushed granite are used. The main criterion for this choice is their low compressibility with high shear resistance; when laying them, it is most convenient to ensure the specified density. Sands are used in medium and coarse fractions, compacted layer by layer until a density of at least 1.7 g/cm³ is achieved.
It is for high-quality compaction that gravel or crushed stone is used. It is usually poured on top of sand; when compacted, large granules are pressed into small ones, compacting them well. Natural mixtures of sand and gravel also compact well, which is why ASG is also often used. Otherwise, mixtures are made directly on site.
Although the density of the bulk layer is measured in a dry state, the compaction process itself is carried out with intense moisture. This is done in order to achieve the optimal moisture content of the sand, at which it is most effectively compacted. However, water should not stagnate at the bottom of the pit - therefore, if there is waterproof clay soil, it is better not to drain at all.
The thickness of the bulk cushion is usually determined based on the proximity of groundwater. In sand, the capillary rise of water usually does not exceed 30 cm. This is the height of the bulk layer that is considered optimal for a house, but if necessary, it can be increased.
Expert opinion Vitaly Kudryashov builder, aspiring author
Ask a Question
Note: At the stage of excavation work, embedded sleeves are installed to enter communications into the house.
Mortgages for entering communications
The installation of formwork begins when the bottom of the pit is filled and well compacted. Its height should take into account the thickness of all layers that can be provided in the foundation pie: waterproofing, insulation (if present) and the slab itself.
Sub-concrete slab - to be or not to be
According to domestic standards observed in official construction, concrete preparation is a mandatory element of preparation for the construction of a foundation. What does it give:
- a perfectly flat base for the slab, allowing you to correctly align the frame and comply with the protective layers of concrete required by the standards;
- mechanical protection for hydro- and heat-insulating layers;
- protection of the slab monolith from rapid loss of moisture;
- separation function so that concrete does not mix with bulk soil;
- protection against force majeure water breakthroughs into the pit;
- ensuring the geometry of the pit bottom during the entire period of operation.
Expert opinion Vitaly Kudryashov builder, aspiring author
Ask a Question
Note: Pouring a sub-concrete slab entails certain costs, and therefore many contractors express a desire to replace it in a project with a profiled membrane. It is very tempting to combine a rigid underlying layer with waterproofing “in one bottle”. For a house or any other heavy building, this is not the best idea, because the surface of the membrane is corrugated, and it is impossible to properly position the frame on it. The membrane is much better suited for laying under concrete preparation, because it does not have internal reinforcement. Such a replacement can also be made during the construction of small buildings such as a garage or outbuilding, in the process of installing floors on the ground.
The thickness of the footing can vary between 4-10 cm. In general, it is done like this:
- The prepared and compacted pillow is surrounded by lighthouse slats. The width of the slab is set using templates, and the height is set using a level, focusing on the design mark.
- The lighthouse slats are 50 mm thick boards with a width equal to the thickness of the fill. The slats are secured to the base by driving metal rods or wooden pegs every 1.5 m. The boards are secured using mounting angles or clamping brackets.
- The concrete mixture can be produced on site or delivered to the site from the nearest BRU. To fill this layer, use lean concrete, class B7.5. Based on 1 part of M500 cement, to make such a mixture you will need 5.8 parts of sand and 8.1 parts of crushed stone. Water-cement ratio 0.5.
- The mixture is compacted with a vibrating screed, but without excessive vibration, which contributes to the settling of the aggregate and delamination of the concrete.
- To avoid damage by rain, as well as cracking or drying out, the surface is covered with a layer of sawdust or sand. For seven days, it is spilled with water once a day, if it is not hot outside, and up to 4 times at temperatures above +20 degrees.
Expert opinion Vitaly Kudryashov builder, aspiring author
Ask a Question
Note: For adhesion to the main slab, vertical reinforcement bars are placed in the footing.
Waterproofing
Further work can be carried out when the concrete reaches 70% strength. In the summer, at temperatures above 20 degrees, this occurs already on the 10th day. The sub-concrete slab is freed from the lighthouse slats, the protective backfill is removed from it, and the surface is thoroughly washed with water and dried.
This is how the surface is prepared for the installation of horizontal waterproofing, and it is an obligatory element of a slab foundation. There are many ways to protect concrete surfaces from moisture: the use of penetrating (penetrating) compounds, coating, injection.
But the most used and has already become classic is insulation with roll materials. True, they do not last long, so they are combined with a coating of bitumen mastic, which serves as an adhesive base for roofing felt or waterproofing. Thus, a triple barrier is created (there should be two layers of rolled material) for the penetration of groundwater to the slab and release through capillaries to the overlying structures.
Rolled waterproofing made on the concrete base
Waterproofing the base of the foundation is carried out as follows:
- The rolls are rolled out on the surface of the concrete base so that the material straightens, for which it needs to lie down for at least 12 hours.
- Before gluing the sheets, the concrete surface is treated with an adhesive primer.
- Pasting is done so that the outer panels are bent to overlap vertical surfaces. Thin strips of the same material are first glued to the corners - this will allow the insulating carpet to fit more tightly to the base and not tear at the bend points.
- Bitumen-based mastics are used as an adhesive composition, possibly with the addition of rubber or polymer resins. The sticker is made with an overlap of the panels of at least 100 mm, and with a displacement of the joints in the rows of at least 300 mm.
- If the rolled material is bitumen, then mastic is usually applied only to the base. When using glass roofing material, foil insulation, baseless insulation, mastic must be coated not only with the concrete surface, but also with the back side of the canvases.
- The gluing process itself is very similar to wallpapering: the canvases are smoothed first longitudinally, then diagonally, expelling air, and then the edges are pressed.
- The resulting air bubbles can be pierced and, after expelling the air, glued well. If it turns out that there is not enough glue there, you can make a cross-shaped cut, bend its edges and coat it again.
- Some types of rolled materials (usually polymer) are mounted by welding, with preliminary fixation with synthetic glue. The canvases are first enlarged on site or they can bring fabrics already enlarged in the factory, welded into a carpet with a torch gun. It should be rolled up until the glue hardens, after which the base can be primed, lubricated with glue and waterproofing rolled out over it.
- Bitumen-based materials can also be installed using a fused method. In this case, the adhesive layer of mastic is liquefied by heating with a torch or IR emitter, after which the canvas is rolled out and pressed very quickly. The best quality gluing is obtained when the base is primed two or three times, and its surface is heated simultaneously with the adhesive.
To protect the finished waterproofing layer from damage during walking and reinforcement work, a sand-cement or asphalt screed 3-4 cm thick is poured on top of it. Only after it has hardened can further work be continued. As an option, a reinforced film can be laid on top to protect the waterproofing carpet.
Thermal insulation
Unlike some European countries, in our country thermal insulation is not mandatory for the foundation. However, the high cost of coolants and the desire for comfortable living are forcing both designers and developers to think about how to reduce heat loss. As is known, up to 20% of lost heat escapes through the foundation, so you have to think not only about vertical thermal insulation of the basement walls, but also about insulating the base of the slab.
Installation of a waterproofing carpet on top of the insulation
In direct contact with the soil, the insulation is forced to withstand the effects of freezing and thawing moisture. In foundation pies, slabs of extruded polystyrene foam of the highest rigidity (EPS or XPS) are used for this purpose. This is a rigid material, it is not as susceptible to mechanical damage as waterproofing, and therefore can itself serve as the basis for pouring a slab.
Drawing of an insulated EPS board
Although the footing is the most optimal protection, it is replaced with a membrane to reduce costs and speed up the pace of construction. In this case, such a replacement is quite justified. You can even do without a membrane at all, since polystyrene foam itself is moisture-proof. The only thing to protect the EPS slabs from being crushed is that there must be at least a 5-centimeter layer of sand on top of the bulk gravel or crushed stone layer.
Expert opinion Vitaly Kudryashov builder, aspiring author
Ask a Question
Important: When it is planned to insulate the foundation slab, waterproofing is performed on top of the insulation.
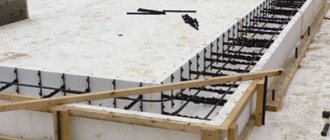
Reinforcement
To reinforce a slab foundation, both metal reinforcement and composite reinforcement with a periodic profile can be used. But in official projects, steel rods of class AIII are still laid. Minimum diameter 10 mm. As it increases, the safety margin of the structure increases; specific values are selected depending on the weight of the building and the strength characteristics of the soil on the site.
The frame has a two-tier configuration and consists of two parallel meshes with a cell size of 200*200 mm, connected by clamps. The number of rods laid in one direction is calculated as follows.
For example, you have a slab measuring 8*10m.
- First divide the length, then the width by 0.2 m, and add 1 m per indent: (10:0.2+1) + (8:0.2+1) = 92. These include 51 rods of 10 m each and 41 rods of 8 m each.
- In meters this is 510+328 m = 838 m per grid.
- There are two grids in total, which means: 838x2 = 1676 m.
The frame consists of two parallel grids
We have calculated the working reinforcement, but we also need to determine the amount of transverse reinforcement:
- The two meshes are connected to each other at each intersection. Their total number is 41x51 = 2091 pieces.
- With a slab thickness of 0.4 m and protective layers below 0.07 m and above 0.05 m, the height of the frame will be 0.28 m. That is, the meshes will be connected by rods 28 cm long.
- We find the total amount of transverse reinforcement (usually AIIID8): 0.28 m x 2091 pcs = 585.5 m.
Expert opinion Vitaly Kudryashov builder, aspiring author
Ask a Question
Note: Instead of knitting mesh on site from rods, you can purchase factory welded mesh cards. But this is more expensive, so for large volumes of work, reinforcement is often knitted.
The wire (diameter 1.2 mm) is also easy to calculate. According to the norms, one knot requires 30 cm of wire folded in half. We have 2091 clamps, they need to be tied on both sides. This means: 2092*2 = 4182 connections. We multiply this figure by 0.3 m, we get 1255 m of wire.
Plate forming
Giving the required shape to the slab is carried out using formwork. It is installed on top of the concrete preparation, from the X and Y axes indicated on the working drawings. The axial points are secured to cast-off strips placed outside the working area. The zero mark is taken to be the mark of the top of the foundation slab.
Having completed the markings, they begin to install the formwork elements. It consists of the following stages:
- Sorting and receiving lumber. Typically these are 50*100 boards, 50*50 mm bars and 16 mm thick bakelite plywood to obtain a high-quality slab surface.
- Production of enlarged panels or formwork blocks.
- Installation and geodetic alignment of formwork elements, their final fastening.
Expert opinion Vitaly Kudryashov builder, aspiring author
Ask a Question
Note: If professional construction teams are working, removable, reusable formwork can be used, assembled from ready-made panels.
The panels are installed in the design position according to the markings on the concrete preparation. The place where the shields will be located is cleared of debris and ice. The stability of the formwork elements and their resistance to extrusion under the weight of concrete is ensured by racks driven into the base, reinforced with supports - they are located no further than 3 meters from each other.
To obtain a slab with the correct geometry, the exact position of the formwork elements in space is very important. Therefore, even before the final fastening of the shields, their verticality and horizontality are checked with a plumb line and level.
Heating elements
One of the advantages of such a foundation is that underfloor heating elements can be installed into the body of the slab. The Scandinavians came up with this method of insulation, offering the world two technologies:
- The Swedish method of forming a slab involves a layer of polystyrene foam under it, and a heating system enclosed in a concrete screed on top of it.
- The Finnish stove is U-shaped. Its load-bearing horizontal part is quite thin, only 100-150 mm, while the size of the stiffening ribs is 200 * 400 mm. They rest on a soil cushion without deepening; polystyrene foam fills the space between the soil and the horizontal part of the slab.
USP structuring option
As can be seen in the drawing, the heating elements (heating water pipes or electric cable) are placed directly inside the slab, tying them to the reinforcement mesh of the frame.
Features of concreting
To ensure the strength of the slab, it must be properly poured. Taking into account the impossibility of continuous delivery of concrete and the need for workers to rest, the structure of a large area is divided into sections separated by working seams. The main requirement for them is that the seams be positioned perpendicular and symmetrical to the axis of the structure, which will make it possible to concrete in longitudinal strips.
- Typically, working seams cut the slab into 4 blocks, and the volume of delivered concrete is assigned with the calculation of complete concreting of at least one of the parts. A working seam is formed due to a flat frame, onto which a metal mesh with a fine mesh is screwed on top with wire.
- Pouring the concrete mixture can be carried out using a concrete pump or a truck crane with a rotating hopper attached to it. When using a concrete pump truck, concrete is distributed inside the block using a flexible hose, starting from the farthest point. In the second case, concrete is transported to the site in a concrete mixer truck. From there it is reloaded into a rotating hopper, which is then delivered by crane to a given location. In both cases, the free fall height of the concrete should not exceed 1 m.
The concrete pump is ready for work - Before concreting, the inside of the formwork walls are coated with waste oil. Concrete is laid in horizontal layers of equal thickness across the entire width of the block. The compaction of each layer, up to reaching the design pouring mark, is carried out using deep vibrators. Then the top layer is leveled and smoothed using a vibrating platform.
- Concreting of the next block, separated by a working seam, can be carried out with a break of up to 7 hours. If the working seams are not arranged, then the maximum allowable break is 1.5 hours. In private houses, the foundations are not too large in area (customers prefer to add the missing meters through the basement and attic floors), so in practice the second concreting option is more often used.
- The design mark of the top of the foundation should not coincide with the edge of the formwork. It should be at least 50 mm lower, for which markings are applied from the inside on the sides using a level. Self-tapping screws are usually screwed in along the top line of the slab and twine is tied to them. You can use dye cord.
- The most optimal curing mode for concrete is 90% humidity and a temperature of +18 degrees. The opening of the surface of the slab should not be washed away by rain or subjected to premature drying by wind and sun.
Proper care of concrete is one of the most important conditions for high-quality hydration of cement and the formation of stone with specified strength characteristics. At a temperature of +15, the slab is watered for a week every three hours during the day and once at night, after which the formwork is removed and further waiting for strength to gain.
Marking the foundation: how to build a right angle on the ground using simple tools?
At the time of marking the foundation, we only had a tape measure at our disposal. We were not ready for this, but we managed to remember the Pythagorean theorem and his “golden” triangle, the aspect ratio of which is 3: 4: 5.
We chose a point where one of the corners should be located and drove a peg. From this point, two legs of 3 and 4 meters were measured to the sides (at this moment everything was done “by eye”). Again we marked the points with pegs.
Then they stretched the tape measure between these pegs, as if indicating the hypotenuse, and began to adjust the end points of the legs so that the hypotenuse became equal to 5 meters.
Later we learned that builders recommend, for convenience, cutting ropes 3, 4 and 5 meters long. They make this whole operation easier. But we managed with a simple roulette.
If you understand something, blink. =)
When the right angle is drawn, half the job is done. It’s easy to just mark the other points regarding it. The main thing is not to forget to measure the diagonals. If they are equal, then the base of the house, be it a square or a rectangle, is drawn correctly.
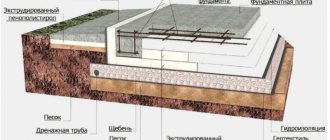
Construction of the foundation slab
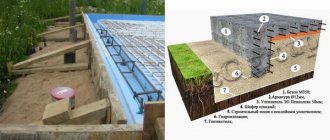
The monolithic slab consists of several layers, which together create a reliable and durable foundation for any building:
- The bottom of the pit, dug to the size of the future house, is the starting point for the construction of the foundation.
- The first layer is a “cushion”, which is created using quartz sand or a gravel-sand composition. Only natural material without shrinkage particles is used. The total thickness of the sand “cushion” is 300 mm.
- To create the second layer, crushed stone is used and filled to a thickness of 100-200 mm. But this layer may not be done, at the discretion of specialists.
- The third reinforcing layer is created by geotextiles. Modern technical material holds sand particles and prevents their erosion, prevents the formation of silt in the presence of increased moisture on the soil surface. Geotextiles can also be located at other levels. For example, to separate sand from the soil (spreads to the bottom of the pit), located between sand and gravel.
- Insulation - heat-insulating material with a thickness of at least 150 mm. For these purposes, extruded polystyrene foam, which has a high density, is used.
- Waterproofing layer. This is done so that moisture coming from the lower layers does not come into contact with the concrete.
- Reinforcement frame over the entire base area. For its manufacture, reinforcement with a diameter of 10 to 14 mm is used, depending on the planned load on the slab.
- A layer of concrete grade M200 and higher.
Why did we dig the pit by hand?
After some discussion, we decided that we would do the excavation work ourselves. At first glance, this may seem crazy, but there are a number of reasons for this:
- The size of the house is 6*8, not that big.
Plus 50 centimeters on each side, the pit size is 7*9 with a depth of 20-30 centimeters. This is about 16 cubic meters. I understood that I would dig this volume in a week. As a result, we completed it in 6 days. In our case, there is no point in digging a deep foundation. After all, we live in a warm climate, here the temperature rarely drops below zero, and the soils do not heave. We decided that choosing 20-30 centimeters of soft soil would be enough. Next comes the clay, which is a solid base. - The technique does not sense where the fertile loose layer ends and the clay begins. In our case, the soil practically does not differ in color. If we called an excavator, it would select the soil in the pit unevenly. I would loosen the bottom, which would entail a waste of money, time and effort. After all, the bottom would have to be additionally leveled by hand and compacted in places where the solid foundation is broken. Or level at the deepest point where the equipment dug, then backfilling with a solid base (in our case, crushed stone) would be much more expensive. In places where equipment would inevitably disturb the clay layer, water would begin to accumulate, and we do not need an additional source of dampness.
- The equipment would have done it faster, but it wouldn’t have been able to do it so carefully; it would have created ruts around the construction site. I would still have to manually level the pit and the surrounding ground.
- An excavator would dump the soil into one pile, and we would have to manually drag it around the site. While digging myself, I immediately transported the earth in a wheelbarrow to the ditches that I wanted to fill.
- The price of the equipment is one of the significant disadvantages. It’s good to pay for work that doesn’t need to be completed or edited. Otherwise, it’s easier for us to do it ourselves right away.
- It was necessary to make a slope of the pit, but the equipment would not have been able to cope with it. The slope of the pit is the plane of the bottom of the pit, which is intentionally made with slopes in the desired direction. In our case, the slope is made from south to north, towards the drainage ditch.
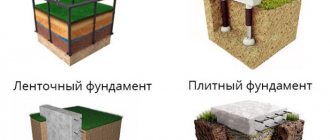
Types of slab foundation
There are various types of tile base and do-it-yourself pouring technology. In construction, the classification of a slab base is made according to two parameters: assembly features and the degree of elevation above ground level. According to the first criterion, prefabricated and cast-in-place structures are distinguished. The first of them is ready-made reinforced concrete slabs, which, by joining and laying, quickly form a base. The second method requires the installation of traditional formwork and pouring concrete.
There are 3 types of slab foundations classified according to the degree of elevation:
- non-buried, which does not involve preparing a pit before pouring the foundation;
- shallow burial, which must be lowered into the ground to a depth of about half a meter;
- deep burial, the depth of the pit of which reaches the freezing point of the soil, 1.5 meters or more.
For additional fixation when installing a monolithic slab, piles are sometimes used.
Scheme of a slab foundation on piles
The use of one of the types of slab foundations directly depends on the time and cost of construction, soil mobility and the proximity of groundwater.
Working with a hydraulic level
After we dug the pit, we made markings along the edges of the pit using a hydraulic level. This is necessary in order to remove excess earth from the plane and mark the vertical boundaries of backfilling the pit with crushed stone.
We drove pegs around the perimeter of the pit and, using a hydraulic level and an ax, marked the required height. Next, we pulled the thread along the marks on the peg and cut off the excess soil with a shovel. The place where the ground is cut is still the highest point, and this is where our foundation will begin.
Rain test
After we dug the pit, the next day it rained very heavily. The day before the rain, we still chose the time and dug a drainage ditch along the site. We did this “just in case.”
But after a lot of rain, instead of a pit, we saw a pool filled with water. A decision was made: to connect the pit and drainage ditch by digging a trench along the slope. The pool drained immediately, and since then the water has not bothered us anymore. But we are thinking about a more thorough drainage system on the site, which we will talk about in a separate article.
Author: Nikita Kuznetsov
Calculation
The construction of any foundation begins with preliminary calculations, which are part of the design documentation. Based on the data obtained, information is taken about the dimensions and features of each element of the base, a plan of the slab “pie” is drawn up, and the thickness of each layer is selected.
The most important indicator of structural strength is the thickness of the monolith. If it is insufficient, then the foundation will not have the necessary bearing capacity. Excessive thickness results in an unreasonable increase in labor intensity and financial costs.
Correct calculations can only be made on the basis of geological surveys - soil analysis. To do this, wells are usually made at different points on the site, from which soil is taken. This method allows you to determine the types of soil present, as well as the proximity of groundwater.
Each type of soil is characterized by a variable load resistance, which means how much pressure (in kg) the foundation can exert on a specific unit of soil area (in cm). The unit of measurement is kPa. For example, the variable load resistance of crushed stone and coarse gravel is 500-600 kPa, while for clay soils this figure is 100-300 kPa.
However, calculations should be made based not on the soil resistivity values, but on the specific pressure on a specific type of soil. This is due to the fact that with little resistance the foundation will sink into the soil. If the pressure turns out to be insufficient, swelling of the soil under the foundation and its deformation cannot be avoided.
The optimal pressure values are constant and can be found in SNiP or in the public domain. The specific pressure is measured in kgf/cm kV and is individual for different types of soil. For example, plastic clays have a specific pressure of 0.25 kgf/cm kV, while the same value for fine sand is 0.33 kgf/cm kV.
It is interesting that if you compare the data from the table of resistivity and soil pressure, it turns out that the second table (pressure) will contain a smaller number of soil varieties. So, gravel and crushed stone will “disappear” from it. This is explained by the fact that a slab foundation is not the only possible option for construction on this type of soil. Perhaps it would be more rational to use a tape analogue.
The facts stated above indicate the need to calculate the total load of the monolith that acts on the ground. Knowing this indicator, it will be possible to make a decision to increase or decrease the thickness of the monolith, and also (if it is irrational to reduce the thickness of the slab) to use lighter materials for load-bearing wall structures. For example, instead of heavier bricks, use blocks when building walls from aerated concrete.
The optimal thickness for most buildings is a monolith thickness of 30 cm. The load-bearing capacity of the structure in this case will be sufficient, and the project will be economically profitable.
For brick walls, it is recommended to slightly increase the thickness of the base - it should be from 30 cm. For lighter materials, foam and gas blocks, this value can be reduced to 20-25 cm.
After obtaining data on the required thickness of the monolith, we begin to calculate the amount of concrete solution. To do this, according to the drawing, you should calculate the height, thickness and width of the slab and make a small supply of mortar of 10% of the resulting number. The grade of cement must be at least M400.