Construction of a cellar under a garage
Most owners do the construction of a cellar under a garage. Building a garage with a cellar with your own hands requires an integrated approach. After all, these are essentially two separate rooms with different functions. Today we will look at how to build a cellar under a garage and how to arrange a cellar in a garage. After all, there should be no dampness here. You will be given instructions on how to complete this work.
Consider the types of cellars
We are building a garage with a cellar, but before starting work we need to decide which type will be most acceptable. According to the principle of cellar location, they are divided into two types: free-standing (see Dugout cellar: convenient vegetable storage) and located under the room. Since the planned storage will be located inside the garage, its appearance will depend on the depth.
You can build a small pit in the garage for storing vegetables. It’s not at all difficult to build, the principle of operation is the same as when building an inspection hole, but some craftsmen successfully adapt a tank for such needs and dig it into the ground.
| Semi-buried cellar | Such a cellar can be built even in damp areas, because its depth is usually up to one meter. The walls of the pit are filled with concrete or slag concrete, or they can also be built of brick. Pasting or coating materials are used as waterproofing. |
| Fully buried cellars | This type of cellar is very popular today. The standard depth is considered to be a hole of 1.5-3 m. Such a structure requires calculation of parameters taking into account data on the groundwater level. The best option is the bottom of the cellar 0.5 m above the level. |
What does the concept mean?
The ceiling of a cellar or basement is a horizontal load-bearing building structure of a building being built , designed to ensure the tightness and strength of a special room for storing food or equipment located below ground level.
For such structures, it is possible to use various floor structures (from monolithic to wooden), it all depends on what load these floors will bear.
So, for example, for a separately located cellar, it will be insignificant, while basements in the basement or garage can bear significant loads.
At the same time, these floor slabs differ from other types of floors installed in residential buildings, since they work in particularly humid conditions and must ensure not only the strength and durability of the structure, but also a stable temperature throughout the year and standard humidity.
These characteristics will depend on how correctly the walls of the basement and cellar are erected, as well as on the professional thermal insulation of the ceiling and effective ventilation. Only in this case will the most comfortable conditions for storing vegetables and winter preparations be created inside them.
Completing of the work
Building a cellar in a garage with your own hands begins with correctly determining its dimensions.
Before building a cellar in the garage, first of all you should remember the recommended dimensions: the depth should be from 1.7 to 1.9 meters, the width from 2 to 2.5 meters (more details Cellar dimensions: what are they). Even if the space allows, do not make the cellar very wide.
After this, you need to decide on the type of room and draw up its plan:
- It is very important to reproduce a clear and correct drawing, this will allow you to calculate the consumption of materials.
Attention: It is recommended to build a cellar, retreating from the walls by half a meter, so much space is needed to install lateral waterproofing; instead of a wall, use the surface of a strip foundation.
- Using this method, it is possible to save money, but it is very important to comply with the conditions: the floor height must exceed 0.3 meters of the strip foundation mark. This design option can only be used if you are absolutely sure that working on the base of the garage will not harm the structure itself.
- In the work plan, it is imperative to provide for waterproofing of the cellar room, as well as the arrangement of its ventilation systems. The issue of arranging a garage cellar can be solved in several ways, but equipment remains the most practical. When entering through a hatch (see also Secret hatch into the basement: which is better), use an ordinary metal ladder. If the garage is spacious enough, you can build concrete steps.
It is impossible to complete the project and carry out construction work without the following important requirements:
- You should start work only if you are confident that you can dig a deep hole from 2 to 3 meters in an urban environment, since there are numerous utility lines located at depth.
- Be sure to check the groundwater level. You should know that building a deep cellar in a finished garage is not entirely correct. But if the decision is final, it is necessary to take into account measures to protect against leaching of groundwater. Even no modern methods can solve the problem of eliminating the source of flooding in a finished cellar; it is best to prevent the situation at the initial stage of construction; for this purpose, a circular drainage system is made.
Selecting the material
Currently, the modern construction market provides a wide variety of materials for the construction of cellar walls. As a rule, the choice depends on the cost, since most people want to build a cellar with little financial outlay.
Attention: If you need to build walls in a short time, use reinforced concrete slabs, but this building material is relatively expensive.
So:
- Wild stone and monolithic concrete are considered good, inexpensive options. If red brick is used to build walls in the cellar, it must be well-burnt. Experts do not recommend using slag concrete and sand-lime bricks for such purposes. To pour the foundation, use concrete M 100 or concrete prepared according to standard instructions: cement M 400, sand, crushed stone.
- Cement-sand mortar is also used for floor screed and plastering of internal walls.
- Solid boards are used to assemble the formwork. An economical option for waterproofing is laying layers of roofing felt on molten resin.
Requirements for parameters and characteristics
Floors are subject to a variety of force loads, primarily from the weight of their own, upper structures, walls, utility networks and equipment.
Under their weight, high stresses appear in them, which lead to deformations and deflections of the beams. The maximum amount of deflection in basements and cellars that is allowed according to the requirements of SNIP: 1/200-1/400 of the span length , more specifically they are established by calculations for the design and selection of building materials.
Developers should strive to minimize the deflection of the floors, although at the same time, such a requirement invariably leads to an increase in the thickness of the slab.
For basements located in residential buildings, it should be the minimum acceptable, as a rule, in the region of 200-300 mm, for the reason that an increase in this indicator leads to an increase in the total construction volume, and therefore the weight of the building, the load on the foundation and the cost of the project.
Basic requirements for the parameters and characteristics of basement floors:
Durability, for built-in basements must correspond to the design life of the main building, for separately located cellars at least 50 years.- Protection from flood and groundwater, high waterproofing characteristics.
- Fire protection, they must correspond to the 1st degree of fire resistance with a fire resistance of at least 1 hour.
- Ease of use, creation of conditions for normal presence of people and storage of products.
- High heat-shielding characteristics to create optimal food storage temperatures.
- The economic component of construction should not lead to a high final cost of the project.
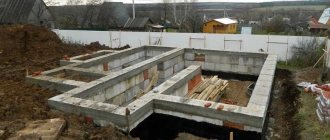
Foundation construction
In order to build a foundation, first of all they dig a pit:
- When the required depth is reached, the bottom is leveled and compacted. Then they lay out crushed stone - 3 cm, fill it with concrete, the total thickness of the layer should be about 8 cm.
- After the concrete has completely hardened, waterproofing begins. Lay 2 layers of roofing material and glue them together with molten resin. It is very important that at the edges the waterproofing layer extends slightly beyond the boundaries of the wall by 10-15 cm. Then the formwork is installed and filled with mortar.
- In order to protect your building from groundwater, build a drainage system.
Laying walls in the cellar
The masonry method depends on the material used:
We make the walls from bricks
- For example, if brick is used, in this case the most simplified masonry method is chosen. When performing this, it is very important to maintain the verticality of the walls. Carefully rub together the external and internal seams. The final process is painting the brick walls in the cellar with lime.
- Another option is to make monolithic concrete walls; this process is quite simple, but in this case the need for constructing formwork becomes more complicated. It is constructed in this way: shields for each wall are knocked down from smooth, strong boards, and metal pillars are driven along the perimeter of the foundation. Afterwards, formwork is attached to them and poured with ready-made concrete.
Fighting condensation
The formation of condensation in the cellar is very often caused by poor ventilation or poor ceiling insulation. It is necessary to combat this harmful phenomenon immediately, since both the room itself and the products stored in it suffer from the presence of condensation.
First of all, measures are taken to insulate the ceiling. To do this, you can use any material that has moisture-absorbing ability and dries quickly. Such materials include forest moss or artificial expanded clay material. Sometimes you have to insulate the walls as well. If this does not help, then condensation and drops from the ceiling are removed using umbrellas made of galvanized iron or plastic film. You can also use drainage plywood. Special gutters are attached to them to drain water and divert it into water intake wells. If the cellar design does not provide for these, you can use a regular bucket. In this case, in the summer the cellar must be carefully examined and repaired.
Arrangement of the ceiling in the garage cellar
To simplify the process of assembling the ceiling, reinforced concrete slabs are used:
- A hole is made in the slab for the hatch, and the level of its installation is determined on the base of the building.
- After installing the slab, it is coated with resin and insulated with glass wool or cement-sawdust mixture. The insulation layer should be approximately 20 cm.
- The surface is finished using clapboard or slate; if an additional layer of insulation is installed, the ceiling is covered with plaster.
Construction of the ceiling
Using ready-made reinforced concrete panels, it is easy to quickly cover the ceiling. Sequence of operations:
- Decide on the dimensions of the slabs.
- Purchase and deliver them to the work site.
- Create an opening for the entrance hatch.
- Lay the solution on the supporting plane.
- Install the panel using a crane.
- Ensure the tightness of the joint areas along the contour.
- Treat the surface with bitumen and plaster indoors.
Using reliable formwork, you can pour a monolithic cellar ceiling on your own, reinforcing it with a reinforcement grid. There are certain features:
- it is necessary to use formwork with an increased safety margin and carefully seal all gaps;
- it is important to reliably install support posts that are capable of supporting the mass of concrete and the weight of the formwork;
- it is required to assemble a reinforcement frame from steel rods connected together with knitting wire.
The main advantage of a solid ceiling is that there is no need to dismantle the roof of the garage to install reinforced concrete panels. The strength of a monolithic structure is not inferior to a ceiling made of ready-made slabs. Having completed the installation of the ceiling, you should install the ladder and secure the hatch.
Perform the final finishing at your discretion; the optimal finishing material is wooden lining
Waterproofing a cellar in a garage
Building a garage with your own hands with a cellar requires the obligatory application of a layer of waterproofing. To do this, you can use modern materials, but if you want to save money, you can resort to traditional methods.
Be sure to apply a layer of waterproofing
So:
- Use bitumen lubricants, this will lead to minimal costs. It is applied in two layers, with roofing material placed between them. Then the structure is sprinkled with coarse sand.
- It is recommended to treat the internal walls of the cellar with mixtures for the so-called. penetrating waterproofing. They are unique in that they do not create a film on the surface, but penetrate into the structure of the material, turning the wall into a monolithic structure.
- The main advantage of penetrating insulation is that it cannot be damaged, and its service life is equal to the service life of the cellar walls. This type of waterproofing can be used for both external and internal surfaces. Surfaces should not be dry; walls must be moistened before applying the mixture.
- Before application, the mixture is diluted with water using a wide brush. The layer thickness should be approximately 2 mm. Manufacturers of drooping waterproofing claim that it can penetrate through the capillaries of wall material to a depth of 0.9 m, while creating an insoluble crystalline formation in it.
- With the help of crystals, all voids in concrete are filled, the passage of moisture is eliminated, while the walls remain vapor-permeable.
- To improve technical characteristics, concrete surfaces are treated to resist water pressure under a pressure of about 20 atmospheres. The positive point is the ease of applying waterproofing, the work can be done without the use of additional equipment, the garage owner can do all the work himself.
How to calculate?
In fact, the calculation of the basement floor is based on the use of simple formulas for establishing the bending moment M and the moment of resistance W , and their ratio must satisfy the condition: M/W<=Rd, where Rd is the permissible resistance of the structure in MPa, at a load q that can withstand the beam and its length l. M=(ql2)/8.
According to GOST 26519, published in 1985, a safety factor of 1.3 must be taken into account for beam floors. For basements built into residential buildings with a permissible load of 151.0 kg/m2 with a margin, this value is equal to: 151 x 1.30=197 kg/m2.
Intervals made of light blocks with a layer thickness of 180 mm and D 500 create a load: 500x0.18 = 90 kg/m2 . A reinforced screed with a layer of 55 mm and a density of 2000.0 kg/m3 creates a load: – 2000*0.055=110 kg/m2.
The total floor load will be: 197 +110+90=396.0 kg/m2. The deflection is calculated based on the total load for an I-beam Ry=2000 kg/cm2, span length l=4.5 m
Find Mmax Qmax . Based on the results obtained and Wtr and Itr and rental tables, select the I-beam number:
In this case, I-beam No. 14 is quite sufficient.
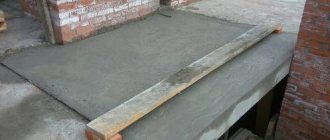
Making a floor in the garage cellar
The most optimal option for making garage floors is the use of reinforced concrete.
It is better to use concrete to make the floor
So:
- The floor surface is leveled, then covered with a layer of crushed stone and sand (15 cm + 5 cm), compacted well. To speed up the construction process, a reinforced concrete slab can be used as the floor.
- If you create a reinforced concrete surface with your own hands, you will have to put in a little more effort.
- Reinforcing bars are installed, and a base is created for laying the reinforcing mesh.
- After this, the mesh itself is laid, and the whole thing is filled with concrete (at least four layers).
Insulating a cellar in a garage
Today, a wide selection of insulation is known. Expanded polystyrene is well suited for cellar walls; its installation is carried out on the outer sides of the walls. The significant advantages of this material include: a high level of water resistance, insulation is resistant to fungi and mold, and a long service life.
Scheme for insulating a cellar in a garage
So:
- A common insulating material for cellar walls is PSB-S-25 with a thickness of 50 mm. The insulation is installed in the cellar on both wall surfaces, thereby maintaining a stable temperature in the room. If you only insulate the inner surface of the walls, there is a risk of condensation settling at the seams.
- I use sawdust as thermal insulation for concrete floors. They are laid in a layer of up to 40 cm and compacted well. After this, a layer of roofing material is laid out and a cement screed is applied. The frozen surface is treated with bitumen.
Attention: Insulation of the ceiling is very important in this case, since it is on this surface that condensation will remain when cold air enters the cellar.
- If a concrete slab is used as a basement floor in a garage, then the construction of a false ceiling will be required. It is constructed in this way: in the walls of the cellar, at a distance of about 15 cm from the floor slab, pipes are attached, and a fenced mesh is constructed from reinforcement bars.
- At the end, the structure is painted with waterproof paint. The resulting space between the floor panel and the reinforcement grid is filled with insulation. In this case, mineral wool materials can be used.
What tools and supplies will be needed?
Since floors are made from a variety of materials: reinforced concrete, rolled steel and wood, various tools and materials will be required accordingly.
To install the most common types of wooden floors on metal load-bearing beams, the developer must prepare the following materials and tools:
- I-beam floor beams by number depending on the permissible deflection, the number is calculated depending on the span length and the interbeam distance of at least 600 mm;
- thermal insulation material, mainly mineral wool and Penoplex;
- steam and waterproof membranes and tape for sealing seams;
- lumber for flooring and sheathing, in case of installation of a ventilation gap for mineral wool;
- antiseptic and fire-resistant impregnation for wooden products;
- measuring instruments: angle, ruler, tape measure, level and plumb line;
- jigsaw and regular hacksaw;
- electric drill with drills;
- Bulgarian:
- hammer and set of carpentry tools;
- welding to connect steel load-bearing beams.
For monolithic reinforced concrete floors you will need:
- concrete,
- fittings,
- boards for formwork,
- concrete pump and hoses for pouring mortar.
Cellar ventilation
We are building a cellar in the garage and do not forget about ventilation. After all, the humidity of the room will completely depend on this. And in order for vegetables and fruits to retain their beneficial properties when stored in the cellar, it is necessary to properly organize the supply of fresh air into the room, and the humidity level must be normal. Look at photos on the Internet and select the necessary materials.
Don't forget about ventilation
Ventilation arrangement in the cellar has two types:
- Natural ventilation is considered simple and inexpensive; it involves installing supply and exhaust pipes so that air circulates freely. The exhaust pipe is fixed near the ceiling, and the supply pipe is placed so that its edge is 10 cm from the cellar floor, the second – 0.5 m above the roof level. The second end of the supply pipe is brought out and covered with a mesh. Covers are placed over both pipes.
- The second method is more expensive and complex - forced; for its installation, a fan is installed in the exhaust pipe. When it turns on, the stagnant air is expelled outside, and fresh air enters the cellar.
- The best option in terms of cost and efficiency is considered to be if you combine forced and natural ventilation installations in the basement of the garage. Forced ventilation is used in the summer, during this period the temperature outside and inside the cellar reaches its minimum. The final stage of building a cellar and preparing it for operation consists of installing a hatch roof and placing a ladder.
- When the harvesting season begins, racks with shelves are placed in the cellar. Before filling the basement, it is thoroughly dried and cleaned of various microorganisms. To do this, you can burn alcohol tablets (10 pieces) indoors. After this, the cellar in the garage is ready for use.
Before you start building a cellar in the garage, the video is worth watching. A large selection of video lessons is at your service.
Finishing work
Finishing garage walls does not require special skills from the performer; the main thing is to take into account a number of nuances and perceive the work as an excellent opportunity to gain the necessary experience, because no one else will evaluate the quality of the work performed.
The main task of finishing work in the cellar is to give it a normal sanitary and hygienic condition
How to plaster walls
This process is not that complicated. You can also do it entirely with your own hands. So:
- You should attach a metal mesh to the walls, since in a damp room the plaster simply will not stick to the foundation block. To attach the mesh, it is best to use parachute dowels.
- Ventilation channels and small cavities do not need to be covered with mesh.
- If the walls will subsequently be tiled, the mesh should be minimally hidden with plaster mortar, leaving space for applying tile adhesive.
- The solution should be applied with a trowel, and for smoothing it is best to use a polisher.
After this, you need to draw up a correct work plan and calculate the necessary materials. The price here can be quite different, it all depends on what you want to get in the end.
Ready-made basement structures
All of the above work is complex and costs a lot of money. Today you can purchase a ready-made plastic cellar for your garage. It is made from low-density polyethylene or polypropylene. Production method: welding of individual elements or molding of finished cellars.
The advantages of plastic structures are obvious:
- complete tightness, which guarantees protection of the internal space from the penetration of moisture or groundwater;
- a wide range of models allows you to choose the size of your garage;
- ease of installation - it takes one day along with digging a pit;
- the lightness of the design does not require the presence of heavy equipment at the construction site;
- high strength of the structure;
- Fully equipped in terms of hatch and ventilation;
- reasonable price, for example, a plastic cellar made by welding, measuring 1.6x1.6x2.4 m costs 100,000 rubles.
Plastic cellar Source en.decorexpro.com