A concrete cellar is a reliable and durable structure designed for storing crops, wines, food and everything that needs to be kept cool. A properly equipped cellar will always be dry, will not freeze or warm up, maintaining approximately the same air temperature, regardless of weather conditions.
Despite the fact that many modern building materials have appeared on the market today, there are various building construction technologies, the process of creating a typical cellar under a residential building is the same as many years ago. The cellar can be made of plastic, concrete slabs, different configurations and designs, but the simplest and most expedient way is still to fill the cellar with concrete.
What you need to know about the cellar before construction
Before you start searching for building materials and starting work, you need to understand all the nuances, disadvantages and advantages of different approaches. It is important to study and take into account some features before implementing the project.
Important nuances of building a cellar:
- Depending on its depth and location, a concrete cellar can be underground, above-ground, built separately from the house or inside the building. It is most effective to equip the cellar completely in the ground, but this option will require a lot of money, time, and effort. Partially recessed structures are often made (about half the height), which is quite enough to protect the room from freezing and ensure comfort in operation.
- Any materials except porous ones are suitable for building a basement. It’s not worth building a cellar using the currently popular aerated concrete blocks: the material absorbs moisture, causing it to accumulate in the room, and can quickly collapse. You can use gas blocks only if you install several layers of waterproofing all around, but this is very expensive.
- A good modern option could be a ready-made plastic cellar box, which comes with a hatch, shelves, ladder, and ventilation system. You need to make a concrete caisson under it, and plastic cellars are expensive, but they save you from many problems.
- A concrete basement today is the most acceptable option, as it is inexpensive, durable and reliable.
- The roof of a cellar can be arched (for partially buried or above-ground projects) or flat (for a completely buried room).
- The floor is left earthen (if the groundwater lies much lower) or filled with concrete and waterproofed (more reliable).
- The cellars are insulated with the same soil that was removed during the digging of the pit.
Beginning of work
Before you begin measures to arrange a reliable storage facility, determine the design of the structure, taking into account the depth of the aquifers, the characteristics of the soil, and the topography of the land plot.
Before you start working on concrete cellars, you should make a decision regarding its location
Please pay special attention to the following serious points:
- The volume of the cellar is selected in accordance with the need to store a certain amount of grown crop and the size of the plot;
- The location of the structure should provide comfortable operating conditions for the storage facility. It is preferable to locate the building close to housing, which is not important in the summer, but in the snowy winter, walking the extra distance can be a problem;
- if the terrain of the site is variable, then the best place for arranging a cellar is a hill that prevents the possibility of melt water from penetrating into the interior of the structure;
- The level of location of aquifers affects the degree of deepening of the building. It's not difficult to define. Make holes up to 3 meters deep, lower the wooden plank. Yes, after a couple of hours moistening will not occur - this indicates deep aquifers.
Closely located groundwater is not an obstacle to the construction of a cellar equipped with powerful protective waterproofing and pre-drainage.
Which concrete cellar design option to choose?
It is quite possible to build a concrete cellar with your own hands. But first you need to decide on the construction technology - the basement can be assembled from ready-made reinforced blocks or by pouring concrete mixture into pre-prepared formwork (also reinforced with steel rods). Usually the monolith is poured on heaving soils, which contain a lot of loam.
It must be remembered that in both options, the cellar floor must be equipped with a drainage system and a layer of waterproofing, then the surface must be reinforced and filled with a concrete mixture of at least 20 centimeters. It is advisable to make the floor reinforced and durable in any case, since the groundwater level can change, as well as the soil load on the structure. And the base is capable of taking on about 30% of the wall load.
Prefabricated structures that use concrete blocks and slabs in their construction are less durable, more expensive and susceptible to moisture.
Monolithic
Monolithic concrete cellars are constructed by filling the box with concrete. Before starting work, it is imperative to examine the area - determine the groundwater level, find out the presence of gas mains, water supply lines, communication lines, cable channels, sewer pipes, etc. at the site.
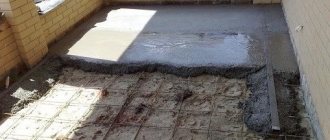
To equip a concrete cellar, choose the type of structure (ground, underground), dig a pit of the required depth, fill the bottom with a layer of drainage, then lay a layer of roofing material for waterproofing, reinforce it with steel rods, install the formwork and fill the structure with concrete.
The resulting basement is reliable, durable, able to withstand the load of soil, moisture, and the effects of various negative factors.
Made
The finished concrete cellar is made after pouring the floor, assembled from foundation blocks. The blocks are assembled using masonry mortar with waterproofing additives. Assembly occurs thanks to masonry mortar and special grooves. After assembly, the entire surface of the blocks is treated with a waterproofing agent (such as Dehydrol Lux brand 3).
It is very difficult to build a prefabricated concrete basement with your own hands - it’s all about the weight of the blocks (from 100 kilograms), which, even if it is theoretically possible for one person, is still difficult to lift. In this case, special equipment is used.
The main advantages of building a basement from prefabricated blocks are the speed and ease of construction, the resistance of the blocks to biological negative factors (fungus, mold), and frost resistance. The blocks are presented in different sizes and shapes, so choosing elements of optimal dimensions will not be difficult. Provided that the waterproofing layer is properly installed, a prefabricated basement can be equipped even with a high groundwater level. Among the disadvantages of this option, it is worth mentioning the high cost of both the blocks themselves and the work using them.
Recommendations
Advice for developers from specialists with experience in the construction and operation of basements:
- For interior decoration, materials are used that are not afraid of dampness or have been treated against rotting.
- To go down to the basement you need to arrange a comfortable, non-steep staircase.
- It is recommended that the first floor floor be heated over the ceiling with full thermal insulation.
- It is advisable to insulate the blind area and drain surface water into a drainage ditch or perforated pipe.
A properly equipped basement will be a great place to relax Source mysticirelandusa.com
Advantages and disadvantages of concrete cellars
Concrete structures have certain pros and cons that need to be studied before creating a project and implementing it.
The main advantages of a concrete cellar:
- Strength – the ability to withstand considerable loads, resistance to seasonal movements.
- Simplicity - doing everything yourself is not difficult and is quite possible for one person.
- Long service life - more than 20 years.
- Resistance to frost - provided that waterproofing is carried out in the cellar, there will never be frost, regardless of the ambient temperature and the level of soil freezing.
- Hygiene.
- Resistance to various chemical influences.
- Low cost.
Among the disadvantages of a concrete cellar, it is worth highlighting: a high level of thermal conductivity (which is why it is desirable to carry out waterproofing and thermal insulation), the risk of cracks appearing during the installation process (usually due to non-compliance with the technology).
Due to the huge number of advantages and the minimum number of disadvantages, a poured concrete cellar is considered the most optimal choice.
Equipment design
The cellar is constructed with monolith reinforcement using ribbed reinforcement with a diameter of 8 to 14 mm
There are two options to build a foundation with a basement with your own hands - a pile and a monolithic strip type of device. It’s worth saying right away that the first option is quite difficult to implement, so in practice we most often encounter a monolithic foundation. In our article we will discuss the construction of the basement space in the second type of house foundation. For a monolithic structure, there are the following rules for its construction:
- In the case when the construction of a basement space is planned at the design stage of the house, its depth can be about 3 meters. The bookmark is made using special equipment. The work begins with preparing the pit and depends on the type of backfill.
- When we carry out actions to create a foundation with a basement floor, there are no restrictions on the depth of the building. For optimal functioning, it is enough to correctly calculate the wall thickness for various materials.
- To avoid the negative impact of the soil in winter, you need to fill the area around the walls with sand instead of earth. This is easy to do, because DIY construction is carried out in a foundation pit, around which there are sections of territory to be filled. This action must be performed immediately after waterproofing and insulation.
- The cellar is constructed with monolith reinforcement using ribbed reinforcement with a diameter of 8 to 14 mm. If this is a small building, then the horizontal load-bearing components of the frame have this value of 10-12 mm.
- In a conventional reinforcement frame there are usually four load-bearing members, but in some cases there are also five components. The ring with the jumper should be placed at a distance of up to 80 cm, and the entire structure should be connected to each other with wire.
- An important process is waterproofing the foundation with a basement, which will help protect the room from dampness. This can be done using mastic or cellophane film.
- Thermal insulation is also necessary, especially in the case of a basement, since cold easily penetrates the monolith. To solve this problem, foam is used, but there are cheaper ways.
It is best to start building a foundation with a basement with your own hands at the same time as planning your house. This will allow you to perform calculations taking into account the basement space, which will allow you to avoid unpleasant situations in the future.
Calculation of concrete composition
Taking into account the fact that for a cellar it is desirable to prepare concrete with high characteristics of resistance to moisture, the quality of the material plays a major role here. There should be no lumps in the cement, so it must be sifted through a 1x1 millimeter sieve to remove them.
The composition is usually the following: part cement, part sand, 3 or 4 parts crushed stone/gravel, the optimal amount of water to obtain a solution of the desired consistency. To make calculations for concrete grades more accurately, you can use a special online calculator.
Using well rings
Concrete rings are an excellent material for making a round cellar, which can have the following layout:
- horizontal, using concrete rings installed on a not deeply buried base. It is necessary to first prepare a radius-shaped concrete pad. The rear ring can be laid with brickwork or a solid structure can be used;
- a vertical layout that involves immersing concrete rings into a round pit onto a pre-formed monolithic base. The optimal capacity of the room is provided by 2 rings with a diameter of 2 m and a height of 90 cm.
For each layout option, the surface of the rings after installation should be treated with liquid glass or bitumen, and the seams should be sealed by coating with a cement composition.
The final stage of the work is filling the horizontal cellar with earth and creating a sealed entrance for each design option.
Construction of a monolithic cellar
To create a concrete cellar with your own hands, you will need certain tools, materials, and knowledge. Required materials: cement, sand, crushed stone (gravel), steel reinforcement, plywood or formwork boards, binding wire, waterproofing materials, pipes for drainage and ventilation. Tools: everything for working with concrete, excavation work.
Designation of building dimensions
The dimensions of a concrete basement depend on its purpose and the owners’ plans for the premises. Standard dimensions are 2 by 4 meters. Much depends on where you plan to build the basement, the characteristics of the area, and the possibility of arranging a room of the desired size.
Selection of possible depth
The depth of the basement directly depends on the level of groundwater. To find out, they first carry out exploratory drilling to a depth of 3 meters, insert a wooden strip and leave it for several hours. If the lath is dry, groundwater goes much deeper.
The level of burial depends on the type of basement - whether it will be above ground or underground, and the possibility of making ceilings of optimal height. If groundwater lies high and close to the room, there is no need to build a basement at all - this decision can lead to useless waste.
Technical preparation for construction
Before filling the cellar with concrete, it is necessary to choose the right location and determine the level of groundwater. You cannot build a cellar near the foot of hills, as rainwater will flow down and flood the structure. It is best to build a cellar on the top of a hill (if it is a separate room).
The depth of groundwater is determined as follows:
drill a hole 3 meters deep with an ordinary garden drill (if the soil is complex and contains stones, it is better to use special equipment). According to the standard, there should be at least 50 centimeters from the wet soil to the bottom point of the cellar. The cellar is usually made at a depth of a maximum of 2-2.5 meters, so drilling 3 meters is usually sufficient.
The presence of water can be determined with a borehole depth gauge or a regular rod (as described above). All technical work is carried out in the wettest time of the year (autumn or spring).
Pit development
Before pouring a concrete cellar with your own hands, you need to carry out excavation work. First, the area is thoroughly cleared, the top layer of soil and turf are removed, and the boundaries of the pit are marked with pegs and a cord. The main part of the soil is dug with an excavator; a third of the volume can be cut out with a bayonet shovel.
Wet soils are dug with a drainage system in place: a concrete pit or well 50-80 centimeters deep below the pit level is made separately from the pit, and the water is removed with a drainage pump. The bottom and walls of the pit are leveled, leveled very evenly, then crushed stone is filled in and compacted several times.
Drainage for a modest investment
Drainage is a necessary measure to eliminate the risk of flooding. To successfully deal with backwater, you can create a network of trenches. Special pipes (drains) are installed, which are laid around the perimeter of the room and insulated with layers of geotextile and gravel. These will be coarse filters that will prevent the pipes from becoming clogged with sand.
The drains are placed at a slope so that the water flows away by gravity. The pipes are connected to a common pipeline that goes into a storage well (in this case, a pump is used that pumps water out of the well as it fills) or a pit or ravine.
Formwork assembly
To pour the concrete floor, formwork is installed from panel boards 3-4 centimeters thick and 25 centimeters wide, which, after dismantling, can be taken to create a wooden floor frame.
How the work is carried out:
- Cutting boards to required sizes.
- Assembling panels around the perimeter of the base.
- Installation of the reinforcement frame along the wooden contour, connection of the reinforcement with the steel frame of the stairs to the cellar (if poured).
- Hammering pegs vertically to secure the boards.
- Installation of spacers in the formwork for rigidity.
- Installation of pipes in the frame to create a ventilation system.
Reinforcement
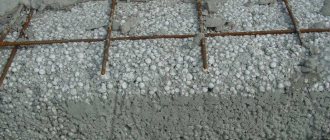
The reinforcement frame is installed around the entire perimeter of the pit and in the walls, which makes it possible to make the floor reliable and strong, not afraid of heaving, and the walls able to withstand the roof and soil pressure. The reinforcement uses corrugated steel rods with a cross-section of 8-10 millimeters, which are laid in a grid format. The elements are knitted with special wire. The frame must be raised above the floor using special clamps or pieces of brick.
Base
Before pouring the concrete cellar with your own hands, you need to make a high-quality foundation. The bottom and walls must be perfectly flat, without loose soil. A layer of sand and gravel (10 centimeters each) is poured onto the bottom; if the soil is wet, another 10 centimeters of fatty clay must be laid on top. Each layer of the pillow is carefully compacted.
A layer of waterproofing is laid on top - you can use polyethylene film or roofing felt. Wet soil requires multi-layer waterproofing. They lay the floor and go onto the walls of the pit. Then the floor is poured with a concrete solution in a layer of 13-15 centimeters. Filling is carried out without interruptions, with uniform distribution of the layer and compaction with a deep vibrator or bayonet.
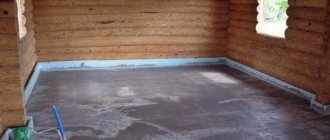
8 hours after pouring, excess moisture from the screed will evaporate, the layer can be rubbed and sanded to obtain a smooth surface. Further work should be continued only after 28 days.
Walling
After the floor has hardened and gained strength, you can begin building the walls. First, they make formwork for the walls (partially removable or simply removable). If the structure is partially removable, build one wall (the surface of the pit acts as the second) - a simpler option, but it requires more material consumption and is not always suitable. Removable formwork is made in the format of a double-sided box with two walls connected firmly to one another.
Formwork for walls can be made from moisture-resistant plywood, edged boards, OSB boards, etc. The inside of the structure can be lined with polyethylene. The thickness of the cellar walls is usually up to 15 centimeters. A reinforcement frame is mounted between the walls of the shields - from vertical ties and horizontal jumpers located in the corners. The elements are connected with knitting wire.
The walls are poured in layers up to 25 centimeters thick, with the obligatory compaction of the mixture with a bayonet or vibrator. If the vibrator is powerful, you can fill it in layers of 60 centimeters. After each layer of concrete is poured, anchor loops are placed in it to tie the frames together. This is how the walls are built to the required length.
After 6-7 days, the formwork can be dismantled. Concrete requires proper care - spraying with water, protection from ultraviolet radiation. After 28 days the walls are ready.
Roof
The roof is poured in the same way as the walls. First, install the bottom of the formwork, supporting it with reliable racks on the floor. Along the perimeter of the cellar, boards are installed on edge, which extend beyond the edges of the walls by 10 centimeters. If the roof should be vaulted, lintels of the desired shape are installed across it. The jumpers are tied to the perimeter box and supported with posts in the center and along the edges.
A continuous plank sheathing is installed on top of the crossbars, covering it with roofing felt. Two ventilation ducts from sewer pipes with a diameter of 110 centimeters are also installed here. One pipe should reach the floor, the second with its edge reaching the roof.
Now the reinforcement frame is mounted - if the roof is vaulted, the rods are bent at the desired angle with a special tool. If the roof is flat, the reinforcement is laid out in the same way as on the base. The ends of the reinforcement are connected to the ends of the rods left when pouring the walls. It is necessary to ensure that the entire frame is embedded in the thickness of the concrete. Afterwards, the external formwork panels are installed and the roof is poured.
Filling is carried out as usual. If the roof is pitched, the vibrator cannot be used. Concrete can be bayoneted, then it needs to be smoothed with a trowel and cared for during the drying process. The ceiling can also be made from a reinforced concrete slab, which will save time and effort, but you will have to use special equipment to deliver it.
Waterproofing
After the concrete has hardened, the roof must be covered with a layer of waterproofing to reliably protect it from precipitation. Here it is better to choose roofing material. And on top you can install a layer of thermal insulation - turf and soil, in addition to rigid polystyrene foam. If you are concreting a basement in a private house, you can refuse these activities.
A concrete cellar is the best solution for those who need to create a high-quality and reliable place to store food and more. Provided that the technology and work rules are followed, it is quite possible to create a high-quality concrete cellar with your own hands.
Foundation with a basement and without a basement - what's the difference?
In houses without basements, the foundation can be made shallow, superficial, or on a hanging grillage, which has its own advantages in each specific situation. The main thing is the minimized volume of excavation work, which during the construction of a basement constitutes a significant share of the total cost of the foundation. Along with the volume of excavated soil, the cost of the basement is also influenced by the height of the walls, which, depending on the purpose of the buried premises, must correspond to the height of the technical or residential premises.
Pit intended for a house with a basement
Some types of foundations (piles, pillars), which in themselves are economical in this regard, cannot be used at all when designing a basement. Its walls are either formed by the foundation, as in the case of a strip, or rest on a flat foundation, as in the case of a slab - there is no third option. As a result, we have only two types of foundations on which to build a basement. They have an individual design, which depends on the specific hydrogeological conditions of the soil at the site.
Main requirements
Not every construction company will undertake the equipment of a basement with a pile foundation. And independent construction is fraught with unforeseen consequences
Success is guaranteed by extreme caution and accurate calculations
At the design stage, the distance from the piles to the cellar walls is taken into account. The distance should not be less than 2 m. Violation of this requirement leads to loss of stability of the rods and to subsidence of the soil.
To dig a pit for a cellar, you need to know the location of each pile. The walls of the cellar are erected inside a perimeter outlined by screw piles. Maintain the same distance from the supports.
Pile pillars are selected according to:
- type of structure;
- area of the area;
- type of soil.
The materials for the walls are tarred logs, bricks, and reinforced concrete blocks. Additional layers of thermal insulation and waterproofing are used. To protect walls and façade finishing, cladding materials are used.
Summary
As you can see, the construction of a concrete cellar requires a serious and balanced approach. The strength of the structure will depend on this. The cellar must be quite durable so that it is safe to be in it when required for its maintenance.
Recommended Posts
Protecting plants from heat
DIY dressing table
Mastic for floor tiles
Do-it-yourself soundproofing of walls: reducing the noise level in qua...
Apartment aviary for dogs
DIY broom made from plastic bottles
We make a ceiling in the basement from wood
Using a wooden beam structure is a proven method for arranging a basement floor.
Sequence of work:
- Saturate the wood with antiseptic.
- Waterproof the supporting planes of the beams with roofing felt.
- Install the beams on the end surface of the walls and secure them.
- Attach boards to the beams and lay insulating material.
- Cover the insulation with sheet roofing material.
- Fill the resulting structure with soil or fill it with a thin layer of screed.
To ensure structural rigidity, it is important to install the beams in pre-prepared grooves.
The ceiling that is obtained after using this method requires high-quality thermal insulation