Basement made of concrete
Growing vegetables and fruits on a personal plot is only half the battle; the harvest also needs to be preserved. Basements are excellent for this purpose: sunlight does not enter them; the temperature and humidity are constant, if, of course, everything is done correctly.
For this purpose, it is much more convenient to use not a basement under the house, but a separate cellar, and if you take on its arrangement, then make the cellar out of concrete. Our instructions will tell you about all the nuances of its construction. You will also be offered a video on the topic: “Do-it-yourself concrete cellar.”
Features of concrete basements
A concrete cellar is the best solution for those who need to create a high-quality and reliable place to store food.
A concrete cellar can be above-ground or underground. The last option performs its functions best. However, its construction requires excessive time, physical effort and material resources. Therefore, most often a cellar is built with your own hands in the ground from concrete, deepening it into the ground to half its height. This is quite enough to protect the premises from freezing.
The floor in a concrete cellar is often left earthen. However, this makes sense when groundwater lies significantly below its level.
When the cellar is completely buried in the ground, the roof is made flat. Otherwise, it looks like an arch.
Concrete cellars are insulated with soil extracted during excavation.
What is it needed for
Any person living in a rural area knows how necessary a cellar is. It is truly a strategic structure. Maintaining a constant temperature close to zero, you can store vegetables and pickles in it throughout the year, regardless of the temperature on the surface.
For a good cellar, it doesn’t matter whether it’s cold outside or hot. It is always dry and cool. It does not require any energy sources to maintain an optimal microclimate.
The listed positive aspects are achieved due to the fact that the room for storing vegetables is located below the freezing depth of the soil. Each region will have its own depth. The earth, accumulating summer heat, prevents it from freezing in winter, and the cold accumulated over the winter does not allow it to warm up in summer.
Depending on the type of location, the cellar can be either underground or semi-aerial. Buildings that are partially underground can serve as a concrete cellar with a side entrance. This type is convenient for loading root vegetables and vegetables, but is little used in central Russia. The reason for this is the large depth of freezing; the room must be completely underground. Therefore, partially above-ground options are being built in the southern regions.
Vegetable storage facilities are so in demand that even city residents make concrete cellars in the garages and basements of their homes.
Advantages and disadvantages of concrete cellars
The main advantages of construction are strength, long service life, hygiene.
The main advantages of concrete cellars are:
- long service life;
- resistance to frost with the proper level of waterproofing;
- resistance to chemicals;
- strength;
- hygiene.
The structure has a relatively low cost and is easy to manufacture. Even one person can build it.
Main disadvantages:
- high thermal conductivity, which requires careful hydro- and thermal insulation;
- the presence of cracks that appear during work.
However, these defects can be avoided if the procedure and technology for carrying out the work are strictly followed.
Insulation works
The climatic parameters of the basement depend on the effectiveness of insulation. Use a mixture of wooden sawdust and cement mortar as thermal insulation, which is evenly applied to the surface in a layer 4 cm thick. Perform finishing measures after the composition has dried. It is advisable to use polystyrene foam, mineral wool or polystyrene foam.
Don't forget about the need for room ventilation. This will prevent condensation from forming.
Types of concrete cellars
A cellar under the house is made at the very beginning of construction.
A reinforced concrete cellar can be built under any structure (house, garage, barn, etc.) or separately.
A cellar inside a building is made at the very beginning of construction, and a free-standing cellar is built at any convenient time.
Cellars can be built using ready-made reinforced blocks or pouring concrete mixture into pre-installed formwork. In this case, reinforcement with steel rods is additionally used.
When using any construction technology, the cellar floor is initially equipped with drainage and waterproofing systems. The surface is reinforced with steel mesh and filled with concrete, the layer of which must be at least 20 cm.
Reinforcement will avoid the destruction of the floor in the cellar under the influence of changing groundwater levels.
Caisson cellar
The caisson cellar is made of hydroconcrete.
The finished caisson cellar is made of special moisture-proof hydroconcrete. Structurally, it consists of several monolithic boxes connected to each other with special glue. They are additionally reinforced with a steel spatial frame
The finished concrete cellar is supplied together with a technical well, an entrance vestibule and a ventilation system.
The structure does not deform, does not condense moisture and is reliably protected from groundwater.
Types of materials for construction
Before choosing materials for construction, you need to answer the question: what properties should they have? The main requirement is the ability to tolerate high humidity. And the higher the groundwater is to the surface of the earth, the more resistant the material should be. They do not tolerate dampness well:
- Sand-lime brick. It is destroyed by prolonged exposure to water.
- Some types of red brick. This applies to varieties that are not sufficiently fired during manufacture.
- Wood. Does not tolerate moisture well, even when treated with special compounds. The exception is larch, which only improves mechanical properties from contact with water.
- Foam concrete. Despite the fact that its strength increases with water, it itself has a porous structure, which will contribute to the appearance of excess moisture. Humidity itself helps keep vegetables fresh, but too much moisture leads to mold.
From the most practical materials for construction you can choose:
- Cinder block. This is a durable material that is not afraid of dampness and has low thermal conductivity.
- Iron ore brick. This material is well annealed during manufacturing, so it is not afraid of high humidity.
- Reinforced concrete. You can either order it from the manufacturer or prepare it yourself. Knowing the ratio of components, you can achieve any strength. In addition, concrete kept in a humid environment increases its strength.
Taking into account not only the properties of the materials, but also the cost, you can decide in favor of building a concrete cellar.
DIY cellar construction technology
To find out the depth of groundwater, they drill a hole and install a wooden plank in it.
The depth of the cellar is determined by the depth of groundwater. To at least roughly find out, they drill a hole in the spring or fall at least 3 meters deep, install a wooden plank in it and leave it there for several hours. If the plank remains dry, the groundwater lies much lower; if it is wet, it is not advisable to build a cellar in this place.
It is not recommended to build a cellar at the foot of a hill - flowing rainwater will periodically flood it. It is best to install a basement at the top of a hill.
To construct an underground or semi-underground cellar, a pit is required, the lowest point of which is located at a distance of no closer than 0.5 m from the wet ground.
Pit
Pit for a cellar
Before you begin work on arranging a concrete cellar with your own hands, you need to do a number of preparatory work:
- clearing the site;
- removal of turf and topsoil;
- marking the boundaries of the pit.
Then they begin to dig a pit. About a third of the volume can be dug out manually, and then it is better to resort to the help of an excavator.
To avoid flooding, it is recommended to carry out drainage - a concrete well is made separately from the pit, up to 80 cm deep below the level of the bottom of the pit. Water is pumped out with a drainage pump, the walls and bottom are leveled, and then several layers of crushed stone are poured in, compacting them successively.
Filling the bottom
The bottom of the pit must be carefully compacted.
Any type of basement requires the preparation of a reliable foundation.
- The bottom of the pit is carefully leveled and compacted.
- A layer of crushed stone, the thickness of which should be at least 20 cm, is poured onto the bottom and leveled.
- A mixture of clay and water is laid on top of the crushed stone, thus forming a water seal.
- The water seal is covered with a layer of bitumen material on top and concreted.
This design ensures that the cellar floor will always be dry.
Bottom filling process:
- Formwork is installed, for the manufacture of which boards 3-4 cm thick are used.
- A mesh made of reinforcing bars is laid at the bottom. If in the future it is planned to construct a monolithic cellar, additional vertically installed metal rods are installed along the perimeter of the pit.
- Concrete solution is poured.
- Cover the slightly dried concrete with plastic wrap and wait until the floor is completely dry.
It will take about 30 days for the concrete to gain the necessary strength.
Pouring monolithic walls
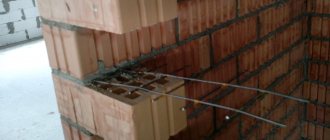
A reinforced mesh is installed between the walls of the pit and the formwork and concrete is poured.
Monolithic walls are erected in the following order:
- Formwork is installed around the perimeter of the walls. It is reinforced with internal supports. It is necessary to take into account the location of doors and ventilation holes.
- Vertical reinforcement installed when constructing the floor is connected with transverse rods.
- Concrete is poured between the walls of the pit and the formwork. Do this alternately on each side. It is recommended to fill the walls in one approach.
- The formwork is removed after the concrete has completely dried.
After the walls gain the necessary strength, the ends are leveled. Concrete is cut using diamond wheels.
The use of concrete blocks in the construction of prefabricated cellar walls
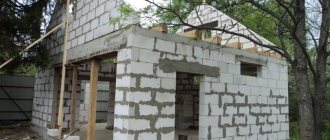
A cellar made of concrete blocks is constructed similarly to brickwork.
Since when assembling walls from concrete blocks there is no need to wait until the concrete hardens, the process of their construction itself takes much less time. The blocks are installed similarly to brickwork and are connected to each other with cement mortar.
You cannot build basements from aerated blocks, as they absorb moisture well, which contributes to their rapid destruction, despite several layers of waterproofing.
Floor installation
The easiest way to install a cellar floor is to use ready-made reinforced concrete slabs. However, you can do it yourself. To do this, install wooden formwork from chipboards, which are secured with special supports. It is mounted in both vertical and horizontal directions. Then a reinforcing mesh is installed on the formwork and everything is filled with concrete mortar.
Waterproofing
Bituminous mastic is used for waterproofing from the inside and outside.
The construction of a concrete cellar is completed by the process of waterproofing it. Most often, bitumen mastic is used for this purpose, which is used to treat all surfaces of the structure inside and out.
Having completed the treatment of the walls from the outside, all the voids between the walls of the pit and the cellar are filled with soil. It is important to ensure that there are no stones in the ground that could damage the waterproofing.
Concreting walls
Building walls is a little different from pouring a floor. It requires more concrete, which means that it will not be possible to prepare the required amount in one working day. Therefore, you will have to take a technological break and fill it in two stages. The first pour will take place from the floor level to a height of 1 meter, and the second from this mark to the level of the concrete ceiling in the cellar.
After the first pour, you need to take a break and wait until the concrete reaches a low strength: it stops crumbling under the influence of your fingers. Then the first layer must be passed with a wire brush to remove the film that forms during concrete hardening. After this, you need to pour cement 2-3 cm thick onto this surface and then continue pouring.
Installation of a finished concrete cellar
The caisson cellar is installed using lifting equipment.
The finished caisson cellar is installed in three stages:
- Dig a pit, the dimensions of which should be 0.15-0.20 m larger than the overall dimensions of the product.
- Using lifting equipment, the caisson-cellar is installed into it.
- Soil is poured between the walls of the cellar and the pit and thoroughly compacted.
If necessary, the walls of the cellar can be insulated.
General recommendations
When the box is prepared (the walls and floor are concreted and waterproofed), a ceiling for the basement is constructed. It is necessary to determine what is best to make the ceiling from? After answering this serious question, you can calculate the need for materials and begin work.
It is convenient when the basement is located in the room where the vehicle is stored. By doing all the work in the garage yourself, you can save financial resources, since you will not involve professional builders. To reduce costs, determine the necessary materials in advance and find out the prices at which they can be purchased. This will allow you to assess the overall level of expenses.
What types of ceilings can be installed in a cellar?
We provide ventilation
After installing the ceiling, you should also think about organizing a high-quality ventilation system, the operation of which, in fact, will determine the safety of the products in the storage facility.
Ideally, it is necessary to install two pipes at once, one will be an exhaust pipe (its purpose is to remove excessively humid and warm air from the room), and the second will be a supply pipe (responsible for the flow of clean air into the cellar). When using these two pipes in the cellar, optimal temperature and humidity conditions will be maintained throughout the year.
In fact, ventilation needs to be taken care of even at the stage of installing the ceiling. For example, you can make two small holes into which ventilation pipes will be installed in the future. If your cellar is small, then you can get by with just one pipe.
When installing pipes, you need to take into account the fact that the air flow can be hampered by precipitation or debris, so you need to make a small cap over the pipe, and install a metal mesh inside, which will also protect against insects and rodents from entering the cellar.
External device
The estimated size of the future cellar depends on what you are going to store in it. Its shape in the layout can be a circle, a square or even a polyhedron. Typically, a cellar has two parts: a lower part, which goes into the ground, and a cellar - an above-ground part that protects the structure from heat and frost. It can be used as a storage room.
Covering depending on the type of cellar:
- An ordinary earthen cellar is covered with a gable roof, lowered to the ground itself. It can be constructed from straw mixed with clay, branches or reeds. The roof itself is made of boards, under which roofing felt or roofing felt is laid. It is possible to insulate with peat to avoid freezing.
- A cellar with a cellar has a pitched roof and protruding overhangs, which helps keep the walls dry.
- A stone cellar can be made strong and reliable with the help of a correctly calculated and laid masonry vaulted roof.
- An above-ground, bunded basement has a roof made of clay mixed with straw, which is then covered with polyethylene or roofing felt.
Ventilation systems are often installed in basements. You can bring out 2 pipes through a hatch, or directly through the ceiling, or simply build in a hatch for ventilation.
Permanent formwork for foundation
Last month I introduced you to the structure and types of removable formwork for the foundation. Now it’s the turn to study permanent formwork for the foundation, especially since permanent formwork is increasingly used in modern construction and is gaining popularity due to its convenience and significant time savings (a large amount of time is required to dismantle removable formwork, this stage is missing in our case) . I will tell you about the types of permanent formwork, as well as about installation on your own, today, in this article.