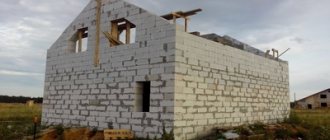
The strip foundation has the optimal combination of technical characteristics and capabilities.
It has a high load-bearing capacity and efficiency, allowing you to build large and massive houses on a relatively small supporting structure.
An important feature of the tape is the ability to combine it with additional elements, in particular with a basement.
Unlike most alternative options, the tape is fully adapted to the construction of an underground room without interfering with the base structure.
In addition to the main functions, the basement allows you to monitor the condition of the concrete strip and maintain it if necessary.
Let's take a closer look at the basement construction technique.
Cellar or basement?
The difference between a basement and a cellar lies in two factors:
- Location . If the basement is an element of the foundation of the house and cannot be separated from it, then the cellar can be built either directly under the house or at a distance from the building, in any convenient place.
- Purpose . The cellar was traditionally intended for storing food products stored for the winter. The basement has a wider list of functions, from storing supplies for the winter to creating a workshop, warehouse, gym or other needs.
The most fundamental difference between these structures can be considered the temperature regime. If the storage of food requires a lower temperature, which promotes the preservation of preparations, vegetables, etc., then the functionality of the basement requires higher temperatures, comfortable for performing various works.
In addition, if a cellar can be built on a finished building, then the underground is large and is built only during the initial construction of the building.
The strip foundation allows you to provide almost any temperature regime in the basement, depending on the purpose. This type of base allows you to obtain the maximum basement area corresponding to the size of the above-ground floors.
If necessary, it can be equipped as housing, although less comfortable than the usual premises on the upper floors.
Obvious disadvantages of the basement
- It costs more than the finished floor of a small house, even if it occupies 15 m2.
- Requires time and labor resources, special equipment. This is not always convenient if the house is far from the city.
- Requires usable space to install stairs in the house.
- If you “delay” construction or do not complete the basement at all, its walls will collapse, which will negatively affect the foundation of the house itself in the future.
- In many cases, when installing a basement in a house, it will need to be registered as a residential premises.
Conditions for building a basement
The main condition for the construction of a basement is a low level of groundwater. If they are located too close to the surface, the basement will be damp and the concrete floor will be subject to heaving loads.
Given the large area, their size may be critical and deform the base along with the concrete slab . If the depth of groundwater is too close to the basement floor, seasonal fluctuations can provoke a sharp increase in loads, the consequences of which can be very disastrous.
In such conditions, high-quality drainage of the pit should be provided.
Height difference
It is worth talking about the weak point in more detail. When creating differences in foundation support marks, it is not recommended to do it in one go. It is better to divide the process into several stages:
- pouring a slab for the basement;
- raising the walls of the underground part by a third of the height (in a monolithic version or from prefabricated blocks);
- pouring a monolithic stiffening belt that will protrude beyond the basement walls by 60-90 cm;
- raising the walls another third of the height;
- pouring a reinforced concrete belt under the foundation strip (it is a continuation of the stiffening belt);
- production of tape (parts without basement);
- continuous reinforced concrete belt along the edge of the foundation.
The result is a stepped transition, which allows you to reduce soil compaction zones and better distribute the load. The foundation strip and basement walls can be made from either blocks or monoliths
In this case, it is important to carry out shear calculations of the structure and lay additional reinforcement in the upper part of the cantilever projections
Setting up a basement is a task that needs to be carefully considered.
When deciding to arrange a room under part of the house, it is important to remember that the most reliable and less labor-intensive option would be the following: a basement under an extension separated from the main building by an expansion joint
Good publicity
What should be the depth of the strip foundation?
To build a basement, it is necessary to immerse the tape in the ground to a depth below the freezing level. This is the minimum value; in practice, they are most often guided by the height of the basement, the thickness of the sand preparation layer and the concrete floor.
In total, the depth of the belt can be laid in excess of 2 m. It must be taken into account that under such conditions the side surface of the belt has a large area, which contributes to an increase in horizontal loads on it from the outside.
Their size can be reduced only by expanding the pit and increasing the layer of filling of the sinuses, which compensates for pressure and performs drainage functions. The volume of waterproofing work and the overall consumption of building materials increases, especially if there is a concrete floor.
The calculation of the basement structure must be carried out by a competent specialist; acting “like a neighbor” in this case is too risky.
Temperature control
If you are buying a country house or cottage, then after inspecting all the external structures of the building, be sure to look into the underground, which should not have noticeable defects or signs of freezing of the elements of the house. After purchasing a home, it is best to monitor the temperature in the basement throughout the winter season.
You need to monitor the temperature in summer too. Special electronic devices are excellent for this, which are capable of remembering and displaying limiting positive and negative values. The temperature in the underground should be approximately the same as in the cellar (in the summer, it is usually slightly higher, but there is nothing to worry about).
If water begins to freeze in pipes located underground, this is a clear sign that additional heating of the room is needed. In this case, a special convector can be installed in the underground floor, which will maintain a constant optimal temperature. In summer, appropriate thermal insulation work can be carried out.
Construction over part of the house and over the entire area
A strip foundation allows you to create a basement both under the entire house along the perimeter of the external walls, and under part of it.
There are individual cases of constructing underground premises that exceed the size of the above-ground part of the house, but they require separate consideration due to the complexity of calculations and construction .
In most cases, when the size of the basement is smaller than the total area of the base, the depth of the tape is taken according to the conditions of the building parameters. For the basement, a separate pit is dug with a deeper foundation, creating a sufficient height for the room
The pit is inscribed in the general perimeter of the belt. This option is used in cases where it is possible to use a shallow version of the tape .
If it is necessary to build a full-fledged buried foundation, the basement is formed by removing soil in the desired section of the tape.
How to deal with dampness under the house?
Having completed the installation of a cellar in the house and begun its operation, many are faced with the problem of dampness. How to prevent condensation from accumulating on the walls of the storage facility, and moisture from penetrating into the living space?
You need to understand that water will definitely seep into the cellar under the house due to groundwater and high water. No waterproofing can give a 100% guarantee. In addition, during storage, vegetables will release moisture, which will accumulate in the air.
The optimal solution in this case seems to be a do-it-yourself effective ventilation device. The ventilation system for the cellar should consist of two pipes. Through one pipe, fresh air will flow inside, and through the other, on the contrary, it will go outside. You can use any pipes: special ventilation pipes or ordinary ones made of polyvinyl chloride (which are usually used for sewage).
If your house has a small cellar, then you can make ventilation with just one pipe, which will be responsible for both air flow and exhaust. When the size of the cellar is significant, it is recommended to install special devices inside the ventilation pipes that will forcefully pump air out of the storage facility, preventing it from stagnating, leading to the formation of condensation.
The insect can enter the cellar through the ventilation.
The exhaust pipe must be brought to the roof of the house. The lower part of the exhaust pipe must be installed under the ceiling of the cellar (in accordance with the laws of physics). The lower part of the supply pipe is installed at a height of 20-30 from the cellar floor. and the upper part can be displayed through any window. The supply pipe must be equipped with a metal filter, which will protect the cellar from debris and pests. In turn, a deflector can be installed in the exhaust pipe, which will increase draft from the cellar in windy weather.
With the help of a high-quality ventilation system, the cellar under the house can be used without problems for decades. Even a novice builder can make a storage facility correctly with his own hands.
Author » Ilya Avdeev
Website editor-in-chief, civil engineer. He graduated from SibSTRIN in 1994, since then he worked for more than 14 years in construction companies, after which he started his own business. Owner of a company engaged in suburban construction.
Waterproofing
Cutting off the tape from contact with water is a mandatory element that helps preserve the working qualities of the material and increase the service life of the base. The traditional method of waterproofing , which has been used for many decades, is to apply a layer of heated (molten) tar to the side surfaces.
To cut off horizontal surfaces, a double layer of roofing material is used, glued inside with bitumen mastic. The bottom layer is laid before installing the armored belt, and the top layer is applied after curing and hardening of the material.
Modern materials for waterproofing make it possible to form high-quality protection for concrete from moisture . The most effective are impregnations that penetrate the surface layer of the material and completely eliminate the possibility of capillary penetration of water into it.
NOTE!
Most builders do not yet trust new and little-tested means, preferring proven methods - applying a layer of bitumen mastic or hot tar.
Storage floor
The most common option is to install a concrete floor. Arranging such a surface, of course, will not provide 100% waterproofing of the room, although concrete has many advantages over a ground floor, which are visible already at the construction stage:
After the reinforcing mesh is assembled, concrete can be poured.
- Anaerobic bacteria can emit gases that are potentially dangerous to humans, which will never enter the cellar through the concrete floor.
- A variety of pests will also not be able to enter the storage facility through the concrete surface, so installing such a floor is the right solution if you are concerned about this problem.
- Even large rodents cannot destroy a concrete floor.
- During high water, when the dirt floors simply begin to slip away from under your feet, the concrete surface will remain in place.
The construction of a concrete floor in a cellar in a private house involves the following steps:
- The first step is to dig a pit, decide on the size of the cellar and level the bottom of the hole.
- Next, you need to make a sand cushion, the thickness of which should not exceed 20 cm. It is compacted using available tools and water. The cushion must be firm and level, otherwise the concrete floor will undergo deformation in the future.
- Then it is recommended to lay a layer of gravel, which also needs to be thoroughly compacted and made as even as possible. The arrangement of this layer will ensure high reliability of the surface and the cellar under the house will not be subject to deformation.
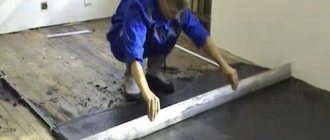
- Waterproofing material is laid overlapping on the gravel-sand cushion (special polyethylene or roofing felt can be used). This is necessary not only as a barrier from groundwater, but so that the cement laitance does not go into the lower layers after pouring the solution. Thanks to this approach, concrete gains maximum strength. Of course, this will not provide an absolute guarantee against moisture penetration into the premises, but at least it will reduce the risks as much as possible.
- A stack of reinforcement is placed on the waterproofing layer. The thickness of the reinforcement bars should be 5 mm or more. Reinforcement of the floor surface ensures the resistance of the surface and its durability during operation.
- Finally, the floor is poured with cement mortar about 10-15 cm thick. You need to understand that the coating will gain working strength only after a few weeks. For the first days after completion of work, walking on such a floor is prohibited.
General installation diagram
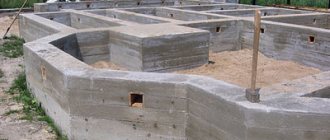
The construction of basements is carried out simultaneously with the construction of the general foundation. This allows you to obtain a strong, monolithic base with maximum load-bearing capacity and resistance to external loads.
There is a technique for constructing prefabricated belts with basements that uses foundation blocks (FBS), but this technology is mainly used for the construction of massive multi-story buildings.
Let's consider the procedure for pouring a monolithic concrete strip:
- Preparing the site, marking, digging a pit.
- Preparing a trench for the tape at the bottom of the pit.
- Creating a layer of sand backfill.
- Laying a layer of waterproofing.
- Installation of formwork.
- Creation of a reinforcing frame.
- Pouring concrete.
- Allow the concrete strip to cure until the material hardens completely.
- Stripping, applying waterproofing.
- Further work.
The procedure is indicated schematically, without details . Details depend on specific conditions, hydrogeological conditions, soil composition, etc.
Several additional actions may be necessary - drainage, insulation or other operations that are applied as necessary and according to design data.
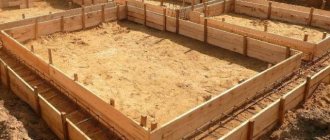
Installation of formwork
The construction of the formwork is usually carried out directly on site. The material is wood (edged board 25-40 mm thick) or plywood .
Shields are assembled, the width of which corresponds to the height of the tape with some technological margin. The assembled panels are installed in their places, aligned along the axes of the tape and fixed with stops in increments of 0.7-1.2 m. The distance between them determines the thickness of the tape and is fixed with crossbars. When assembling, it is necessary to ensure maximum density.
Gaps or gaps larger than 3 mm are not permitted . If large gaps appear, use tow or fill the gaps with wooden slats. The installation of the formwork is carried out carefully and firmly so that when pouring it is possible to withstand the loads and weight of the concrete.
IMPORTANT!
Plywood formwork allows you to obtain maximum quality tape, a simpler and more airtight structure.
Installation process
Installation of the strip foundation is carried out:
- In a monolithic way. The formwork fencing of the tape is prepared on both sides, the space inside the formwork is reinforced and filled with concrete mixture with compaction.
- Using foundation reinforced concrete blocks. Typical concrete products for the construction of building foundations are usually marked with the letters FBS with digital indicators of the parameters of length, height, thickness in decimeters, for example: FBS 24-6-3. The blocks are installed by analogy with brickwork using cement-sand mortar.
- Sometimes the foundation strip is built as a wall from small solid concrete blocks. The typical size of the material is 40x20x20 cm, the wall thickness can be any, the masonry is similar to brick.
The fastest way to build foundations is to use special blocks. But industrial products like FBS are expensive, installation requires lifting mechanisms, and transportation of blocks to the site is expensive.
Small-piece concrete products are used for small volumes of strip foundations. The most affordable way to build with your own hands is considered to be the construction of a monolithic foundation strip.
Alternative options
Along with monolithic technologies, piece construction materials of small and large format can also be used to create strip foundations. In the first case, this is a revered brick - so we will pay a little attention to it.
Brick tape
When constructing a basement floor from brick, you only need to take for work a clay, well-fired version, which builders call “iron ore.” You can distinguish it by color: the longer it is fired, the more saturated red, or even red-brown, it turns out.
The rich color of the brick indicates a good degree of firing
So:
- The aesthetics of the products are not particularly important here, so you can buy the most inexpensive backfill brick. But so that you don’t have to plaster or veneer the visible part of the base when it is brought to the surface, you can use a facing brick to lay the facing verst.
- Unlike all other foundation options, which can be laid directly on the ground, there must always be a concrete foundation under the brickwork. This can be a reinforced concrete footing (10 cm thick), or a full slab foundation (30-40 cm thick).
- In the first case, the brickwork must necessarily widen downward. If the walls are up to 3 m long, their thickness will be 380 mm (1.5 bricks). In this case, the width of the supporting part of the wall should be 640 mm (2.5 bricks). On longer walls, these figures increase to 510 and 770 mm respectively.
- When the walls of the basement rest on a monolithic slab, there is no need to widen it, so the masonry is erected like a regular wall. However, brick walls have many mortar joints through which moisture can be absorbed - so it needs enhanced waterproofing.
Layout of a brick basement floor
Laying the plinth in the ground part
This plaster will create an impenetrable barrier to moisture on the outside of the brick wall.
Coating basement walls with bitumen mastic
Naturally, these are hydrophobic additives to the solution, but this is not enough. When it comes into contact with the ground, there is always a chance that the masonry will get wet - especially when the groundwater level is close. Therefore, the outside should be plastered with waterproofing plaster, and then floating waterproofing should be done (see Waterproofing basements from groundwater: options and execution of the work). In dry soil, it is enough to coat the masonry with bitumen mastic and cover it with roll material.
Note! When there is a monolithic slab at the base of the basement floor, instead of brick you can also use small-format concrete blocks - only not cellular ones, but ash concrete ones: cinder block or expanded clay concrete block. You can also use polystyrene concrete blocks. Just remember that such masonry cannot be used as an independent foundation!
How to build with your own hands?
The construction technology according to step-by-step instructions after digging a pit is as follows:
- backfilling the cushion with crushed stone and sand;
- spill of cement screed;
- protection from water;
- forming the basis for the foundation;
- preparation of drainage (for close-lying groundwater);
- covering the base with additional waterproofing.
The good thing about working on your own is that it helps you save money on paying professionals. But first you have to thoroughly calculate everything. If some type of work can be done manually and using special equipment, it is better to prefer the mechanized option. The costs of paying for equipment or the help of craftsmen will soon be justified by a significant improvement in quality. It is advisable to complete any work involving pouring cement in one working day, otherwise the strength properties will be unsatisfactory.
After the excavator completes its work, the bottom and walls of the pit will need to be compacted by compaction. It is imperative to calculate the walls and floor in the basement, only then will it be of high quality inside and out. Those who build such structures without calculations find themselves in a losing position.
When calculating, take into account:
- whether the wall reinforcement is inserted into the foundation;
- whether the backfill soil is brought to the top point of the wall;
- how the floor is supported;
- Are the engineering and geological conditions during construction difficult?
- what coefficients apply in a given area.
In most cases, the basement is used not only for storing food for the winter. This means that in addition to installing walls and floors, they will also have to be properly insulated
This is especially important when organizing additional living or working space. Backfilling can only be done with materials that are not prone to heaving
In any warm basement, the basements are insulated; for this purpose, materials with a zero level of water absorption are used, which retain their characteristics even when moistened.
Extrusion foams are most often recommended. Slab floors are insulated by laying out the material on the load-bearing parts between the joists. The insulation layer is preceded by protection against getting wet. A vapor barrier is formed above the insulation, which will prevent the exposure of water vapor contained in the air to it. The material of this barrier is laid with a roll overlap of at least 10 cm.
Even the warmest foundation of the house may not cope with the task. The fact is that after pouring the tape, it must certainly be reinforced. Only this approach guarantees normal mechanical strength. Cracks that appear must be immediately saturated with solution and tightened with metal strips.
Main types of basements
A basement under the house is an undoubted convenience. It increases the area that can be used for various needs. The ground floor houses:
- storerooms;
- cellar;
- Technical buildings;
- garage;
- sauna, bathhouse, swimming pool;
- Gym;
- workshop;
- billiard room;
- rest rooms.
The basement floor can accommodate many specialized objects
Depending on the purpose, a certain temperature and humidity regime must be maintained in the basement and ventilation must be provided.
For example, in a billiard room or workshop you need to provide heating, but in a cellar this is not at all necessary.
In a pantry, the ceiling can be at a height of 1.8 meters, while in a billiard room or recreation room the recommended value is at least 2.3-2.5 meters.
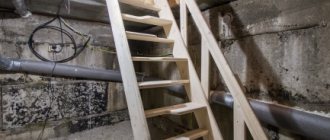
Access to the pantry or cellar is provided through a hatch or a narrow staircase with a door. Swing or overhead gates are installed in the garage.
The basement floor mark can be:
- below the base of the foundation;
- above her;
- on the same level.
In this video you will learn more about the foundation:
Drilling an existing or new basement below the base of the foundation is not recommended unless an assessment of the condition of the structures, engineering surveys, and preliminary calculations of the foundation for strength and stability have been carried out. Otherwise, this may lead to a decrease in the bearing capacity of the soil, uneven settlement and the appearance of cracks. Sometimes the consequences become catastrophic.
Stages of arranging the foundation
Before starting work, calculate the depth and thickness of the base.
To prevent horizontal movement of the tape, the basement walls are made thicker . Since this increases the overall weight of the structure, the width of the base base increases.
It is recommended to build a monolithic rather than a block strip - it is more resistant to frost heaving and can withstand loads better.
Before starting work:
- purchase the necessary materials,
- order special equipment,
- determine the work schedule.
Calculation of sole area and wall thickness
The uniform distribution of the weight of the house depends on the area of the sole. Also, the base of the foundation performs the following functions:
- prevents local soil heaving;
- strengthens weak soil layer;
- increases the uniformity of the arrangement of the structure along the plane of the site.
The area of the sole and the thickness of the walls are calculated using formulas and data from the reference book. Average values for a building with a wall length of up to 3 m and a basement depth of 2.5 m are given in the table:
| Wall material | Sole width, mm | Basement wall thickness, mm |
| Rubble stone | 900 | 600 |
| Rubble concrete | 600 | 400 |
| Brick | 770 | 380 |
| Concrete monolith | 400 | 200 |
| Concrete block | 500 | 250 |
You can perform independent calculations using an online calculator and reference data available on the Internet.
Excavation
At the beginning of the work, the future foundation is marked . For these purposes, use ordinary pegs with a rope stretched over them. In accordance with this marking, a pit is dug, manually or using machinery. The bottom and walls of the pit must be smooth, without crumbling.
Water disposal and drainage
This is the second stage of work. There are three types of groundwater that is drained from a building:
- ground, rise during the rainy season or snow melting;
- capillary - rise from aquifers;
- perched water - formed in backfill cavities, communication trenches after floods, heavy rains, and so on.
Ventilation baseboards and grilles
To ensure good air circulation in the space between the rough and finished floors, the following method is used. When laying finished floor boards, a gap is left between the wall and the edge of the last board - about 2.5-3 cm, which is subsequently covered with a plinth. In the corners of the room, retreating 15 cm from the baseboard, holes are made for ventilation and covered with ventilation grilles.
Often, to increase the rate of air exchange, in addition to the grilles, special ventilation plinths are installed, in which there are holes for air passage with a diameter of about 10 mm. The plinth is attached along its entire length on two opposite sides of the room.
High rates of air exchange are achieved by using a slotted plinth, when, when installing it, wooden pads 12 mm thick are placed under the material every 50-75 cm. The resulting gaps ensure good ventilation of the space under the floor.
It should also be noted that advice, consultation or simply the presence of a specialist when installing a ventilation system for plank floors will help avoid annoying mistakes in such a simple process.
Common Mistakes
Among the common mistakes during the construction of strip foundations, the leading ones are:
- Saving on materials. The use of low-quality concrete, poor-quality waterproofing, crushed stone, and sand reduces the cost of construction, but significantly reduces the reliability of the foundation.
- Using blocks instead of a monolith. The blocks are great for a shallow foundation or for a home without a basement. But with a basement, the soil pressure on the foundation walls increases, which leads to the shifting of the blocks.
- Incorrect foundation calculations.
- Connecting reinforcement by welding, if it is not intended for this purpose, or in violation of technology.
- Insufficient coverage of the reinforcement with concrete - the layer of mortar should cover the rods by 5 cm, no less.
- Pouring concrete without using formwork.
Work order
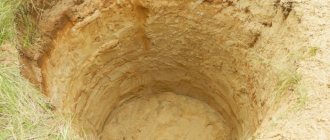
The pit for the basement must be deepened by 2-2.5 m
The technology for building a house with a strip foundation, in which a basement is planned, is not much different from conventional work. It is mandatory to carry out:
- site marking;
- works related to land;
- filling and compaction;
- compaction of the foundation base;
- marking the base tape directly;
- construction of formwork structures;
- waterproofing;
- assembly of the reinforcement frame;
- pouring and compacting concrete.
A feature of the work preparing for the construction of a house on a strip foundation, equipped with a basement under its entire area, is the need to perform double markings. The first marking will be needed to assemble the formwork over the entire area of the house, and the second marking will be needed directly for constructing the tape.
To obtain a smooth structure, it is necessary to level the walls of the pit
You can do all the work related to building a basement in a house with your own hands. It is necessary to correctly mark the territory and take full responsibility for the execution of land and other work. The slightest failure to comply with the technology can lead to distortion and destruction of the foundation.
The beginning of construction involves determining the right angle and carefully checking the diagonals. To do this, you will need to make markings in exact accordance with the length of all sides of the future building. Now you can start digging trenches, and the earth should only be thrown outside the site.