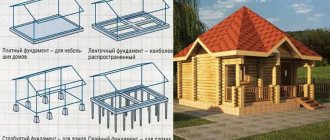
It is very difficult to build strong and reliable structures on difficult soils. It is very important to get the foundation right. Not all types of foundation are suitable for such areas. For example, a traditional strip foundation may not withstand ground movement.
That is why in areas with difficult soil and low bearing capacity, a pile foundation is used.
Very often, ready-made products are used as supports, but this is not always possible. For example, if the development is carried out close to other structures, then it is difficult to use special equipment (and without it it is sometimes impossible to install piles).
And in this case, the question will be relevant for you: how to make piles for the foundation with your own hands. This is exactly what the article will discuss.
Main purpose and types of pile foundations.
Pile foundations are used in the construction of industrial and residential facilities; it can be used in the construction of multi-story buildings even on soft soils.
Such a foundation can significantly reduce the process of arranging basements or completely eliminate these construction works from the cost estimate.
The main reasons for constructing a pile foundation are as follows:
- Weak topsoil. Such soils may contain humus, peat impurities, sand, and clay.
- The presence of a large amount of water in the soil makes it quicksand. Such natural conditions create the need to transfer the load of the structure to denser and deeper soils; installation of a pile foundation with a grillage, increased soil density.
- Using a pile foundation, you can reduce the amount of earthworks. Preparation costs will also be reduced: digging a pit, renting a truck, transporting excavated soil, backfilling, purchasing concrete and much more.
Pile foundations come in several varieties:
Pile-grillage, pile-screw, pile-tape. Each type has advantages and disadvantages, we will look at them in more detail.
Video description
The following video shows in detail the screw manufacturing process:
The finished blade is welded to the end of the pile, trying to ensure that the plane of the screw is perpendicular to the trunk. Apply a suture on both sides, without gaps. The strength of the entire structure depends on its reliability.
Final processing
After completing the welding work, remove scale from the seams and grind them thoroughly. Then the entire product is cleaned of rust, degreased and an anti-corrosion coating is applied. This can be a high-quality metal primer or ship paint. They should be applied in at least two layers, allowing each to dry before applying the next.
Paint will protect metal products from corrosion Source i.ytimg.com
Stack foundation: pros and cons.
Using a lattice base has both positive and negative sides.
The advantages of such a foundation:
- allows construction on almost any type of soil;
- increased stability;
- increased load capacity (allows you to hold roofs and walls with a very high specific gravity);
- value for money (no need to use a ready-made solution, you can do it yourself);
- the strength of the base allows the entire structure to settle in the event of soil shrinkage; does not require special preparation of the construction site (reducing costs by reducing labor-intensive work);
- ensuring natural ventilation of the entire lower plane of the structure (humidity is reduced, condensation is eliminated);
- safety (reduces the risk of flooding in the event of a flood);
- speed of construction; high speed of construction.
Important! The construction of a foundation on piles requires accuracy in calculations and adherence to construction technology. When the support tonnage is overloaded, there is a high risk of the building collapsing in the future.
Disadvantages of a pile-grillage foundation:
- the impossibility of erecting a pile-grillage foundation on rocky soils; the complexity of installing the foundation during horizontal soil movement;
- the rather high price of a pile-grillage foundation, which is much higher than the cost of other options;
- inability to build a basement or basement room (this type of foundation is used exclusively for light and medium-sized structures);
- accuracy of calculations (calculation errors will lead to deformation of supports and the formation of cracks in the house).
- Ordering a pile foundation calculation from specialists is not cheap. Therefore, the total cost of work will increase significantly.
Waterproofing and insulation
Carrying out high-quality waterproofing is an indispensable stage in the arrangement of any type of foundation. A pile foundation also requires the use of waterproofing materials to isolate groundwater. The buried part of the supports is protected with coating mastics. The same mastics are used to protect the ground part of metal and wooden products. For reinforced concrete and grillage, in addition to waterproofing mastics, glued or fused rolled materials are used.
Despite the fact that the pile foundation, in fact, has only an above-ground part, it still needs to be insulated. The optimal solution to this problem is the use of extruded polystyrene foam boards, for example “Penoplex” or another brand. The slabs are fastened using plastic dowels with a wide head on the outer and inner sides of the grillage.
Pile-screw foundation: pros and cons.
This technology has been known since the last century, so its advantages and disadvantages have been studied for a long time.
Advantages of this foundation:
- low price for a pile-screw foundation, which is several times cheaper than a monolithic or slab foundation;
- high speed of construction (no need to level the ground and dig trenches); minimal disturbance of the soil structure;
- lack of vibration (the ability to build buildings next to architectural monuments, monuments, centuries-old trees);
- recommended for installation in marshy areas, on the edge of bodies of water (ideal choice for the construction of a pier);
- complete independence from weather conditions; reusable design; installation work is carried out with minimal costs (physical, technical).
Disadvantages of a pile-screw foundation:
- the supports are very sensitive to corrosion (iron alloys are used in manufacturing); fragility of the structure;
- inability to use the space under the house (it is strictly forbidden to build a cellar or basement).
Pile-strip foundation: pros and cons.
A fairly common type of foundation, which also has its own specific characteristics.
Advantages of strip pile foundations:
- can be built in areas with difficult terrain;
- efficiency (minimum amount of equipment and human resources involved in the construction of the structure); ability to withstand minor impacts and ground movements;
- piles can be made independently, using only available material;
- speed of construction.
Disadvantages of strip foundation:
- the need for detailed geodetic measurements;
- individual calculation of the length, thickness and depth of each rack;
- impossibility of creating a basement;
- mandatory work on insulation of subsoil;
- used exclusively for the construction of low-rise buildings (maximum three floors).
Currently, the cost of any construction work has increased significantly. Therefore, many homeowners solve the problem of building a foundation on their own and using all kinds of available means.
Step-by-step instructions for making metal piles
For example, let’s take the simplest version of manufacturing products, but the screw blade has a rather complex geometry. This results in the following advantages.
- The blade is welded to the tip - the twisting force is reduced, the pile goes into the ground more easily.
- The bottom rib has a special geometric shape that easily cuts the soil. There are options when the edges are made sharp, but professional builders do not advise doing this. The reason is that thin edges quickly bend, which greatly increases the resistance. Instead of making screwing easier, the opposite situation occurs.
Thick-walled pipes with a wall thickness of 6 mm and a diameter of 50 mm are used for the products. Used pipes, which greatly reduces the cost of materials, while the quality and all physical parameters are at the proper level. Protecting surfaces from corrosion is done with bitumen mastics.
Step 1
. Using a basic template, mark the end of the pipe. It is necessary to cut out the so-called crown; after bending it, a sharp end is formed. It is needed to facilitate screwing the pile into the ground. The template can be made from durable cardboard or a piece of linoleum. The process consists of several stages.
- Cut a piece of linoleum. The width should be equal to the circumference of the pipe, and the length should be twice the diameter. In our case, the width is 50 × 2 = 100 mm, and the length is calculated by the formula C = πD = 3.14 × 100 = 314 mm .
- We will make four teeth, the width of each at the base is 100:4 = 25 mm. Place dots at these deletions.
- Draw the axes of symmetry and connect them with lines to the vertices of the triangles.
- Cut out the triangles, you should end up with a crown, this is the template for all the piles.
Sample
Practitioners advise always making a reserve depending on the thickness of the abrasive disc.
Step 2
. Using a template on the end, draw a crown (rose) with a felt-tip pen or chalk. If you make piles from pipes with different diameters, then you need to make your own template for each of them. This only takes a few minutes, but makes the process of making piles much easier.
Marking
Step 3
. Using a grinder, carefully cut out the triangles. Make every effort to keep them the same. If the crown is asymmetrical, then when bent the sharp end will move, and this is a very undesirable phenomenon. When the pile is twisted, the tip rotates in a circle, the area of the inlet opening increases, which causes a significant increase in the required forces.
Cutting metal with a grinder
Practical advice. It is recommended to cut through the bases of the triangles; this will facilitate the process of bending the crown.
Leave strips of metal about 1 cm wide and cut the rest. Do not be afraid that as a result of such manipulations the pile will lose strength. This won't happen for two reasons. Firstly, the slots are then carefully welded. The load on the seam is in compression, and it can withstand such forces without problems. Secondly, the petals themselves do not feel significant pressure; their function is to form the tip.
Step 4
. Bend the roses towards the center of the pipe with sharp blows of the hammer. The blows must be strong; with experience, you will understand how the metal reacts to forces. Bend all the triangles in turn, making an effort so that they more or less evenly approach the center.
Step 5
. Place a so-called tight ring on the end. It is cut from a pipe of smaller diameter, in our case approximately 30 mm.
Bending metal using a ring
Gently hit the ring until the vertices of all triangles converge at one point. You won't get the perfect tip the first time, don't worry. Such work cannot be mastered without practice, theoretical knowledge only helps solve the problem, but without practice you will not be able to feel and correctly calculate the force of the blows and the location of their application.
Step 6
. Without removing the ring, grab the triangles of the crown. After this, you can remove it and use a hammer to more accurately adjust the petals. Make sure that there are no large gaps between them, and that the tip is located in the center of the pipe.
Spot welding of ends
Step 7
. Carefully weld the tips and the slots made. The seam should be smooth and without gaps. Cook the sharp end especially carefully. If it bends while screwing in, then very big problems will arise. Most often, the pile will have to be removed and repaired.
Welded seams of tips
Remove scale from the weld. Some inexperienced craftsmen skip this operation in the hope that the scale will protect the metal from corrosion. This is wrong. On the contrary, oxidative processes proceed faster. The reason is that scale quickly absorbs water and slowly evaporates it. The duration of contact of metal with moisture increases significantly and accelerates negative processes.
Step 8
. Prepare the blades. We already mentioned above that this option uses parts of complex geometry. They must also be made according to a template; it can be found and downloaded on the Internet and printed on a printer. The blades are cut with a gas cutter; if you don’t have one, then it is more profitable to order the production from specialists. They will definitely withstand all sizes, and this is very important for the quality of the piles.
Blades
Step 9
. Using a simple bending machine, stretch the blades and create a thread pitch. It is highly desirable that this machine has special devices for giving the parts the same size. All screw piles must have the same pitch; this is the only way to ensure approximately equal load-bearing characteristics of the elements.
Blade stretching
Step 10
. Weld the blades to the pipe. Carefully try on the parts, choose a position in which the size of the gaps is minimal. It is necessary to rotate the pipe, each time trying to select the optimal position for the blade. The fact is that the tip itself does not have ideal surfaces. Handmade work can never compare in quality to mechanical work. The larger the gap, the lower the fixation strength, the longer and more complex the welding process.
Welding the blades
Prices for popular models of welding machines
Welders
Be sure to apply seams on both sides; we have already mentioned that this element holds the loads from buildings and structures.
Finished pile
If necessary, coat the metal surfaces with bitumen mastics. As practice shows, with some experience and proper organization of labor, it takes approximately twenty minutes to make one pile.
How to paint screw piles and frames?
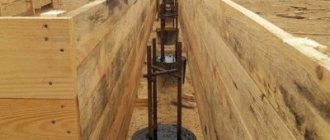
At the top of the piles, devices are attached for screwing into the ground; the specific mechanisms depend on the installation method. In some cases, it is enough to drill holes at different heights and tighten the elements using metal rods. If construction mechanisms are used, then a complex universal device is made at the end to hold the pipe.
Homemade piles
Find out how to make flashings for the foundation plinth, and also read the installation instructions in a special article on our portal.
Let us consider in detail the main points of the construction of three types of pile foundations.
This type of foundation has a characteristic concrete foundation structure. A beam filled with concrete and reinforced with reinforced elements is attached to it. This is a unique system consisting of supports (piles) and mesh. The supporting function is performed by round or rectangular pillars. The pillars are immersed to a specially calculated depth. It is on them that the entire weight component of the building rests.
The grillage is a monolith that unites all installed piles. A pile-grillage foundation can be erected independently, because there is no need to remove the soil. In order to drive the supports into the ground, special clamping devices are used. After the final installation of the piles, they are cut at the same level. Then a general connection is made with a grillage, ensuring an even load on each individual support.
Types of piles
Pile classification:
- Screw.
Pointed metal pipes with blades installed at the bottom. They are screwed into the soil like a screw. A strip-screw foundation is convenient because it allows you to work manually close to other buildings.
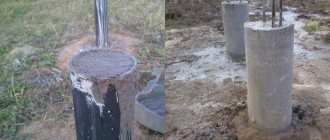
- Bored.
The supports are poured directly on site. A well of the required length is prepared, a metal frame and waterproof formwork (asbestos-cement or polyethylene pipes) are placed in it. If the soil allows, the walls of the well can be used for this purpose.
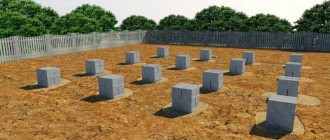
- Submersible.
The finished supports are driven into the soil using a construction piledriver. There should be no other buildings near the place of work. Space is required for entry of construction equipment.
The strip foundation on screw piles is a combined structure. The walls of the house rest on a single strip, and the supports provide strong adhesion to the ground.
Tape immersion methods:
- Recessed.
This option is used when constructing massive structures. The tape falls below the soil freezing mark. A large amount of excavation is required and there are no aquifers. This technology is used extremely rarely due to the inexpediency of installing auxiliary supports. If the area allows the installation of such a system, this structure will support any structure.
- Shallow.
This option is used most often. The support is immersed to a depth of 30 cm with an open base of 50 cm. The advantages include a small amount of excavation work. It is necessary to accurately calculate the groundwater level and find out about seasonal changes.
- Not buried.
It is a pile-grillage structure. The tape is above the zero value, so it does not perform a support function.
In most cases, a shallow-depth technique using bored piles is used.
Its advantages:
- a small amount of earthworks;
- the ability to do everything yourself, without the involvement of specialists;
- easy transportation, since all details of the scheme are created directly on the territory;
- the ability to do without special devices.
Sectional pile-screw foundation.
A photo of a pile-grillage foundation will show this much better than any detailed description. Often the base of the supports are metal pipes, hollow from the inside. This makes them lighter than other types of piles. It is easier to drive them to a considerable depth. To increase stability, concrete is poured inside.
Important! In this case, the grillage serves as a reliable and rigid foundation for the next stage of construction - laying walls.
You can make it in two ways:
Assemble from reinforced concrete elements. Pour monolithic tape. The process of screwing in the drill bit and pumping liquid concrete under pressure. To build a foundation with your own hands, it is better to choose the second method - a monolithic mesh. This will greatly simplify the task of pouring concrete.
The sequence of actions is as follows:
Leave a small space between the ground and the bottom of the chicken wire. This will help prevent swelling of the entire structure; mark the future location of the piles; drill wells and install piles; formwork should be laid on top; A reinforcement cage is mounted inside the formwork. It is necessary to completely immerse it in concrete solution. To do this, bars should be placed under the lowest bars;
A screw pile, carefully protected from corrosion, can be reused. The rods protruding from the bracket must be connected to a cage that strengthens the lattice. This will provide the base with greater reliability and strength; the grate can then be filled with concrete. Concreting is done in layers to avoid the formation of air bubbles.
To choose the right type of foundation, you need to proceed from the approximate weight of the future house. A foundation with a pile lattice has fairly large load limits, so it is suitable as a foundation for buildings made of aerated concrete, panel and frame houses.
It is not recommended to use this type of foundation in multi-story buildings due to its low resistance to overturning loads that occur on moving soils. The best option is to use a pile-lattice foundation under aerated concrete.
Important! The width of the grid should slightly exceed the width of the walls of the future structure. This will increase the durability of the building.
Varieties according to the method of deepening
The main way to classify piles is by the method of their deepening. The following types are distinguished.
- Reinforced concrete drills are installed in a pre-drilled well. Despite the presence of preliminary excavation work (drilling wells), with this installation method there is no impact impact on the pile. This allows you to minimize the likelihood of damage to the concrete pillar during its installation.
- Screw piles at the working end have a cutting edge in the form of a screw winding. Screw supports of small diameter and length are screwed into the ground manually using a screw, and large ones - using special mechanisms. One of the advantages of screw supports is that, if necessary, they can be removed (unscrewed) from the ground and installed in a new location. To increase the load-bearing capacity of the screw support, after screwing it in, the resulting funnel is filled with concrete, which makes it permanent.
- Driven piles have a pointed end and are driven into the soil without preliminary excavation using special equipment: vibratory hammers or hammers. To protect the upper part from damage during the dive, a steel ring is put on it. The disadvantage of this method of installing supports is the possibility of damage to both the pile itself and the waterproofing, if any.
- Bored supports refer to supports installed directly in the ground. The essence of this method is to pre-drill wells and then fill them with concrete mixture.
Pile foundation calculation
The total number of piles and their breakdown is designed for the construction of a one-story house 7x7 m. The approximate weight of consumables (roofing, wood, cladding, etc.) is 25,000 kg. Payload: 7x7x150 (accepted value for residential premises) = 7350 kg. Snow load: 7x7x180 (constant) = 8820 kg. Calculation of the total mass of the load on the foundation: 25000 + 7350 + 8820 = 41170 kg. This value must be multiplied by a safety factor of 1.1. We have 45,287 kg.
Now all that remains is to divide the resulting value by the size of the load on the pile (for example, a screw): 45287/2000 = 22.6435. After rounding we get 23. This is the required number of media. Installation stage - 1.2 m.
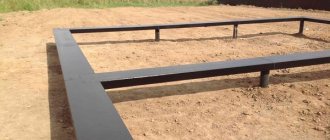
The foundation is on screw posts with a metal grid.
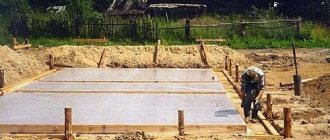
If the site on which you decide to build a house has complex terrain, it is more advisable to use a strip foundation. It consists of tape (grillage) and fleece. The technology for constructing a foundation of this type is not particularly complicated, so you can do it yourself. To perform this work, observe the following rules:
Make markings. To do this, direct the rods to the corners of the future structure and stretch the rope between them; determine the location of the piles; dig a hole for the tape; drill holes for the piles at the bottom; install asbestos-cement pipes in the dug holes, filling them with sand to about 30 cm;
A mesh foundation is usually used on loose, water-saturated soils.
Provide thorough waterproofing of piles with roofing felt; install several metal rods in each tube. The bars should rise 20 cm above the ground; fill each pipe with concrete, preventing air pockets from appearing; After the concrete has hardened, the tape is applied. To do this, the bottom of the structure is laid with bars 5 cm thick, and then a special mesh is installed. The mesh elements are securely connected to the reinforcement elements; formwork has been installed (wooden panels reinforced with struts and struts). The formwork should be slightly higher than the height of the future plinth;
Important! To give the walls additional reliability of the formwork, secure them with pegs driven into the ground (outside and inside). The tops of the posts should be tightly tied with wire. Concrete must be poured without leaving any gaps.
According to reviews, screw pile foundations are best used for the construction of residential and non-residential premises on wet soils. Let's calculate the required number of pillars using an example.
Initial data: pile diameter - 40 cm; estimated weight of the house - 80 tons; soil bearing capacity 5 kg/cm2. Fw = (πd2 / 4) × R. Pile load: 3.14 (constant value) x 1600 (square diameter) = 5024. Divide the resulting value by 4 (constant number) and multiply by the soil bearing capacity: 5025/4 x 5 = 6280. Number of piles required: 80 t / 6280 = 12738. Round the resulting value. You need 13 piles.
Remember that for the correct implementation of a pile foundation, it is necessary to calculate the number of piles. Incorrect calculations will lead to the appearance of cracks in the house and the gradual destruction of its walls.
Video description
The process of making a pointed tip is shown in the video:
A paper template will help you accurately mark - a sheet of paper, the length of which is equal to the circumference of the pipe. This length is divided into 4-6 parts depending on the number of segments, their height is determined and the designated points are connected. The cut out “crown” is applied to the pipe and traced along the contour.
An example of a finished cut for further production of a cone Source kzs.ru
After removing excess metal with a grinder, the remaining petals are bent towards each other using a hammer. It will be easier to bend them if you make small horizontal slits at the junction of the petals, which will also need to be boiled later.
And this is an example of welding a previously made workpiece into a pile cone Source kzs.ru
Making a screw
Another type of material that must be purchased before making piles with your own hands is sheet carbon steel grade St.3, the thickness of which must be at least 5 mm. The main working element is made from it - a spiral blade.
For normal passage through the ground, one turn of the spiral is enough, so the blank for making the screw will be a circle cut out of steel with a hole in the center. Its outer diameter is selected in accordance with the diameter of the trunk. The dependence of these parameters is reflected in the table.
External screw size depending on the diameter of the pile shaft Source remont-book.com
Strengthening the pile foundation strip.
To build a house without a cellar and basement, you should choose a screw foundation. It consists of piles that are screwed into the ground like screws. Not recommended for hard soils. The video will show you more clearly how to properly install screw piles for a foundation with your own hands.
The construction process consists of the following stages:
- We determine the number of supports required and the magnitude of the load on them. The load on bolted piles for the foundation is calculated using the formula: area of the house x (40 + 15xV), where B is the height of the building facade;
- we make markings on the ground using stakes and rope;
- drill holes for the piles. Their diameter should be slightly smaller than the diameter of the pile blades; install supports;
Important! Be sure to use a level to ensure strict vertical installation. If the support is uneven, the foundation will not support the load.
the excess length of the pile is removed with a crusher; A steel platform is welded to the cut edge of the support. A metal channel is attached to it.
How to make a pile foundation from wire mesh.
Wire mesh is the part of the foundation that extends above the ground. It is designed to distribute the load on the pile structure. To make a grillage, reinforced concrete or metal beams are used, combining the piles into a single structure. To properly build a grillage, you must follow the following sequence:
The formwork is being erected; reinforcement has been laid. It is carefully strengthened to avoid possible displacement; concrete is poured. Make sure there are no leaks beyond the formwork; air comes out of the concrete. This can be done using ordinary fittings;
Preparatory stage
Any work, especially something as important as creating a foundation, begins with calculations. You need to calculate how many piles are needed, as well as their location.
Note! The supports are installed at the corners of the house, as well as at the intersections of load-bearing walls. But if the house is large enough or has more than one floor, then the number of piles may be greater.
In addition, you should find out at what depth the foundation supports need to be installed. This parameter depends on many factors, the main ones being:
- depth of stable soils;
- groundwater level;
- soil freezing depth;
- mass of the building itself
Most of this data can only be learned by conducting geological research, and specifically by carrying out several test drillings. Of course, this will require additional expenses from you, but without this information it will be impossible to make a reliable and durable foundation.