As a rule, indoor renovation ends with the installation of lighting fixtures on the ceiling. Despite the fact that tension systems and plasterboard suspended structures have now become widely popular, the traditional finishing method - puttying the ceiling base and then painting it - still does not go out of fashion. Therefore, the question of how to hang a chandelier on a concrete ceiling is relevant for those who have decided to carry out the installation work to install the devices themselves.
Basic methods
First, let's figure out what options there are for installation on the ceiling. Today there are two types of fasteners:
- Hook - used for old-style chandeliers, as well as very heavy lamps
- A mounting strip or bracket is a modern fastener that is used for light chandeliers and lamps
The specified types of fastening involve working with a concrete slab. Therefore, you cannot do without special tools. Next - details on how to attach a chandelier using the above methods.
Mandatory preparatory activities
In order to cope with the task and do everything correctly, you need to prepare the tools so that during the process of installing the chandelier on the ceiling nothing distracts the master:
- you need a stepladder of sufficient height (you can get by with a table);
- hand-held electric drill or hammer drill;
- pliers and wire cutters or side cutters (from electric shock, handles must be insulated);
- various screwdrivers (including with indicator function);
- a roll of electrical tape;
- several mounting blocks (with a reserve) for wire clamps;
- the necessary fasteners on which the chandelier will be installed on the ceiling.
Before fixing the ceiling chandelier, be sure to read the instructions for connecting it to the electrical network. Usually it gives a detailed description of all operations, so a master who knows a little about electricity should not have any particular difficulties.
Hook mount for chandelier
A more difficult task is installing a chandelier on concrete ceilings on special hooks. To begin with, let’s make a reservation that the hooks are as follows:
- With regular thread
- With anchor bolt
A threaded hook is used for mounting lightweight chandeliers (3-4 kilograms) - only in this case can the fastener cope well with the task. For heavy lamps weighing more than five kilograms, hooks on anchor bolts are used.
What tools are needed?
To attach a light source to a concrete ceiling, you need to prepare the following tools:
- Screwdriver Set;
- electric drill;
- a set of drills for working on concrete;
- pliers, wire cutters;
- electric screwdriver;
- current indicator;
- elements for fastening products;
- wire connection terminals;
- stepladder.
The method of fixing the chandelier determines the selected type of electrical appliance.
Some useful tips for hanging any chandelier on a concrete ceiling
Our tips will help you quickly and efficiently install a chandelier on a concrete base:
Kawabanga! Concreting the floor
— If you need to hang a heavy chandelier, you should use anchor fastening. It is also best not to do the work yourself, but to use the help of a partner
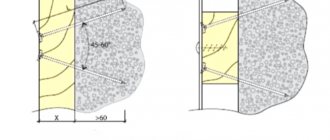
— When installing a chandelier anchor hook, it is recommended to carefully match its diameter with the diameter of the hole so that it can be screwed tightly
— Use special electric screwdrivers to install the chandelier, which will signal if current is supplied through the wire. This will simplify and speed up your work and protect you from surprises when installing the chandelier
Safety precautions when working
During the installation of the chandelier, it is important to follow safety precautions to avoid electric shock. Therefore, before installing the lamp, the room is de-energized. To do this, open the switchboard and lower the switch. Check the lights are turned off and the voltage in the electrical wires using an indicator screwdriver. If you fix the fasteners incorrectly, this will damage the power supply.
Another safety measure when installing a lamp is a mandatory check of the grounding of the electrical wiring.
Return to contents
Types and methods of fastening
When choosing your lamp, even in the store you need to pay attention to the mounting methods.
Modern ceiling lighting fixtures are available with several types of chandelier mounting options:
- a loop on the luminaire fixture that allows it to be installed on a ceiling hook. This is one of the main types of mounting a ceiling chandelier. In this case, the base should be as strong as possible, for example, concrete floors.
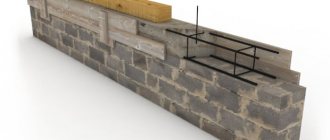
- a reliable I-beam platform for mounting a massive, heavy chandelier. Allows fastening at several points.
Having considered the types and methods of fastening, you can decide how to install the chandelier on the ceiling correctly, without unnecessary and unpleasant consequences.
Recommendations from professionals
Every experienced electrician has his own tricks. They are acquired through a long process of work. A few useful tips will help you improve your lighting:
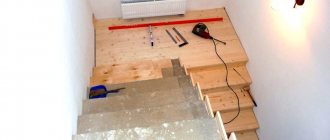
- The place for the electrical lighting device is marked before installing the gypsum board. You can draw a diagram of the ceiling on a sheet of paper and indicate the measured distance from the walls to the desired point. According to the drawing, it will be easy to find the required place after the drywall has been installed.
- After covering the frame with gypsum board sheets, the location of the metal embedded profile can be easily found with a magnet. In a similar way, you can find the elements of the entire frame and mark them with a pencil on the ceiling.
- When it is not possible to securely fasten the fasteners to the ceiling, preference is given to a light chandelier, which is hooked onto the body of the plasterboard with a butterfly or fungus.
All exposed contacts are insulated. Current should not pass through the metal body of the chandelier.
In order not to get confused with the wires, mark in advance where the wires of different colors are intended
Installation using a mounting strip
Before attaching the chandelier to the ceiling using a mounting strip, it must be:
- Markings are made for fastening the strip. To do this, the plank is applied to the ceiling and outlined with a pencil so that the attached elements do not interfere with the connection to the electrical network. Mark the drilling locations. Plastic dowels are carefully driven into the drilled holes. The plastic should be ribbed, which will prevent it from becoming loose over time and starting to fall out of the nest;
- Using screws or self-tapping screws, the fastening strip is attached to the ceiling.
- After installing the connecting wires, the bowl or other decorative element is applied to the installed bar, aligning the connecting holes.
- Tighten the entire structure with decorative nuts, after which you can screw in the light bulbs and install shades or other components of the lamp.
It is worth noting that hanging a chandelier from the ceiling can be difficult alone. Another hand is needed to connect the wires. Therefore, when connecting a lamp to the mains, one person holds the chandelier, the other handles the wires.
You can mount a chandelier on the ceiling with your own hands without any problems, the main thing is to prepare the necessary material and tools, study the included connection instructions and always have an assistant.
Wiring connection
To connect electrical wiring, first turn off the voltage at the input panel.
Then follow these steps:
- determine the power supply system - three-wire or two-wire;
- then mark the separation of the wires at the place where the chandelier is connected to the wiring, the phase wires should have red, brown or black insulation, and the neutral wires should have blue or light blue;
- connect the phase and neutral conductors to the corresponding terminals of the chandelier; if the wiring also has a grounding conductor, connect it to the lamp body;
- if the chandelier has several lighting circuits or each LED lamp has a separate pair of terminals, then the sockets are connected to the wiring through special clamps.
After connecting to the wiring, the lamps are covered with a lamp cap, and decorative elements are installed. If the design of the chandelier includes a decorative cup near the ceiling, then it is also put in place.
Types and methods of mounting chandeliers: features, advantages and disadvantages
To attach the lamp, make a hole in the base, insert a dowel, and then screw the hook into it.
Kawabanga! Proper care of concrete after pouring in summer and winter, rules for caring for concrete mixture
Butterfly hook
The butterfly dowel consists of a self-tapping screw and plastic “wings”. After twisting, the clip of the product opens and rests against the back of the base. And thanks to the ribbed sections, the dowel does not scroll or fold inside.
Its design allows the load to be evenly distributed. This element is suitable for drywall and plastic.
However, a butterfly hook is rarely used, since it can hold products no heavier than 3 kg.
Make a tunnel in the drywall or plastic panel. Screw the dowel into the cage, turning it several times. Then insert the hook and tighten.
Bar for mounting a chandelier
Mounting to a strip is a neater installation method because the light fits tightly to the ceiling, so the wires are not visible.
However, the bar for attaching the chandelier is suitable for products no heavier than 2 - 3 kg. In addition, the installation process is more complex than in the case of a hook.
Installation of the lamp on the bar occurs according to the following plan:
- There are 2 holes made in the base into which dowels are inserted and screws are screwed in.
- The lamp body is fixed to the bar with nuts.
For mounting heavy lighting devices, a cross-shaped bar is used. It is installed in the same way as a regular one, however, its installation requires a larger base, in addition, it has more attachment points.
Threaded hanger
This type of fastener is used for concrete floor slabs. If the lamp needs to be attached to a plasterboard or PVC ceiling, then before installing them you need to prepare a platform on the old ceiling, which will ensure the rigidity of the structure.
To secure the lamp, insert the spring-loaded petals into the hole, after which they will open inside the base. Using the threaded connection, adjust the height and fix the product body.
Anchor suspension
This is a large anchor-shaped hook with a spacer that expands inside the ceiling. The anchor can withstand heavy loads and provides reliable fastening to a concrete base.
However, the hook does not look aesthetically pleasing, so it is suitable for lamps with a decorative trim.
To install an anchor suspension, drill a hole of the required diameter, insert the anchor with the hook until it stops (hammer if necessary), make 3 - 5 turns.
Collet mount
The collet provides a rigid and durable fixation. This is a brass pin with a spacer along one edge. It is suitable for plasterboard and tension coverings. Collets for light and heavy products are available for sale.
To install a chandelier on a collet, you need to prepare a mortgage in advance.
To attach the collet, drill a tunnel in the platform, drive the collet, and tighten the pin.
Kawabanga! Concrete columnar foundation
Screw with half ring
It is enough to simply screw in the screw with or without preliminary drilling (depending on the diameter of the element and the base material).
However, the hook screw is only suitable for light chandeliers.
Phasing
If there are no color markings on the wires, you will need an electrical device to recognize them. It is called a phase indicator and shows its presence at the end of the wire. It has an external resemblance to a screwdriver.
Such a device consists of several parts, which are:
- housing made of insulating material;
- metal conductive tip;
- depending on the model, electronic display or signal LED;
- button or metal terminal.
Using an indicator screwdriver, the presence of voltage is determined as follows: it is held with the right hand between the thumb and middle finger, and the index finger is placed on the metal terminal.
You need to touch all the wires one by one with the sting. When contact with the phase wire with voltage is made, the corresponding icon will appear on the display or the LED will light up. Phase search using an indicator is performed exclusively with one hand.
Do not touch the indicator screwdriver or the wire insulation with your other hand. The fact is that in the event of an insulation breakdown, an electric shock occurs, and when it passes from one arm to the other, there is a high probability of a sudden contraction of the heart muscle.
Phasing is done step by step:
- First of all, they de-energize the room, for which it is enough to unscrew the plugs or turn off the machine in the panel. In addition, turn off the switch going to the lamp. The old device is removed, and if this was done earlier and its ends are already insulated, freed from the insulating tape. Using an indicator screwdriver, make sure there is no phase on each wire one by one. If necessary, strip the insulation so as to free approximately one centimeter of the metal core. The wires should be spread apart - they should not touch each other.
- Turn on the machine on the panel, as well as the lamp switch. An indicator screwdriver is used to touch the exposed part of the wires to determine the phase and neutral wire. To make it convenient, mark the neutral conductor with a marker, a piece of electrical tape, or bend it. When three wires are brought out of the ceiling, and there is a two-key switch on the wall, first of all, turn on both keys, find the neutral and two phase wires and mark them. Then one of the keys is turned off to see that there is no phase on one wire. Next, turn off the second key to make sure there is no voltage on the other wire. In this case, you can connect the chandelier according to a two-stage diagram. If there is no indicator, use a multimeter instead, for which it is switched to the AC voltage measurement mode.
- At the next stage, they are looking for the place where the wiring is laid in the ceiling. This is done so as not to damage the wires when the strip for placing the chandelier is attached. For a non-contact method of determining the phase, an electronic indicator will be required. They hold it in their hand, turn on the switch and begin to move it at a short distance from the ceiling in the place where the plank is planned to be attached. When a phase wire is found, a phase sign will appear on the display. The device is carried back and forth several times, marking the boundaries where it detects the phase. As a result, the location of the cable is determined, which means the place where you should not drill. Turn off the switch and machine. Then they begin the next stage of preparation.
What and how to attach to a plasterboard sheet
The ceiling chandelier is attached to the gypsum board using anchors or collet pins, which are used for the heaviest products. Such fasteners must be fixed to the base ceiling. A threaded hook and spring dowel are used for lighter models.
Required materials and tools
To mount a chandelier on a gypsum board, you need to prepare a hammer drill, screwdrivers, wrenches, and a hammer. In addition, you will need pliers, electrical tape, terminal blocks, a knife, a stepladder, and selected fasteners.
Instructions for installing the lamp on a plasterboard ceiling
If you bought a heavy lighting structure, then attach it to an anchor suspension:
- Drill a hole (30 - 60 mm) in the gypsum board.
- Make a hole in the base for the hook, taking into account its diameter.
- Loosen the nut a little, pull out the stud, and insert the fastener.
- Tighten the nut.
If necessary, this mount can be extended using a metal rod.
The lamp is installed using the same principle using a threaded hook and a spring dowel.
A lightweight lamp (up to 3 kg) is mounted on plasterboard, reinforced with a profile frame:
The profile frame relieves the load on the plasterboard ceiling.
In the kitchen
Side lighting is often installed in the kitchen. But without a lamp located in the middle of the ceiling, the room looks unfinished. The central location of the lamp brightly and evenly illuminates the space.
Before you begin installing the device, decide what type of mount the ceiling chandelier will have. If this is a ceiling option, then the installation work will be simple.
Most often, in the kitchen room, a plasterboard ceiling is installed. This coating covers communication parts and various ceiling defects. What place to choose and hang the chandelier on a plasterboard ceiling so that it fits into the overall style of the room?
Pendant lights look good above the dining area. There are lighting fixtures in which you can adjust the length of the overhang over the table. With such local lighting, it’s nice to get together with the whole family or sit and talk with friends.
If you plan to hang the chandelier on a plasterboard ceiling, then the installation must be completed before the final installation of the ceiling covering. To prevent the ceiling from collapsing, you cannot attach the lamp to the sheets themselves. When installing the ceiling frame, where the device is mounted, you need to fix it with profiles.
There are two ways to hang a chandelier on a plasterboard ceiling: using one or two profile strips, or a console with a bracket attached.
- make a hole in a sheet of drywall for a decorative overlay;
- drill holes with a drill at the base of the ceiling itself, through the hole in the sheets;
- insert the dowel, then the screws - for both options;
- fix the chandelier. Close the fastening parts.
There shouldn't be any difficulties in installation. If you doubt that you will be able to hang a chandelier from the ceiling, the video below has step-by-step tips.
There are several types of fastening a lighting fixture to a concrete ceiling:
- Hook. Suitable for mounting massive structures, various heavy lamps and crystal chandeliers.
- Bracket (mounting plate). The modern device is used mainly for lightweight products.
Mounting with mounting strip
The most convenient way to fix a chandelier on a concrete ceiling using a bracket is that all the necessary parts and elements are included with the lamp.
A special mounting strip is installed on the finished surface in the following sequence:
- Decide on the installation location and prepare it for further work. The plate is usually installed on an even layer of plaster. The surface must be strong.
- Before fixing the plate, check the wiring, its quality, and the number of wires brought out.
- Bend or eliminate the old hook, if one remains from a previous repair. If the design allows, the hook is left bent as a backup fastening option.
- Mark the holes for the bracket. Drill holes with a drill and then drive dowels into them. Secure the bar with the screws provided with the device.
The final stage is to tightly attach the decorative trim of the chandelier to the bracket using nuts or screws. Secure the lampshades and screw in the light bulbs.
Installation with hook attachment
This is a more labor-intensive process that depends on the type of hook. They are:
- With regular thread for mounting medium-weight chandeliers up to 4 kg.
- With an anchor bolt - designed for heavy specimens weighing over 5 kg.
In the first option, you will need to drill a hole with a drill at the intended installation location of the device into which the dowel is inserted. Then we simply screw the hook into it. A hole of the required size is drilled for the anchor bolt, and then it is driven in and completely screwed in until it stops.
Experts advise insulating the hook with electrical tape to prevent the formation of a short circuit in the wires. With a two-phase connection, working with electrical wires will be similar to the description above, with only one difference - the serial connection of each phase pair.
So, securing the lighting fixture with a hook consists of:
- hanging the device loop on a hook;
- connection and insulation of wires;
- tightly fastening the special decorative cup of the device near the ceiling by pulling it up until it stops.
Electrical wiring: how to avoid getting tangled in wires
The wires are connected according to the instructions that come with the lamp. However, problems often arise at this stage.
Wiring phasing
When checking phasing, you only need to work with one hand; holding the wire even by an insulated section is strictly prohibited! This poses a risk of electric shock. For the same reason, you should not touch the tip of the tester during operation.
It is recommended to carry out phasing while standing on a rubber mat.
To check that the wires are connected correctly, turn off the light at the switch (there is no need to turn off the circuit breaker). Touch the tester tip to the phase conductor; if everything is correct, the light bulb will not light up.
Calling
If you don’t know exactly how the wires run, and you need to make a hole to mount the lamp, then you need to carry out a test. Otherwise, you may damage the cable.
To find the wires, follow this plan:
Then disassemble the structure and begin installation work.
Electrical installation rules
To connect the electrical wiring, follow the diagram supplied with the chandelier. Multi-lane lighting fixtures have more than two output wires. They are intended for connection to a two-key switch, with the help of which the operation of certain groups of lamps is controlled. The same instructions will help you figure out where and which wire.
The wires are connected not with twists, but with special terminal blocks
During electrical installation, it is important to follow a number of general rules:
- work is carried out after turning off the voltage at the switch;
- copper and aluminum wires cannot be connected without a special adapter;
- Terminal blocks are used to connect wires, but twisting cannot be done;
- the phase wire is always passed through the switch so that it is interrupted, and the zero goes straight;
- installation of electric lighting devices with a control panel is carried out in accordance with the manufacturer’s instructions.
Electrical installation work requires compliance with safety regulations. If you are not confident in your abilities, it is better to turn to an electrician for help.