Quite often, residents of prefabricated high-rise buildings are faced with the problem of gaps forming between the slabs on the ceiling. This usually occurs due to displacement of the slabs after the building shrinks a few years after construction, and also in older houses. Many solve this issue with the help of suspended or suspended ceilings, but if this option is not considered due to the small height of the room, then the cracks need to be eliminated. Let's find out how to repair cracks in the ceiling using a simple and reliable method without turning to specialists.
Roof inspection
Residents of the upper floors in houses without an attic should make sure that the roofing is reliable before starting work, so that the work done will not be in vain. If the waterproofing layer on the roof is damaged, heat can escape and water can leak through the seam in the ceiling, even after it has been sealed, so if damage is detected, it must be repaired. To do this, you can contact the management company responsible for the overhaul of the building, or take care of replacing sheets of roofing material yourself, which is most often used to cover the roof.
Where to start if the apartment is on the top floor?
Let's start our article with the most complex and expensive option.
So, if your apartment is located directly under the roof, then before you start sealing the cracks inside, it would be a good idea to see what’s going on on the roof.
This is very important, because if seams appear, then it is very possible that there is some damage on the outside. And if these “holes” are not patched up, then your joint putty will last until the first good rain
Fortunately, most high-rise buildings have a soft roof covered with roofing felt. It’s not very expensive, so it’s better to spend some money, but do everything for sure.
Of course, you are unlikely to get by on your own here. Not even because of labor intensity, but because laying roofing felt requires special heating tools. Where did a simple, albeit very homely person, get them from?
You don't need a lot of material. Place the sheets in the place where you can definitely see that the coating is worn out and cracked.
And after you solve the main problem from above, you can take on renovations inside the apartment.
Preparing the necessary materials
When sealing the seams between the slabs on the ceiling, you need to focus on the quality of the materials used, which are selected depending on the condition of the seams.
- To enhance the adhesion of materials, which is crucial when working with the ceiling, it is imperative to use a deep penetration primer for concrete bases.
- Deep seams must be sealed using special NC cement, which efficiently fills voids due to its ability to expand after hardening. Rusts that are shallow can be sealed with regular gypsum plaster.
- The presence of wide or deep rusts can only be corrected by using dense polyurethane insulation or polyurethane foam.
- To eliminate all irregularities, you will need to purchase latex elastic putty.
- The durability and reliability of the result will be ensured by reinforcing sickle tape, the width of which should exceed the width of the seam by 8–10 cm.
External factors
If the apartment is located on the top floor and you have a seam, the fault may be that the building’s roof is of poor quality, and before you begin to remove the seam, you need to carefully inspect the roof. After all, sealing internal cavities will not get rid of drips, mildew, mold, and dampness if the roof leaks and you will waste your energy, time and money on repairs.
Carefully inspect the roof, and after making sure that it is in good condition, proceed to sealing the seams.
Recommendations from experts
- Polyurethane foam can be replaced with ceramic glue, which has proven itself to be good for sealing deep seams.
- Small cracks and seams can be easily repaired with acrylic sealant. Its silicone analogue is not recommended, as it is difficult to paint over and gradually turns yellow.
- An effective replacement for sickle mesh is gauze or bandage. You can also use a regular cotton cloth, steamed and moistened with water.
- To avoid damaging the electrical wiring during repairs, find out its location in advance.
Main stages of work execution
Sealing the seams between the slabs is carried out in several stages.
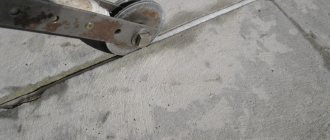
- Work to eliminate cracks must begin with widening the seam between the slabs: seemingly small damage can hide a considerable amount of work. This can be done using an electric hammer with a special attachment or a chisel. The cement mortar used to seal the seams during the construction of the house is not strong enough, so the process of completely cleaning the seam should not cause difficulties.
- The next mandatory step is to remove all remnants of old cement mortar and filler using a narrow metal brush or wide brush. The seams need to be cleaned very carefully.
Important! The depth of the cleaned seam should be at least 5 cm.
- After grouting the rustications between the slabs, their inner surface must be treated with a primer in several layers. The special composition will not only improve the adhesion of the materials, but also provide protection against fungus, and also secure the remaining old mortar.
- To seal rusts whose width exceeds 3 cm, you will need to use polyurethane foam, which, when expanded, can fill the empty space. Excess hardened foam must be cut off in such a way that a tapering groove with a depth of 3–5 cm is formed between the plates.
- If the seam between the slabs is deep but quite narrow, you need to use a sealant of a suitable width. Sealant is applied to one side of the sealing bead, then the sealant is tucked into the seam using a spatula. After this, the seams on the ceiling are sealed with an expanding mortar "NC" while maintaining a small recess.
- After the cement mortar has dried or a recess has been prepared in the foam, the remaining empty space is filled with gypsum plaster or latex putty.
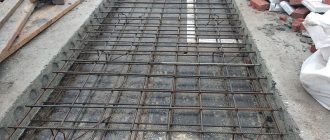
- After a few days, necessary for the final drying of the composition, the seams are reinforced. A layer of putty is applied to the ceiling along the entire seam with a wide strip protruding beyond its edges by about 5 cm on each side. A reinforcing mesh is fixed on it and pressed into the solution with a spatula.
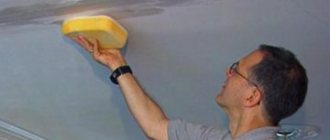
- After the putty has dried, the entire ceiling must be primed in two layers.
- Upon completion of the work on sealing the rusts, the ceiling is plastered and puttied, allowing it to be leveled and prepared for finishing.
To seal deep and wide rusts, you can use ceramic tile adhesive instead of foam.
Primary sealing
This type of sealing is usually carried out in panel houses immediately after their construction is completed.
Interpanel seams of new buildings are processed in 3 stages:
- Empty interpanel cavities are filled with heat-protective polyurethane foam.
- The interpanel seam is treated with the innovative Vilaterm insulation, which is a fine-celled, fairly lightweight white material.
- Additionally, the seam is sealed from the outside with a special mastic that has good water-repellent properties.
The use of these three stages allows you to create a so-called “warm seam”, which allows you to provide reliable heat and waterproofing in all weather conditions.
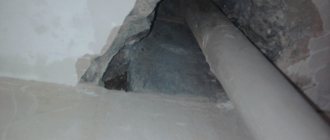
Repairing a hole in the ceiling
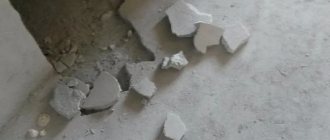
When unstitching, you may encounter a defect in the floor slab in the form of a fairly large hole. There is no need to be afraid of this; sealing the hole is carried out according to the same scheme as working with seams.
- The hole is thoroughly cleaned of cement and dust.
- The inner surface is treated with a primer. The second coat of primer is applied after the first has dried.
- The hole space is filled with polyurethane foam.
- Excess frozen foam is cut off, and a cone-shaped depression 5 cm high with a base equal to the diameter of the hole is cut out in the center of the hole.
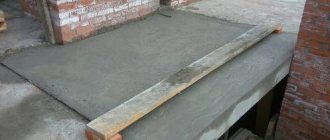
- The recess is filled with cement mortar.
- After the composition has dried, putty is applied to the area where the hole was located, on which the reinforcing mesh is fixed.
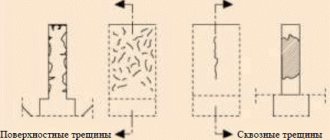
Causes of crack formation
Crack formation can be caused by various reasons. On surfaces made of different materials, cracking appears under the influence of various factors.
So, a crack in a plasterboard ceiling can occur due to the following:
Repair of plasterboard ceilings: repairing holes and cracks with your own hands
- A common reason is due to a violation of the technology for installing wooden sheathing. Due to the fact that wood is subject to deformation and changes in linear dimensions due to changes in temperature and humidity, a small gap must be left from the end of the batten to the wall. If this is not done, the frame will deform and the ceiling will crack.
- If sickle tape was not used when filling the seams between the plasterboard sheets, the solution will become covered with a fine network of cracks over time. It is especially important to reinforce seams in new buildings, which will still shrink.
- Sometimes frequent changes in humidity and temperature in the room lead to cracking of the ceiling.
To understand how to repair cracks in the ceiling between the slabs, you need to understand the reasons for their appearance and completely eliminate them. This will ensure that the ceiling crack seal will not peel off or crack again after some time.
On plastered and concrete bases, such defects arise for the following reasons:
- finishing materials have served their allotted time;
- the seam on the ceiling often becomes covered with cracks due to changes in humidity and temperature;
- during shrinkage of the building, the floor slabs may move slightly, which is why the joints on the ceiling often crack;
- if the finishing of the ceiling surface was carried out in violation of technology.
In any case, you first need to determine the causes of the defect and, if possible, eliminate them, and only then begin repair work.
Alternative methods for masking seams on the ceiling
In addition to using building mixtures and directly sealing cracks and seams, you can resort to installing various suspended structures, which, although they will not eliminate the problem, will help to safely hide it.
- Using plasterboard as a finishing allows you to cover both the overall damaged surface and a separate unsightly part of it by installing a multi-level ceiling or a separate decorative element.
- Plastic ceilings will successfully hide the seams, but are not suitable for all rooms; most often they are used in the bathroom, hallway or kitchen.
- Stretch ceilings will enhance the ceiling in any room; their advantage is quick installation and long service life.
- Minor cracks can be hidden under polystyrene foam tiles that are glued to the ceiling.
Sealant
With this material everything is much simpler. You just need to choose an acrylic sealant, which, after application, can be painted along with the glued coating tiles. Of course, you need to choose the shade of sealant that will match the main tone of the ceiling, but usually it is white, so there will be no problems.
Before you putty the ceiling made of foam squares in this way, you need to stock up on hand rags and a damp sponge, as in the previous finishing option. In addition, you will need a special gun into which a tube of sealant is inserted and which helps squeeze it into the desired place. The spout of the tube with gap filler must be cut to the size of the thinnest joint to be sealed.
The nose of the cylinder is brought to the joint and the seam is slowly filled with material. You should not treat a large area at once - a joint length of one meter is enough. After this, you need to put the gun aside and use a damp sponge to evenly smooth out the layer of applied material.
The sealant hardens quite quickly, but it is still worth waiting a few hours until it completely hardens. This way you can process not only the seams between the tiles, but also fill the gaps between the baseboard and the ceiling covering.
Polyurethane foam
After applying a layer of primer into the gap, experts recommend using polyurethane foam. Let's talk about its correct use. When sealing holes and cracks in the ceiling, people often encounter the following problem. The working position of the cylinder is with the bottom up and the tube down. But in cases with a ceiling, this position is impossible, since the bottom of the cylinder rests on the ceiling. If you tilt the container a little in a different position, the foam will not flow out.
In this case, there is a solution. It is necessary to lengthen the tube to such an extent that its edge can be raised above the bottom of the balloon. You can easily extend the tube using the tube from the second cylinder by connecting both tubes with tape or insulated tape.
When choosing polyurethane foam in stores, you may encounter some options, such as:
- one-component
- two-component.
Let's figure out which one to choose. One-component is the most common; it is much more convenient and easier to use. The appearance of foam in the form in which we need it appears through contact with the air of the mixture inside the cylinder. Due to the pressure in the cylinder and the ability of the foam to expand, the foam perfectly fills all hard-to-reach places.
Two-component foam must be mixed in strict proportions a few minutes before use. It is poured into a special gun in which it is mixed. The advantage of this foam is that it hardens more quickly, even regardless of air humidity. And the advantages, of course, include the highest yield.
But to seal a gap in the ceiling, it will be enough to buy one-component foam in a balloon; this will save money and time.
When choosing polyurethane foam in a store, carefully examine the appearance of the cylinder. There should be no visible chips or damage on it, and also check the expiration date.