Due to the high strength of the monolithic base, the floor can be installed on the foundation in any form using a screed on the slab to provide evenness. On this basis, you can set without additional preparation:
- fireplaces of any complexity;
- boilers for heating systems;
- various partitions.
With all these advantages, the concrete base is very cold, so insulation work should be carried out before installing the floor. To ensure that the surface of the foundation does not give off dampness and cold, a heat-insulating cake must be laid. Extruded polystyrene foam is a good choice for filling such insulation. It is best laid in the gap between the foundation slab and the rough floor screed. Sometimes it can be used between the basement and the first floor.
Slab base, installation
In order to better understand the progress of the work, it is imperative to familiarize yourself with the points of work on the independent installation of a monolithic foundation. The first thing you should pay special attention to is calculating the foundation. Most often, when performing this type of work, many make gross mistakes, which have a negative impact at the time of installation of the base.
It is very difficult to make foundation calculations yourself without certain knowledge. In addition to the loads on the base at the time of calculations, it is necessary to take into account possible shrinkage, deformation, distribution of all loads along the slab, and so on. Calculations are carried out based on state standards and norms. If you do not have skills in such work, it is best to contact construction experts.
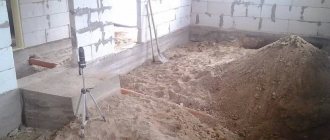
After completing the calculations, it is necessary to engage in excavation types of work. A recess should be made along the entire perimeter of the future foundation. Next, you need to lay geotextile materials, which are necessary to ensure that the sand cushion does not press through the weight into the thickness of the clay.
Compacting the sand cushion
A sand cushion is being laid; in some situations, medium-fraction crushed stone can be used. Backfilling is necessarily accompanied by layer-by-layer compaction, which allows the material to be compacted. It is recommended to spill the mixture with water while compacting. After this, engineering communications are carried out. Next, a concrete mixture 10 centimeters thick is poured.
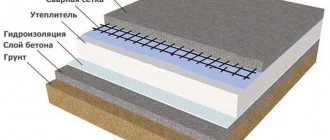
Waterproofing is laid on the resulting preparatory layer, which is necessary for the concrete slab. It is imperative to solder the joints of the material. For this, it is best to use burners. The dimensions of the waterproofing must be larger than the area of the foundation. The edges of the insulation must protrude so that they can be later attached to the base plate.
Upon completion of the installation of the waterproofing layer, thermal insulation is laid. The best material for this would be extruded polystyrene foam. In most cases, a plastic film is laid on top of it. Installing thermal insulation will solve such a problem as cold floors in the room. Also, if it is available, heating costs will be reduced during the cold period.
Reinforcement of the future slab
A structure made of metal reinforcement is installed on the surface of the finished foundation layers. The reinforcing mesh should be laid at a level of 50 millimeters from the bottom of the foundation, that is, from the polystyrene foam layer, and the second at 50 mm from the top edge. Formwork panels are installed along the perimeter of the finished structure. They should be firmly connected to each other to avoid leakage during pouring. The final stage of the base slab is pouring it with concrete mixture.
How to properly waterproof a foundation slab and underneath it?
The issue of waterproofing a monolithic foundation must be approached comprehensively by performing the main waterproofing under the slab, as well as additional waterproofing on it.
- The first and most important contour of waterproofing protection passes under the slab and serves as a cutoff, protecting it from the effects of surface water, ground water and moisture from the soil located under the structure. Waterproofing under the foundation must be applied to a rigid and durable base, namely concrete preparation. Otherwise, the waterproofing done will be useless, since it will not be airtight and will simply come apart at the seams due to the constant dynamics of the soil.
- The second waterproofing circuit is located horizontally on a monolithic slab and is performed after the concrete has completely set and dried. When erecting walls, it is necessary to make a small indentation from the edge of the slab inward, so that future vertical waterproofing of the walls can form a water lock with horizontal insulation.
Important: The main mistake of builders is that they forget to make concrete preparation under the foundation, which makes it impossible to install high-quality waterproofing under the slab, since any waterproofing must rest on a rigid and reliable foundation. The lack of waterproofing under the slab allows water and moisture under the foundation to be absorbed into the concrete base and gradually destroy it, as well as rise capillary up the concrete and appear as wet spots on the floor or in the area where cold joints are located (joints of the slab and walls).
Scheme of waterproofing the slab from above and in the part of the concrete preparation under the foundation
Additional measures:
To further protect the foundation from the effects of water, it is recommended to install a high-quality drainage system located 30-50 cm below the foundation level of the house or building. This arrangement of the drainage ensures that it can take away both the water that approaches the monolithic base from the side and that which will be located under it, thereby weakening the pressure and impact of water on the base slab.
You can read in detail about the drainage system and methods of its installation in the article - “Installation of drainage around a turnkey house: Proper drainage, its types, installation technologies, materials, diagrams and prices.”
Slab foundation design
The slab follows the contours of the external walls of the building with a protrusion of 50 to 80 mm. This tolerance is necessary to compensate for the torsion of the formwork and the curvature of the walls so that they do not overhang the foundation in any place.
The thickness of the slab is selected in accordance with the required ability to withstand bending load. Serious calculations should be carried out only when constructing buildings over two floors, including basement. The standard slab thickness of 35 cm is quite enough even for brick buildings, especially if the foundation is made using Finnish technology and has stiffening ribs along the edges.
A thickness of 35 cm is considered standard for a simple reason. The protective layers of concrete for the upper and lower reinforcement chords are 50 and 70 mm, respectively. The remaining 230 mm is the optimal distance between the reinforcement mesh, necessary for the correct perception of tensile and bending loads.
Aerated concrete - material features
Foam concrete, gas silicate and aerated concrete belong to the category of cellular concrete - a separate type of building material containing a large number of air chambers in its structure (from 70 to 90%). The advantage of this material is its high thermal insulation properties, the disadvantage is low strength depending on the concentration of air cells. In this regard, before constructing an aerated concrete house, careful calculations are carried out.
The main features of aerated concrete include the following:
- When building a house over 1 floor, it is necessary to make serious calculations.
- It is important to exclude all factors leading to shrinkage of the house, otherwise the formation of cracks in the structure of the blocks cannot be avoided. Therefore, they are especially careful when arranging the pit and foundation.
- Aerated concrete has thermal insulation properties, but retains heat poorly.
- It is important to perform high-quality interior and exterior finishing. It is worth remembering that walls made of aerated concrete do not hold fasteners well.
- Particular attention is paid to the choice of floor material, which should not be too heavy.
House made of aerated concrete
Characteristics of a concrete base
When faced with the question of which floor is better, many come to the conclusion that a concrete base is one of the most unpretentious.
It is superior to wood for many reasons, the main one of which is its immunity to the formation of decay processes.
In addition, concrete will not creak over time and has a fairly durable surface that is practically resistant to mechanical stress.
Concrete is not susceptible to stress and is durable
Moisture resistance indicators compared to wood are also excellent. However, it should be borne in mind that some of the disadvantages of a wooden floor can be eliminated by using modern technologies.
You should not extol the concrete surface and forget about its disadvantages. You can get rid of a constantly cold floor only after installing an additional source of heating (warm floor). Based on this, the best option would be to lay tiles directly on concrete in the bathroom, toilet or kitchen. For residential premises and living rooms, it is recommended to use other materials with inherent warmth and comfort.
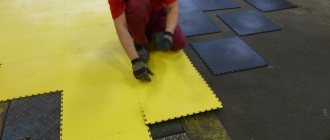
What logs to use
You need to choose the size and number of bars based on the load and thickness of the floor boards. The cross-section of the logs and their thickness depend on the span length - the distance between two supports. The greater the distance between the supports, the more powerful the beam required. There are no such requirements for logs installed on a concrete base. Here, most often, the dimensions are selected based on the dimensions of the insulation, and the thickness of the board that will be laid on the floor.
The pitch for the logs (the distance between two adjacent bars) is selected from 30 cm to 100 cm. It depends on the thickness of the floor board. The correspondence is shown in the table. A step of 50 cm is considered optimal for baths. The thickness of the board is 25-30 mm.
Table of the dependence of the thickness of the floorboard on the installation pitch of the logs
There are also some recommendations on the width of the floorboard - do not take it too wide for the bath - as the humidity increases, it will warp more, which can even create difficulties when moving. Medium width is the best choice for baths.
It is advisable to lay the logs in one piece, without joints. But if necessary, they can be spliced. To do this, either cut a tongue and groove into half a tree, or connect them end-to-end, securing them on at least two sides with pieces of boards at least 1 meter long.
Types of strip base
At the first stage of construction, a strip foundation is erected. A trench is dug under it, and a layer of sand is laid along its bottom. Waterproofing is installed on top of the pillow and only after that can you begin to arrange the base itself. Strip foundations can be of two types:
- Monolithic, that is, made of concrete mortar;
- Prefabricated, that is, assembled from reinforced concrete products.
The second option is not used as often, since it requires the use of special equipment. The foundation can also be divided according to the type of burial:
- Shallow - such structures are suitable for one-story buildings or light cottages (frame, timber, foam block). The depth in this case is 0.5-0.7 meters. The soil acidity indicator is also important; it should be low or medium.
- Recessed - this type of foundation is used for the construction of high-rise buildings or when using heavy materials, for example, in the construction of monolithic cottages. In this case, the foundation goes deep 0.2-0.3 m below the soil freezing level.
Location rules
The first and last lags from the wall should be at a distance of no more than 20 cm. If, while observing the calculated step, the outermost lags are located further, their number is increased and the step is reduced.
They are placed either along the wall in which the door is located, or perpendicular to it. If one wall is much longer than the other, then it is along this long wall that the logs are placed. If the room is square or similar in shape, then the location of the window may influence the choice: floorboards look best if they are located along the flow of light. That is, in this case, the logs are placed along the wall in which there is a window.
Pros and cons of the foundation
Like all structures, the monolith has its advantages and disadvantages.
Advantages
It becomes possible to erect structures with significant weight on soft soils.
Minimum shrinkage deformations.
There is no need for deep foundation laying, which reduces the amount of special equipment used.
A monolithic concrete slab can be used as the floor of the first floor, as it has a flat top surface.
In addition, the use of structures with ribs:
Increases the strength of the base, which allows you to reduce the thickness of the flat part.
Improves resistance to mechanical damage and deformation.
Makes it possible to evenly distribute the load of the building.
Flaws
Significant consumption of material.
Defining Characteristics
A solid support base consists of two structural elements: a plate and a tape holding it around the perimeter .
The sole occupies the entire area under the structure. It is held in place by a tape whose cross-section is the same along its entire length.
Regarding the depth of soil freezing, the strip base can be shallow or recessed. This is a calculated value that is directly related to the geology of the site and the load that the structure puts on it.
According to the design method, both monolithic and prefabricated LF are allowed . In the first case, the concrete mixture is poured into a finished trench equipped with formwork.
The second option will cost the developer an order of magnitude more, since the stamped blocks need to be brought in, unloaded, and laid using crane equipment. But it will take less time than waiting for the liquid concrete mixture to harden.
Possible applications
The design features of the presented type of foundation determine its popularity in construction. It is used in the following cases:
- the site is characterized by unstable soil (moistened, with a high clay content), and other types of foundation are not economically justified;
- the construction of a heavy structure is being designed;
- the house will be located on a single basement floor.
Advantages and disadvantages
The advantages of the foundation include:
service life of at least 100 years;- stability in unstable soils;
- does not change location when the earth moves;
- replaces the floor on the first floor;
- you can arrange the ground floor;
- construction can be done without involving a construction team.
Before choosing the type of foundation, the developer needs to take into account the disadvantages:
- high consumption of building material;
- labor-intensive process;
- complex calculations;
- the need to dig a large pit.
At the construction design stage, it is important to foresee all communication developments in advance. Because then, in order to bring any utility lines underground, part of the foundation will have to be dismantled.
Advantages of flooring on the ground
Now let's look at the advantages of ground floor technology compared to floors. Here it is worth immediately making a reservation that we are leaving out all situations when installing floors on the ground is not possible.
- The relative simplicity of the work - installing floors on the ground does not require the use of serious construction equipment. To lay prefabricated floors, you need to rent a truck crane, but this option is not available everywhere. Floors on the ground are well suited for those who build a house on their own, since there are no difficulties in monitoring and accepting compaction work.
- A comprehensive solution - in fact, floors on the ground immediately solve a number of problems: vapor barrier, waterproofing, insulation. The floors themselves do not provide such properties, so insulating measures will need to be taken additionally.
- There is no excess consumption of concrete - the floors rest on the foundation, so that bending forces do not lead to sagging of the slabs; they have to be made stronger and thicker than the floors.
- Using an internal backfill zone - floors on the ground use the area inside the foundation as a support; in the case of floors, the area under the floor is not used as a base.
Installation of waterproofing of the foundation slab, prices with prices for 1m2
The prices indicated in the table are preliminary prices for work related to waterproofing the base of a monolith foundation. The prices indicated in the table may change if there are special conditions or complexity of the work. To get an accurate price, it is recommended to write to our estimate department using email or order an engineer to inspect your facility.
| Name of works | Unit _ | Price in Rubles |
| Installation of built-up waterproofing in 1 layer | m2 | from 300 |
| Self-adhesive insulation device in 1 layer | m2 | from 300 |
| PVC membrane device | m2 | from 600 |
| Applying bitumen mastic in 1 layer | m2 | from 200 |
| Application of liquid rubber spraying | m2 | from 400 |
| Manual application of liquid rubber | m2 | from 400 |
| Applying primer or primer | m2 | from 100 |
Calculator for independent cost calculation
Open calculator
Waterproofing cost calculation
Installation of formwork
Due to the small height of the slab, the formwork under it is arranged according to the simplest scheme. In most cases, it is represented by one row of decks around the perimeter, assembled from sheet materials on a frame made of 60x60 mm timber. You should know that when constructing a monolithic slab, the walls of the pit are not used as a casting mold.
Due to the low height of the concrete product, the formwork does not experience significant static pressure, however, due to the large mass of concrete, it is subject to significant water hammer. For this reason, both the top and bottom of the formwork require reliable support on the ground. This is achieved by driving wooden sleepers at a distance of 80–100 cm to the outer side of the decks. Spacers made of boards are screwed to the sleepers: one horizontal to support the lower chord of the deck and one inclined for the upper.
The main weak point of the formwork for the foundation slab is considered to be right external and internal corners. In addition to supporting the converging decks, they are additionally secured with braces or overhead metal corners. The braces should remain until the concrete is poured into the form; they can be removed before leveling.
Step-by-step instructions for installing a slab foundation
Surface preparation
The first step is to mark the perimeter of the area and remove the fertile layer of soil. After excavation work, a geotextile flooring is laid. Next, you should fill the area with crushed stone and sand to form a cushion. The sand is compacted in layers of 10 cm. Then communications are laid. Laying communications in a slab foundation is similar to the same operation in an insulated Swedish slab. It is better to lay pipes in special sleeves, which allow repairs and replacement of communications. Some builders duplicate sewer pipes in the slab so that if one pipe fails, they can use another.
Formation of the base
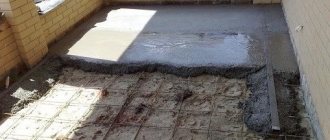
Next, a screed is made from M100 mortar with a thickness of about 10 cm. Waterproofing is laid on top of it, the seams of which are soldered with a torch. The waterproofing should be slightly larger than the area of the future foundation in order to then turn the flooring up.
Slab foundation reinforcement
After the foundation is formed, the reinforcement is installed. As a rule, for the slab frame you need to knit two-row reinforcement from a rod with a thickness of 12-16 mm and a cell size of about 20-30 cm. The entire frame must be at least 5 cm above the base level; for this, special spacers are placed under the reinforcement. This is done so that after pouring the slab with concrete, the reinforcement is recessed inside.
Video description
How it is possible to reduce the cost of flooring while complying with technology is explained in the video:
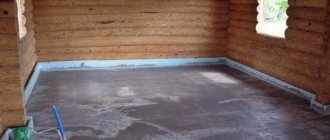
Rough concrete floor
Before pouring the floor in the house, you need to form a continuous waterproofing sheet on top of the insulation. This can be a technical film with sealed joints. The overlap on the walls is also maintained at a height of at least the thickness of the screed (from 60 mm). The solution here is used with a class of B22.5. Welded steel mesh is used for reinforcement.
Additionally, before pouring you need to consider:
- laying utility lines in the body of the insulation, protecting them with a metal casing;
- installation of a “warm floor” system in a screed, taking into account recommendations from the manufacturer of a specific series.
Depending on the planned finishing, a decision on the condition of the concrete surface is considered. For example, under flooring on joists or ceramic cladding, it will be enough to saturate the base with a strengthening primer. If laminate, parquet or linoleum will be laid next, you will need to fill the floor with a self-leveling compound. It is important to take into account the permissible layer of 3 cm.
Self-leveling floor Source bathroomz.ru
How to make a floor in a wooden house using the dry screed method
When deciding what is best to make a subfloor in a wooden house, many began to lean toward dry screed. This is a good option for doing it yourself, since the technology is simple, no special equipment is required, and the materials are accessible and lightweight. The advantage of this approach is also that finishing can begin immediately after laying the base.
But there is one significant drawback. Dry screed is not acceptable for use in a basement, bathroom, or boiler room. The reason is the low moisture resistance of the materials used. Therefore, the technique is applicable as an alternative to the traditional pouring of a reinforced concrete base for finishing.
The installation instructions look like this:
- installation of a pillow, laying insulation around the perimeter (width 80 cm, thickness according to calculation), pouring a concrete layer with a layer of 8 cm or more, waterproofing flooring;
- laying and insulating pipes, installing a protective casing;
Pipe laying Source hausbauen24.eu
- filling the surface with expanded clay or quartz sand without compacting with a layer of 1.5 cm, creating a flat horizontal plane;
- formation of rigid flooring from special sheets of gypsum fiber boards or gypsum fiber boards (for example, for the Knauf system), wood boards (plywood, chipboard, OSB) with a layer of about 20 mm.
Additionally, EPS boards with mounting edges or stone wool can be placed under the hard flooring. To ensure high rigidity of the base, slabs (gypsum fiber board or wood) are laid in a checkerboard pattern in two layers with the lower joints overlapping.