Do-it-yourself concreting of the yard
If you are faced with such a task as concreting a yard, do not rush to look for a master who will have to pay a lot of money for the work.
Arranging your own territory with comfortable paths or hardy areas for a car can be done with your own hands. Properly concreting the area around a private house does not mean facing an impossible task. It is enough to carefully study the technological rules and you can begin the construction process. Let’s try to present in detail the material on how to correctly carry out all stages of work and get the desired result, which will delight the owners for many years.
Conclusion
By watching the video in this article, you can learn more about how to make a concrete screed yourself. Also based on the text presented above, it is worth concluding that this installation method is very labor-intensive and requires precision when performing.
At the same time, concrete screed is actively used by many professional craftsmen even in our time, when modern materials with higher characteristics began to appear. This method will be considered one of the most optimal for a long time.
Preparation for the main work
Digging up a large area of soil is labor-intensive and time-consuming work, but the technology provides for such a process and it is unlikely to be possible without it.
Of course, you can simply level the base and lay asphalt or concrete on top of it, but here you will have to bring in additional soil, otherwise the screed will not hold properly and will simply crumble.
Adding soil
If the soil around the house is infertile and you will in any case need to add good soil, then the top layer does not need to be removed. In this case, the preparatory work will consist of marking the area for pouring and filling it with crushed stone. If the base of the yard is clay, which does not shrink, you can do without crushed stone.
Soil removal
If the yard is covered with fertile black soil, it would be more expedient to move it to the place of flower beds or beds, where it will be very useful, and it is better to arrange concrete or asphalt at the same level with the relief.
To do this, at the very beginning, mark the boundaries of the paths or site and, guided by them, remove the soil. On average, it is necessary to remove a layer of 20 cm. This may seem like too much, but you need to take into account the arrangement of drainage to dry out moisture, which negatively affects the concrete surface. This stage will be the next after removing the layer of earth.
Drainage system
In this case, drainage is nothing more than a backfill under a “cushion” of concrete, which consists of two identical layers of sand and gravel. After the soil layer has been removed, add 5 cm of sand and compact it using a special device that you can easily make yourself. We will need a large channel onto which a pipe handle is welded. To tamp, you need to lift and forcefully lower the tool onto the sand. Or you can align everything with a rule, but this will be somewhat inconvenient.
To simplify this type of work (tamping), you can pour a large amount of water on the sand, and it will settle down in a dense layer. There is one drawback: water is an expensive resource, and its consumption will be impressive.
Now you can fill in the next layer of crushed stone 5 - 7 cm. It is recommended to take a medium or small fraction, as it compacts better. Large stones will leave gaps, and this will be a violation of technology, and it will not be possible to properly concreting the yard.
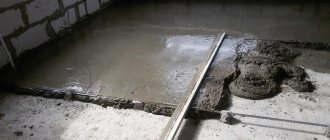
Wet screed
The screed using wet technology is made from cement and sand, in a ratio of 1:3 with the addition of water, to a plastic, creamy state.
Such a screed requires careful waterproofing of the base, preventing water from the solution from penetrating onto wooden structures.
The solution is prepared directly at the pouring site and laid in an even layer along the beacons.
It is not advisable to install a wet screed on a wooden floor for the following reasons:
- due to its heaviness, a wet screed requires a rigid and durable base;
- the wet process increases the humidity in the house, which is not desirable for wooden structures;
- with minor damage to the film waterproofing, water from the screed can get onto the wooden base and lower floors;
- a wet screed requires mandatory reinforcement, which additionally makes the structure heavier;
- The drying time and strength gain of the wet screed is 28 days;
- During the entire drying period, a wet screed requires care: protection from drafts and moisture.
Figure 7. Installation of a wet cement-sand screed.
Main technological process
All preparatory stages can be considered completed, and it’s time to lay asphalt or install concrete pavement. Like any construction, the pouring of paths and areas in the courtyard of a private house is carried out according to strict rules and is divided into several stages. To work you will need the following tools:
- shovel;
- profile for drywall;
- level;
- rule or board.
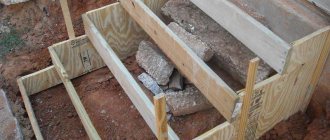
Formwork
To ensure that the concrete screed does not spread and hardens in the shape that it was decided to give it, it is necessary to build formwork. Any flat objects at hand are usually used as material, as long as they have a smooth surface. Here you may find it useful:
- boards (classic version);
- slate sheets;
- chipboard;
- plastic panels.
It is plastic that will become indispensable when pouring curved figured paths, since the PVC structure bends well and is pliable in work. The formwork structure is mounted along the edge of the site and defines its contour. Its installation is simple: the boards are laid in the shape we need and supported by stakes driven into the ground.
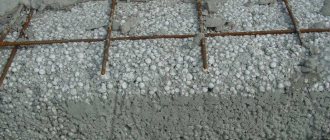
Reinforcement
Having completed the installation of the formwork, they move on to reinforcement, which will provide special strength and durability of the screed. Typically, the solution is reinforced using construction metal mesh or various metal products. You can use fittings, rods, pipe cuttings or steel wire.
Of course, it is better to perform this process using a ready-made mesh. It is convenient to work with it, because the material lies evenly on the surface of the crushed stone flooring with an overlap (otherwise the screed will become covered with cracks). The thickness of the rods is about 6 mm, and the cell sizes are around 15 cm.
Lighthouses
In order for the concrete layer to have a sloping surface, it is necessary to use guide beacons in the work. The consumption of the solution increases significantly in this case, so this rule can only be partially applied in the local area.
Sloping surfaces of paths and platforms will drain rainwater in a timely and efficient manner and rid the yard of puddles and stagnant melt liquid. Following this principle, it is better to install beacons along the required plane, without reference to horizontal lines.
What is the best material to make lighthouses from? Here, profiles for drywall work would be most appropriate. They are affordable, and the use of such material will ensure a perfectly smooth front surface. Since we are forming a platform with a sloping surface, the metal profile is mounted on slides made of building mixture at different heights and, using a level, is set at the desired slope.
It is necessary to wait for the solution to dry completely and make sure that the beacons are securely fastened. On average, this takes one day. Once everything is ready for the next step, you can continue the process of laying concrete on the paths or platforms.
Concreting
Pouring mortar is a fairly simple but responsible process that can be carried out using ready-made concrete ordered at the factory, or by preparing the building mixture yourself. If you need to equip a large area of the yard, then the first option would be more appropriate.
But in the case where the area to be filled is not very impressive, it is better to do everything yourself. For such work you will need a concrete mixer or an old unnecessary trough, which you won’t mind throwing away later.
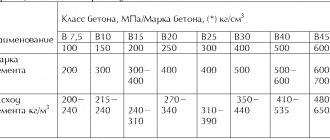
Proportions and shading
1 part of M400 cement is placed in a concrete mixer or trough (for external work it is better to take frost-resistant grade F 200). Sand (3 parts) and crushed stone (2 parts) are added to the cement.
First, all components are mixed without water, and only then can liquid be carefully introduced until a solution of medium thickness is obtained (usually ½ of the amount of cement is required). Using a shovel, the finished mixture is thrown onto the reinforcement between the profiles a few centimeters above the beacons. An even strip or plaster rule is stretched along the beacons, with the help of which the mortar is leveled.
In this way we remove excess concrete. Filling the paths must be done in one step, ensuring they dry evenly. If the screed sets in pieces, then cracks will appear at the joints of the material poured at different times.
Technological clearances
In order to avoid damage to the coating during climate change, it is necessary to provide expansion joints. As is known, at low or high temperatures the material changes linear parameters (expands and contracts), so it is very important to create technological gaps. This is a simple process and will not cause any difficulties.
You can insert thin slats at the pouring stage and remove them until the concrete hardens. The second option involves “scraping out” strips of mortar before it hardens using a construction tool. If for some reason you did not provide technological seams, do not worry, it is easy to fix. Gaps can be cut with a grinder after the concrete has completely hardened.
Recommendations for caring for semi-dry screed:
After completing the work, the screed needs to be covered with polyethylene film 80 - 100 microns thick; a thinner film will also work, but it will be difficult to lay it since it is very light.
not to create drafts in the room during , otherwise this will create premature evaporation of moisture from the screed.
It is recommended to lift the film after 3-4 days and evenly moisten the top layer of the screed , for example, using a watering can. Do not pour water so that puddles form! The main thing is to moisturize, not flood! After the screed is moistened, you should cover it back with film, it is advisable that the film at the joints should be laid with an overlap of 30 - 40 cm.
During the period of work and maturation of the screed at the site, the temperature in the premises should be from +5 degrees Celsius, otherwise the screed assembly process will be stopped and it will be loose.
* If the screed was carried out using underfloor heating systems, they should not be turned on for 28 days , after this time, ventilation should first be arranged in the rooms where the screed was made to remove residual moisture, after which you can systematically increase the temperature of the heated floor system.
When continuing finishing work in rooms where semi-dry screed is applied, the following rules should be observed:
So, we can summarize the recommendations for caring for floor screed:
Answers: Administrator “Screed Floor”
Hello. It is better to leave the film for 2-3 weeks; a week after installing the screed, it is advisable to moisten it a little additionally, and also leave it under the film. After a week, electricians can move freely. It is not advisable to ventilate the room for the first week. The screed gains strength in the first 28 days, the curing processes and the formation of cement stone occur only with the required moisture content of the screed.
Please tell me! 19.05 made a semi-dry screed. After a day, we easily moistened it and covered it with film (the windows are closed) After 4 days, we removed the film, moistened it and covered it again (the windows are closed) There is no one at the site (we are not loading it) How many days after moistening (on the 4th day) should we keep the screed under the film? When should you start ventilating (from what day should you not be afraid of drafts)? And is it necessary to further moisten it after removing the film?
Answers: Administrator “Screed Floor”
Hello. It is better not to remove the film for the first 2 weeks; it is advisable to moisten the screed on the 7th day after completing the work; it is not advisable to ventilate it in the first week; the screed gains strength within 28 days.
On Saturday we made a semi-dry screed. On Sunday I watered it and covered it with film. When can you open windows?
Answers: Administrator “Screed Floor”
Hello. If the screed is under film, you can already ventilate the room, but you need to make sure that the screed is moistened during the week.
Source
Drying and processing
Filling the yard with concrete is almost complete, all that remains is to wait for the surface to dry (on average 24 - 48 hours) and clean it with a spatula or sand-lime brick from sagging and unevenness. If no temperature gaps were provided during the screed pouring process, they are cut through the dried concrete with a grinder.
However, there is one more point from which the cement screed will gain strength - drying should be slow. What is needed for this?
Covering with film
After the water has left the surface of the concrete that has begun to set, it is covered with a film, and evaporation noticeably slows down. When the air temperature is very high, the area or path concreted near the house is watered with water.
Whatever you choose as a material for arranging your local area, asphalt or concrete, depends only on personal preferences. The main thing is that all stages of the construction process are carried out correctly and strictly according to technology.
Fasteners and tools
To carry out installation work, you will need auxiliary equipment and fasteners.
- Self-tapping screws are used to fasten floor elements to each other. It is recommended to use galvanized self-tapping screws with double threads. The threads of these hardware have different diameters, and therefore prevent the fasteners from being squeezed out of the floor element.
- PVA glue is used to glue the boards together. Universal construction PVA is most suitable for these tasks.
- A screwdriver is a tool that makes it easier to tighten screws; it is better to use a cordless screwdriver with several batteries so as not to waste time charging the tool.
- A jigsaw or circular saw - these tools will be needed to cut floor elements to size. When working with gypsum types of coatings, it is better to use a jigsaw with a pipe for connecting a construction vacuum cleaner. This way you can immediately collect all the dust, preventing it from settling in the room.
Sawing GSP with a circular saw with a connected construction vacuum cleaner to collect dust
- Measuring instruments - tape measures, rulers and levels are used as measuring instruments; a rule is used to distribute the backfill over the floor surface. Sometimes a rule may immediately have a built-in level. A laser level will help you mark the locations for the beacons. If you don’t have a laser level at hand, you can use a hydraulic level.
The hydraulic level is a long tube with flasks at the ends. Based on the principle of fluid movement in communicating vessels, the hydraulic level allows you to “beat off” the zero level of the room.
Tools, devices, materials
To concrete the yard, you will need:
- electric mixer or trough for concrete;
- vibrating plate or manual rammer;
- wide shovel, buckets;
- vibrating screed or manual surface smoothing;
- profiles for drywall;
- wooden rule 1.5-2 m;
- pegs with twine.
For the solution, use coarse river sand, medium-sized crushed stone, Portland cement grade 400 (preferably with mineral additives for resistance to water and different temperatures). You will need borders for framing.
First stage
It all starts with planning the yard for flower beds, lawns, a vegetable garden, and a greenhouse. Along the “found” directions, the contours of the paths are laid with pegs and stretched string, a recreation area, a platform near the house, etc. are allocated.
Areas under concrete screed are cleared of plantings, turf, and debris. The ground is leveled. When the terrain has a natural slope, water leaves the concrete surface by gravity. Otherwise, you will have to create a height difference.
Formwork is installed on the ground, sand is poured out and passed through with a vibrating plate. The same operation is performed with crushed stone. The thickness of compacted sand and crushed stone can vary from 4 cm to 20 cm. Already now it is necessary to create a slope of 1 cm/1 m of the surface.
A metal mesh is laid on top, for example: from 8 cm squares. The reinforcement, like a skeleton, maintains the integrity of the hardened concrete.
Reinforcement mesh
Beacon layout
Drywall profiles are laid at a distance of no more than 2 m, otherwise it is difficult to use the rule. To maintain the slope, use a cord sliding along the longitudinal marking cords on the pegs. The slats are placed on several piles of thick concrete mixture. The transverse cord runs along the profiles of the lighthouses and it becomes clear where to sink them and where to raise them. The same thick cement composition is placed in the gaps between the dried slides and allowed to set. The entire profile rests on a solid bed and will not bend under the rule.
Beacons corrected with a transverse cord
A range of products to facilitate winter mechanized floor screeding
In accordance with production conditions, specialists use:
- sand warming rods
- inflatable warmers
- frost-resistant additives
Sometimes the number of links is increased to speed up the process.
The least expensive method, often used in large areas (shops, offices), is to use several sets of equipment and a large number of units at once. Then the work happens quickly, the sand is consumed at such a speed that it does not have time to freeze. Triggers at temperatures not lower than -10.
Sand is delivered to the construction site in the back of a heated heavy-duty truck; small batches - 20 cubic meters each. or based on the full consumption of this volume in 2 hours in the cold. In two hours you can process 20 cubic meters. sand using three links.
Pouring with cementitious composition
Concreting is done in 2 ways:
- monolithic, when only the solution with crushed stone is laid out in a layer of 10 cm;
- combined, when the top 2 cm of the fill is made from a mixture without crushed stone.
Under the canopy, the combined floor looks aesthetically pleasing.
Filling is carried out within 1 day to prevent drying and subsequent cracking.
Concrete is placed above the level of the beacons. The ends of the wooden rule are placed on adjacent profiles and the excess concrete composition is removed using longitudinal movements, loading it onto the next section of the floor.
Fill alignment using a rule
A fresh concrete floor is passed over with a vibrating screed or a long trowel to “polish” the surface to a damp shine.
Border edging
The perimeter of platforms and paths can be fixed with ready-made borders or made by concreting in wooden forms.
The edging is set 5-6 cm above the level of the concrete floor. After approximately 1-1.5 m, a gap is left between the joints for the outflow of rainwater.
Note: concrete surfaces require regular dousing for at least 2 weeks, especially in hot weather.
Concreting does not require large financial costs. After several years of its service, you can find funds for decorative finishing of the yard with paving slabs. Concrete will be an excellent base.
The following video will tell you about the correct choice of Portland cement for a concrete screed in the yard:
How to reinforce concrete: mini-instructions
Under the influence of various factors, the concrete coating is damaged and loses its properties. Despite the fact that over time, production is improved and the quality of building materials increases, universal construction products also have their drawbacks. Everyone wants to carry out a good renovation in their apartment so that they do not have to resort to re-finishing for at least several years. To do this, you have to work carefully and carefully, resort to various tricks, and correct the shortcomings of the material used by various means. Ironing a concrete floor can be considered one of these methods.
PS on the street
Semi-dry screed on the street
When you purchase your own plot of land, you willy-nilly think about improving it. Of course, you can use paving slabs. But many people have a question: is it possible to do a semi-dry screed on the street ? And the answer will be yes! Blind areas, garden paths.
The main thing to remember is that using non-concrete screeds is extremely ineffective. And due to the fact that street screeds are exposed to weather conditions, they should be made with a slight slope, but not more than 2%. Installed channels with the same slope, delivering water to a safe collection point, can serve as an additional assistant in this regard.
Outdoor screeds - layers
According to accepted standards, semi-dry screed on the street should be carried out in several layers:
- the basis;
- interlayer;
- waterproofing;
- underlying layer;
- screed
Base for outdoor screed
The base for the screed means a layer of earth with the turf layer removed from it. The roots remaining at the site of the future screed must be completely removed. In case of active root growth, it is recommended to treat the area with special means that prevent possible growth of vegetation (herbicides).
The soils most suitable for plant growth are not suitable. This includes black soil and peat.
If there is a large accumulation of groundwater in the area of the future screed, then some additional steps must be taken:
- Groundwater drainage.
- Raising the screed level.
- Mandatory presence of waterproofing in layers
The best material that serves as a layer between the base and waterproofing layer is clay.
Due to the water pressure to which the street screed is exposed, waterproofing along the entire perimeter of the planned scope of work is simply necessary. In places where the screed meets other objects, it is necessary to make an allowance of 300mm.
The main materials used for waterproofing are insulation, brizol, hydroisol, duplicated polyethylene and others.
There are two types of waterproofing for street screeds: bitumen and polymer. In the first case, three layers are necessary, in the second, two are enough. If the amount of precipitation and the level of exposure to water is lower, then it is possible to reduce the number of layers by one.
The underlying layer is considered to be a layer consisting of gravel, sand, crushed stone, asphalt concrete, or a combination. It is designed to level the soil layer and also performs a reinforcing function. The underlying layers must be compacted.
The thickness of the underlying layer, depending on the material chosen for it, varies. So for a sand layer, 60mm is enough, but for a gravel layer - at least 80mm.
The material for the underlying layer can be any of the available types, and is selected individually, depending on the location of the object.
Screed on the street
The semi-dry screed is applied to a special mesh, which has a reinforcing effect, in increments of 100mm. If the layer is thick, over 25 cm, it is better to make a two-layer screed.
Temperature restrictions when installing a screed
The quality of construction depends not only on the mixture used and your experience, but also on weather conditions. Screeding a floor in winter is a rather difficult task that will require special skills and abilities from the performer.
This procedure is extremely important, so any mistakes must be avoided. The temperature at which the screed is performed directly affects its quality and service life. In this article we will look at at what temperatures you can pour a concrete screed outdoors.
Solution quality depending on temperature
Nowadays, special components are added to mortars, which allow construction to be carried out at any time of the year.
However, concrete has certain chemical characteristics that impose restrictions on working with such a mixture. The floor screed procedure is divided into two stages:
- Grabbing the floor.
This usually takes no more than a day. Drying of concrete also depends on the type of mixtures added. - Hardening of the solution. The time it takes to complete this procedure depends on the following characteristics:
- brand of mixture;
- presence of additives in the composition;
- the temperature at which the work was carried out;
- moisture level.
In the following table you can see the strength of concrete depending on the temperature at which the work was carried out.
So, let's determine at what temperature the screed can be made.
It is best to work at temperatures from 3 to 25 degrees.
Under such conditions, the screed will be able to go through two stages with a minimum amount of time and a better quality indicator.
Keep in mind that the speed of hardening directly depends on heat. The higher the temperature outside, the faster the solution will gain its strength.
Temperature and other weather indicators have a great impact on the curing time of the screed and its strength. This is due to the fact that water can harden quite quickly.
Construction in winter
At low temperatures there is a risk that the concrete will crack.
Keep in mind that at temperatures of -3°C or lower, the water in the mixture will begin to crystallize.
Because of this, the surface structure will be disrupted and microcracks will form, which will gradually increase in size.
The hardening process may stop or slow down even at temperatures below zero.
Keep in mind that even if the concrete thaws after freezing, its properties will still be impaired. This means that the surface quality will be significantly lower.
When filling the screed in winter, take care of its heating
However, construction is often urgent, so work has to be carried out even under inconvenient conditions.
There are several ways to pour a concrete screed in winter:
- heat the solution;
- organize heating of the structure;
- purchase high-grade material;
- use special antifreeze additives or plasticizers.
When using these methods, the result is a durable surface. To process it you will need to use special methods and equipment.
Pouring screed at low temperatures
So is it possible to carry out such work during frost? Thanks to modern technologies, screeding in winter has become possible, but you will need to follow certain instructions. To learn how to pour screed at sub-zero temperatures, watch this video:
The procedure for working in cold weather is as follows:
- The first step is to dig a pit or trench.
- Then the formwork is installed.
- Afterwards a reinforced frame is installed.
- You will need to heat the container into which the concrete will be poured. Keep in mind that it is extremely important to ensure that the formwork is heated for the first two days; it is at this time that the mixture sets.
- Waterproofing is being prepared that will cover the poured mixture.
- After two days it will be possible to reduce the heating intensity.
- After the solution has hardened, the formwork is dismantled, and the composition continues to gain strength.
Recommendations for working at low temperatures
During mixing of concrete, due to the passage of chemical reactions, the concrete heats up
. Winter pouring of concrete is an extremely difficult and important process that requires the performer to know certain nuances. Let's look at them in more detail:
- Before pouring in the house, you need to make sure that it is possible to create acceptable conditions for concrete screed at low temperatures. Also keep in mind that the cost of such work in winter will be significantly higher. During mixing, the solution creates certain chemical reactions, so that the mixture can spontaneously heat up during installation.
- We recommend using fine-grained mixtures. They interact with water much faster, which will release more heat.
- The thicker the layer of composition is applied, the more heat will be released, and, therefore, the slower the structure will cool.
- If it is necessary to increase the temperature, you can heat only water or additives. Cement cannot be heated, otherwise it will lose its properties. For more information about concrete work in cold weather, watch this video:
This is how screeding is done at low temperatures. From all of the above it follows that pouring concrete can be done at any time of the year, the main thing is to adhere to the rules and technologies.
It should also be taken into account that the price of such procedures will be significantly higher due to the need to use additional equipment and additives.
gurupola.ru
Construction portal No. 1
Apartment renovation cannot be completed without high-quality leveling of the floors. Screeding the floor in an apartment is an inevitable stage of any renovation if you want the result of the renovation work to please you with its quality for many years. Installation of a floor screed is necessary if you are going to lay tiles, laminate, parquet boards, carpet, linoleum or any other floor covering on the floor, which means you need to know what the differences are between the methods, which floor screed is better, what materials are best to use in residential indoors.
Criteria for choosing the type of screed
When deciding on the type of screed to be planned, the following factors must be taken into account:
- Strength characteristics of the load-bearing base. Screeds of various types, especially at the time of installation, differ from each other, including their specific gravity. The foundation being constructed must have a safety margin that allows it to withstand the load from a freshly laid coating without changing its physical characteristics.
- Location of the room. If there are rooms being used under the foundation being constructed, then water from the concrete being laid or wetted may seep into them through the ceiling.
- The degree of evenness of the supporting structure. Filling significant depressions on the base with an expensive type of screed material is not rational.
- The height of the ceiling of the furnished room. Each type of screed has an individual minimum thickness. In rooms with low ceilings, installation of thick-layer coatings is undesirable.
- Operating conditions of the room. Humidity, household loads on the base, the presence of a vibration source in actual proximity to the structure.
- Deadlines. This refers to how quickly the screed needs to be completed, and whether this is possible at the current time of year - you cannot work with concrete in cold weather.
- Result requirements. A smooth screed does not require additional leveling of the floor for finishing. The smoother the screed, the wider the list of finishing materials possible for installation.
- Own performance skills. Experience in installing one type of screed or another will allow you to do it yourself - partially or in full.
- Availability of necessary equipment. Without a trowel, decent quality semi-dry screed cannot be ensured.
- Budget.
The first point on the list is that the strength of the base is the determining factor on which the very possibility of implementing a particular technology depends. All subsequent ones are somehow tied to the last point - the budget.
Having assessed the existing situation, it is necessary to try on the screed options for it. In some cases, to select a coating, it may be sufficient to know only the basic characteristics collected in a comparative table:
Table 1. Comparison of the main characteristics of screeds
| Screed type/characteristics | Wet | Semi-dry | Dry |
| Weight 1 m2 1 cm thick | approximately 80 kg | approximately 9 kg | |
| Deadline for completion and start of operation | 4 weeks | Up to 200 m2 per day by a team of two people | |
| Strength | High resistance to all types of mechanical loads | Low strength, vulnerable to shock and vibration loads | |
| Moisture resistance | High | Absent. Cannot be used in areas with high humidity | |
| additional characteristics | Reinforcement, the need to prevent leakage of “cement laitance” during installation | Dispersed reinforcement is recommended | Used on substrates with a small margin of strength characteristics |
To be more confident in the correct choice, you need to know the features of the technologies in more detail.
The most popular types of screeds:
- Concrete
- Cement-sand
- Self-leveling (self-leveling floor)
- Dry
Experienced experts say that each of these methods is good enough to create a perfectly flat surface without differences in height, suitable for further installation of finishing floor coverings. When to install floor screed?
All floor leveling work should be done only after you have completely dismantled the old wall and ceiling coverings. If the apartment is undergoing redevelopment, it is also necessary to dismantle the old partitions and erect new ones from plasterboard, and then carry out all the electrical work. Only after the work with the electrical and partitions has been completed, and the walls and ceiling have been rough-finished, can you work on the floor in the room.
If you are using a non-dry screed, it usually takes about thirty days to dry. The level of moisture in a screed is determined differently by everyone, but professionals recommend starting to walk on a fresh surface no earlier than a couple of days, and laying the flooring no earlier than a month later.
A thin layer of self-leveling flooring, which is also often used to hide small differences in height, dries much faster. It usually takes two weeks for a self-leveling screed to dry. In this case, it is necessary to do waterproofing before screeding. Self-leveling flooring has a lot of advantages: its small thickness makes it suitable even in apartments with low ceiling heights. If you plan to lay parquet as the final covering, you must additionally cover the screed with moisture-resistant plywood. If another coating is planned, it is enough to lay a layer of foamed polyethylene backing on top of the dried screed.
Combined screed
The highest quality and most effective results are obtained if you apply several floor leveling techniques at once. Many professional repair crews do this today. The combined method is advisable when the base is so uneven that significant differences in height do not allow the floor to be leveled using only a self-leveling mixture.
In this case, a primary rough screed is first made. It is usually made from concrete or cement mixed with a significant amount of quartz sand. The layer of primary screed is always thick enough to hide serious surface irregularities. After the primary layer has dried, it must be impregnated with a waterproofing compound. Typically, rubber or bitumen mastic is used as a waterproofing mixture in this case. Then the next layer is applied, for which a self-leveling mixture of small thickness is used.
If it is planned to install a heated floor in the room, then the electrical cables of the heating system are laid on the primary screed and then covered with insulating material, after which the next leveling layer is poured. If the screed is being prepared for the subsequent laying of ceramic tiles or porcelain stoneware, the work is completed. If you decide to use parquet or carpet as a decorative covering, you must additionally cover the concrete screed with sheets of plywood, keeping small gaps between them so that the floor does not creak.
Advice! When laying parquet, undried screed can cause further damage and deformation of the coating. Be sure to dry the concrete; do not rush to lay the final coating on it without waiting for it to dry completely.
What is dry screed?
This technology appeared on the construction market relatively recently. For its production, dry mixtures that are diluted with water are not used, so it is considered less labor-intensive. Dry screed is a special building board that resembles plasterboard in composition, but has greater strength. These slabs are pre-coated with a special waterproofing compound. They are laid on a backfill of polystyrene, which levels the base of the floor. The slabs are laid directly on the backfill quite rigidly, the edges of each slab should overlap the next one so that all joints are closed.
The dry screed is ready for further use immediately after installation. This is its main advantage: you don’t have to wait two or more weeks for it to finally dry. The final floor covering can be laid the very next day. In addition, another advantage is its light weight.
The disadvantage of concrete and cement screed is the very large load on the floors. Per square meter of space there are up to 100-120 kg of concrete mixture. In some houses, the floors are not designed for such a high load, so dry screed becomes the only way out of the situation.
Step-by-step instructions for applying a leveling floor screed
Let's find out how to make a concrete floor screed. First you need to use a laser level to set marks at a certain height from the floor. Whether your floor will be smooth and neat depends on how level the “zero level” of the future screed will be. The optimal height of the “zero level” is 1.5 cm from the base surface.
Surface preparation. The base must be cleaned of old floor coverings, dust and dirt. All cracks and minor surface defects must be repaired using a special cement-based repair compound. The cleaned and repaired surface must be coated with a primer. It is best to use soil with quartz sand for this to enhance the adhesion of the surface to the screed. Apply edging tape where the floor meets the walls to insulate the vertical surfaces.
Using pieces of aluminum profile, set up the beacons, securing them to the base. Beacons are a prerequisite for an even and neat screed. Install them using a level, so that in the future you can use the level of the beacons to navigate the thickness of the leveling layer.
Watch the video on how to make a floor screed in an apartment
Prepare a solution of the required consistency according to the instructions. Mix the solution thoroughly using the mixer attachment on your drill to avoid lumps. The mixture should be homogeneous and thick. Use the solution immediately, without waiting for it to thicken and lose its properties. The mixture is carefully poured onto the prepared base and then leveled using a long-handled toothed roller. This is necessary to remove small air bubbles in the solution, which can subsequently impair the strength of the leveling layer.
Currently, a new technology for performing work on leveling the floor with a semi-dry screed is gaining increasing popularity. This method differs from the old-fashioned method that is familiar to us in that in this case the cement-sand mortar contains a minimal amount of water, is mixed on the construction site outside the premises and is supplied into the premises itself by a special mortar pump under pressure. Then it is leveled using a laser level, compacted and rubbed with a special trowel.
The use of screeds in private construction
If two housewives are given the same set of products and asked to cook the same dish, then it is far from a fact that the result obtained will be identical. This, or something like this, is the case with the strong half of humanity if you need to make a screed. And the components seem to be the same (water, cement, sand), and the concrete mixers are not very different, but the end result may vary significantly. What's the matter, why is this happening? What subtleties do you need to know to make the concrete screed perfect? This is exactly what we will be talking about.
Today we will look at the construction of concrete screed using the wet method - the classic one.
Based on personal experience in performing these works, I consider it necessary to focus on some points that need to be understood before the work begins. So:
Operating conditions for the future screed
This is an important factor for understanding what the future concrete screed will be like. Three key points:
- design of the future screed
- materials and components
- "pie" used, etc.
For clarity, the figure below shows some features that must be taken into account when preparing for work.
The above figure allows you to roughly imagine what you need to know and take into account in order to master the construction of a concrete screed. Therefore, there can be only one piece of advice here: if you have decided where and why you will do the screed, it is better to collect as much information as possible on the specifics of performing specific work for specific conditions.
This will allow you to have a clearer idea of the upcoming work. In particular: what must be done without fail, what can be sacrificed, what materials or components can be excluded or replaced, etc. In this way, the decisions and actions you take will be conscious and competent, which already guarantees against obvious lapses and mistakes. But since it is known that theory without practice is zero, let’s look at the features of the practical performance of work that may be in demand in private construction, using the example of the work that I had to do.
Features of installing concrete screed in open areas and in unheated rooms
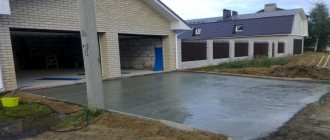
From such works I had to make those shown in the illustrations.
The photo on the left shows the work being done to install a concrete blind area around the perimeter of the house. The approximate volume of work (by area) is 42 m2. The service life at the moment is approximately 5-6 years. The photo on the right shows concrete floors in a covered but unheated space, in this case a garage. The work was carried out in 1997. The total volume of work (in area) is 58 m2, of which the garage floor is 34 m2 (8.5×4) m, the workshop floor is 24 m2 (6×4) m. The service life is currently 14 years.
If we take the real capabilities (financial, technical) of the average homeowner, then for the given conditions in terms of the place of application, the cost and availability of materials and necessary tools, the cost of the work itself, nothing better than the “classics” has yet been invented. Therefore, what is worth mastering first is laying a concrete screed in its simplest form. Basic materials and equipment for laying concrete screed are shown in the photo below.
Cement and sand, taken in a ratio of 1 to 3, filled with water and mixed, constitute an independent product - a ready-made cement-sand screed. In the case of making a concrete screed, they are a binding component to which filler is added, for example, crushed stone, expanded clay, etc.
Now a few words about the choice and features of certain components.
Cement. I always use Portland cement M 400 or M 500, packaged in bags. If you have a choice for making a concrete screed, it is better to take cement grade M 500. In our local market, Volsky cement (Volsk), Zhigulevsky (Zhigulevsk) and Mordovian cement are available for sale. I did not find any fundamental difference in the quality of cement when used. And a couple of important notes on cement:
- I don’t advise you to buy cement cheaply; they might sell you a low-quality product;
- With prolonged (more than six months) and even improper storage, cement noticeably loses its properties. Therefore, there is no need to buy cement in excess;
- It is necessary to prepare a place for its storage in advance (preferably under a canopy).
Sand. The choice of sand comes down to one thing: river or ravine? The photo below shows the sand: on the left - river sand (from the remains of the previous delivery), on the right - ravine sand.
It is better to give preference to river sand. This choice is due to the fact that there are fewer foreign impurities in river sand. For example, excess clay impurities in gully sand cause the concrete screed to become more susceptible to moisture, which affects its strength. Although I had to use both sands. With the general correct design of the screed, the features of a particular sand are practically leveled out.
Crushed stone is a traditional filler in the manufacture of concrete screed. In our area, dolomite (limestone) crushed stone is mainly used, shown in the photo below. By the way, a rare case: as can be seen in the photo, there is practically no dust in the brought crushed stone (sandy, dusty impurity).
From the point of view of the consumer properties of crushed stone in relation to the production of concrete screed, the following can be noted.
- It is better to use fine crushed stone (approximately 5-20 mm in size) with jagged shapes. We call such crushed stone “klinets”. The use of a wedge (fine fraction of crushed stone) is especially important for the top layer of the screed, as it allows you to obtain an almost perfectly smooth horizontal surface;
- In other cases, you can use crushed stone of a larger fraction (20 - 40) mm and even larger, especially if the concrete screed is quite large in area;
- It is necessary to pay attention to the presence of dust-like (sand-like) impurities in the crushed stone. If there is an excess of it, it may be necessary to adjust the proportions of the components (cement, sand, water) when preparing the concrete mixture.
Expanded clay. It is a traditional filler in the production of expanded clay concrete screed. From personal experience in using this material, I can note the following features of its properties and use: as can be seen in the photo below, it has more rounded and smoothed shapes compared to crushed stone and in terms of strength characteristics, it is inferior to crushed stone.
With this in mind, I use it in a somewhat unique way, which is what I want to draw your attention to.
1. When installing a concrete screed on the street, I use expanded clay concrete screed only as the inner layer of the concrete screed, which is protected on top by a layer of ordinary concrete screed. See photo below.
Why? There are several reasons. Firstly, using expanded clay instead of crushed stone makes the work much easier. At the same time, the cost of expanded clay is slightly (not significantly) more than crushed stone. Secondly, in the harsh conditions of using the screed outdoors (exposure to snow, water, temperature changes), I simply did not want to take the risk. Therefore, a layer of concrete screed was made on top of the expanded clay concrete screed.
Practical experience has shown that in some, most unfavorable cases, even a concrete screed requires repair after several years of operation, this is shown in the photo below. The photo on the left shows part of the blind area after about 3 years of operation, the photo on the right shows the same area after repairs have been completed.
In the end, it ended with me covering all the blind areas and the porch with ceramic tiles.
2. But in its “pure form”, he actively used expanded clay concrete screed inside buildings, in particular when installing a heated floor on the ground in utility buildings (canopy, cellar, boiler room) when insulating the floor on the ground in a residential building. See the photo below.
Here I should note that although expanded clay concrete screed is considered warmer compared to concrete screed, by modern standards it does not provide the required heat-shielding properties. Therefore, in all cases, when installing heated floors on the ground, I used a layer of modern heat-insulating materials as thermal insulation. See the photo below.
3. In addition, I must note another important property and advantage of expanded clay concrete screed over concrete screed, which can be fundamental in the practical performance of work. Expanded clay concrete screed has less weight and creates less load on building structures, which can be of paramount importance. For example, I used expanded clay concrete screed when making floors in the entryway, when constructing a cellar, in the kitchen, when installing a floor for a bathroom, when constructing a base for installing a washing machine (to eliminate vibrations) and a gas stove (a fireproof base). The photo below shows the structure and use of expanded clay concrete screed as a floor when constructing a cellar in an attached room.
The photo below shows the use of expanded clay concrete screed when installing a bathroom in a house. Here the expanded clay concrete screed acts in two forms at once, both as a ceiling and as a base for the floor in the room.
In this case, I also used a layer of thermal insulation, taking into account the fact that the space under the floor has a slightly lower temperature relative to the room. In order not to take up the reader’s time, I can note that the implementation of these works (canopy, boiler room, bathroom) is described in more detail in my previous articles.
3. Basic tools and equipment required for screed installation
When choosing tools and equipment, much depends on the type of screed (concrete, expanded clay concrete, self-leveling floor), on the volume of work to be done, and even on the conditions and location of the work. In this regard, we will consider several of the most possible (typical) options.
1. Installation of concrete and expanded clay concrete screed (if the volume of work is sufficiently large).
Undoubtedly, the best option is to use a concrete mixer. It is probably not for nothing that there is an opinion among professional builders that preparing concrete (concrete screed) manually, by definition, cannot meet the requirements of GOST and other regulatory documents. This is probably true.
It is almost impossible to manually mix the solution in large quantities with the required quality (like a concrete mixer).
2. Often, depending on the location and volume of work, it is more profitable to use the old “old-fashioned” method than to prepare the solution in one place and carry it to another. In this case, I usually use a metal container to prepare the solution, with all the ensuing consequences. The photo below shows a fragment of the work being done indoors.
3. When installing a screed using modern materials, in particular when installing a self-leveling floor, the best option would be to use a construction mixer. It is almost impossible to prepare a usable dry mixture by hand.
Here, by the way, you need to take this option into account. If you don’t have a mixer, but if you have a concrete mixer, you can use the latter as a mixer, although not always. Therefore, when choosing a self-leveling floor, you need to take into account the presence or absence of this possibility. Usually this information is present in the instructions for use of specific dry mixtures.
4. Main stages of work execution
It is advisable to consider the main problems associated with poor-quality screed construction in relation to each stage of the work. This is due to the fact that mistakes made at each stage of the work manifest themselves and affect the result - each in its own way. Knowing these shortcomings and the peculiarities of their manifestation, you can make timely corrections directly when performing work or take them into account when repairing an existing screed. It is advisable to highlight the following main stages as the main stages of the work.
- Preparing the base for the screed
- Preparation of a solution (mixture) for screed
- Screed device
- Screed care
Mistakes made at the stage of preparing the base are the most destructive for the screed. And correcting mistakes made at this stage in most cases is impossible or will require large time, material and financial costs. In addition, depending on the operating conditions and the intended purpose of the screed, the preparation of the base may differ significantly both in the volume and specificity of the work, as well as in the requirements and features that must be taken into account.
How to avoid mistakes when performing work at various stages, for various screeds, taking into account the specifics of their operation and using specific examples, we will discuss in the next article.
www.diy.ru
Purpose of impregnation
When a concrete screed is performed indoors, it is not influenced by external negative aspects. It's a different matter when it is performed on the street. In this version, on concrete
things like this work:
- very high humidity;
- high mechanical loads;
- large and severe temperature changes.
The worst thing for concrete is sudden temperature changes - due to this, the screed begins to become covered with cracks. And then water gets into the cracks that form, which leads to irreversible damage.
This is all aggravated if poor quality cement was used during the work, or the pouring technique was violated. In this option, the destruction process will go much faster.
Due to this, the use of strengthening impregnations is simply necessary for screeds poured outdoors. Thanks to its own characteristics, it is absorbed into the outer layer of concrete and strengthens it. Moreover, similar products form a protective film on the surface, which prevents moisture from entering the screed.
Impregnation for concrete
Polymer impregnations
One of the most effective types of impregnations for concrete are those made on a polymer basis. They are intended for use both indoors and outdoors.
- the composition can penetrate deep into the screed by 3-5 mm;
- at the same time, resistance to very high humidity and other atmospheric influences increases;
- the screed
becomes stronger and more resistant to wear, it will not crumble.
Moreover, the working life of the coverage increases. In general, if the screed was made using concrete, grade 300-350, then after processing, the product strengthens it to grade 600.
Main! When working with a reinforcing compound, it is necessary to take into account the concrete grade from which the screed
– the quantity and method of its application may depend on this.
In most cases, when a solution with grade 150 was used to fill the floors, after applying the impregnation, they must be covered with polymer ethylene. This will allow it to penetrate as deeply as possible and perfectly secure the front layer.
Likewise, the use of such compositions is quite justified and is necessary when strengthening the solution. But in order to achieve the best results, you must follow the manufacturer’s instructions and not violate the technology.
The most common damage to screeds
Even if good cement was used when pouring, this does not guarantee that the screed
will not deteriorate over time. In most cases, the following destruction occurs with concrete:
- crumbling;
- cracks appear;
- the front layer peels off.
Main! Preventive measures must be taken immediately after deficiencies are found. If they are put aside, the screed may deteriorate greatly.
Naturally, to eliminate damage, it is best to use special means at the pouring step.
Cracks in the screed
Features of self-leveling floors for finishing
Self-leveling finishing mixtures: characteristics and types
Polyurethane self-leveling floor for outdoor use.
This category includes thin-layer, highly mobile polymer-based compounds. After curing, a seamless coating with increased strength properties is formed. They are used at the final stage to protect the surface from abrasive loads, strengthen and remove dust from concrete. They are often used to create an anti-slip floor with a beautiful decorative effect. In demand in garages, parking lots, terraces, home areas, etc.
Self-leveling finishing floors are one- or two-component compounds. In the first case, polymerization occurs as a result of the elastomer binding moisture from the air. In the second, the process begins by mixing the hardener (activator) with the base. There are mixtures:
- Polyurethane (Remmers PUR Aqua, Huntsman Poliplan);
- Epoxy (SdelaiPOL Etalon, Enekon Eneklad CFS);
- Polymer cement liquid (Remmers Crete, CMT PurCem);
- And etc.
The first two types are most widespread, since the rest are used mainly at large industrial facilities.
Epoxy self-leveling floor for outdoor use.
According to experts, polyurethane-based compounds are more elastic and cover small cracks and minor defects in the base well. Recommended for areas completely or partially protected from direct sunlight, as the coating turns yellow over time under their influence. Used for covered verandas, balconies, street cafes, exhibition facilities, etc.
Epoxy compounds create a very abrasion-resistant film, so they are well suited for parking lots, home areas with a high level of foot traffic, roadways, entertainment complexes, etc. The surface is partially repairable.
A coating based on epoxy resins can be used without a protective canopy, since neither heat nor rain and snow are harmful to such a floor. Many formulations contain UV protective additives, so they “hold” the color for a long time.
The difference between mixtures for interior and exterior use is frost resistance. To prevent the finished coating from cracking due to temperature changes, modifying additives are added to the compounds to provide the necessary elasticity to the coatings.
Polymer compositions are convenient because they can be applied to almost any material of mineral, cement or organic type: concrete, brick, stone, asphalt, slate, metal, wood and others. Some compounds work even on such capricious surfaces as marble and polished ceramic tiles. After application, the compound seals and strengthens the base and removes dust. Monolithic coating is very easy to keep clean, but difficult to damage. Minimum service life is 10 years or more.
Strengthening the screed with a specialized mixture
One of the methods for strengthening screeds outdoors is the use of special mixtures. They are produced in dry form and are applied on top of an already poured concrete solution.
The work methodology for fixing concrete looks similar:
- First of all, you need to understand that the strengthening mixture must be applied to a freshly poured screed. If you pour it onto hardened concrete, there will be no effect - the composition will simply be erased. Due to this, the concrete must still be wet.
- When the composition is applied to the screed, it comes into contact with it and chemical reactions begin. reaction. As a result, the front layer is hard and resistant to atmospheric influences.
Good qualities of such compositions:
- concrete strength and its resistance to wear increases;
- the working life of cement-based screed increases;
- its resistance to sun and moisture increases.
Another advantage of using such mixtures is the possibility of additional surface decoration. Because the composition may contain coloring pigments that can significantly enhance the appearance of concrete.
Strengthening the screed with repair mixture
In most cases, it will be reasonable to use repair mixtures. How to do the job correctly:
- using a hammer drill, holes with a diameter of 20 mm are made in the concrete base. The distance between the holes is 20-25 cm;
- the hole is drilled to the full depth of the screed, the drill must reach the base;
- further, the top of the holes that were created are expanded using a drill with a diameter of 30 mm, the depth is within 3-4 cm;
- Now, it is necessary to clean the pits from dust; for this, it is best to use a construction vacuum cleaner;
- an expansion anchor bolt is placed in the hole and clamped;
- then, the expansion is allowed to be filled with repair mixture.
Main! In case of severe damage, it is much more rational to dismantle the outdated concrete and pour new one than to try to resurrect the old surface.
In the same way, it turns out to significantly strengthen the screed. Additionally, you can open the surface with an epoxy-based resin mixture.
Epoxy based adhesive
Concrete surface repair
In most cases, before strengthening, you need to first repair the old concrete surface. One of the common problems with cement foundations is the peeling of various layers.
The main disadvantage of this problem is that the location of damage can be difficult to determine visually. However, the issue is resolved very easily. In order to find places where there are problems, you just need to tap the surface with a blunt object. Where a dull sound will emanate from the base, the concrete has delaminated.
Repairs are carried out in this order:
- In identified problem areas, it is necessary to drill holes. For repair work, a diameter of 15-20 mm is sufficient;
- The repair mixture is poured into them; a construction syringe is perfect for this.
Pouring the mixture must be done gradually, since you will need to wait until it fills all the voids and is absorbed into the solution. As soon as all the places where there are problems are repaired, you need to wait 2-3 days until the composition sets. Then, the surface can be opened with strengthening impregnation.
Dents in concrete floor
Pothole Repair
If there are dents on the surface, it would be better to repair them before strengthening. The sequence of work looks similar:
- the pothole itself needs to be enlarged; to do this, an indent of a couple of centimeters is made from its edges, and then the concrete is sawed through with an angle grinder;
- after this it is necessary to hollow out the concrete using a chisel or hammer drill;
- the resulting pit is perfectly cleaned, the main thing is that there is no dust in it;
- in the same way, all damaged areas are prepared;
- then the repair mixture is applied to them, but in advance, it would be better to prime these places.
After complete setting, a strengthening compound or impregnation must be applied to the surface. Then, screed
will be able to serve for a long time.
Likewise, there are several options for repair work and strengthening of concrete foundations. The most important thing is to follow the manufacturers' instructions when using a variety of impregnations and repair mixtures. This will ensure that strengthening
will go well, and the floors will not break and will serve for a long time.