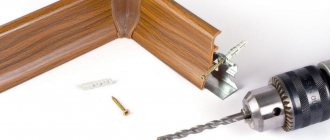
The plinth is a small but very significant element. It is necessary to complete the overall picture when renovating a room, since it is thanks to the plinth that you can beautifully design the joint between the wall and the floor. Also, in this small element you can hide various wires, both electrical and telephony and Internet cables. However, not everyone knows how to attach a plinth.
How to fix the baseboard
Floor plinth
Types of skirting boards
Depending on the material of manufacture, there are several types of skirting boards:
- wooden;
- plastic;
- made from MDF;
- metal.
About the types of floor skirting boards
In apartments, as a rule, skirting boards are made of either wood or plastic. MDF is used much less frequently. Metal skirting boards are usually purchased for installation in industrial or office premises. Depending on the type of plinth, there are different ways to install this element.
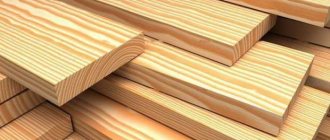
Wooden plinth can be made from any type of wood, but it is quite expensive - after all, it is a natural and environmentally friendly material. Typically, alder, oak, and larch wood are used for production. It is most often used for edging floors made of parquet boards, parquet, and natural wood floors. It can have either a simple triangular or curly shape. This material also has its own difficulties in working. For example, to cut a piece of a certain size, you will have to use a sawing tool.
Wooden plinth
MDF skirting boards are made from wood fibers and have a decorative veneer layer on top. This material looks quite presentable and from the outside is indistinguishable from natural wood plinths. But it costs much less, which attracts many. However, MDF requires special working skills - it is quite fragile.
MDF plinth with cable duct
Plastic plinth is the best option for modern apartment renovation. It is not afraid of moisture or sunlight, has a lot of color variations and is suitable for any floor covering. And the presence of plugs and corners will help to decorate the baseboard beautifully and neatly.
Plastic floor skirting boards
On a note! Plastic skirting boards often have special grooves for fixing carpet or linoleum, which will facilitate the task of laying the finishing coating for this type of floor.
The baseboard should be in harmony with the rest of the interior details
What to choose: wood, plastic or MDF
Various materials are used for the manufacture of decorative strips, so the products differ not only in appearance, but also in the mounting option.
Skirting boards should be selected taking into account the surface of the walls and floors to which they are mounted:
- Wood planks can be used in dry rooms, with a base made of laminate or parquet tiles.
- Wood-fiber MDF skirting boards are stronger in strength than wood, and in appearance they are close to laminated ones.
- Plastic panels are considered universal - suitable for almost all floor coverings - linoleum, laminate, parquet, self-leveling and cork floors, tiles, porcelain stoneware. Plastic strips are resistant to moisture, so they can be used in the bathroom.
Important! The main requirement for choosing decorative panels is a harmonious color combination with the floor. It must also correspond to the characteristics of the room (presence of open cables, wires).
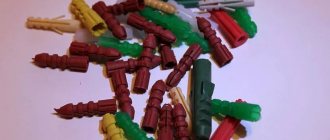
Methods for attaching skirting boards
There are three main ways to attach skirting boards. The task of each of them is to secure this element as securely as possible in its intended place.
Table. What are the different ways to attach skirting boards to the floor?
| Way | Description |
| Adhesive | The technique is not suitable for all rooms. It is used only if the walls are perfectly smooth. Otherwise, there is a risk that the plinth will eventually fall behind the wall or fall off altogether. It is also recommended to use this method only in rooms with 90 degree angles between the walls. The method is simple and allows you to carry out work very quickly. Liquid nails can be used to secure the baseboard. The method is irrational, since it will not allow the plinth to be reused, and there will also be problems with dismantling in the future. It is recommended to use this method for MDF products. |
| For screws or nails (straight) | In this case, any type of plinth is simply screwed or nailed to the walls using screws or nails. The recesses that appear due to this type of work can be closed with special decorative plugs or choppers - just match them by color. This is not a quick, but the cheapest way to attach a skirting board. And plastic products have a special gutter, which is then closed with a plug - it is in the gutter that the procedure for fastening the product with self-tapping screws is carried out. |
| On brackets or latches | Used for mounting MDF or plastic skirting boards and is suitable for use in any room, even with uneven walls. However, despite the manufacturers' statements, such fasteners are quite fragile and, most likely, it will hardly be possible to re-attach the baseboard to it. However, such brackets themselves are reliable. |
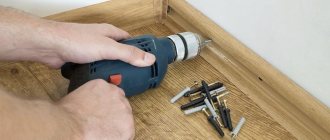
Technology for fastening skirting boards with self-tapping screws
Conclusion
Knowing how to fasten different skirting boards to a concrete wall in different ways - using self-tapping screws, glue and clips, you will be able to do this work yourself. The installation procedure of the panels is not difficult, but, as with any work, attention and skills are required.
Having different options for fastening panels, it will be easier to choose the most suitable option for the final stage of floor finishing. Only careful preparation and the correct method of fastening guarantee quick installation, and the purchase of additional material to redo the work is eliminated.
Features of fastening different types of skirting boards
In general, all existing methods for attaching skirting boards can be divided into two categories - installation by fastening to the floor and installation to walls. You will have to choose depending on the type of baseboard and the design features of the living space.
Features of installing skirting boards made of MDF and wood
Installation of wooden baseboards begins with treating the products themselves with varnish or other means that will protect them from rotting as a result of moisture getting on them. Skirting boards can also be painted after installation. Due to the fact that such a plinth practically does not bend, it is recommended that the bases, that is, both floors and walls, be well leveled with putty before installing it. Wooden plinths are usually attached using self-tapping screws or nails and can be installed either to the wall or to the floor. If necessary, it will be quite difficult to dismantle them without damaging them.
Wooden plinth
MDF plinths are usually mounted using special brackets (brackets), which are fixed to the walls. And if wooden plinths are simply sawed down for joining in the corners, then special plugs are sold for MDF material. If dismantling is necessary, such skirting boards can be easily removed and then put back in place.
On a note! It is recommended to start installing a plinth made of wood or MDF from the doorway, moving into the depths of the room from left to right.
MDF skirting boards
When forming the corners of such skirting boards, all cuts must be thoroughly sanded and treated with an agent that prevents rot and mold. Without certain skills, working with this type of material is quite difficult.
Features of plastic skirting boards
Plastic skirting boards can have a cable channel, or they can be produced without it. If the product has a place for laying wires, it will be covered with a plug. Thanks to this, all communications can be easily removed and repaired if necessary - you just need to remove this very plug. Once the work is completed, the bar is simply put in place and snaps into place.
Plastic skirting board
On a note! The solid plastic plinth also has special grooves on the reverse side where wires can be laid, but work in this case will be somewhat difficult. There will be no direct access to communications.
Installation of plastic plinth
The standard length of plastic skirting boards is 2.5 m, which ensures ease of transportation and installation. The cross-section of the plinth varies from 15 to 25 mm, and its height can vary - from 30 to 150 mm. Most often, products with a profile height of about 50-60 mm are used for installation in an apartment - they are called universal.
Advice! If the ceilings in the room are quite low, then you should not purchase a high baseboard. It will look ugly.
Table. Recommended baseboard height.
| Ceiling height, m | Height of plinth, mm |
| Up to 2.5 | Up to 70 |
| Until 3 | 70-90 |
| More than 3 | More than 90 |
Tools and supplies needed to install plastic skirting boards
Floors
0 votes
+
Vote for!
—
Vote against!
It would seem that the plinth is a very insignificant detail in the interior. Is it needed at all? This is exactly the question that consumers ask themselves who do not know about its true purpose. However, the plinth performs several useful functions at the same time. It can significantly embellish the overall appearance of the floor covering, protect the space between the wall and the floor from water ingress and the accumulation of debris and dirt there, and hide passing cables and wiring. Let's find out today how to secure a wooden baseboard.
Choosing a wooden baseboard
So, you have already chosen your flooring, preferring wood. Whether you're installing hardwood or hardwood flooring, you'll still need to install wood baseboards. There are two types of wooden plinths on the market – veneered and solid plinths. Solid baseboards are most often made from ash, cherry or oak. Its main feature is that it is made entirely of wood.
The second option, veneered plinth, is usually made from solid spruce or pine, and then covered with veneer of more valuable and expensive wood species. Therefore, it looks no less noble than massive products. The differences between these two types of plinths lie solely in price: a solid wooden oak plinth will cost you more than a veneered one. As for the color scheme, here you are provided with a huge variety of shades. And you can choose exactly the one that is in harmony with the floor covering itself.
The main thing is to choose quality material. If the baseboard is made from low-quality wet wood, it will look poorly sanded, with numerous protruding fibers, because wet wood cannot be sanded. It is better not to buy such products, because over time they will dry out and become deformed, which will not add to its attractiveness.
When choosing a wooden baseboard, remember that coniferous species such as pine, spruce, yew, fir and larch are moisture-resistant. They are not capable of deforming when humidity changes, or cracking when drying. In addition, wooden skirting boards made from pine and other coniferous wood are easy to process and convenient for installation. Soft hardwoods (walnut, linden or cherry) are subject to deformation, while hard hardwoods (oak, maple, hornbeam) can crack when drying.
The amount of wooden plinth is calculated according to the general scheme. To begin, measure the perimeter of the room in which you will install the plinth, subtract the length of the doorway from the resulting number, divide the result by the length of one plinth (usually the standard plinth length is 2.5 meters) and round up.
This is the number of products that are needed for installation. Don't forget to take extra material! After choosing a wooden plinth, it must be kept in the room for 24 hours, and only after that should it be installed. During this time, the baseboard will get used to the air humidity and internal temperature in the room.
Requirements for installing skirting boards
When installing a wooden floor, for example, a parquet board, it is necessary to leave gaps around the perimeter of the room. The standard values for such gaps are from 10 to 15 millimeters. However, we recommend leaving gaps of up to 12 millimeters, since most manufacturers make wooden skirting boards with a thickness of 14 to 18 millimeters, and gaps of 15 millimeters often provoke difficulties when installing skirting boards, even to the point of purchasing thicker plastic products and abandoning wooden ones.
You should keep in mind that small wooden pieces are approximately 55 millimeters high, while tall wooden skirting boards are 80 millimeters high. Accordingly, it is not necessary to finish the lower part of the wall. Before installing the skirting boards, you should run all the wires, because wooden skirting boards, unlike their plastic counterparts, are more difficult to remove and reattach.
Preparing wooden baseboards for installation
Since natural wood has natural defects - sapwood and knots, as well as a slight variation in shades, it is recommended to determine in advance which planks you will attach and where. This way you will be able to select planks that are close to each other in color, and also hide knots in the places where the furniture will be located. Or conversely, you can bring out all the natural wood accents if that's what you plan to achieve.
Before installing a wooden plinth, it is necessary to cut out small recesses called pockets, which are necessary for recessing the heads of self-tapping screws or metal dowel nails into them. If you do not make a hidden hole, the caps will extend beyond the plane of the baseboard and stick out, interfering with the application of putty. You can make a countersunk drill with a diameter that is slightly larger than the diameter of the head and the same depth.
For noise and heat insulation of floors, it is recommended to glue pieces of heat-insulating material to the wooden baseboard from below. You can find similar material in any hardware store. To save money, you can use linoleum. According to the standard, you should stick not long strips, but small pieces 5 centimeters long. Glue the material to the wooden baseboard, not butt-to-butt or overlapping, leave air gaps.
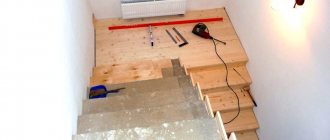
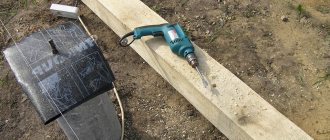
Before installing a wooden plinth, you should stock up on tools such as a hacksaw, a miter box, a hacksaw for wood with a thin blade, a tape measure, a construction angle, an electric drill, a screwdriver, a pencil, self-tapping screws, long nails, and dowels.
Cutting and joining plinths
Installing a wooden baseboard is more difficult than a plastic one. With wooden skirting boards, corners are not used, so the process of adjusting the skirting boards to the corners becomes much more difficult. To cut wooden baseboards, you need a miter box. Before starting work, it should be secured using the mounting holes provided on the frame. You can attach the miter box to a sawhorse, a stool or an old table.
Then, using special clamps, a wooden plinth made of beech is pressed to the body of the miter box. It must be pressed very firmly to the body so that it does not move during cutting, because in this case the cut will turn out incorrect, and when joining the skirting boards, a gap will appear at the bottom or top. When attaching the plinth, it is also necessary to ensure that the rear plane of the product is tightly adjacent to the frame, and there are no corners between the body and the rear plane.
After you have clamped the plinth in the miter box, adjust the blade to the desired position and cut the joint. Attach the resulting section to the wall, and then do the same manipulations with the baseboard along the second wall. Combine two baseboards in the corner and see which one needs further work.
Since in our apartments the corners are rarely ideal and have 90 degrees, after cutting the product on the miter box, it is recommended to manually adjust the wide wooden plinth to the characteristics of a particular room. Refinement is carried out using a miter box and a hacksaw, or by using a block and coarse sandpaper. It’s not possible to achieve perfect joining anyway, so it’s worth using colored putties and sealants to match the wood.
You won’t always be able to cover the distance between two walls with one plinth. In such cases, you will have to use two, or maybe three pieces, making an intermediate joining of the wooden plinth. The quality of the intermediate joining will largely depend on the quality of the product itself. Skirting boards must be of the same thickness and without knots at the joints.
Fastening solid baseboards
Fastening a solid wooden baseboard with self-tapping screws is a complex, but most reliable method. After all the necessary filings have been carried out, it is necessary to make markings on the baseboard for self-tapping screws. At the same time, observe strictly specified distances, because the fastening points will be visible with any camouflage, even if they are even. According to the standard, the distance between the holes for self-tapping screws in a wooden baseboard should be 800 - 1200 millimeters, the distance from the floor should be about 15-20 millimeters.
In specialized stores you can also find more inconspicuous fasteners - long and thin self-tapping screws. In this case, the caps will be very small, and the fastening capacity will be great. In this case, there is no need to pre-countersink - drill holes for the head of the self-tapping screw, since the head will sink into the veneer naturally.
After marking the fastening points on the wooden baseboard, you can screw in the screws until they appear on the other side. Next, you should attach the plinth to the wall, press it as much as possible against the floor covering and screw each self-tapping screw all the way into the wall. After this, remove the plinth, find the remaining recesses from the screws on the wall, mark them, drill holes and insert dowels. Next, the wooden plinth can be put back to be finally screwed to the wall with self-tapping screws.
The procedure for installing wooden baseboards on finishing nails is similar to the previous one, however, finishing nails are used instead of self-tapping screws, and wooden dowels are used instead of plastic dowels. The advantages of this fastening include an almost invisible fastening location. However, you should take into account that in some cases wooden dowels do not stay on the surface: if the walls are very uneven, if the walls are plasterboard or very loose.
Today, there are models of wooden skirting boards on sale that have a decorative insert in the middle, which perfectly hides the fasteners, as in the photo of wooden skirting boards. In this case, a wooden plinth is first installed, and then a wooden insert is glued on top.
Fastening veneered plinth
Veneered skirting boards have a structure that allows the wood to remain stable - neither narrowing nor expanding. This feature allows you to use two different methods of installing veneered skirting boards. The first of them is installing skirting boards using screws, which is completely identical to the method described above for solid wood products.
The second method is to glue the skirting boards, the third is to attach them to special clips. Gluing veneered skirting boards allows you to completely avoid drilling mounting holes, but the walls must be perfectly smooth. If there are even small irregularities on them, after gluing the wenge wooden plinth, gaps will remain noticeable, and in this case it is better to install the plinth with self-tapping screws.
If you have determined that the walls around the entire perimeter of the room are smooth, then you can begin gluing the veneered baseboard. Before gluing, carefully sand the wall to perfect condition. Skirting boards can be glued using different means; in most cases, it is practiced to install veneered skirting boards with liquid nails.
In addition to gluing, veneer skirting boards can also be installed on special clips. Although most manufacturers of veneered plinths do not provide clips in their design, since this method of fastening is even more capricious to wall unevenness than the gluing process, be it a laminated or wooden plinth. On the other hand, the undeniable advantage of installing veneered skirting boards on clips lies in the ability to easily remove the skirting boards for laying cables.
Wooden baseboard putty
Well, now you have installed a wooden plinth. Now is the time to start puttingty and varnish the surface. Before applying putty, the wooden baseboard must be completely cleaned of dust, oil and grease stains, if any. To remove all dust, the product must be wiped with a damp cloth or sponge. Oil and grease stains are removed using a solvent.
Wood putty is matched to the tone of the baseboard. This is very important, because otherwise it will stand out against the general background. Usually, the color of the wet putty does not match the dried surface a little; it may be slightly darker or lighter, so be sure to check the putty before starting work. After installing wooden skirting boards with your own hands, there is always a lot of scraps left on which you can check the tone of the putty.
Usually two or three layers of wood putty are applied. The first layer is quickly absorbed and sets, sometimes cracking if you have used a lot of the substance. After the base layer has dried, apply the next one and sand the surface after complete drying. If after sanding you see that it is necessary to putty the baseboard, then before applying putty, wipe off the dust from the sanded putty with a damp sponge, because the next layer will not stick well.
Varnishing the baseboard surface
After you have attached the wooden baseboard and puttyed it, you can begin to apply varnish. Before varnishing, the wooden baseboard is wiped with a damp sponge or rag and masking tape is applied to the wallpaper and floor. Select the adhesive tape that you will stick on the wallpaper with weak stickiness and do not leave it for a long time, as it will stick strongly and tear off the wallpaper.
Apply the first coat of varnish in advance of installing wooden baseboards, this will speed up the varnishing process. But apply the next layers of varnish only after puttying. Do at least two layers. When varnishing wooden skirting boards, temperature changes should not be allowed, because the varnish will not set evenly. But a draft can deposit various particles and specks on fresh varnish, which will ruin the entire appearance of the finish.
Before each subsequent application of varnish, the previous layer must be completely dry, otherwise it will undermine the uncured coating. After the paint composition has completely dried, it is necessary to ventilate the room. Caring for varnished wooden plinths is extremely simple. It is enough to wipe it with a sponge and protect it from excessive moisture so that the structure of the wood does not collapse.
Thus, you have figured out how to attach a wooden baseboard. There is nothing difficult about this if you cut and join it correctly. And even if small gaps arise, you can correct this situation with the help of putty that matches the color. After this, you should definitely polish the surface to give it a beautiful shine.
Types of plastic skirting boards
If you go to a good hardware store, you might be surprised at the variety of plastic skirting boards manufacturers offer. They differ not only in size, but also in shape, texture, etc.
Wide PVC plinth
For example, skirting boards can be divided into those that are used for installation together with carpet, and those that are universal. The latter can be used with any floor covering, while the former have special grooves. This type of plinth usually has the shape of the letter “L”.
Also, plastic skirting boards can be divided into categories according to the material of manufacture:
- made of PVC foam - a hard, elastic, but rather fragile option, does not have voids inside;
- made of hard PVC - hollow, durable, but quite simple, rarely used in luxury premises;
- made of semi-rigid PVC - resembles a foam baseboard, very flexible, sold in rolls. Looks nice, quite narrow.
Plastic snap-on skirting board
About wooden and MDF skirting boards
Until the 90s, the shape of such plinths was very simple, usually triangular. Now everything has changed, the wooden profiles used have become elegant (and their attachments to the wall have become more diverse).
As a rule, this is a “boot” or a straight profile with a rounded top. The modern baseboard has become higher. Its width of 10/12 cm no longer surprises anyone (the so-called wide wooden floor plinths). Various tones help give ordinary wood the appearance of valuable species.
Wide wooden plinth
For “aged” wooden coverings, the same solid baseboards are produced, coated with oil.
With the advent of the technology for laying parquet and solid boards, specially treated wooden floor planks began to be produced - brushed, bleached, with artificial wormholes, etc., and attaching them to the wall became even easier.
It is important to remember that solid wood baseboards must be coated with oil or varnish before installation. Once the fastening is complete, only small details are finalized.
Types of fastening of floor wooden skirting boards:
- Screw with plastic dowel. Fastening with screws. Necessary for wide planks, the height of which is 8/15 cm. The holes from the screws are closed with a heated wax pencil to match the color of the wooden planks.
- Finishing nail. Galvanized finishing nails have a small head with a rounded shape. When they are sunk into the wood, a small 2 mm hole remains. Covered with colored wax, such fastening is almost invisible. Using this method requires precise and careful work.
Advantages of plastic skirting boards
It is not for nothing that plastic skirting boards occupy a leading position in the building materials market. They have a lot of advantages:
- light and quite flexible;
- can be installed using almost any method;
- do not require pre-treatment before installation;
- have a long service life;
- are not afraid of water and ultraviolet radiation;
- do not rot;
- easy to install;
- do not require special care;
- They can have any color and a lot of variations in size.
Installation of plastic plinth with cable channel
Installation accessories
Plastic skirting boards are convenient because manufacturers sell a large number of components for them. These are internal and external corners, as well as connectors and plugs. Depending on the color and size of the plinth, they are easy to choose.
Accessories for plastic skirting boards
Corners allow you to make beautiful joints between skirting boards in the corners, and connectors allow you to harmoniously join two separate planks. Plugs are used to cover the edges of the plinth after installation is completed. Corners are internal and external, and caps are left and right. This is important to consider when purchasing material.
How to attach the corners of a plastic floor plinth
Attention! All components for products are purchased separately.
Cutting and joining
Unlike a plastic profile, a wooden profile does not have additional fittings that make it easier to design corners and join. Therefore, error-free cutting of profiles is of particular importance; for accuracy it is better to use a miter box.
First, the miter box is secured through the mounting holes on its frame. The profile is pressed very firmly against the body of the miter box using special clamps. The slightest movement is enough for the cut to turn out incorrect, then when joining the elements from below or above, a gap is formed. When tightening the bar, you should pay attention to the location of its rear plane. It should fit tightly vertically to the frame body.
Cutting internal and external corners
A right angle is made from two planks. Without turning the strips over, they are placed on the outside of the miter box and cut out sequentially - first the inner left corner, then the right.
The cutting blade is placed in the desired position and the joint is cut. The finished profiles are then tried on to the corner being finished; perhaps some of them will need further modification. The product for the outer corner is cut in the same way.
If it is clear that the angles are very different from straight lines, it is recommended to first attach the plank to one wall and draw a line along its edge. Then it is applied to the second wall and the edge of the baseboard is marked again.
In any case, it is better to cut the profiles first at the outer corners and with a margin of a couple of millimeters, then, if necessary, polish the cuts, preferably using a grinder.
In the inner corners of the room, the joints are not so noticeable, and it may not be worth trying to achieve perfection. It is enough to fill minor cracks with acrylic sealant for parquet, but if the color is not quite suitable, tint it.
Calculation of the required amount of material
Before you begin installation, you need to make a series of calculations to find out how much skirting board you will need to decorate the room. But it is quite easy to calculate its quantity. The perimeter of the room being renovated is measured without taking into account the width of the doors. Next, the resulting value is divided by the length of one baseboard. Thus, we get the required number of parts. However, it is important to remember that you need to purchase skirting boards with a margin of at least 0.5 meters. This is necessary to compensate for possible errors.
We make calculations
The number of external and internal corners, as well as plugs, is also easy to calculate. The external and internal corners in the room are calculated, and materials are purchased in accordance with the obtained values. There will be enough plugs at the rate of 2 pieces per doorway.
The fasteners are calculated as follows: the perimeter of the room is divided by 50 cm. And the same number of dowels or screws will be needed, but it is better to purchase 10 more pieces in stock.
Calculation of the number of plinths
Advice! In order not to make mistakes when calculating the amount of materials, it is recommended to carry them out (calculations) 2-3 times.
Required Tools
To install a plastic plinth you will need a small set of tools:
- perforator or drill - to create holes in the walls for fasteners;
- screwdriver - for quickly tightening screws (you can get by with a screwdriver);
- tape measure - for taking measurements from walls and measuring plinth cuts;
- marker – for marking;
- metal hacksaw - for cutting baseboards;
- awl – for forming holes in the baseboard for self-tapping screws;
- miter box - convenient for forming corners when cutting;
- sandpaper - for sanding cuts.
What is needed to install the skirting board?
Installation of plastic plinth
Step 1. Installation begins with taking the necessary measurements and marking the plinth for future cutting. The plinth is cut in accordance with the measurements taken.
Measurements are being taken
Marking the plinth
Step 2. To make it possible to install the baseboard, the protective strip is removed, under which a place for screwing in self-tapping screws and a cable channel is revealed.
The protective strip is removed
Step 3. A piece of plinth is applied to the place where it will be attached.
A piece of plinth is applied to the installation site
Step 4. The inner corners of the plinth are installed. An inner corner is placed on one of the sections of the plank.
Installing the inner corner
Step 5. A piece of plinth with a corner attached is applied to the wall at the attachment point.
A piece of plinth is applied to the wall
Step 6. Holes for dowels are drilled. You can drill directly through the baseboard.
Drilling holes
Step 7. Dowels are inserted into the resulting holes. Next, the plinth is attached using self-tapping screws.
Dowels are inserted into the holes
Fixing the baseboard with self-tapping screws
Step 8. The next part of the plinth is inserted into the previously installed inner corner. The procedure of drilling holes and fastening the plinth with self-tapping screws is repeated.
Installing the next part of the baseboard
Step 9. The cable, if any will be laid inside the baseboard, can be laid step by step already at this step.
Cable being laid
Step 10. An outer corner is fixed to the edge of the plinth piece, and the next piece of plinth is inserted. It is being secured.
Installing the outer corner
Step 11. After installing the baseboards and laying the wires, the cable channels are closed with a decorative plug.
The channel is closed with a decorative plug
Step 12. Individual products are connected to each other using special connectors. Plugs are placed on the edges of the plinth in the required places.
Example of connecting two elements
Video - Installing a plastic skirting board
Video - Installing solid baseboards
Prices for plastic floor skirting boards
plastic floor plinth
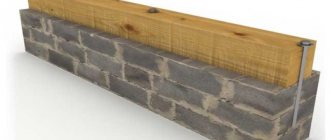
Where is it better to mount it - to the floor or to the wall?
The presence of two perpendicular planes determines two options for fixing the floor plinth. The natural preference will be the simplest and easiest method. The easiest way is to attach this finishing element to a surface that will accommodate fasteners with less labor:
- In houses made of timber with concrete floors and cement screed, it is recommended to prefer fastening the plinth to the wall;
- In houses made of foam concrete and brick with a wooden floor, it is wiser to “drive” dowels or nails into it.
In order to attach the plinth to the floor with a concrete screed, to the walls made of foam concrete, you will first have to drill holes for plastic dowels with a hammer drill. The spacing of the points for installing fasteners determines the type and degree of unevenness of the base and the geometric parameters of the slats. The most common distance between the fixation points of both the baseboard itself and the strips or clips for mounting plastic slats is a minimum of 30 and a maximum of 40 cm.
The choice of mounting plane depends on the technical characteristics of the base
Attention. On walls that are finished or only leveled with plaster, on partitions constructed using plasterboard, on structures lined with soft finishing stone, on chipboard boards, the plinth will not hold firmly. In such cases, it is recommended to choose the floor as the basis for fixation.
If for some reason attaching the plinth to plasterboard or to a chipboard panel is the only possible option, for fixing you need to purchase special self-tapping screws designed to work in this material, or finishing nails with zinc coating.
It is generally advisable to place the attachment points on the metal elements of the frame if it was used as a structural support.
Technology for fastening skirting boards with liquid nails
Installing skirting boards using liquid nails is quite simple - this is one of the easiest methods for installing this type of product. You just need to level the walls and you can start working. This installation method is best suited for plasterboard walls. Installation of the plinth is carried out starting from one corner. Liquid nails are applied dropwise to the wall at a distance of about 3-5 cm from each other. It is desirable that the step be the same. Next, the plinth simply adapts to the walls. The glue can also be applied to the product itself. The plinth is pressed against the wall very tightly and is kept pressed for about 60 seconds.
Installing MDF plinth (white enamel) on liquid nails
Installing skirting boards is a job that even a beginner in the field of repairs and construction can do. The main thing is to understand the principles of working with these products, and problems will not arise. And it is also important to choose high-quality material – both fastening and base.
Aligning walls and measuring corners
It is necessary to level the walls, otherwise it will be impossible to fix the new skirting boards as needed. This is especially important to do during renovations in block and brick multi-storey buildings.
Before installing the plinth, it is important to level the walls
Measure the angles using a tape measure and a building square.